---
title: Custom alerts
sidebar_label : Custom alerts
---
Custom alerts enables you to monitor and receive notifications based on specific conditions set within saved reports and dashboards. Alerts are particularly useful for:
- **Timely monitoring**: Stay informed about critical metrics or deviations from expected values as they occur.
- **Immediate action**: Promptly respond to anomalies or trends that require attention without manually monitoring data continuously.
- **Enhanced efficiency**: Automate the monitoring process, reducing the need for manual checks and enabling proactive management of business metrics.
:::note
Custom alerts are currently enabled for **Dashboards/Reports** that have [**Count** visualusation](https://docs.yellow.ai/docs/platform_concepts/growth/visualisation/countchart) applied.
:::
---------------
## Custom alerts overview
You can set up an alert in Insights:
1. **Report Builder**: In **Insights > Data Explorer > +Create Report**, you'll find an alert button at the top right of the table.

> To activate this alert, you must **save** the report with either count applied.
2. **Saved Reports**: In **Insights > Data Explorer**, saved reports that use count visualizations have the alert option enabled.
3. **Dashboards**: Hover over **Insights > Dashboard (default/custom)** items with count visualizations to access the alert option.

:::note
If you change the existing visualization, the set alert will be disabled. You can create a new alert.
:::
----
## Add custom alerts
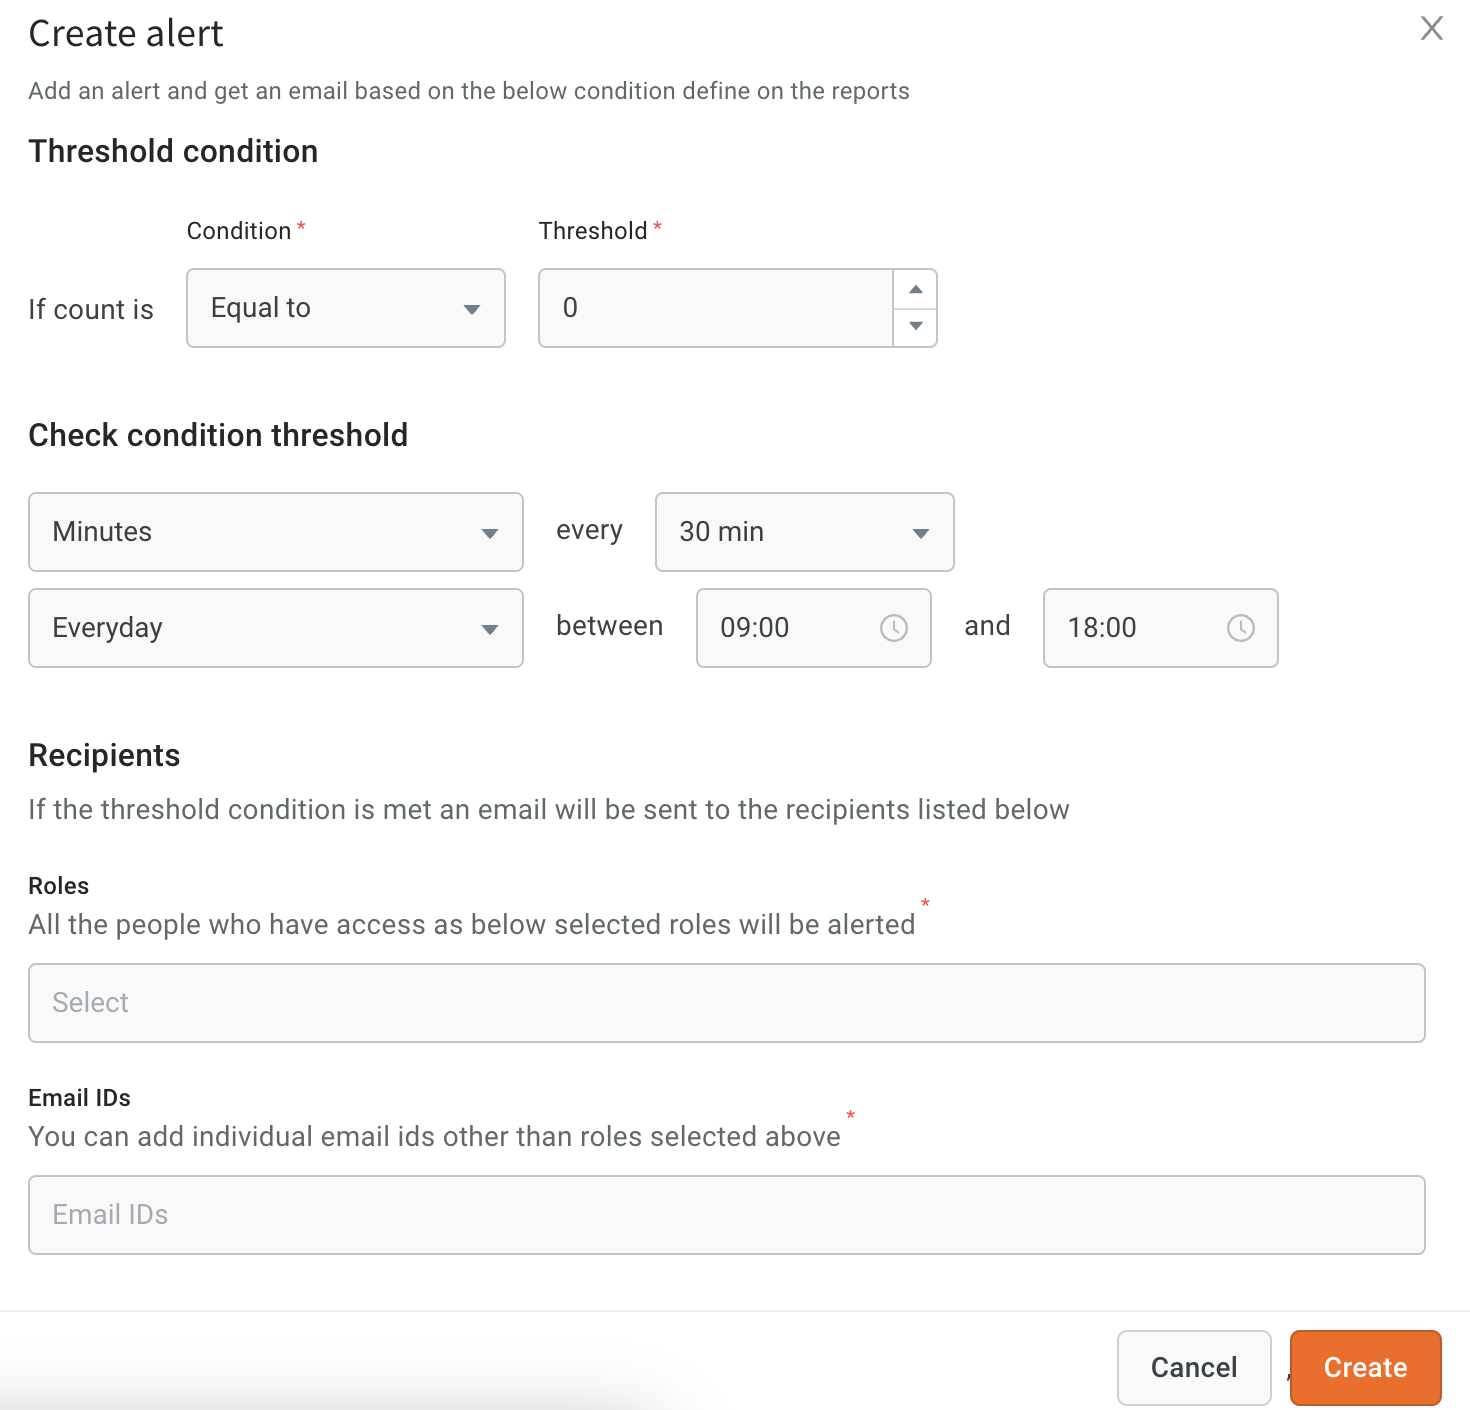
### Set threshold condition
Choose the **operator** and **value** to trigger an email alert when comparing KPIs at set intervals.

The available conditions include:
- Greater than `<value>`
- Greater than or equal to `<value>`
- Less than `<value>`
- Less than or equal to `<value>`
- Equal to `<value>`
- Not equal to `<value>`
- In between `<value>` and `<value>`
- Changes by (%) `<value>`
- Increases by (%) `<value>`
- Decreases by (%) `<value>`
<!--
- Stays the same compared to the last check
- Changes compared to the last check
- Increased compared to the last check
- Decreased compared to the last check
-->
> These alerts are aggregated alerts, meaning they are evaluated over a specified interval.
----
### Select threshold frequency
To check KPI changes at the selected frequency within the specified intervals, choose the alert threshold check frequency:
* **Minutes**: Set alerts at 5-minute intervals.
* **Hourly**: Set alerts every hour up to 23 hours.
* **Daily**: Set alerts daily at a specific time. You can choose not to receive alerts on weekends.
* **Weekly**: Set alerts on specific days of the week.

* **Custom time configuration**: You can choose to send alerts daily or on selected days. Alerts can be configured to be sent between specific times and on chosen days.

-----
### Alert receipients & details
#### Alert activitation
When an alert is set for **minutes**, the first alert activates at the nearest multiple of 5 minutes. For example, if the alert is set up at 10:23, monitoring begins at 10:25 (with the first check at 10:25). Subsequent checks occur at the interval specified when setting the condition.
Similarly, alerts set for **hours** activate at the next hour. For instance, if an alert is set at 10:23, the first check occurs at 11:00.
The next alerts start as per the configured time.
#### Add receipients
* **Role-based recipients**: Select roles from the dropdown. All users assigned to the selected role will receive the alert.
* **Email ID configuration**: Add individual email addresses to the list. Alerts will be sent only to these specified users.
* **Roles & email IDs**: Alerts will be sent to individuals from both the selected roles and the added email IDs.

#### Email format
The body and subject of the email are predefined and cannot be changed.
- **Acknowledgement email**: An email is sent to all recipients immediately when the alert is saved, containing all the details.

- **Alert emails**: Email alerts are sent when the threshold value is reached. These emails include detailed information and a redirect link to the report.
<!--
### Attached email report
The attached CSV report is the base report with appropriate filters applied, not just the count or pivot value.
-->
#### Scenarios where no alert is sent
The alert does not get triggered if the below conditions are met:
- **No change in value**: If the option **Value between two condition checks remains the same, don't send email** is selected, the alert won't be sent if the report or values haven't changed since the previous check.

- **Widget updates**: If an alert is live on a widget and the widget is updated, the alert will be disabled.
#### View existing alerts
Dashboards and reports display an alert symbol, indicating that an alert is enabled.
--------
## Edit/delete alerts
You can **edit** or **delete** the set alerts.
> You cannot change the visualization, but you can create a new alert.
-------
## Examples of alerts
### Setup alerts if no calls are received in the last 30 minutes
To set up this alert, follow these steps:
1. Create a report and save a report using a default table.
2. In **Call details report** apply Filters, Call direction as Inbound and Call start time as Last 30 minutes
3. Get a count **summarisation** of the query and **visualise** it as a numeric value [Count].
****
5. Setup the Alert:
- Save the query.
- Configure the alert to check every 30 minutes on specific days and within specific times.
- The alert will start checking at 9 AM each day, in 30-minute intervals.
- An email will be triggered if the count is 0 at any specific check.
****
-------
## Upcoming changes
* **Pivot table alerts**: The alert option will be enabled for pivot tables, allowing users to set custom alerts for dashboards and reports with pivot table visualization.
* **Pre-built alerts**: Pre-built alerts will be available, enabling activation with a single button click without needing further configuration.
<!--
* **Real-time alerts**: Real-time alerts can be set up.
-->