---
title: Inbox integration with User360 (in-house customer data platform)
sidebar_label: User360 in Chats/Tickets
---
In today's fast-paced business landscape, delivering exceptional customer support is non-negotiable. Customers expect personalized interactions, swift issue resolution, and a seamless experience across all touchpoints. Inbox and User360 integration is a game-changing solution that empowers businesses to take customer support to the next level.
*"The greater the depth of customer data at our disposal, the more effectively support agents can enhance the customer experience."*
:::note
- The Inbox-User360 integration is currently limited to bots created on cloud platforms and is not accessible for bots built on the [App platform](https://app.yellow.ai).
- The bot messages section within Inbox has not undergone a full transformation to align with the Inbox-User360 integration yet.
> We are actively working to address this in the upcoming version.
:::
## Significance of User360 in customer support
User360 is an in-house Customer Data Platform (CDP) that consolidates data from various sources, creating a comprehensive customer database. This centralized hub holds a wealth of information, from purchase history to communication preferences, enabling businesses to gain invaluable insights.
User360 doesn't just collect data; it transforms it into actionable intelligence. By harnessing this data, companies can tailor their interactions with customers in ways that were previously unimaginable. This, in turn, leads to enhanced customer experiences, stronger relationships, and increased loyalty.
> Learn more about User360 [here](https://docs.yellow.ai/docs/platform_concepts/engagement/cdp/overview).
Leveraging User360 in conjunction with Inbox enables you to seamlessly identify incoming customers from various channels while consolidating their records and data. This unified approach significantly enhances the context available to your support team.
Here's how User360 integration empowers your support team and administrators:
| Users | Use-cases |
| -------- | -------- |
| **Support agents** | **Anticipating customer needs**: By consolidating data from multiple channels, User360 enables support agents to gain a holistic view of each customer. This insight allows them to predict customer needs and proactively address issues. <br/><br/> **Personalizing customer interactions**: With abundant customer data, agents can create personalized responses and suggestions, making customers feel valued and understood. <br/><br/> **Proactive support**: With a comprehensive understanding of a customer's history, agents can take a proactive approach to resolve issues. They can reach out to customers before problems escalate, enhancing the overall customer experience. <br/> <br/> **Building strong relationships**: When support agents have access to customer data, they can forge deeper and more meaningful connections. This leads to increased customer trust and loyalty. |
| **Administrators** | **Omni channel view**: User360 provides admins with an omni channel, comprehensive view of each customer. This proves invaluable during critical moments, such as escalations, enabling a swift and informed response. <br/><br/> **Identifying trends and patterns**: With a rich dataset at their disposal, administrators can identify trends and patterns in customer inquiries. This data-driven approach informs product enhancements and support process optimizations, driving continuous improvement. |
----
## User identification methods across Inbox channels
There are two distinct scenarios to consider based on the channel (live chats/email tickets) you are using within Inbox:
<!--
| Using only live chat (excluding email) | Using both email and live chat |
| -------- | -------- |
| This is a relatively straightforward process. The userID can take any value that you intend to track within the flow (phone number, email, SSN, etc). | If you're utilizing both email and live chat, the userID can only be the **customer's email address**. <br/> <br/> UserIDs for email tickets are automatically set as the respective customer's email address. <br/> <br/> Unless you are also collecting email address data in other channels, it becomes challenging to unify sessions across email and channels like WhatsApp for the same customer. |
| To capture the userId in the bot flows, you can proceed with the steps mentioned above.|To ensure seamless operations, incorporate a step within your flow that requests the [customer's email address](https://docs.yellow.ai/docs/platform_concepts/studio/build/nodes/prompt-nodes#25-email) and set this email address as your userID. |
-->
#### 1. Using only live chat (excluding email):
This is a relatively straightforward process. The userID can take any value that you intend to track within the flow (phone number, email, SSN, etc).
> To capture the userId in the bot flows, you can proceed with the [steps mentioned below](#uiprocess).
#### 2. Using both email and live chat:
If you're utilizing both email and live chat, the userID can only be the **customer's email address**.
- UserIDs for email tickets are automatically set as the respective customer's email address. Unless you are also collecting email address data in other channels, it becomes challenging to unify sessions across email and channels like WhatsApp for the same customer.
:::note
To ensure seamless operations, incorporate a step within your flow that requests the [customer's email address](https://docs.yellow.ai/docs/platform_concepts/studio/build/nodes/prompt-nodes#25-email) and set this email address as your userID.
:::
--------
## <a name="uiprocess"></a> Integrate User360 by implementing user identification process
:::info
**Prerequisite: Decide the userId**
The choice of a unique userId for customers in Inbox should be based on the specific needs and context of your business.
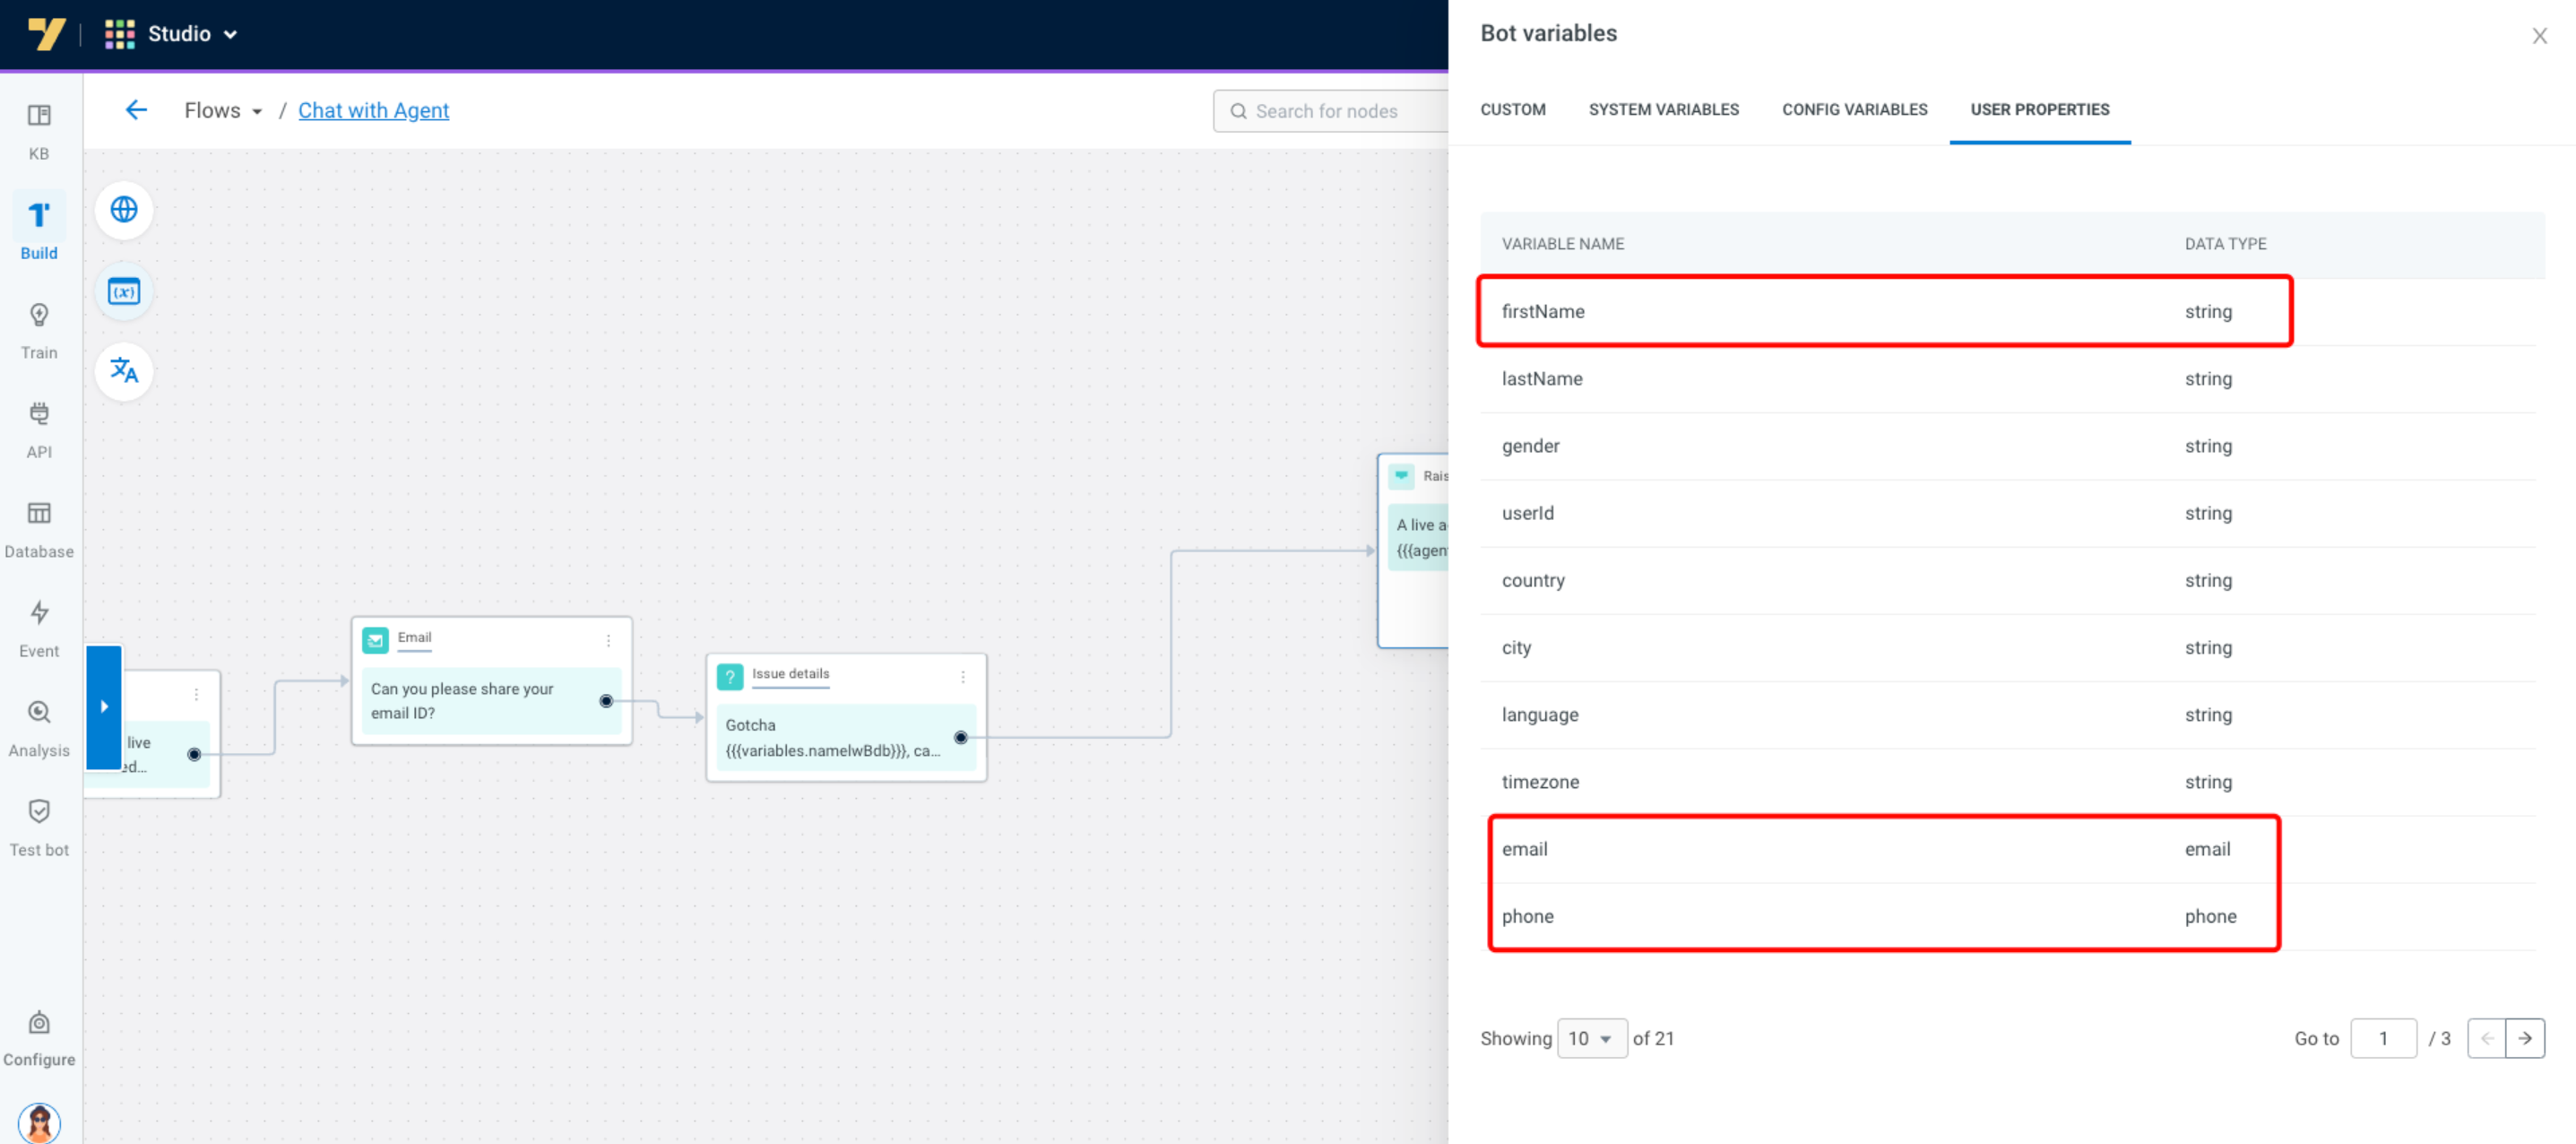
A **userId** is a unique identifier assigned to every customer, serving as a distinctive label for individual users. It plays a crucial role in recognizing users across various points of interaction, enabling the capture and updating of user data. UserIds can take the form of various unique identifiers, here are some considerations to help you decide: Phone number, Email address, External markers (Employee number, Loan ID, Account number), etc.
Learn more about UserIDs [here](https://docs.yellow.ai/docs/platform_concepts/engagement/cdp/user_data/user_properties#1-userid-as-a-property).
:::
After settling on a userId for your bot, the subsequent action is to commence tracking it within your **Studio** flows. Depending on your bot version, you might encounter one of three scenarios:
1. Set userId via. conversation settings
2. Set userId using the user properties (variable)
:::info
In the unfortunate scenario where neither of the above options are visible, it signifies that your current account does not meet the requirements for enabling the Inbox - User360 integration.
We recommend reaching out to your account representative or contacting Yellow's team for [guidance](https://calendly.com/yellow-ps/free-trial?month=2023-09) on access to this integration.
:::
:::note
- Each bot can have only one unique userId.
- Once a userId is assigned to a user, it cannot directly be edited or removed.
- Modifying a userId is technically feasible but results in the loss of any previous data associated with it.
:::
### Set userId via. conversation settings
If you can find the **User identification flow** setting in **Studio** > **Build** > **Conversation Settings** > **User identification**, [follow the steps](https://docs.yellow.ai/docs/platform_concepts/engagement/cdp/user_data/userid-flow#understand-how-user-identification-flow-works) mentioned here to set up the user identification flow.
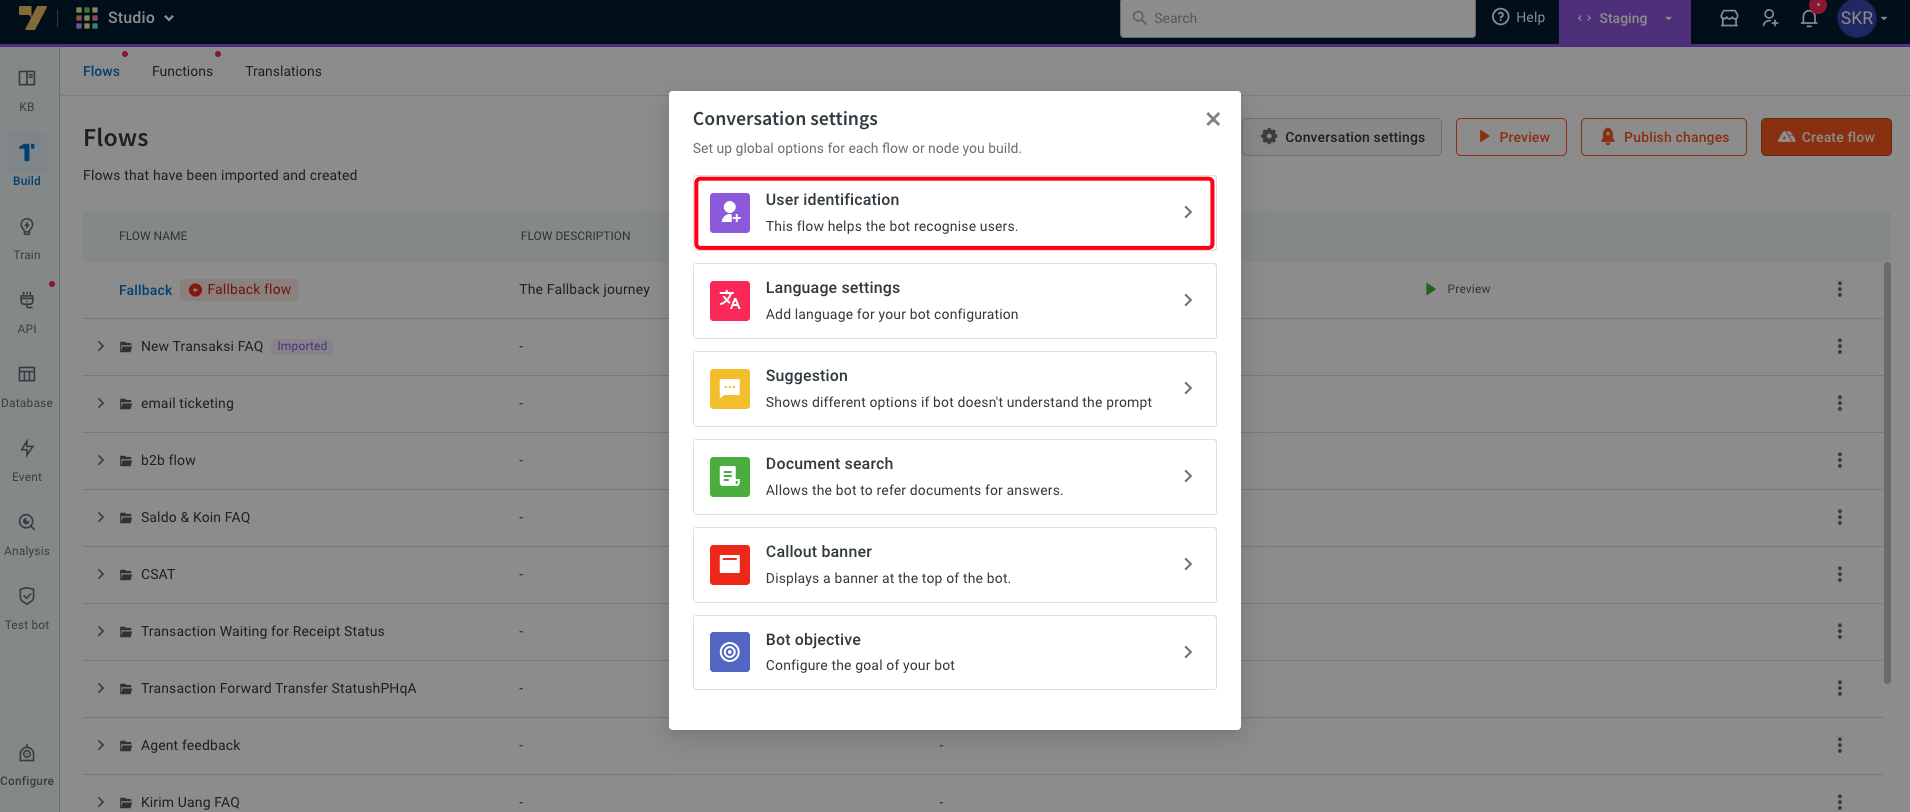
After setting up the user identification flow, use **User property variables** in your flow and input them into the **Name, Mobile**, and **Email** fields of the [Raise Ticket node](https://docs.yellow.ai/docs/platform_concepts/studio/build/nodes/action-nodes#17-raise-ticket) instead of using regular journey or global variables.
<img src="https://hackmd.io/_uploads/r1bEYNdk6.png" width="70%"/>
### Set userId using the user properties
While building flow, configure:
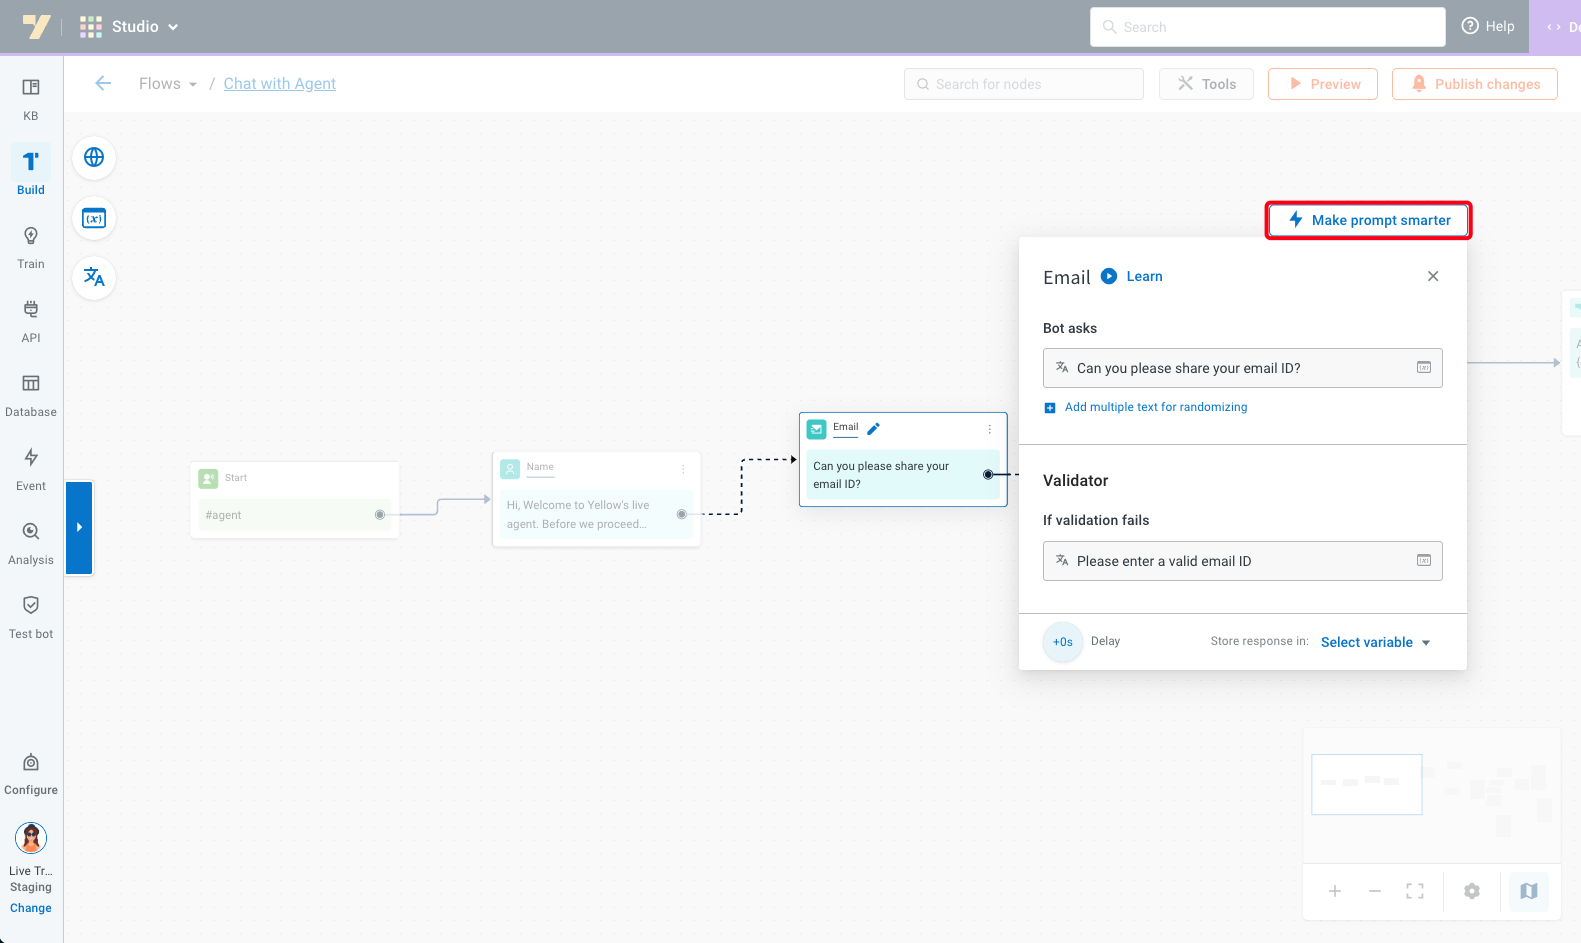
1. Add a prompt node to fetch a value to be considered as the unique ID (email, phone number, etc.).
2. Save the response in a variable.
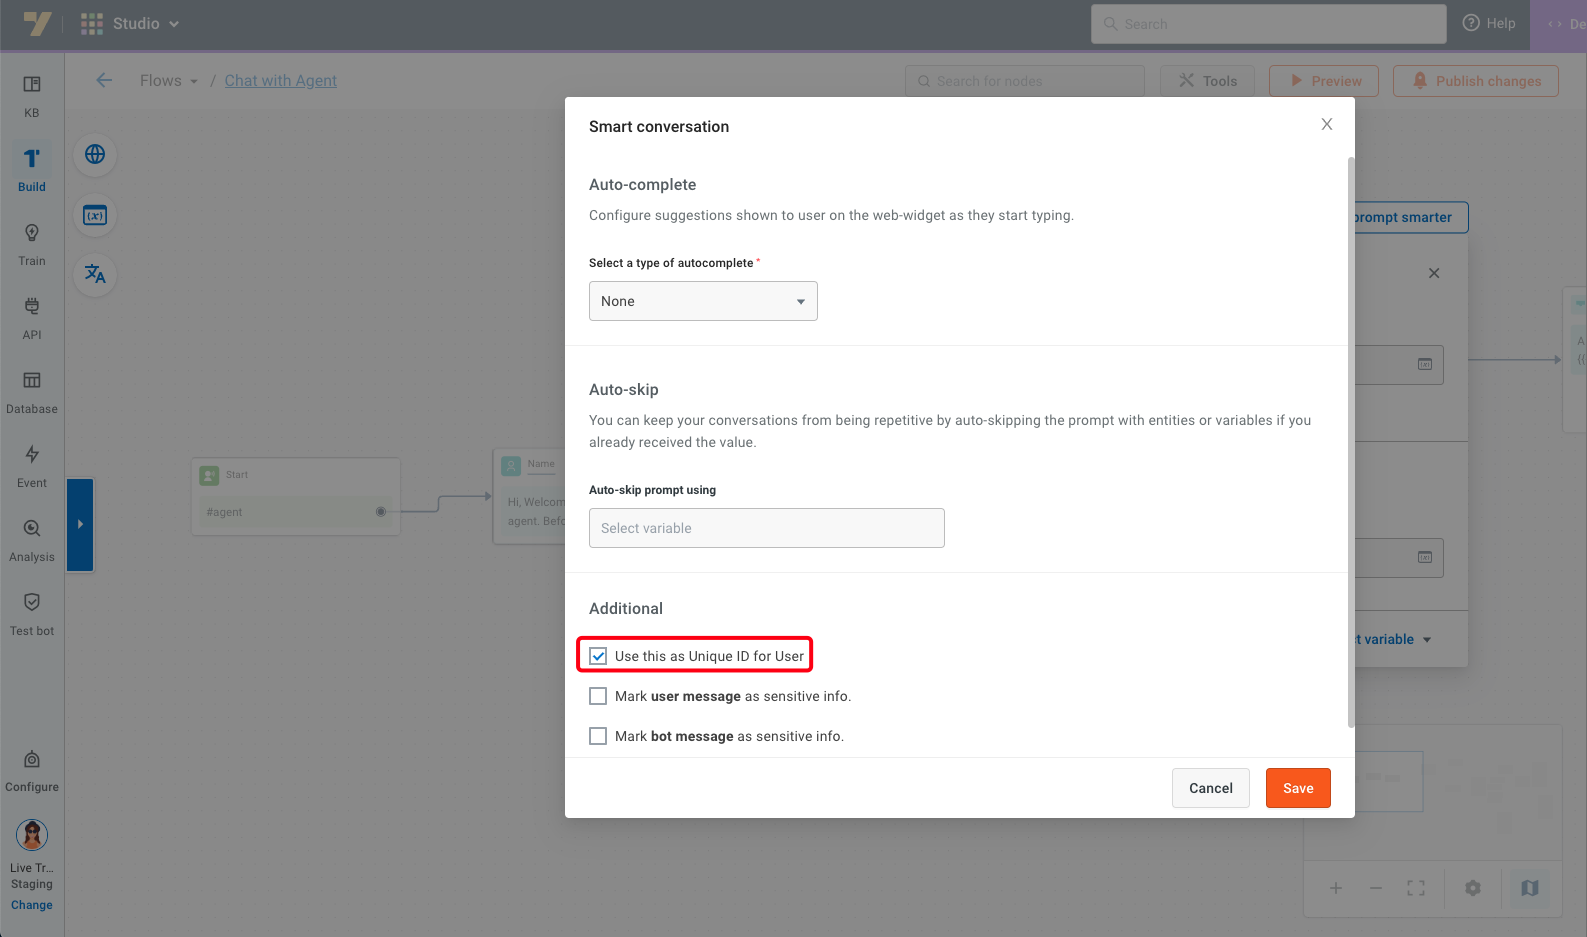
3. Use variable node to assign the entered variable to the User properties **UserID**.
4. Add the next steps and complete the flow.
**Flow for new users**:


**Flow for existing users**:


<!--
### Set userId in the prompt nodes
If the User identification setting is not visible in the Conversation settings popup and **Use this as unique ID for user** option is available, follow these steps:
1. Open the bot flows **Studio** > **Build**.
2. You must collect specific business-related information like email, phone number, or account number (userId) within your flows before any automation. Let's say you want to capture the Email ID as the userId, add an [email prompt](https://docs.yellow.ai/docs/platform_concepts/studio/build/nodes/prompt-nodes#25-email) to your flow.
3. On that prompt, select the **Make prompt smarter** option.
4. Choose **Use this as Unique ID for User**.
5. Use **User property variables** in your flow and input them into the **Name, Mobile**, and **Email** fields of the [Raise Ticket node](https://docs.yellow.ai/docs/platform_concepts/studio/build/nodes/action-nodes#17-raise-ticket) instead of using regular journey or global variables.

<img src="https://hackmd.io/_uploads/r1bEYNdk6.png" width="70%"/>
:::note
To display the contact card on the chat screen, you must store the **first name** along with either the **mobile number** or **email** in **[user property variables](https://docs.yellow.ai/docs/platform_concepts/engagement/cdp/user_data/user_properties#custom-user-properties)**.
These variables should then be passed into the **Raise ticket node**. Following this method is crucial for enabling the visibility of the contact card.
If the above steps are not followed, contact card and the old UI will be displayed with the available user details without the **View recent activity** link.
:::
-->
---
## Use User360 to enhance customer context in Inbox
**Chat screen:**
**Ticket screen:**
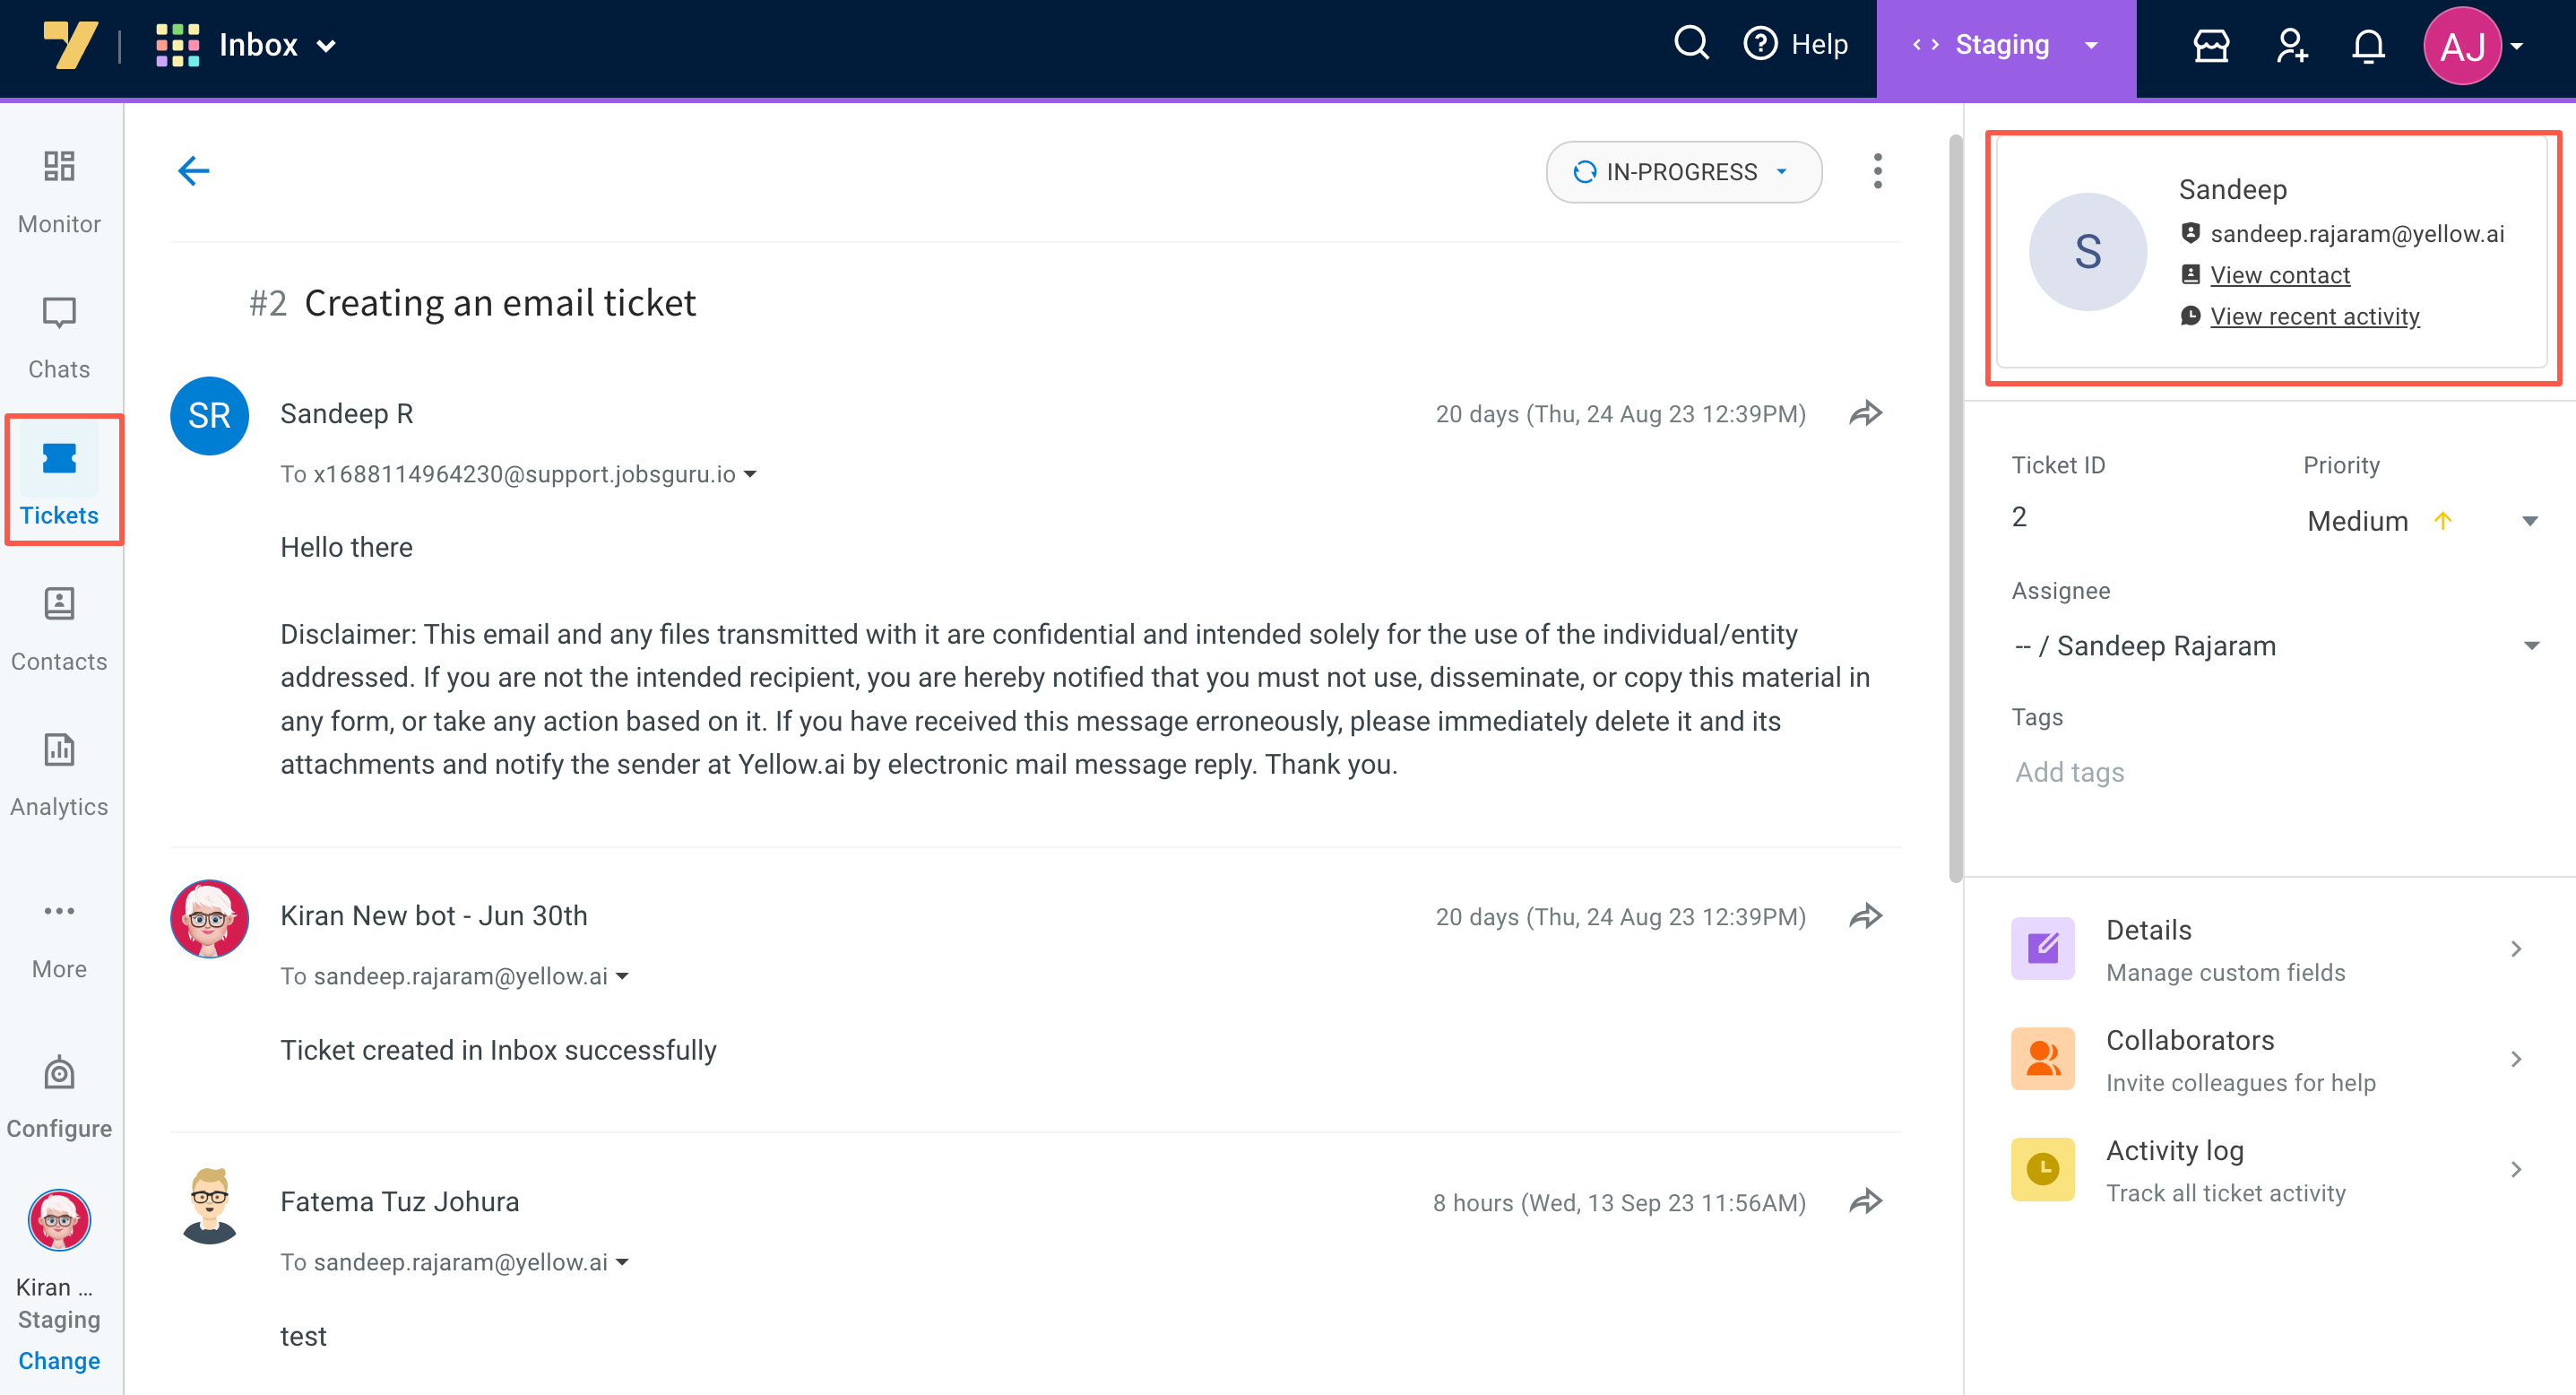
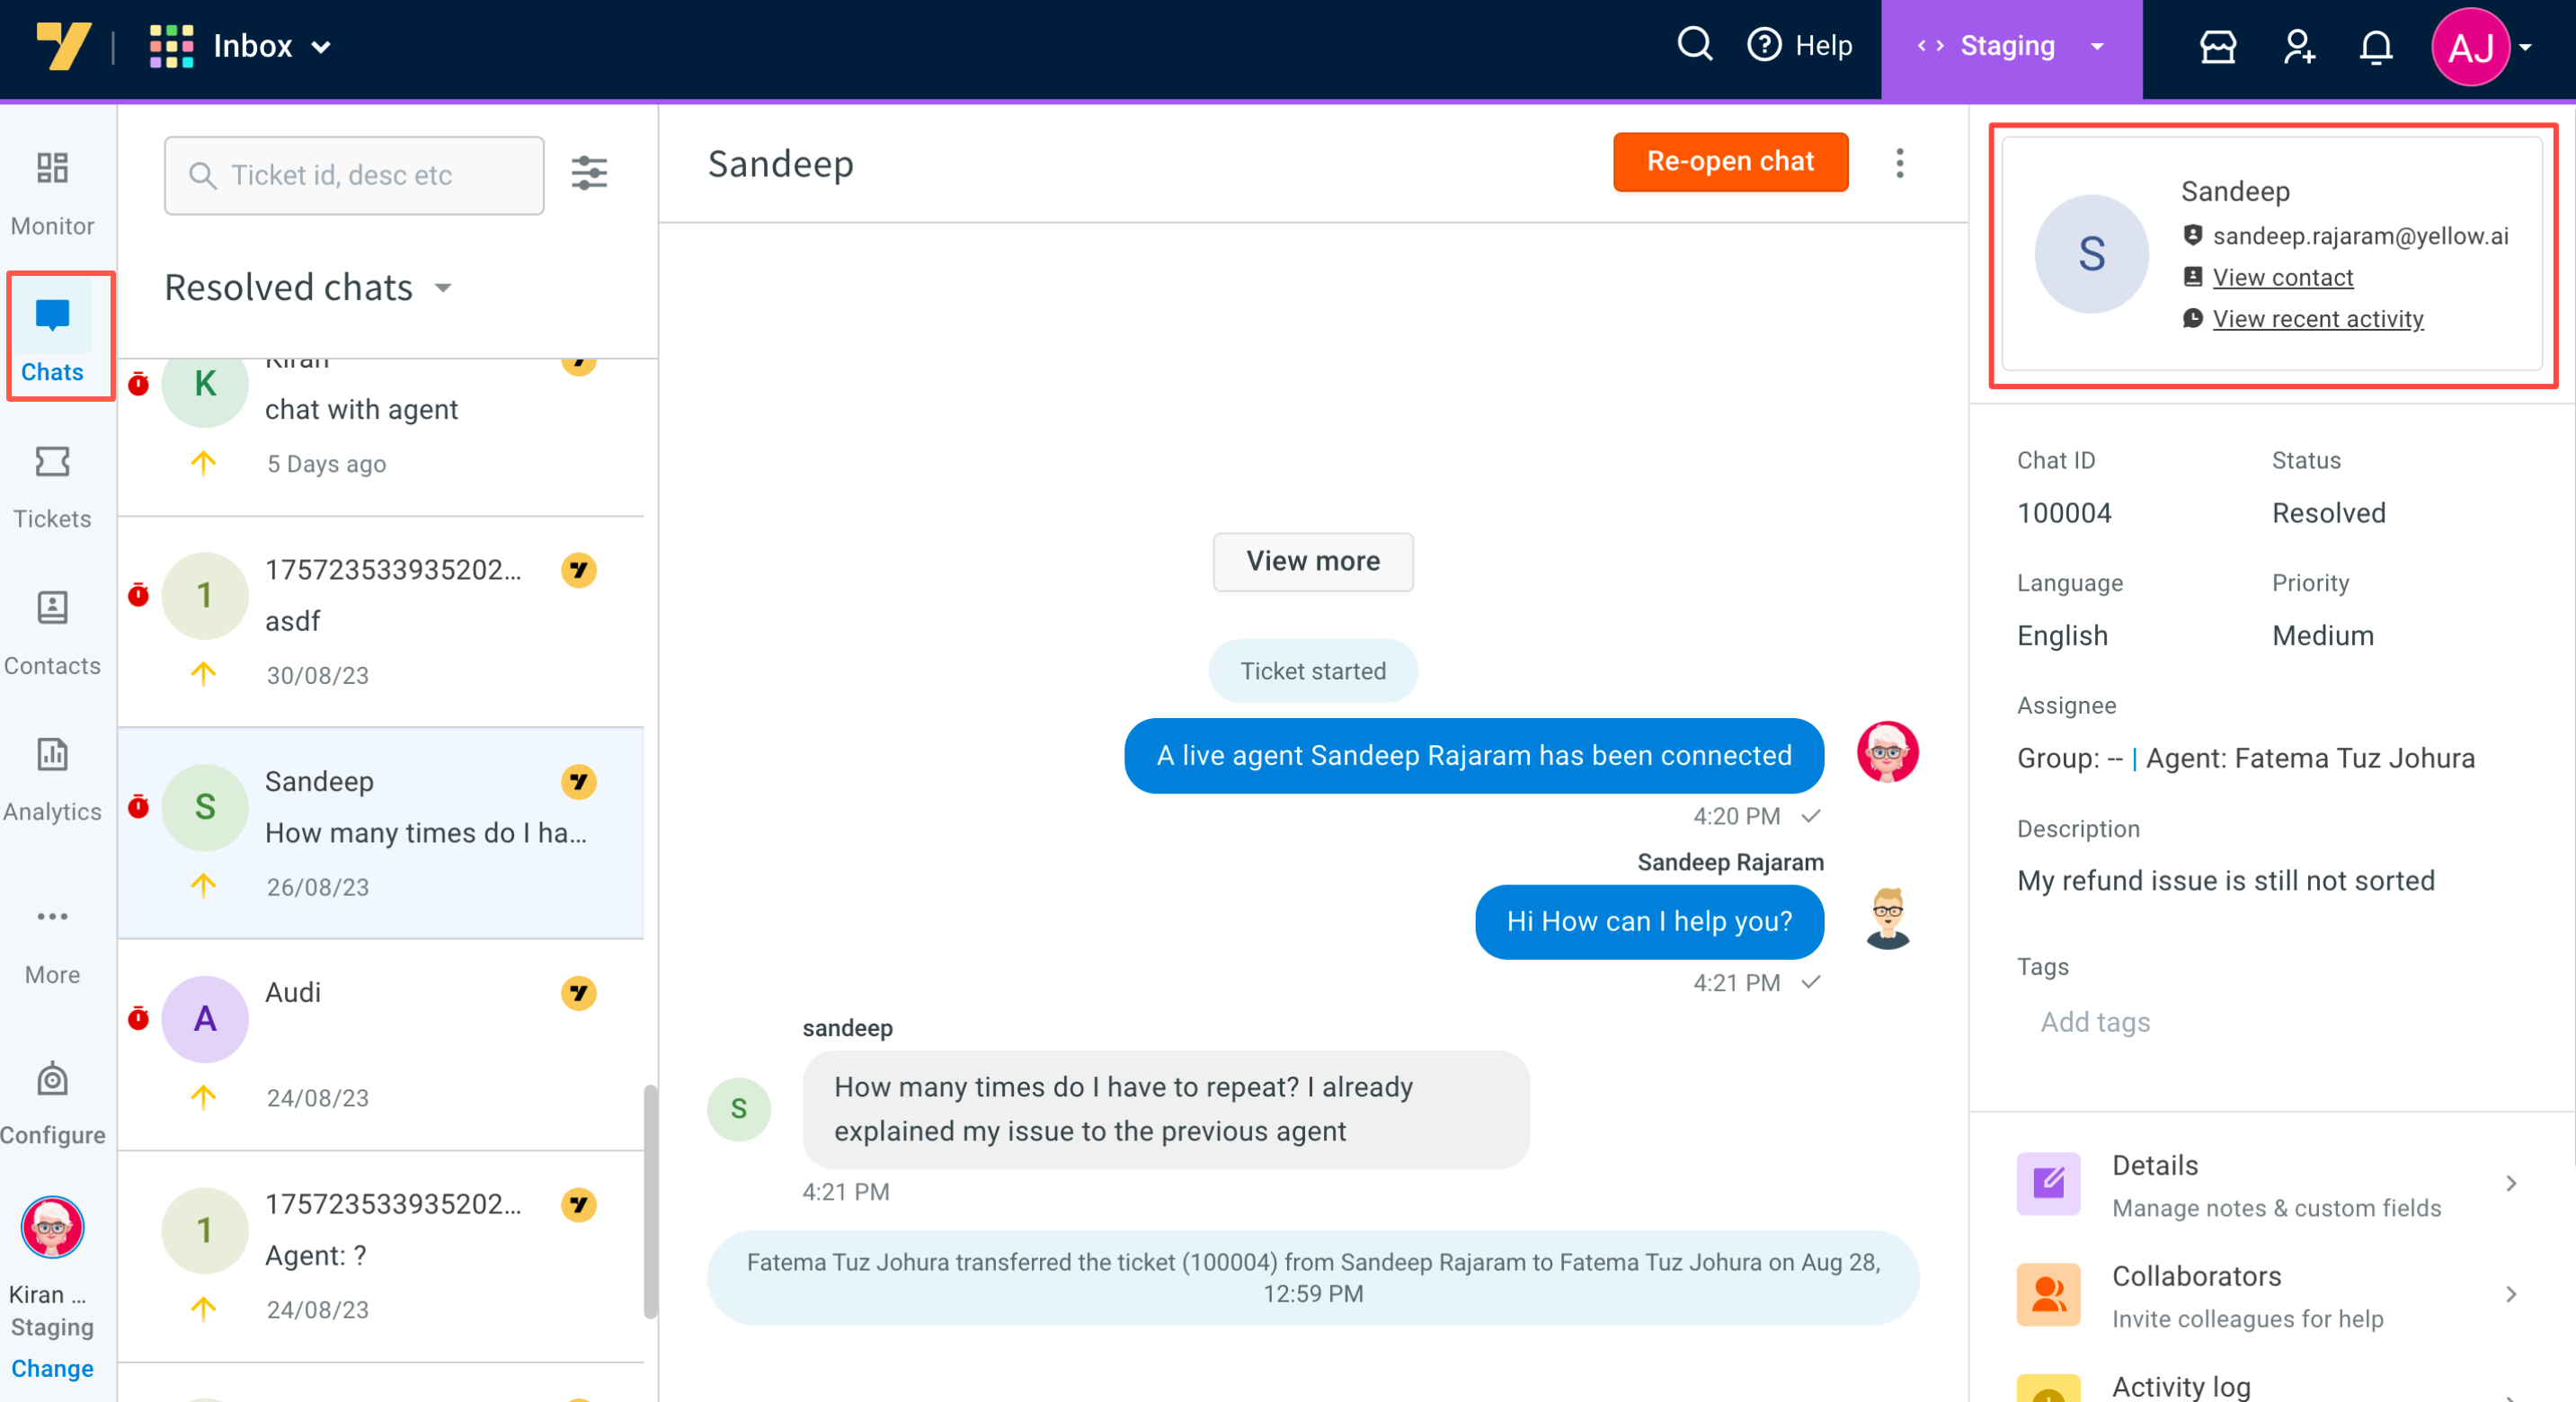
- Within the Customer details section, located on the upper right corner of your Chat/Ticket screen, you can find the customer's name, UserID (email), contact information, as well as the customer's recent activity.
<img src="https://hackmd.io/_uploads/B1PXfVNR3.png" alt="drawing" width="60%"/>
- Select **View contacts** to reach all the customer information collected from User360. Agents have the ability to make adjustments to this information in the event of any changes.
<img src="https://hackmd.io/_uploads/H1wkBrJkp.png" alt="drawing" width="60%"/>
- The **View recent activity** option provides agents and admins with a complete view of each customer, including their past and current support tickets. This information equips agents to better understand customers and offer more personalized interactions.
- Selecting **View all activity** in the timeline directs users to the User360 module, offering extensive customer data, including engagement campaigns and third-party information.
- Clicking on a chat or email ticket in the timeline provides agents access to detailed conversation histories and comprehensive view of each interaction.
<img src="https://hackmd.io/_uploads/HyyGnrN02.png" width="50%"/>
> To view the User360 page you need **Engagement User/Admin** role access.
<!-- Select **View recent activity** to obtain a comprehensive overview of customer engagement. User360 will display extensive data, while inbox activity will exclusively exhibit chat and ticket information, encompassing both historical and current interactions across all channels.
-->
 Sign in with Wallet
Connect another wallet
Sign in with Wallet
Connect another wallet