# 伺服器架設
## 第一週 (2023-09-12)
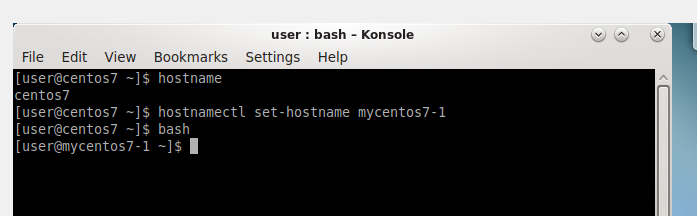
### 修改主機名稱
`[root@mycentos7-1 ~]# hostname` **顯示主機名稱**
`[root@mycentos7-1 ~]# hostnamectl set-hostname (想修改的名稱)` **修改主機名稱**
`[root@mycentos7-1 ~]# bash` **執行使用者直接輸入的命令**
---
### 修改網路卡的IP位址
1. 開啟網路設定
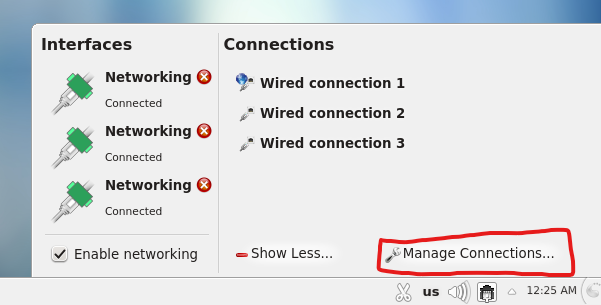
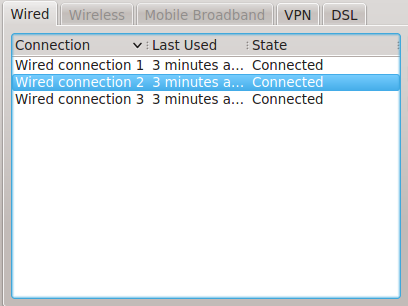
2. 選擇 Host-Only Ethernet 的網路卡(我的是 Wired connection 2)
3. 將 IP 設定方式設為手動
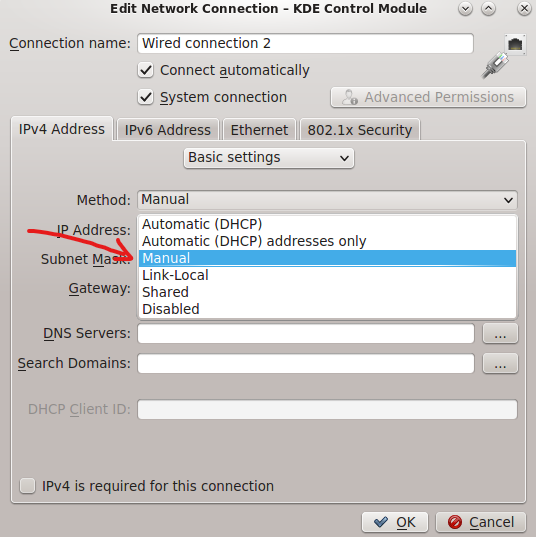
4. 將 IP 更改為 192.168.56.100 (預設為 192.168.56.101)
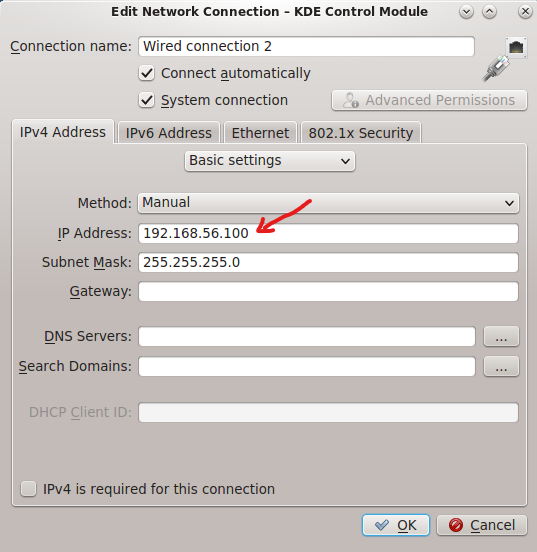
5. 並將子網路遮罩設為 255.255.255.0
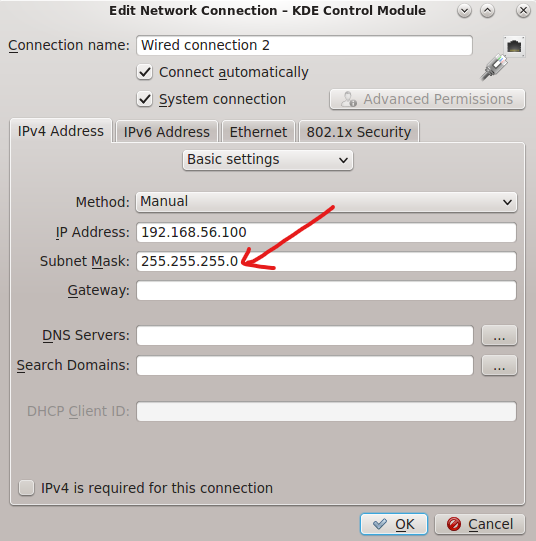
6. 重啟網路
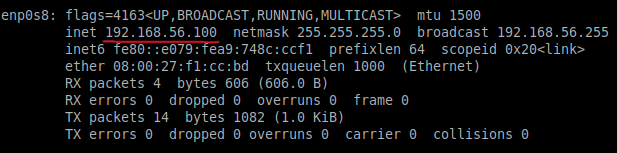
7. 檢查是否修改成功
`[root@mycentos7-1 ~]# ifconfig`
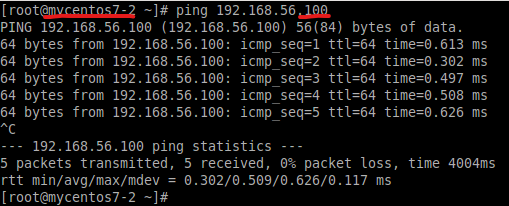
### 設定兩台機器並 互ping
1. 用7-1 ping 7-2(IP)

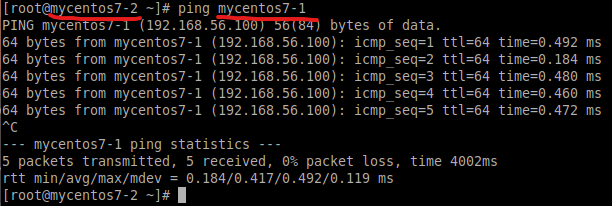
2. 用7-2 ping 7-1(IP)
3. 用7-1 ping 7-2(主機名稱)
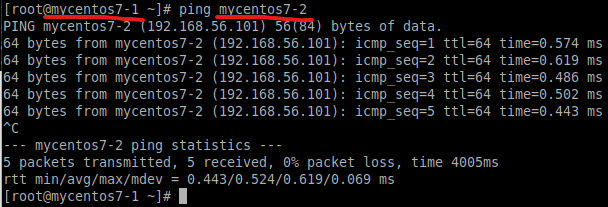
4. 用7-2 ping 7-1(主機名稱)
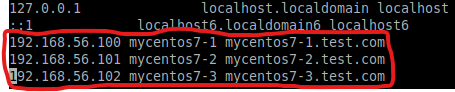
### 用SSH連接機器
1. 用文字編輯器開啟檔案

2. 將圈起來的部分輸入檔案中
3. 連接7-2超級使用者

## 第二週 (2023-09-19)
### 使用 Putty 、 WinSCP 連接到 Linux VM
1. 安裝SSH服務必要套件
`[root@mycentos7-1 ~]# yum install openssh openssh-server -y`
> -y 在安裝過程中的問題回答 y
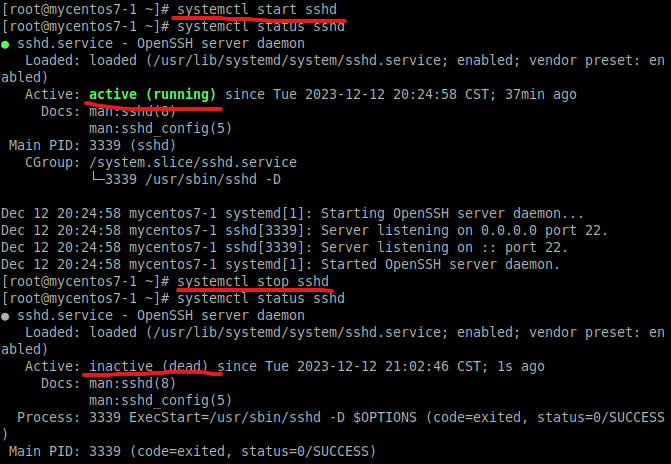
2. 開啟並檢查SSH服務
`[root@mycentos7-1 ~]# systemctl start sshd` **啟動**
`[root@mycentos7-1 ~]# systemctl status sshd` **關閉**
`[root@mycentos7-1 ~]# systemctl status sshd` **狀態**
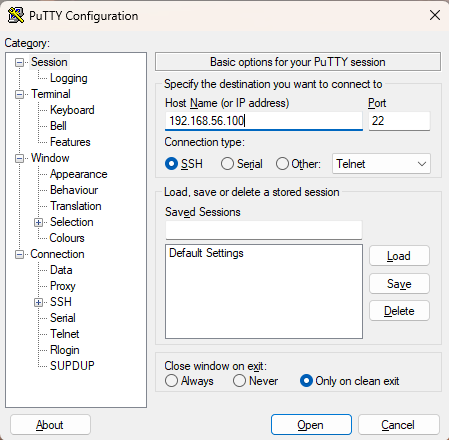
3. 開啟 Putty 並輸入 IP
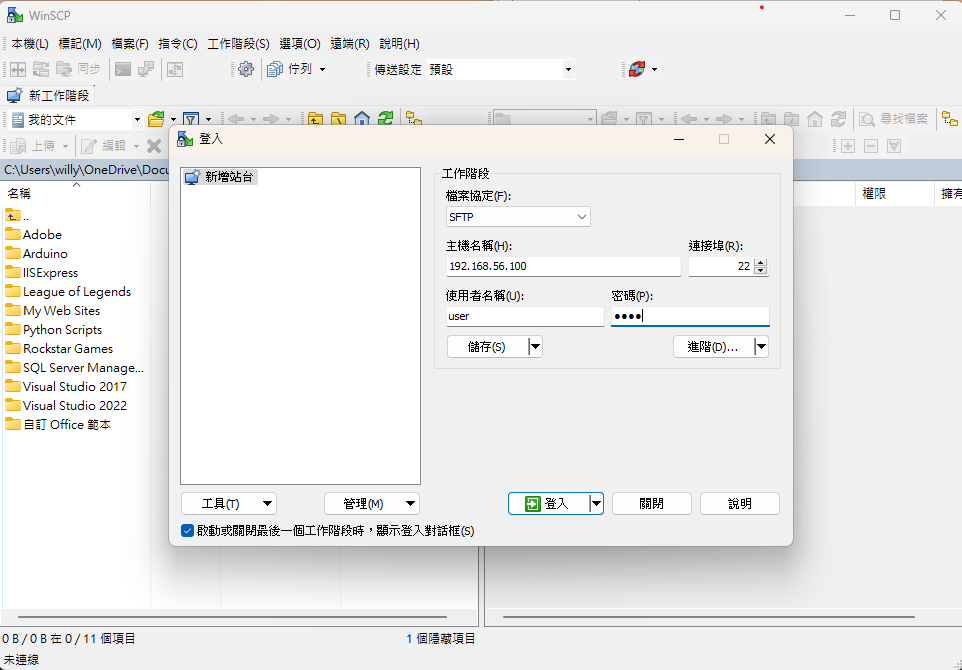
4. 開啟 WinSCP 並輸入 IP、使用者名稱與密碼
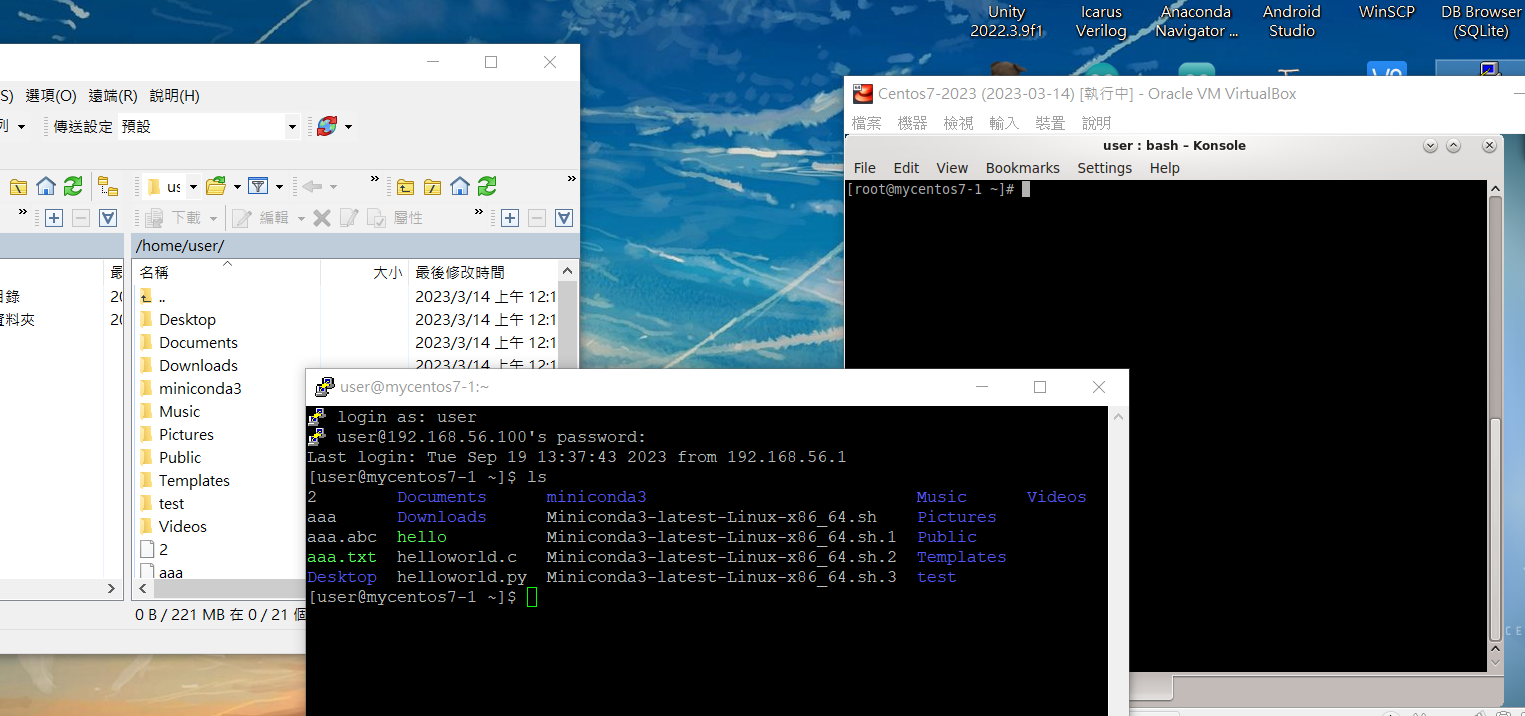
5. 成功連線
### SSH 無密碼登入
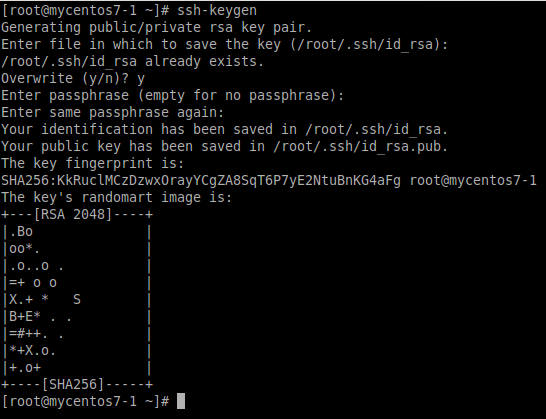
1. 產生SSH Key
`[root@mycentos7-1 ~]# ssh-keygen`
2. 將公鑰放入第二台機器中
`[root@mycentos7-1 ~]# cd .ssh` **進入.ssh資料夾**
`[root@mycentos7-1 ~]# ssh-copy-id root@mycentos7-2`
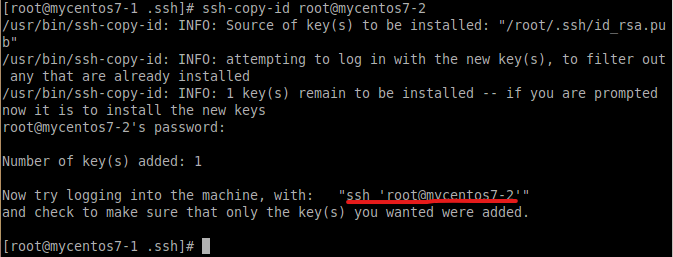
3. 測試是否成功
`[root@mycentos7-1 ~]# ssh root@mycentos7-2`

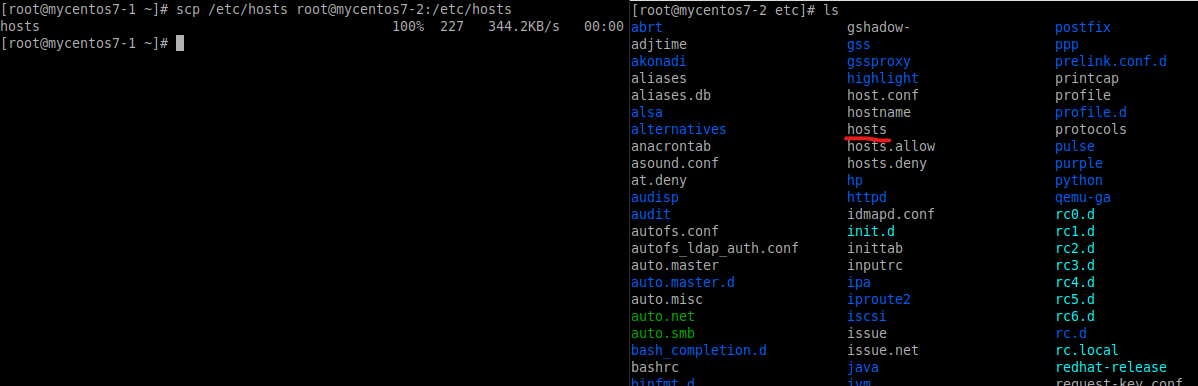
* 複製SSH互信配置到7-2
`[root@mycentos7-1 ~]# scp /etc/hosts root@centos7-2:/etc/hosts`
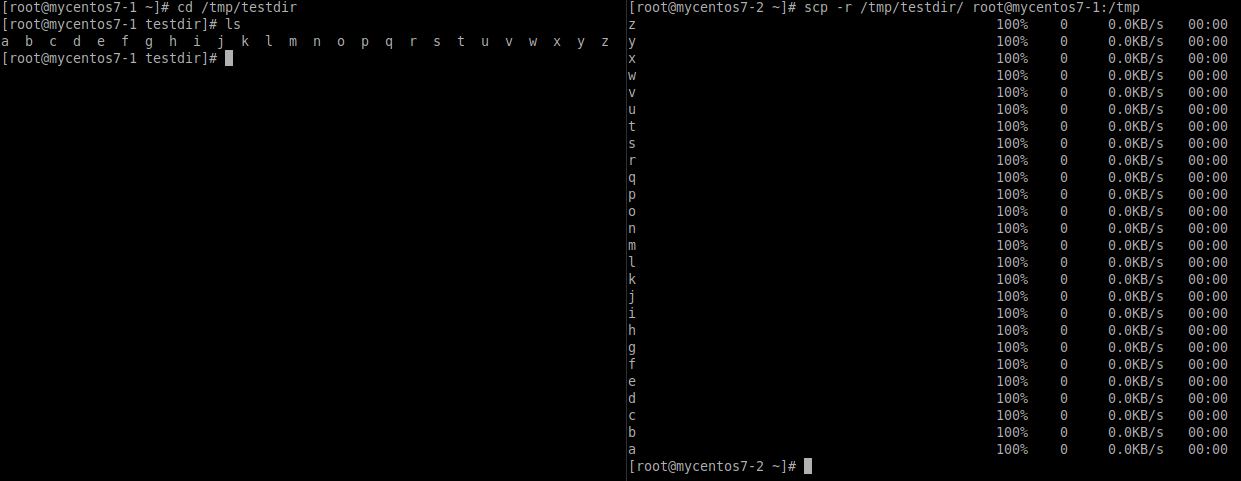
### 使用SCP拷貝檔案和資料的在練習
1. 先在7-2中創建要複製的檔案
`[root@mycentos7-1 tmp]# mkdir testdir` **創建testdir資料夾**
`[root@mycentos7-1 tmp]# cd testdir` **進入testdir資料夾**
`[root@mycentos7-1 testdir]# touch {a..z}` **創建a到z的資料夾**

2. 將檔案從7-2複製到7-1
`[root@mycentos7-1 ~]# scp -r /tmp/testdir/ root@mycentos7-1:/tmp`
## 第三週 (2023-09-26)
### Apache HTTP服務器程序
1. 安裝HTTP服務必要套件
`[root@mycentos7-1 ~]# yum install httpd -y`
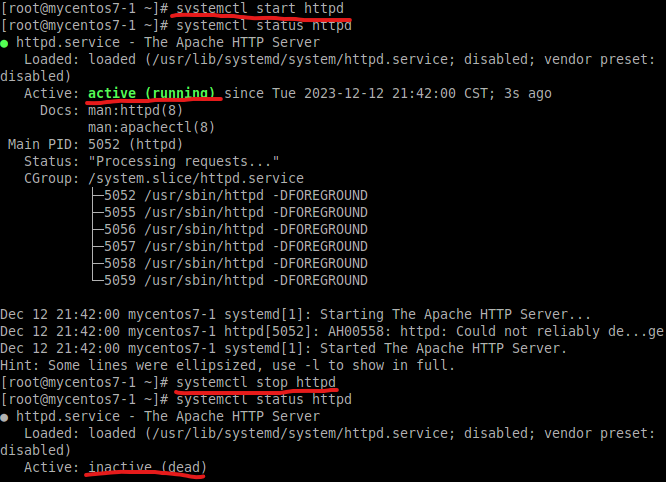
2. 開啟並檢查SSH服務
`[root@mycentos7-1 ~]# systemctl start httpd` **啟動**
`[root@mycentos7-1 ~]# systemctl status httpd` **關閉**
`[root@mycentos7-1 ~]# systemctl status httpd` **狀態**
3. 檢查HTTP扶助開啟的port(80、443)
`[root@mycentos7-1 ~]# netstat -tunlp | grep httpd`

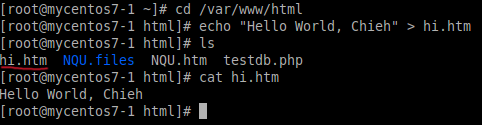
4. 在 html 資料夾中創建 hi.htm
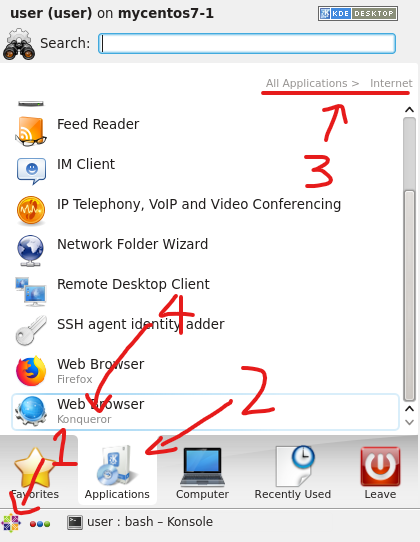
5. 安照數字順序開啟Web Browser
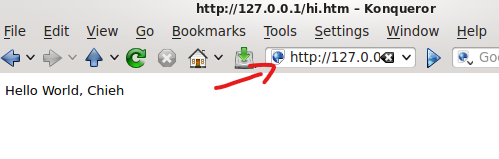
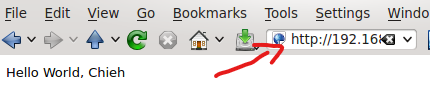
6. 在箭頭處輸入 IPv4本地環回位址+/檔名 127.0.0.1/hi.htm
7. 在箭頭處輸入這台機器的IP位址+/檔名 192.168.56.100/hi.htm
8. 在windows系統中新增 NQU.htm

9. 使用WinSCP將檔案放入虛擬機中
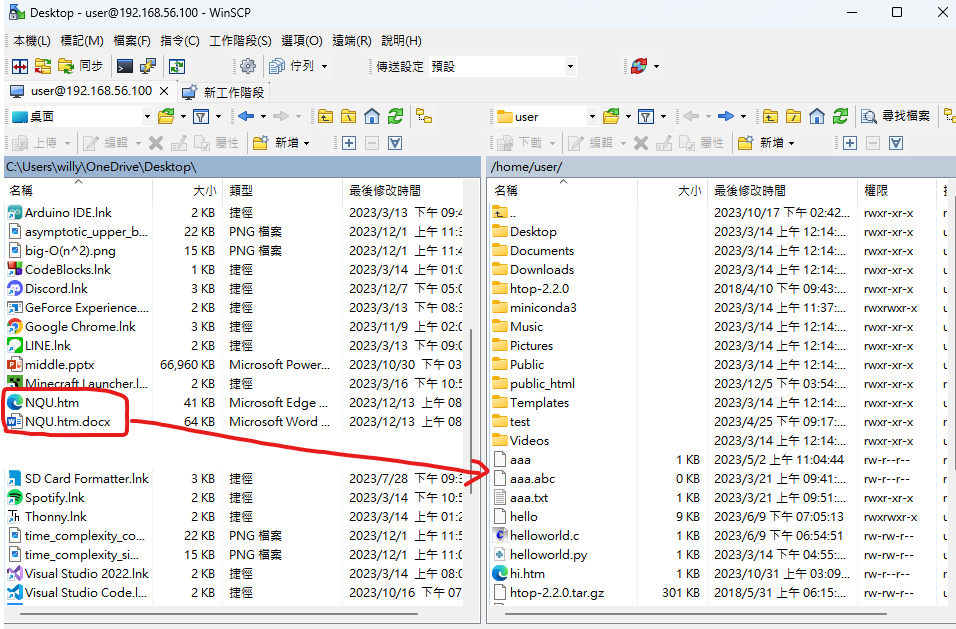
10. 將檔案從/user資料夾中移入/html資料夾中
`[root@mycentos7-1 ~]# cd /var/www/html` **將工作目錄切為/html**
`[root@mycentos7-1 html]# mv /home/user/NQU.htm .` **將NQU.htm移入/html**
`[root@mycentos7-1 html]# mv /home/user/NQU.files .` **將NQU.htm移入/html**
`[root@mycentos7-1 html]# mv /home/user/ls` **列出目錄中的文件**
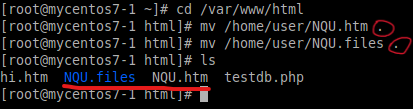
> 圈起來的點所代表的意思為當前工作目錄
11. 在箭頭處輸入這台機器的IP位址+/檔名 192.168.56.100/NQU.htm

### ngrok
**用於創建本地開發環境的臨時公開訪問地址的工具**
1. 從網路上下載ngrok服務所需的檔案
`[root@mycentos7-1 ~]# wget https://bin.equinox.io/c/bNyj1mQVY4c/ngrok-v3-stable-linux-amd64.tgz`

> wget : 下載網路文件的工具
2. 解壓縮ngrok檔案
`[root@mycentos7-1 ~]# tar zxvf ngrok-v3-stable-linux-amd64.tgz`

> tar : 用於打包、壓縮、解壓縮的工具
> #### zxvf :
> * z-使用gzip進行壓縮與解壓所
> * x-從打包文件中提取文件
> * v-顯示提取的文件列表
> * f-顯示被提取文件的副檔名
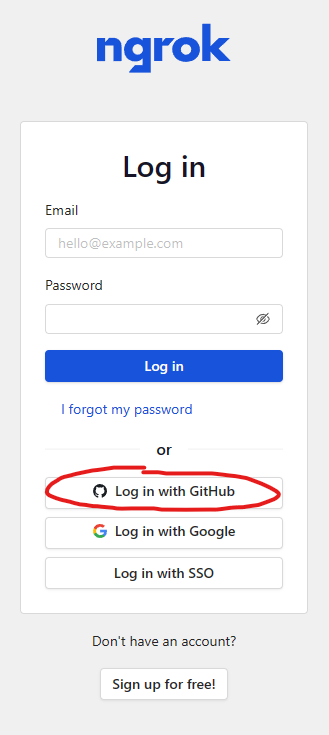
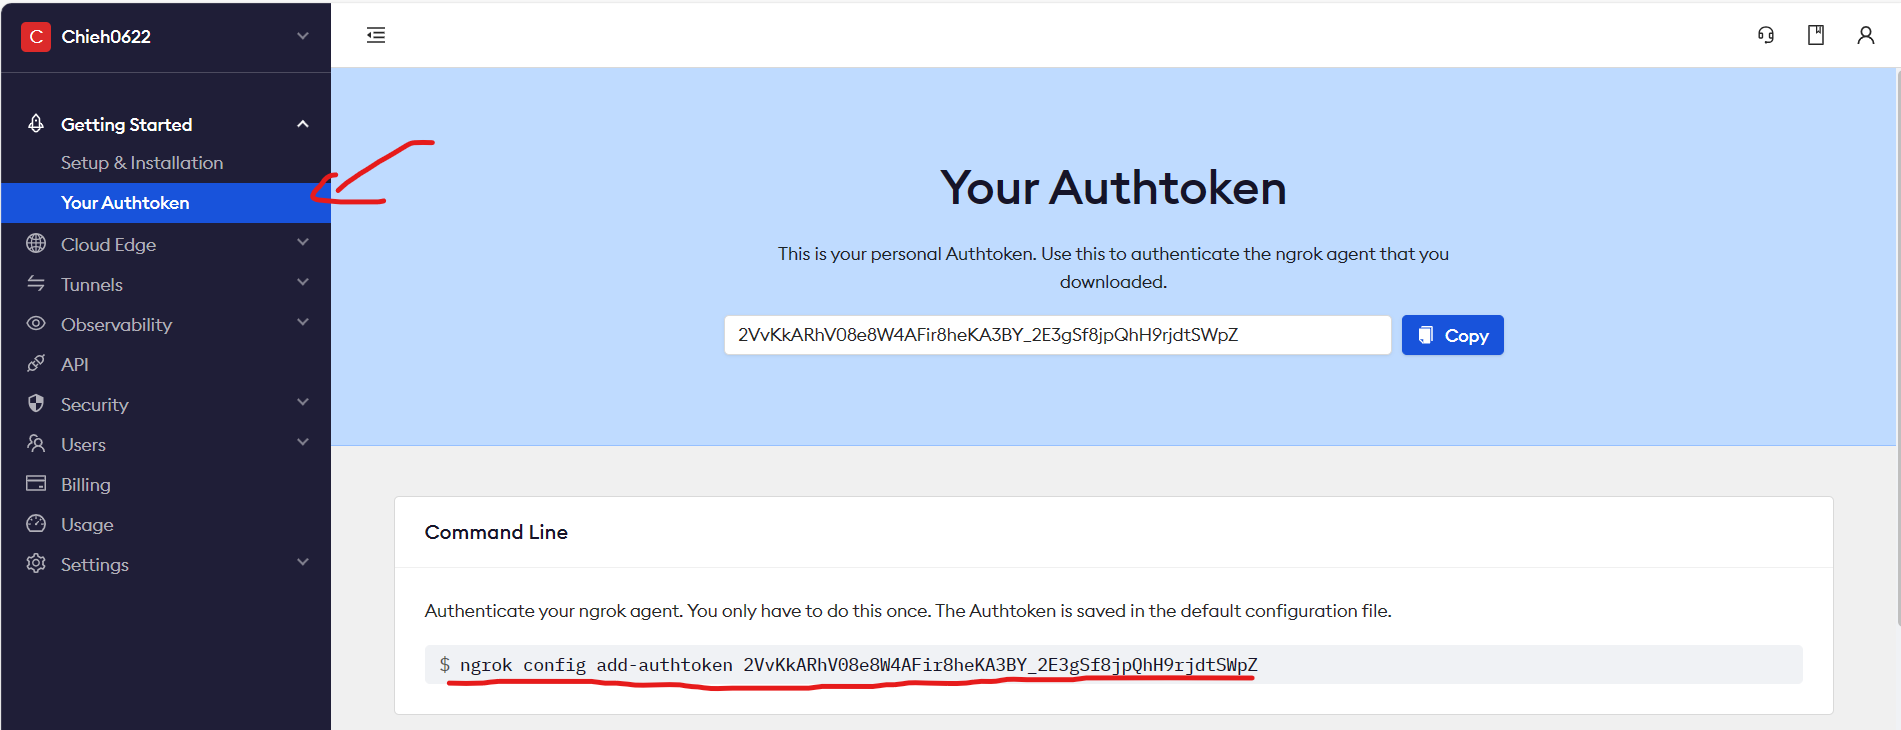
3. 進入ngrok網站並登入
[ngrok網站](https://ngrok.com/)
4. ngrok進行身份驗證
`[root@mycentos7-1 ~]# ./ngrok config add-authtoken 2VvKkARhV08e8W4AFir8heKA3BY_2E3gSf8jpQhH9rjdtSWpZ`
> ./ : 告訴系統在當前目錄下執行
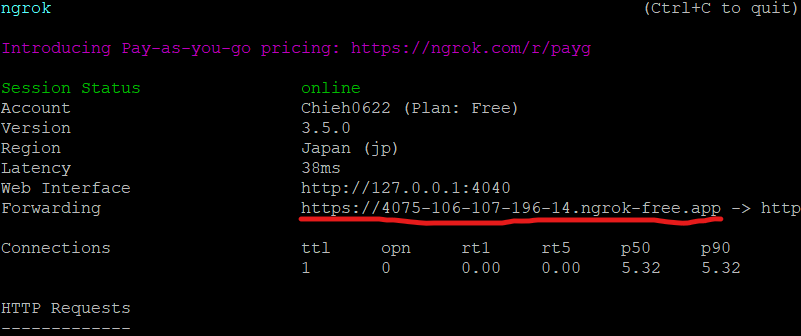
5. 開啟ngrok服務(port 80)
`[root@mycentos7-1 ~]# ./ngrok http 80`
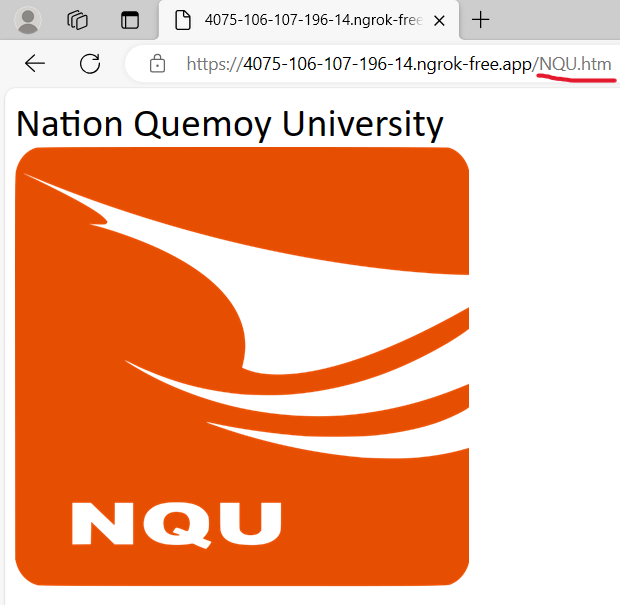
6. 開啟網站並輸入文件名稱
### 系統監視與行程管理(HTOP)
**用於 Unix 系統的互動式進程查看器**
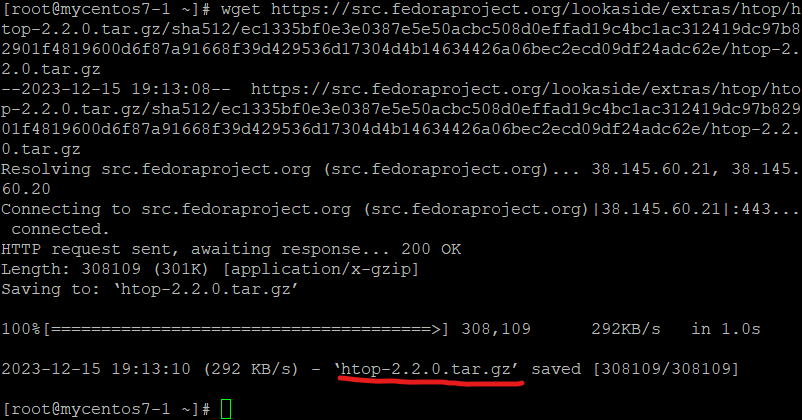
1. 從網路上下載HTOP服務所需的檔案
`[root@mycentos7-1 ~]# wget https://src.fedoraproject.org/lookaside/extras/htop/htop-2.2.0.tar.gz/sha512/ec1335bf0e3e0387e5e50acbc508d0effad19c4bc1ac312419dc97b82901f4819600d6f87a91668f39d429536d17304d4b14634426a06bec2ecd09df24adc62e/htop-2.2.0.tar.gz`
2. 解壓縮HTOP檔案
`[root@mycentos7-1 ~]# tar zxvf htop-2.2.0.tar.gz`
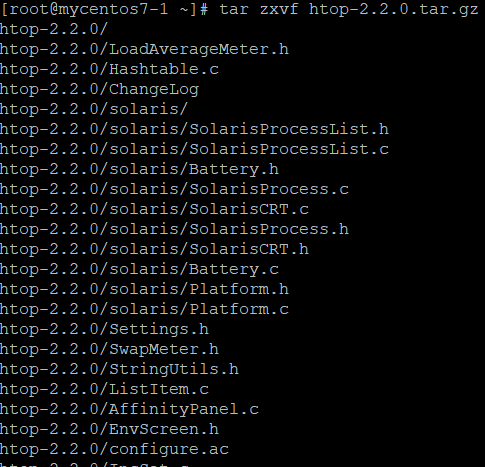
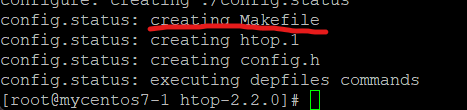
3. 檢查你的系統是否擁有所需的依賴項,設置構建環境並創建一個 "Makefile"
`[root@mycentos7-1 ~]# cd htop-2.2.0/` **切換到htop目錄**
`[root@mycentos7-1 htop-2.2.0]# ./configure` **運行./configure腳本**

4. 安裝已編譯的軟件
`[root@mycentos7-1 htop-2.2.0]# make install`

5. 安裝gcc和ncurses-devel
`[root@mycentos7-1 htop-2.2.0]# yum install gcc ncurses-devel`
> gcc : GNU Compiler Collection
> ncurses : 在文本界面上創建圖形界面的函式庫
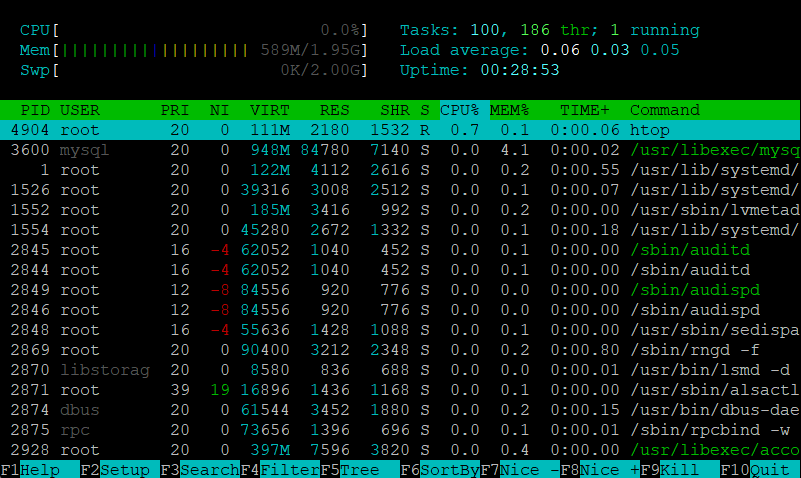
6. 開啟HTOP介面
## 第四週 (2023-10-03)
### NFS伺服器
**Network File System(NFS)是一種分佈式文件系統協議,用於在網絡上共享文件和資源。**
https://qizhanming.com/blog/2018/08/08/how-to-install-nfs-on-centos-7
#### Server端(7-3)
1. 在伺服器端建立資料夾
`[root@mycentos7-3 ~]# cd /`
`[root@mycentos7-3 /]# mkdir /data -p`
`[root@mycentos7-3 /]# ls -al /data`

> -p : 資料夾如果不存在就建立,存在就不建立
> -a : all,顯示隱藏的文件和目錄
> -l : long,以詳細的格式顯示每個文件和目錄的信息
2. 安装NFS套件
`[root@mycentos7-3 /]# yum install nfs-utils`
3. 將NFS設置為開機啟動
`[root@mycentos7-3 /]# systemctl enable rpcbind`
`[root@mycentos7-3 /]# systemctl enable nfs`

4. 啟動NFS服務
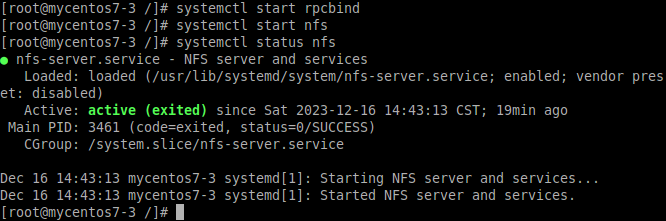
`[root@mycentos7-3 /]# systemctl start rpcbind`
`[root@mycentos7-3 /]# systemctl start nfs`
5. 創建exports檔
`[root@mycentos7-3 /]# vim /etc/exports`
`[root@mycentos7-3 /]# cat /etc/exports`
`/data 192.168.56.0/24(rw,sync,no_root_squash,no_all_squash)`

> /data : 共享目錄位置
> rw : 可讀可寫
> sync : 同步共享目錄
> no_root_squash : 管理者權限
> no_all_squash : 使用者權限
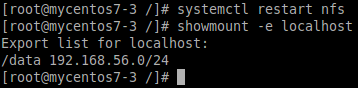
6. 重啟NFS,並檢查7-3的共享目錄
`[root@mycentos7-3 /]# systemctl restart nfs`
`[root@mycentos7-3/]# showmount -e localhost`
#### Client端(7-1, 7-2)
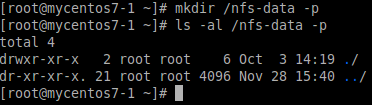
1. 在客戶端建立資料夾
`[root@mycentos7-1 ~]# mkdir /nfs-data -p`
`[root@mycentos7-1 ~]# ls -al /nfs-data`
2. 安装NFS套件
`[root@mycentos7-1 ~]# yum install nfs-utils`
3. 啟動NFS服務
`[root@mycentos7-1 ~]# systemctl enable rpcbind`
`[root@mycentos7-1 ~]# systemctl start rpcbind`

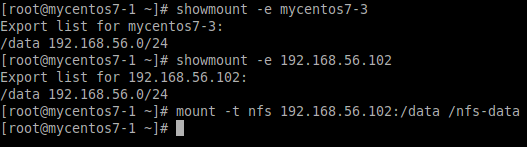
4. 掛載
**/etc/hosts 請先將此文件建立好,否則會出現問題** ***詳情請見[hosts](https://hackmd.io/pXN85ukpTOez4FlHJpSu8g?view#%E7%94%A8SSH%E9%80%A3%E6%8E%A5%E6%A9%9F%E5%99%A8)***
`[root@mycentos7-1 ~]# showmount -e mycentos7-3`
`[root@mycentos7-1 ~]# showmount -e 192.168.56.102`
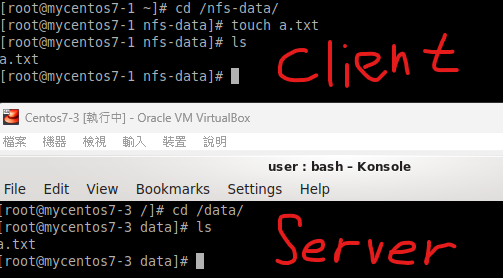
5. 結果
1. Client端
`[root@mycentos7-1 ~]# cd /nfs-data/`
`[root@mycentos7-1 ~]# touch a.txt`
`[root@mycentos7-1 ~]# ls`
2. Server端
`[root@mycentos7-3 /]# cd /data/`
`[root@mycentos7-3 /]# ls`
## 第五週 (2023-10-17)
### SAMBA
**不同平台之間的檔案和列印共享**
1. 安裝SAMBA服務所需套件,建立測試資料夾
`[root@mycentos7-1 ~]# yum install samba samba-client samba-common -y`
`[root@mycentos7-1 ~]# mkdir /test_samba -p`
`[root@mycentos7-1 ~]# chown nobody ./test_samba/`
`[root@mycentos7-1 ~]# chmod 777 ./test_samba/`
`[root@mycentos7-1 ~]# ls -l -d /test_samba/`
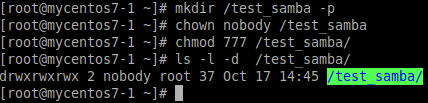
> -d : directory,僅列出目錄本身,而不顯示它們的內容
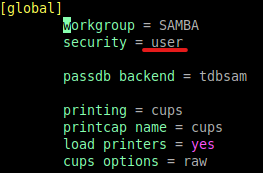
2. 編輯設定檔
`[root@mycentos7-1 ~]# vim /etc/samba/smb.conf`
```
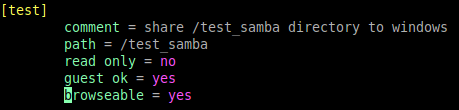
[test] 共享的名稱
comment = for test 描述共享的用途或特點
path = /test_samba 共享的測試資料夾位置(要設在root下)
read only = no 可修改或刪除
guest ok = yes 可以給一般使用者使用,以訪客身份訪問共享
browseable = yes 可以瀏覽的
```
3. 重新啟動Samba
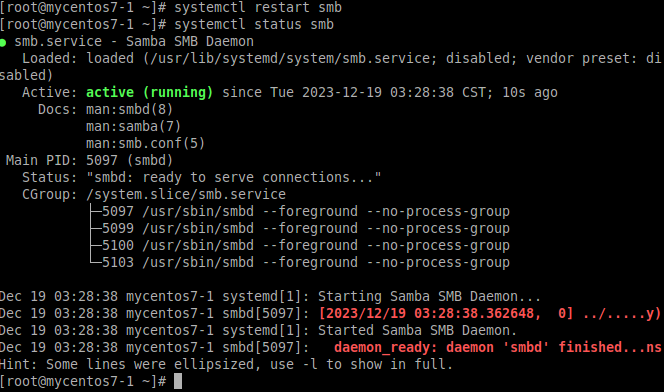
`[root@mycentos7-1 ~]# systemctl restart smb`
`[root@mycentos7-1 ~]# systemctl status smb`
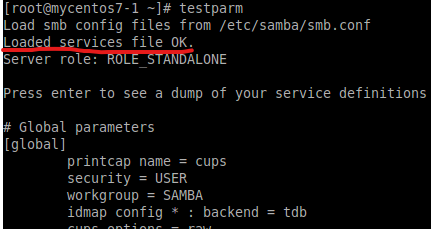
4. 檢查Samba配置文件
`[root@mycentos7-1 ~]# testparm`
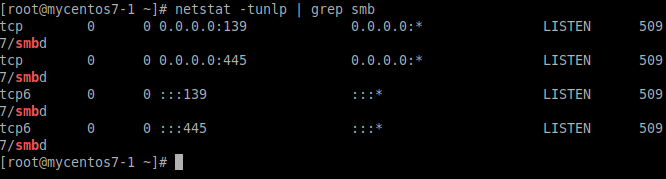
5. 檢查Samba的port(445、139)
`[root@mycentos7-1 ~]# netstat tunlp | grep smb`
6. 設定Samba密碼
`[root@mycentos7-1 ~]# smbpasswd -a user`
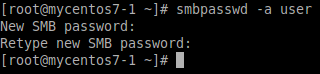
> -a : add,添加指定用戶的Samba密碼
> 密碼 : user
7. 開啟Windows檔案總管並輸入IP

> IP前要加 \\\
8. 輸入帳號密碼
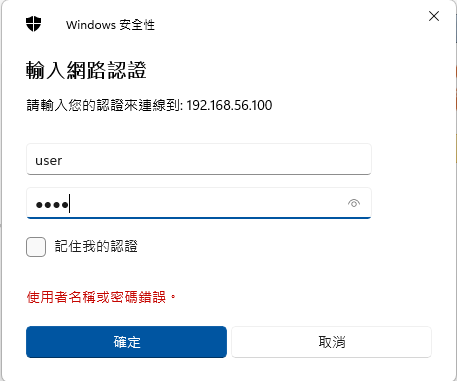
> 帳號 : user
> 密碼 : user
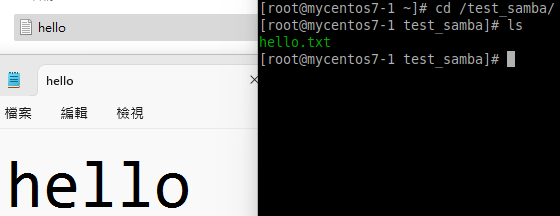
9. 在Windows系統中新增一個文字檔,並確認是否共享成功
### 切換使用者
1. 清除暫存密碼,開啟cmd(Windows)
`C:\Users\willy>net use * /delet`
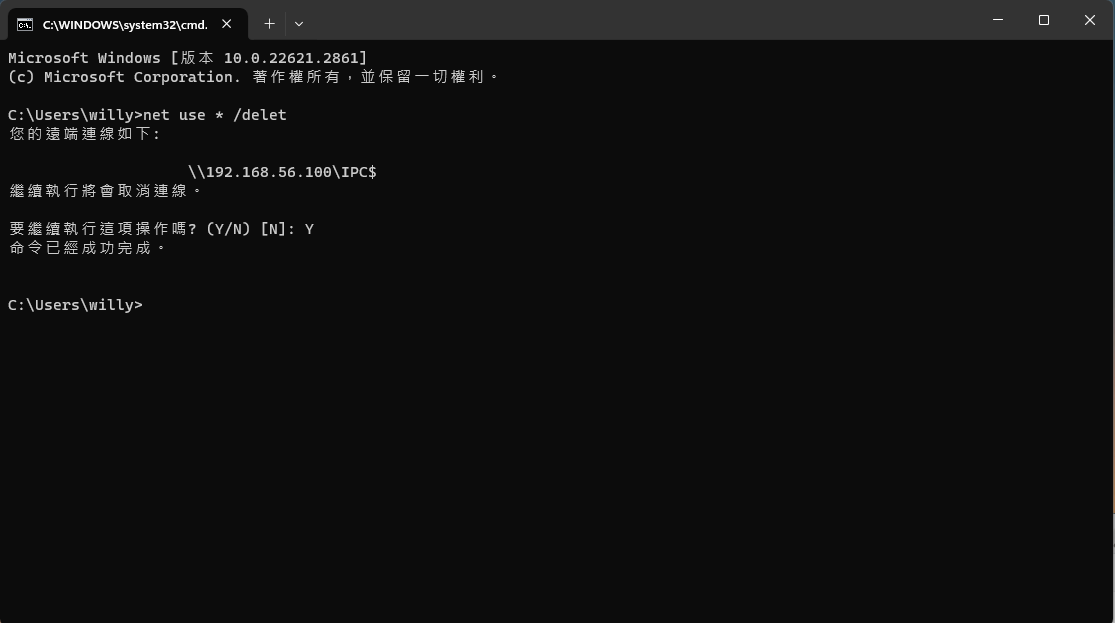
> 建議重複操作數次,如還無法成功,建議重啟檔案總管或重啟電腦
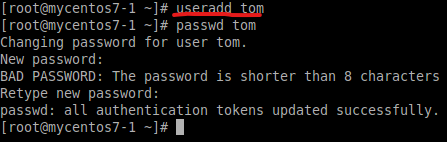
2. 新增一個使用者(tom)
`[root@mycentos7-1 ~]# useradd tom`
`[root@mycentos7-1 ~]# passwd tom` **設定登入密碼**
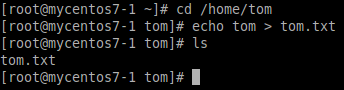
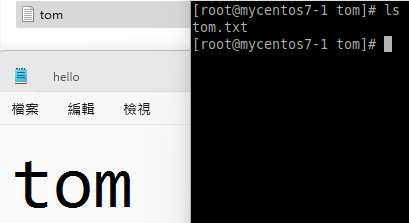
3. 創建一個文字檔
`[root@mycentos7-1 ~]# cd /home/tom`
`[root@mycentos7-1 tom]# echo tom > tom.txt`
`[root@mycentos7-1 tom]# ls`
4. 設定tom的Samba密碼
`[root@mycentos7-1 tom]# smbpasswd -a tom`
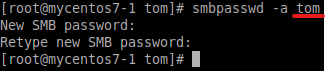
> 密碼 : tom
5. 登入tom
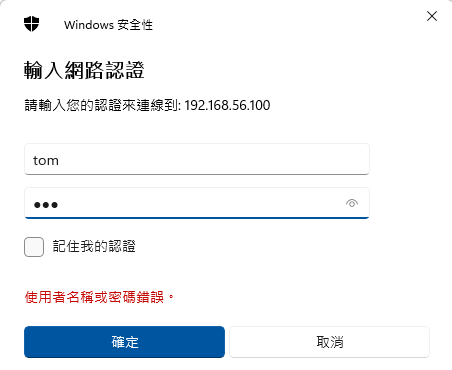
> 帳號 : tom
> 密碼 : tom
6. 確認是否共享成功
## 第六週 (2023-10-24)
### IPV6
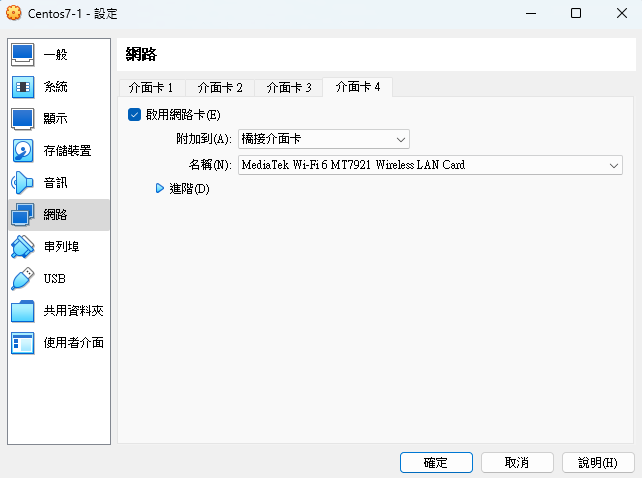
1. 將網路卡設定調為僅一張橋接介面卡

2. 確認IP
`[root@mycentos7-1 ~]# ifconfig`
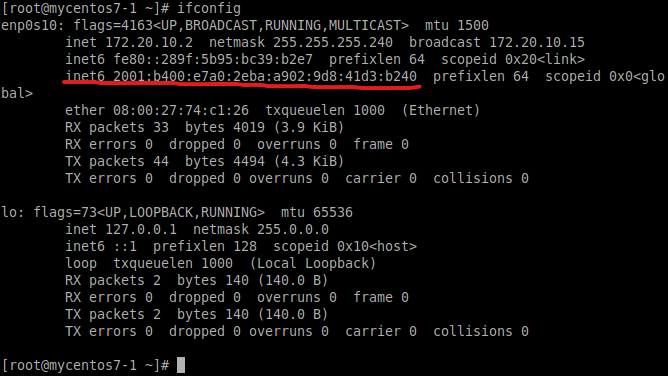
> 20開頭才是我們所需要的
3. 連接PUTTY
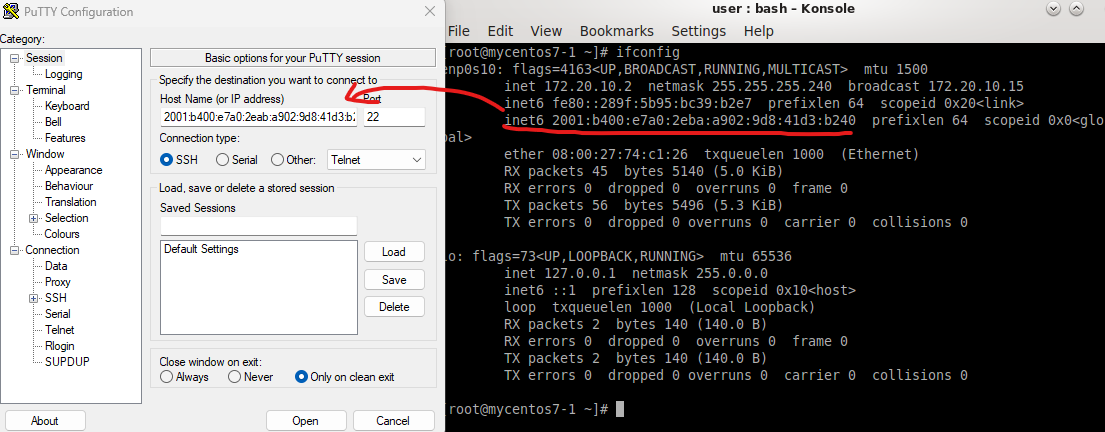
> 若失敗,檢查SSH服務是否開啟
4. 連接網站
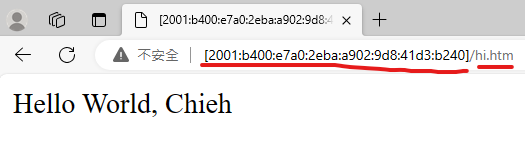
> 若失敗,檢查HTTP服務是否開啟
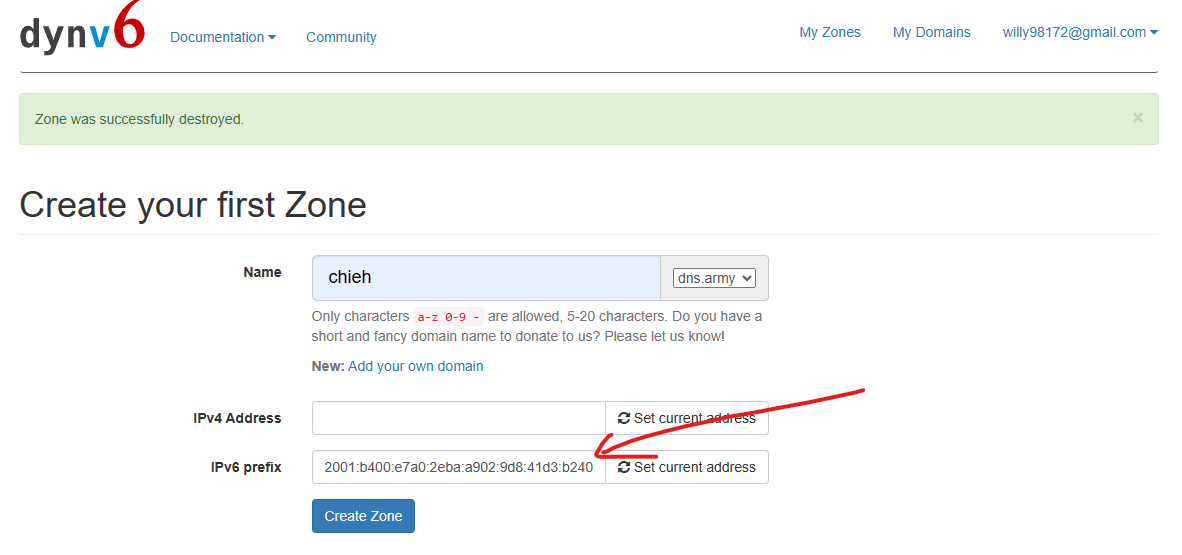
5. IPV6架站
[dynv6](https://https://dynv6.com/)
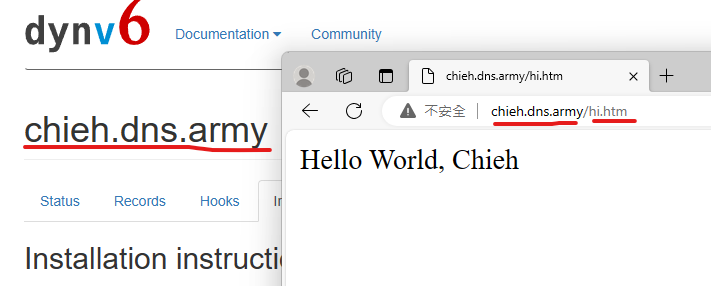
6. 連接
## 第七週 (2023-10-31)
### 變數
HOME (echo $HOME)
PATH 當前目錄路徑 `echo $PATH`
USER 使用者身分 `echo $USER`
UID 當前使用者id `echo $UID`
RANDOM 產生亂數 `echo $RANDOM`
history 當前所有歷史,可以追蹤目前使用者下過的指令
lang 儲存使用者語系
PWD 目前所在目錄

env 產生所有資訊
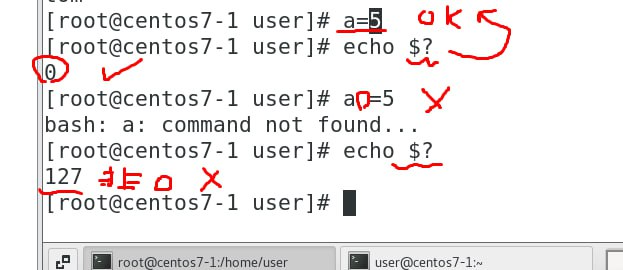
新增變數 (=號左右不可有空白,數字與特殊符號開頭也不行,只有_底線開頭可以)

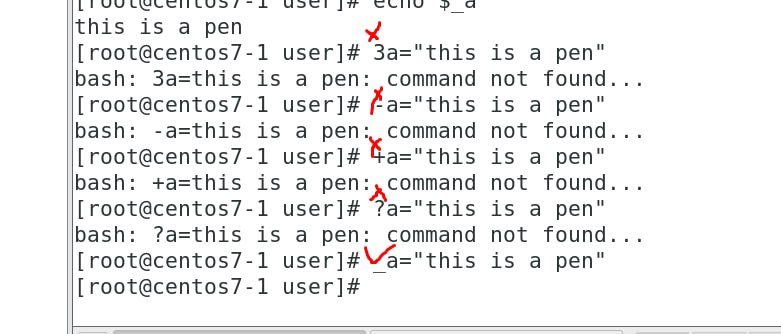
a是變數 aa其中一個加上{}可以避免出錯

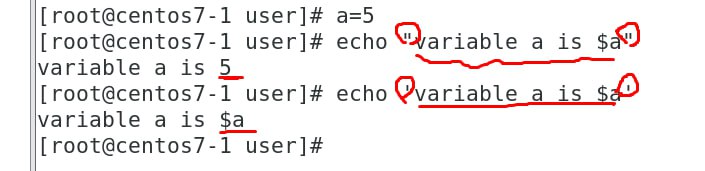
`echo "字串 $a"` 雙引號可以替換變數
`echo '字串 $a'` 單引號不能替換
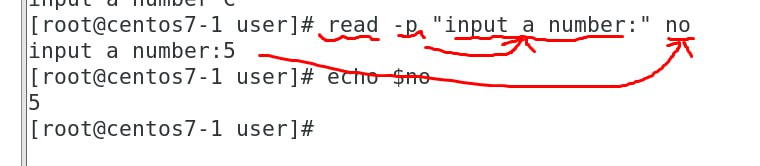
read 跟使用者互動,讀取使用者輸入資料, "文字"要輸入的內容會以字串方式存入, no 是自己取的名稱
`echo $名稱` 會出現存入的字串
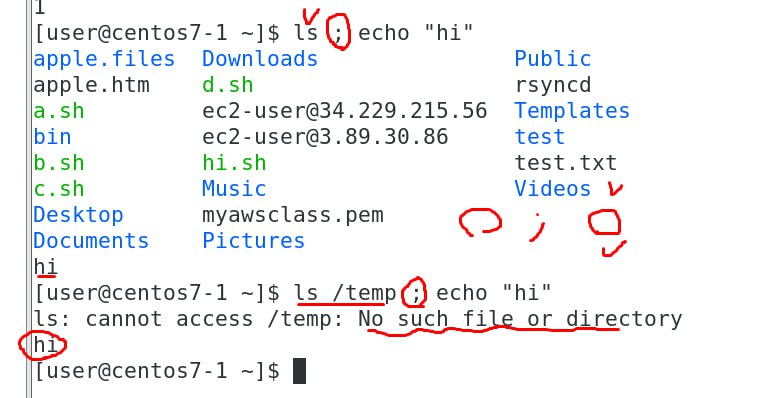
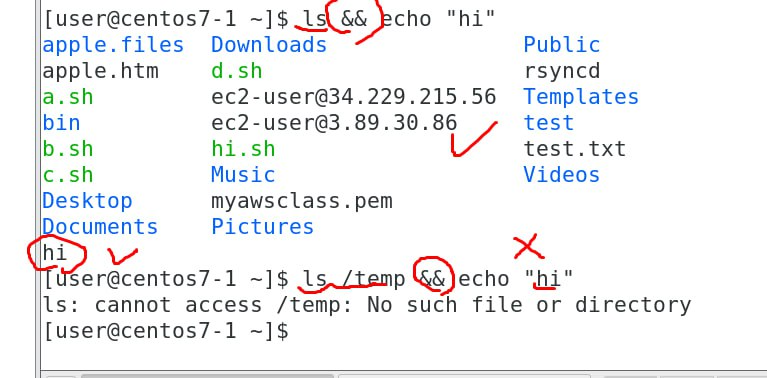
0 是正常 , 非零值是錯誤(不一定是127,不同錯誤會有不同值出現)

連接多個指令可以用: ||, ;, &&

### 檔案管理
指令
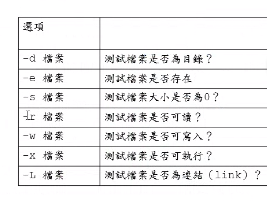
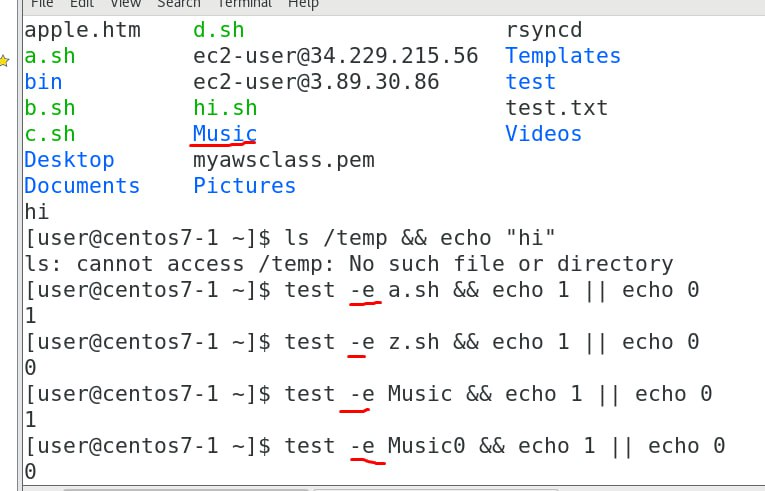
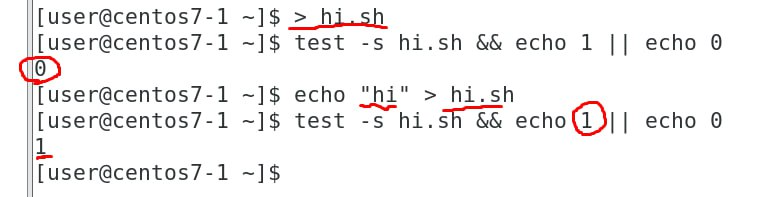
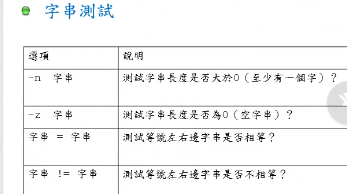
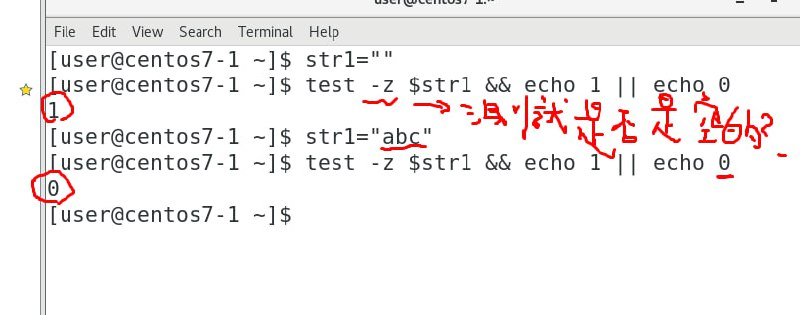
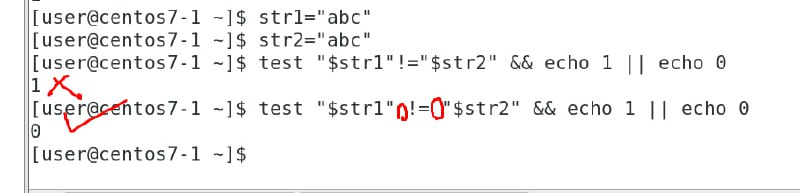
### 字串測試
指令
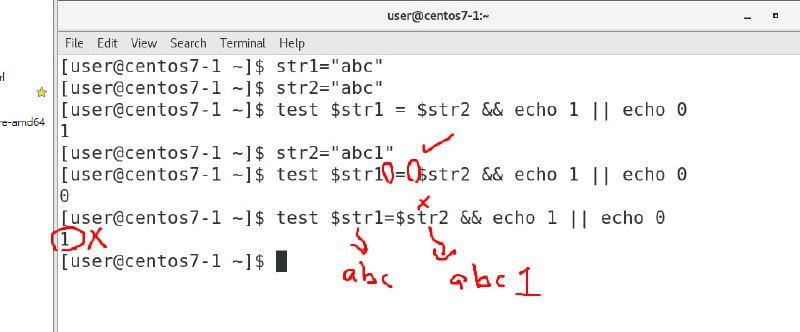
變數比較 (=左右要有空白否則都是錯)
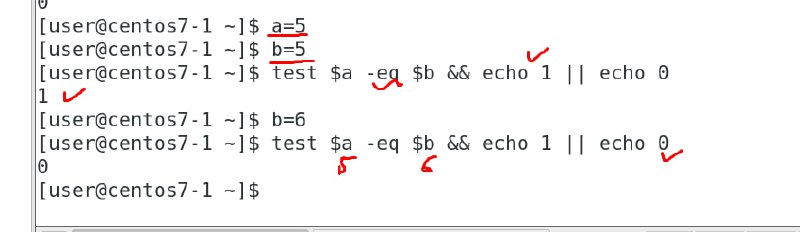
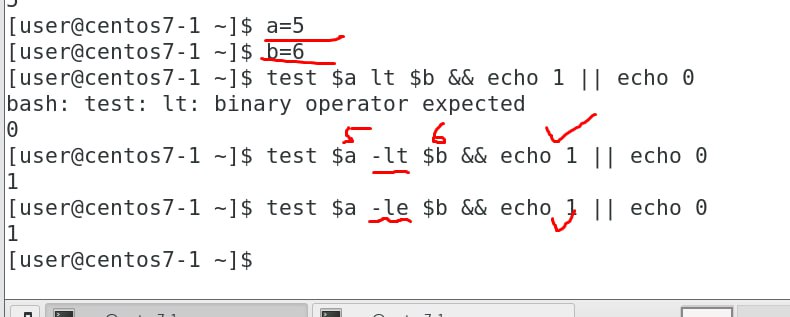
### 數值比較
指令
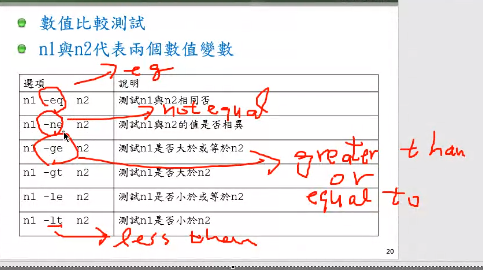
數值比較測試
數字比較不要用=,>=,<=,等符號

### shell 腳本
創建Shell
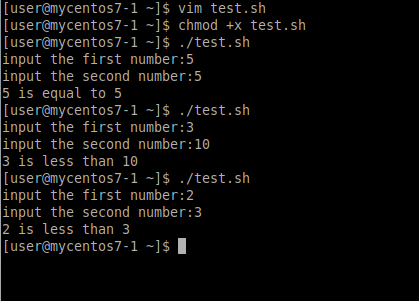
腳本內容

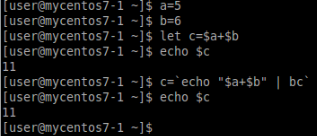
linux 的加減乘除
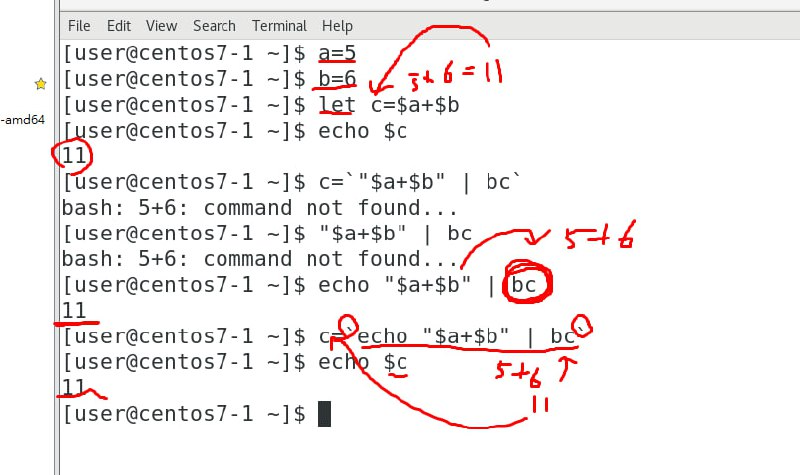
結果
## 第八週 (2023-11-14)
### PPTP VPN
1. 新增一張網路卡(內部網路)
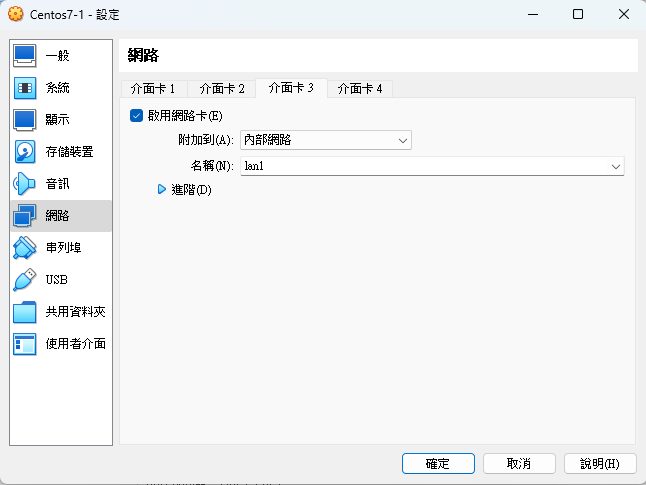
> Virtualbox 有三張卡,分別為NAT、Hostonly跟剛新增的內部網路卡(lan1)
2. 安裝PPTP服務所需套件
`[root@mycentos7-1 ~]# yum install ppp pptpd -y` **如果無法成功安裝,則使用下面的指令**
`[root@mycentos7-1 ~]# yum install -y epel-release` **安裝此第三方套件**
3. 編輯PPTP服務的配置檔
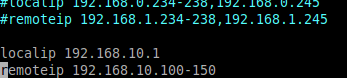
`[root@mycentos7-1 ~]# vim /etc/pptpd.conf`
```
localip 192.168.10.1
remoteip 192.168.0.100-150
```
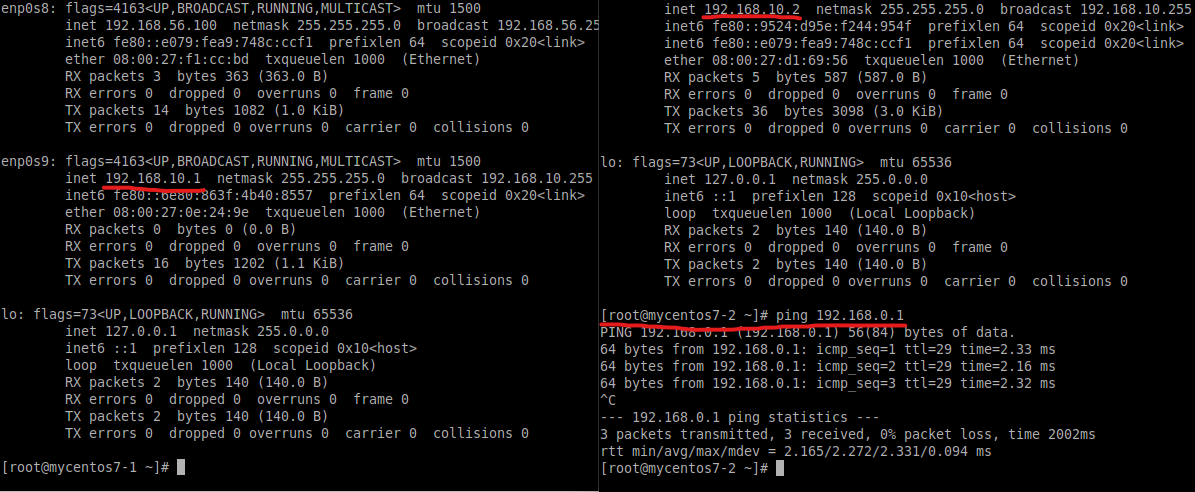
4. 修改7-2的IP(192.168.56.101 -> 192.168.0.2)
`[root@mycentos7-2 ~]# ping 192.168.0.1` **(192.168.0.1 7-1的內部網路卡)**
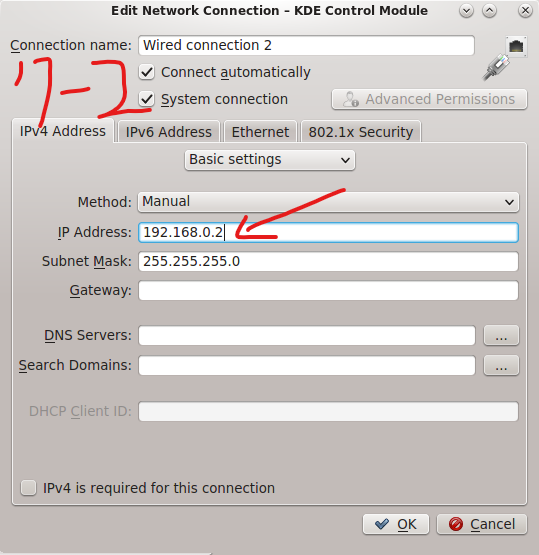
> 參考[修改網路卡的IP位址](https://hackmd.io/pXN85ukpTOez4FlHJpSu8g?view#%E4%BF%AE%E6%94%B9%E7%B6%B2%E8%B7%AF%E5%8D%A1%E7%9A%84IP%E4%BD%8D%E5%9D%80)
5. 嘗試7-2 ping 7-1的內部網路卡
6. 設定VPN帳號、密碼
`[root@mycentos7-1 ~]# vim /etc/ppp/chap-secrets`
```
test pptpd 123456 *
帳號 密碼
```

> *: 代表所有IP都可以訪問
7. 設置最大傳輸單元MTU
`vim /etc/ppp/ip-up`
```
ifconfig ppp0 mtu 1472
```
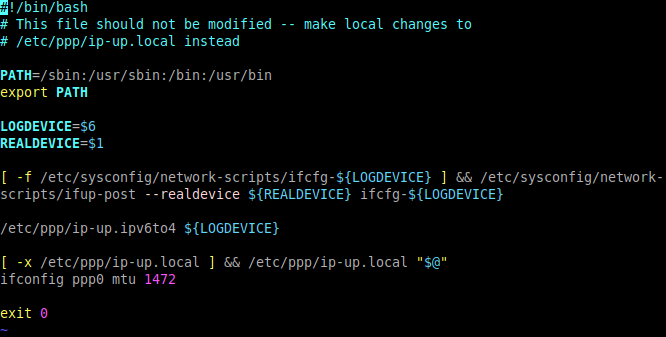
> MTU : 代表一個聯網裝置將接受的最大資料封包的大小。
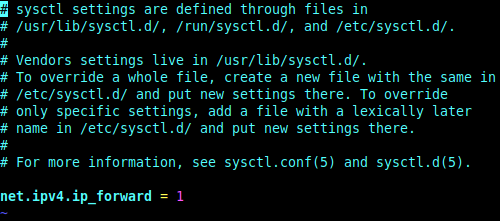
8. 把電腦變成路由器模式
`[root@mycentos7-1 ~]# vim /etc/sysctl.conf`
```
net.ipv4.ip_forward = 1
```
`[root@mycentos7-1 ~]# sysctl -p` **使修改後的參數生效**
9. 重啟PPTP服務(記得關閉防火牆跟getenforce)
`[root@mycentos7-1 ~]# systemctl restart pptpd`
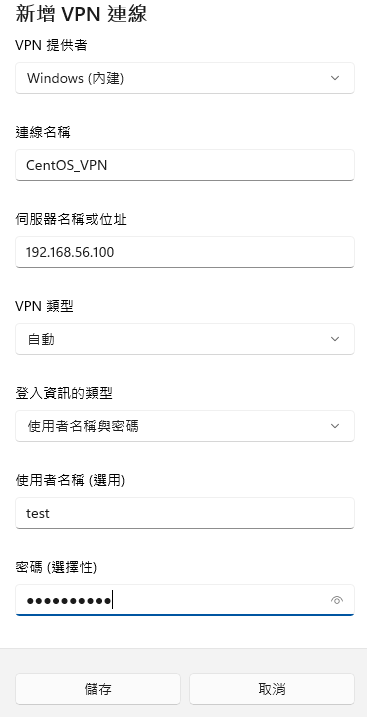
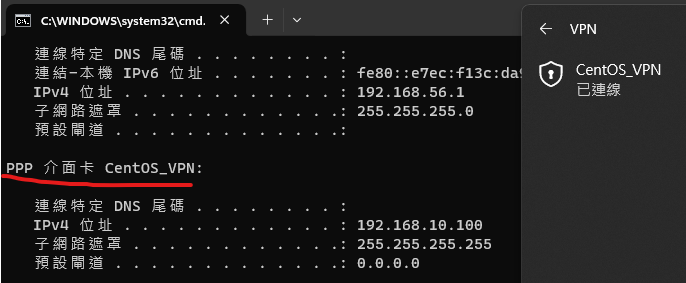
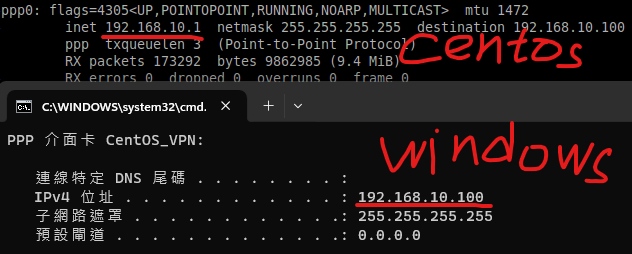
10. 連線VPN
11. 結果(在同一台機器上做會無限循環,無法連到外網)
## 第九週 (2023-11-21)
### Network 和 Network Manager
**Network 和 Network Manager 只能選取一個**
1. 開關enp0s8
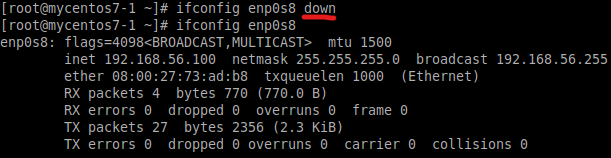
`[root@mycentos7-1 ~]# ifconfig enp0s8 down` **關**
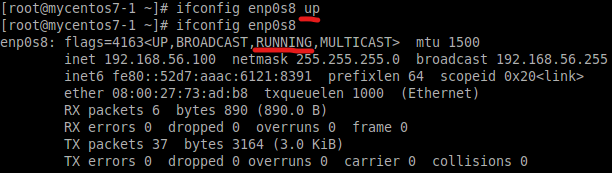
`[root@mycentos7-1 ~]# ifconfig enp0s8 up` **開**
`[root@mycentos7-1 ~]# ifconfig enp0s8` **檢查enp0s8**
2. 關閉enp0s8連線
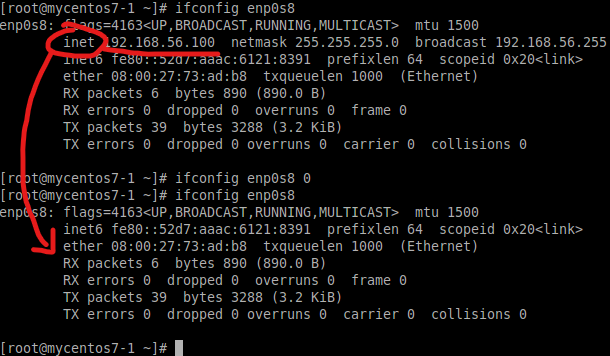
`[root@mycentos7-1 ~]# ifconfig enp0s8 0`
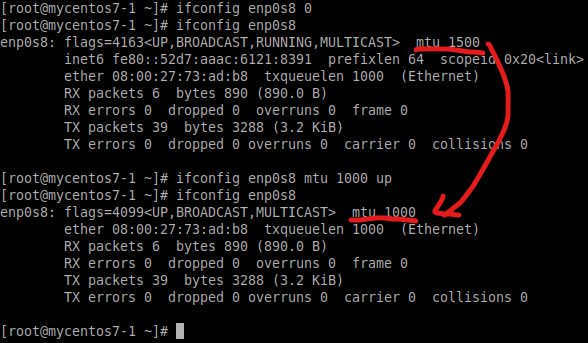
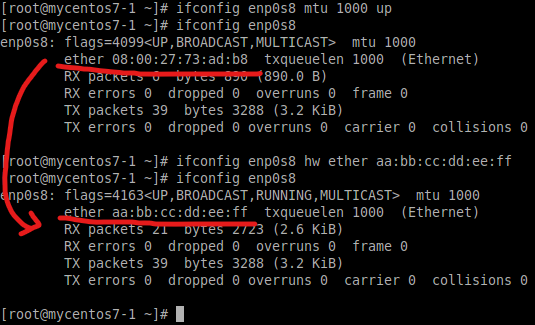
3. 修改最大傳輸單位
`[root@mycentos7-1 ~]# ifconfig enp0s8 mtu 1000 up`
4. 更改網卡物理地址(Mac Address)
`[root@mycentos7-1 ~]# ifconfig enp0s8 hw ether aa:bb:cc:dd:ee:ff`
5. 複製網路介面卡,新增IP位置
`[root@mycentos7-1 ~]# ifconfig enp0s8:1 192.168.56.100 netmask 255.255.255.0`
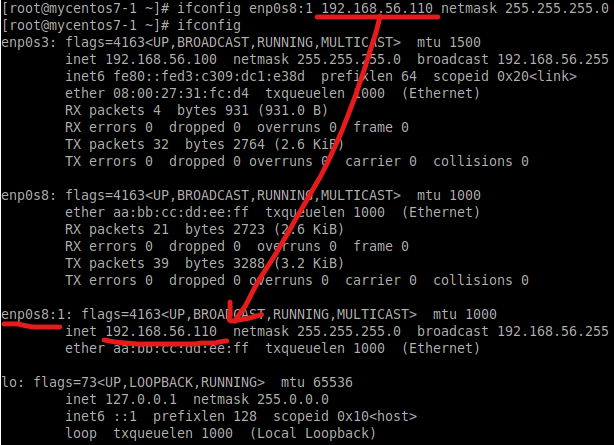
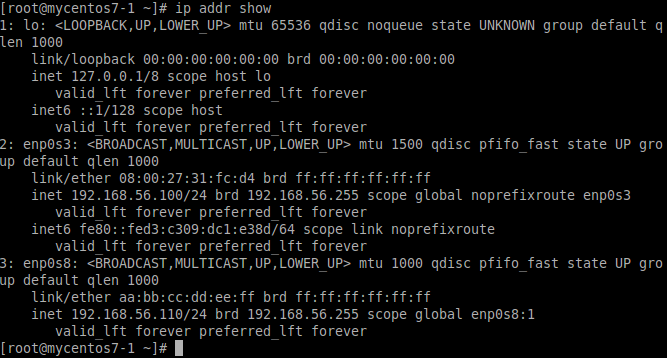
6. 查詢網卡
`[root@mycentos7-1 ~]# ip addr show` **= ifconfig**
7. 檢查route
`[root@mycentos7-1 ~]# route -n`

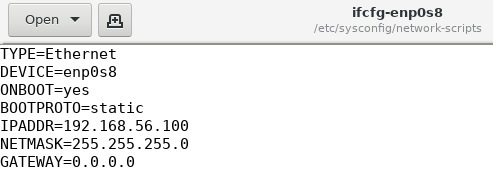
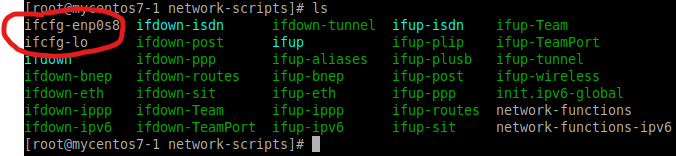
8. 創建網卡設定
`[root@mycentos7-1 ~]# cd /etc/sysconfig/network-scripts`
`[root@mycentos7-1 ~]# gedit ifcfg-enp0s8` **Host-Only網卡名稱**
```
TYPE=Ethernet
DEVICE=enp0s8
ONBOOT=yes
BOOTPROTO=static
IPADDR=192.168.56.100
NETMASK=255.255.255.0
GATEWAY=0.0.0.0
```
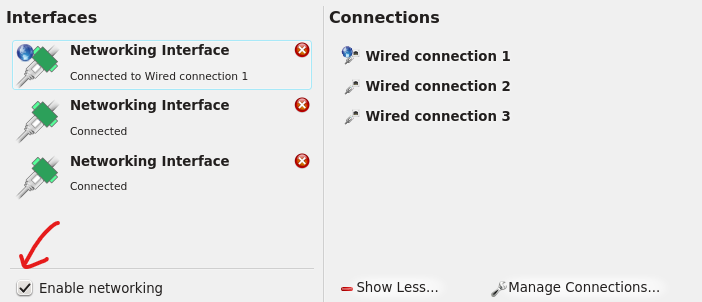
9. 檢查資料夾內的網卡設定
**只能留下圈起來的兩張,如果沒有作將無法重啟Network**
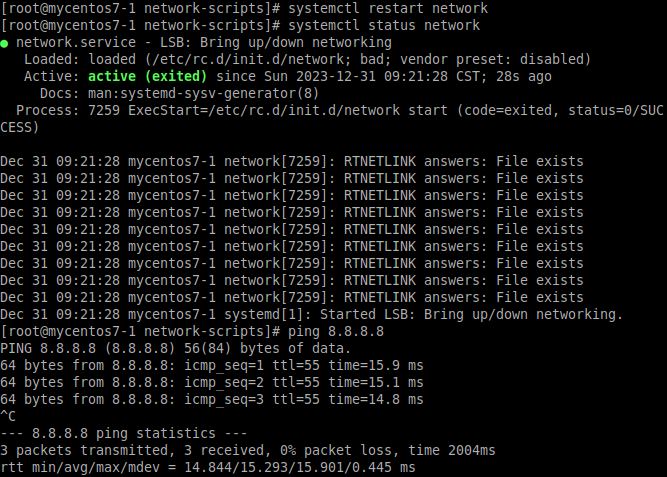
10. 關閉Network Manager,重啟Network,能Ping 8.8.8.8及為成功
`[root@mycentos7-1 ~]# systemctl stop NetworkManager`
`[root@mycentos7-1 ~]# systemctl restart network`
`[root@mycentos7-1 ~]# systemctl status network`
`[root@mycentos7-1 ~]# ping 8.8.8.8`
## 第十週 (2023-11-28)
### 建立 Echo 伺服器
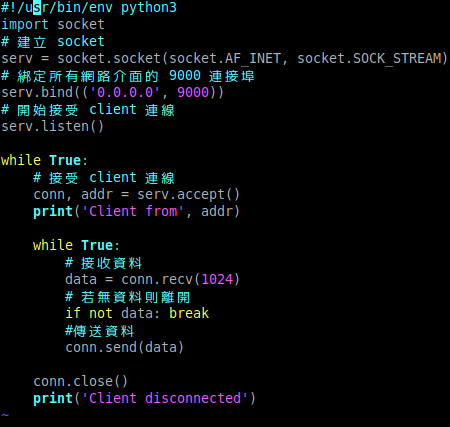
1. 以Python撰寫一個簡單的echo伺服器
`vim /opt/echo_server.py`
```
#!/usr/bin/env python3
import socket
# 建立 socket
serv = socket.socket(socket.AF_INET, socket.SOCK_STREAM)
# 綁定所有網路介面的 9000 連接埠
serv.bind(('0.0.0.0', 9000))
# 開始接受 client 連線
serv.listen()
while True:
# 接受 client 連線
conn, addr = serv.accept()
print('Client from', addr)
while True:
# 接收資料
data = conn.recv(1024)
# 若無資料則離開
if not data: break
# 傳送資料
conn.send(data)
conn.close()
print('Client disconnected')
```
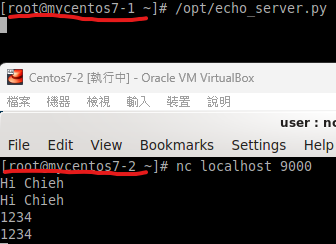
2. 開執行權限,啟動echo伺服器
`[root@mycentos7-1 ~]# chmod +x /opt/echo_server.py`
`[root@mycentos7-1 ~]# /opt/echo_server.py`
3. 開啟7-2虛擬機,並開啟Echo_Server
`[root@mycentos7-2 ~]# systemctl start echo_server`
`[root@mycentos7-2 ~]# nc localhost 9000`
4. 結果
### Telnet
1. 安裝Telnet服務所需套件
`yum install telnet-server telnet xinetd -y`
2. 啟動Telnet
`systemctl start telnet.socket`
`systemctl start xinetd`
`netstat -tunlp | grep 23`
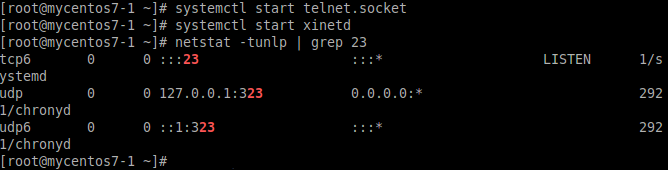
> t : TCP
> u : udp
> n : 不解析
> l : listen
> p : process ID
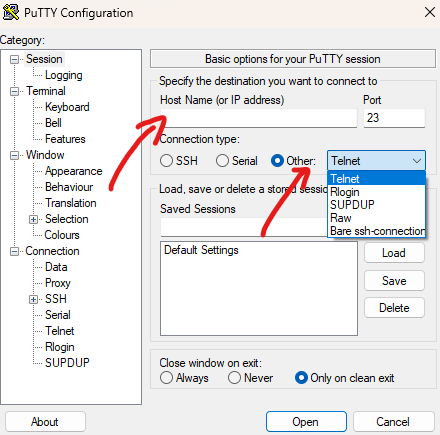
3. 開啟Putty
**選取Telnet,並輸入機器IP**
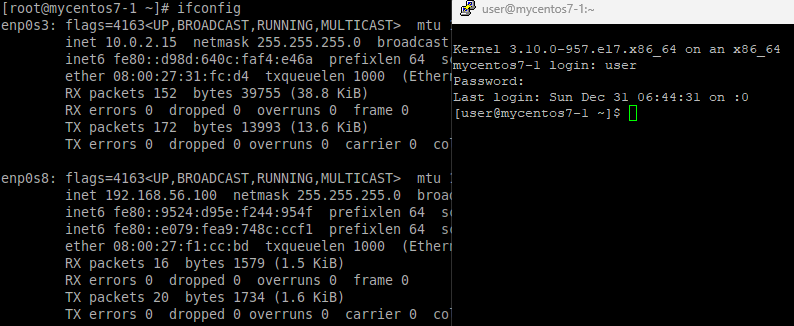
4. 結果
## 第十一週 (2023-12-05)
### LAMP
#### MYSQL
1. 安裝並啟動MYSQL
`[root@mycentos7-1 ~]# yum install mariadb-server mariadb`
`[root@mycentos7-1 ~]# systemctl start mariadb`
`[root@mycentos7-1 ~]# systemctl enable mariadb.service`
2. 設定資料庫
```
Set root password? [Y/n] Y : 是否設置root用户密碼
New password: 123456:
Re-enter new password: 123456
Remove anonymous users? [Y/n] Y : 刪除匿名用戶
Disallow root login remotely? [Y/n] n : 取消root用戶遠端登入
Remove test database and access to it? [Y/n] n : 刪除test庫和對test庫的訪問權限
其他的Enter跳過
```
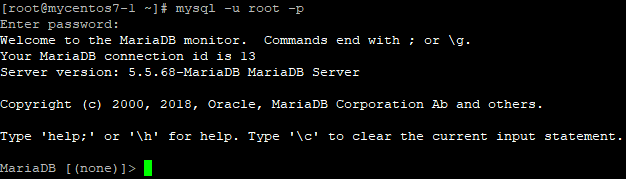
3. 開啟MYSQL
`mysql -u root -p`
4. SQL指令(DataBase **=>** Table **=>** Data **=>** Field)
```
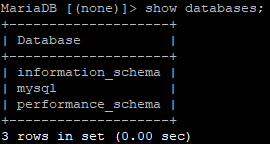
MariaDB [(none)]> show databases; 顯示目前有的資料庫
MariaDB [(none)]> create database testdb; 創建資料庫
MariaDB [(none)]> use testdb; 使用資料庫
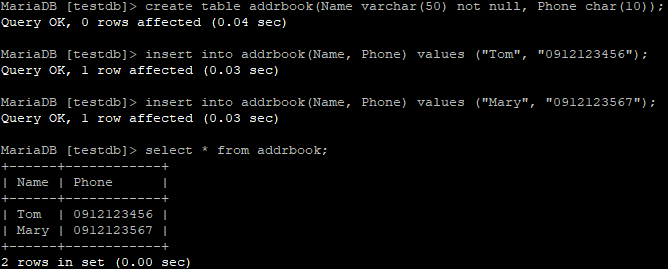
MariaDB [testdb]> create table assrbook(Name varchar(50) notnull, Phone char(10)); 創建資料表
MariaDB [testdb]> insert into addrbook(Name, Phone) values ("Tom", "0912123456"); 加入資料1
MariaDB [testdb]> insert into addrbook(Name, Phone) values ("Mary", "0912123567"); 加入資料2
MariaDB [testdb]> select * from addrbook; 選擇資料
```

> CREATE TABLE 可以加條件 創建資料表名稱(資料欄位1 資料類型, 資料欄位2 資料類型, ...)
> 資料類型 : TEXT INTEGER PRIMARY KEY AUTOINCREMENT
> SELECT 可以把值取出
> SELECT 資料欄位1, 資料欄位2, ...
FROM 創建資料名
WHERE 符合的資料(資料欄位1 = 10之類的)
>INSERT INTO 資料表名稱 (資料欄位1, 資料欄位2,...)]
VALUES 值;
>DELETE FROM 資料表名稱
>WHERE 符合的資料
#### PHP
1. 安裝PHP
`[root@mycentos7-1 ~]# yum install php php-mysql php-fpm`
`[root@mycentos7-1 ~]# systemctl restart httpd.service` **重新啟動Apache,讓PHP運作**
2. 測試PHP是否正常運作
`[root@mycentos7-1 ~]# vim /var/www/html/info.php`
```
<?php phpinfo(); ?>
```
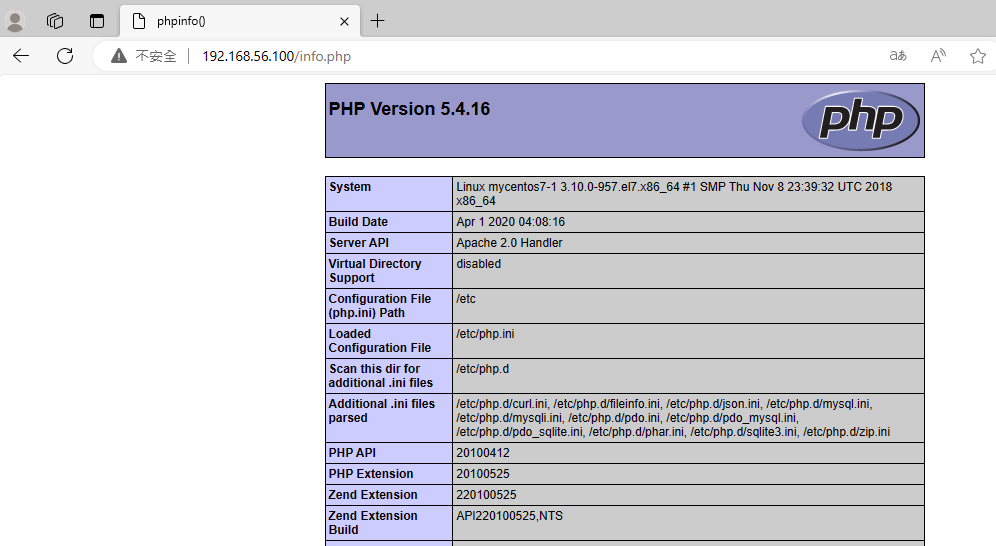
`http://機器IP/info.php` **在網站輸入**
若成功會出現下圖
3. 創建testdb.php
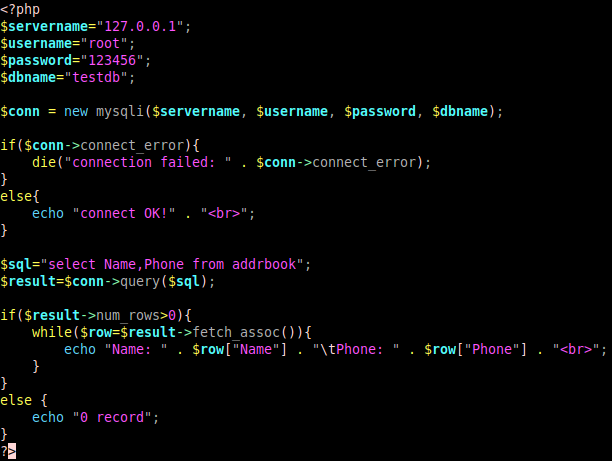
`[root@mycentos7-1 ~]# vim /var/www/html/testdb.php`
```
<?php
$servername="127.0.0.1"; SQL和PHP同一台主機上,所以servername寫127.0.0.1,不用寫其他名字或IP
$username="root";
$password="123456";
$dbname="testdb";
$conn = new mysqli($servername, $username, $password, $dbname);
if($conn->connect_error){
die("connection failed: " . $conn->connect_error);
}
else{
echo "connect OK!" . "<br>";
}
$sql="select Name,Phone from addrbook";
$result=$conn->query($sql);
if($result->num_rows>0){
while($row=$result->fetch_assoc()){
echo "Name: " . $row["Name"] . "\tPhone: " . $row["Phone"] . "<br>";
}
}
else {
echo "0 record";
}
?>
```
設定完後重啟Apache
`[root@mycentos7-1 ~]# systemctl restart httpd`
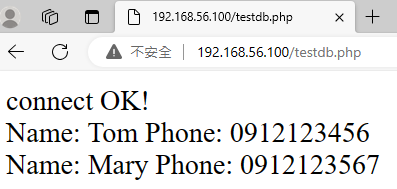
4. 結果
`http://機器IP/testdb.php` **在網站輸入**
> 如果無法連線到SQL,要設定 :
`[root@mycentos7-1 ~]# setsebool httpd_can_network_connect_db=1`
## 第十二週 (2023-12-12)
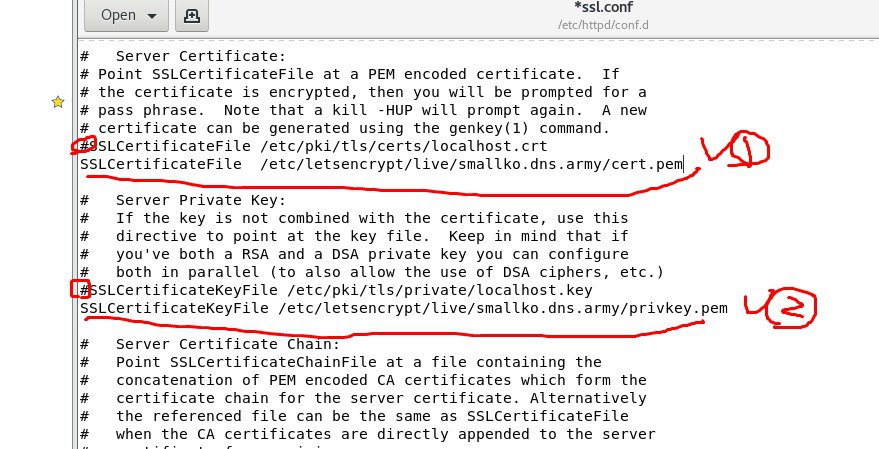
### HTTP架站
1. 將網路卡設定調為僅一張橋接介面卡
2. 安裝Certbot
`[root@mycentos7-1 ~]# yum install epel-release mod_ssl certbot -y`
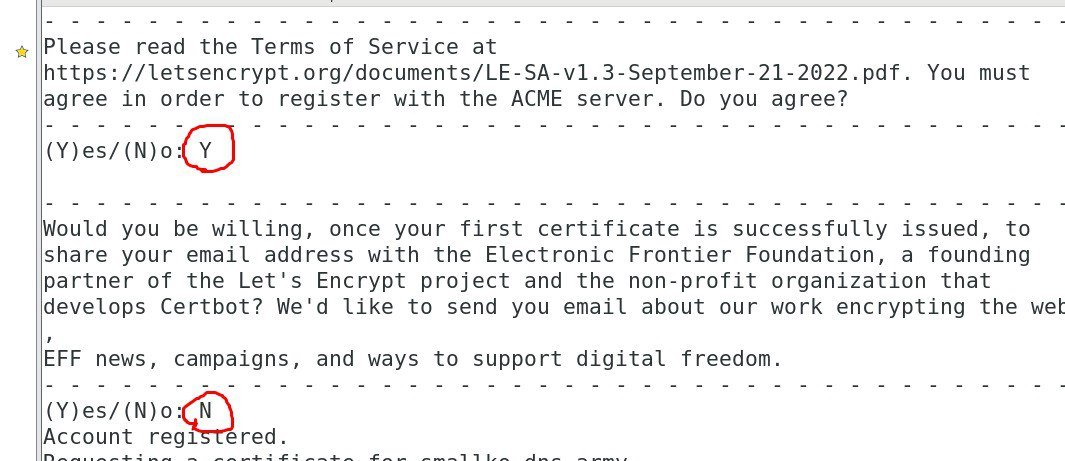
3. 申請憑證
`[root@mycentos7-1 ~]# certbot certonly --webroot -w /var/www/html/ -d yourdomain.dns.army --email youremail`

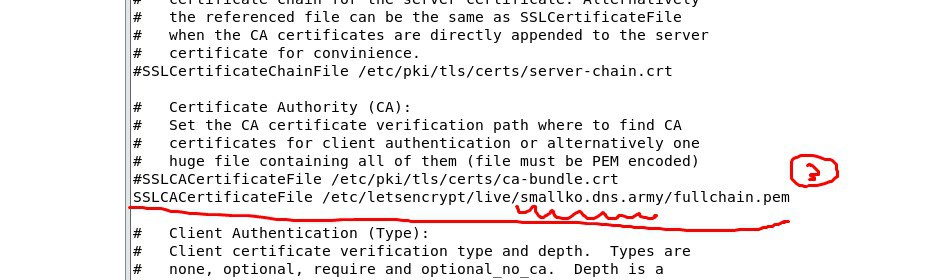
4. 設定授權檔案
5. 重啟HTTP
`[root@mycentos7-1 ~]# systemctl restart httpd`
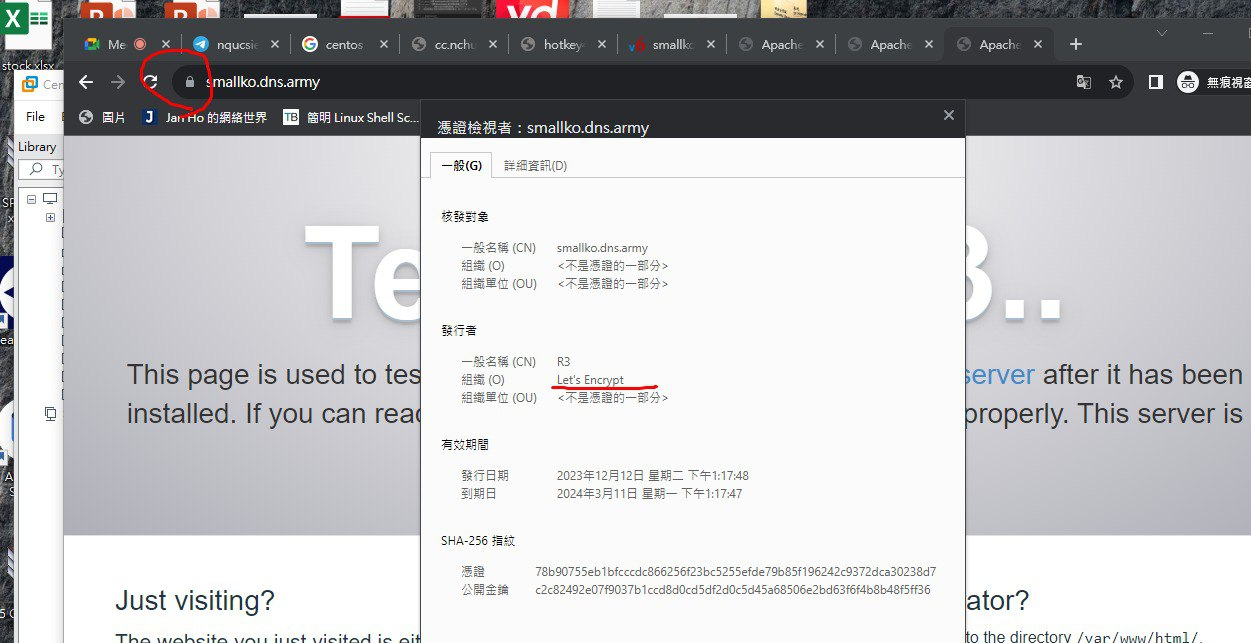
6. 結果
**線鎖頭而不是不安全時,及代表成功**
## 第十三週 (2023-12-19)
### 資料夾限制IP存取
1. 編輯conf檔
`[root@mycentos7-2 ~]# cd /etc/httpd/conf`
`[root@mycentos7-2 conf]# ls`
`[root@mycentos7-2 conf]# gedit httpd.conf`

2. 將權限改為可覆蓋所有指令
`AllowOverride None -> AllowOverride All`

3. 設定資料夾b可閱覽的權限(Windows-192.168.56.1)
```
<Directory /var/www/html/b>
Order deny,allow 先禁止,後允許的順序來處理存取控制
Deny from all 拒絕所有用戶對這個目錄或位置的存取
Allow from 192.168.56.1 允許特定IP地址的用戶對特定目錄或文件進行存取
</Directory>
```

4. 創建資料夾b,並創建文字檔
`[root@mycentos7-2 ~]# cd /var/www/html`
`[root@mycentos7-2 html]# mkdir b`
`[root@mycentos7-2 html]# cd b`
`[root@mycentos7-2 b]# echo "Hello Chieh" > hello.txt`

5. 測試結果

### 密碼登入下載檔案
1. 編輯conf檔
`[root@mycentos7-2 ~]# cd /etc/httpd/conf`
`[root@mycentos7-2 conf]# ls`
`[root@mycentos7-2 conf]# gedit httpd.conf`

2. 設定
```
<Directory /var/www/html/files>
Options Indexes 啟用目錄列表或目錄索引功能
AllowOverride AuthConfig 用於啟用或配置身份驗證機制
</Directory>
```

3. 創建files資料夾,並設定密碼
`[root@mycentos7-2 ~]# cd /var/www/html`
`[root@mycentos7-2 html]# mkdir files`
`[root@mycentos7-2 html]# cd files`
`[root@mycentos7-2 files]# htpasswd -c .htpasswd user
`
`[root@mycentos7-2 files]# htpasswd .htpasswd tom
`
`[root@mycentos7-2 files]# cat .htpasswd`

4. 創建.htaccess
`[root@mycentos7-2 files]# vim .htaccess`
`[root@mycentos7-2 files]# cat .htaccess`
```
AuthType Basic 指定所使用的身份驗證類型
AuthName "Private File Area" 指定身份驗證對話框中顯示的領域名稱
AuthUserFile /var/www/html/files/.htpasswd 指定存儲用戶認證信息的文件的路徑
Require valid-user 指示只有經過驗證的使用者才能訪問
```

5. 測試結果

* 查詢有哪些IP連入
`[root@mycentos7-2 httpd]# tail -n 5 acess log`

### FTP
1. 安裝FTP服務所需套件
`[root@mycentos7-1 ~]# yum install vsftpd -y`
2. 啟動FTP服務(安裝好後不會開啟要自己啟動)
`[root@mycentos7-1 ~]# systemctl start vsftpd`
`[root@mycentos7-1 ~]# systemctl status vsftpd`

3. 檢查它的port
`netstat -tunlp | grep vsftpd`

4. 開啟WinSCP並輸入IP

5. 測試結果
