
# Advanced Windows OS installations
<br />
## Introduction
Congrats Ironhacker! If you are in this section, it means you have successfully finished your prework!
Now, it is time for the final push to set yourself for success in the bootcamp - we will guide you through the installations of the tools you will be using in the class and later as a developer.
## Step #1: Install the latest [Node.js](https://nodejs.org/)
[Node.js](https://nodejs.org/) is becoming a requirement for today's Web development toolkit thanks to popular projects like Facebook's React. We'll discuss it in more detail during the course.
To install the latest version of Node.js, you simply need to visit [the official website of Node.js](https://nodejs.org/en/download/) and go to **Downloads**.
**Select the LTS version and then click on Windows Installer**. This will download the Setup Wizard for Node.js on your computer.
:::warning
:point_up: When installing NodeJS, you should download and install the **LTS** version. This is a stable version that will work with most packages.
:warning: Installing a version marked as **Current** may cause issues with older NodeJS packages that are hard to track down.
:::
Open the file and go through these installations steps:
- Accept the _Terms and Conditions._
- Continue clicking _Next_ in all iterations.
- Installing **Chocolately** is **optional**. This is because some npm modules need to be compiled from C/C++ to work with languages like Python, but we are not using them, so its installation is optional.
After finishing the installation, you can open your Git Bash Terminal (we will call it just Terminal from now on) and type the following command (without the `$`). You will see the actual Node version you just installed.
```shell
$ node -v
```
## Step #2: Install [MongoDB on Windows](https://docs.mongodb.com/manual/tutorial/install-mongodb-on-windows/)
[MongoDB](https://www.mongodb.com/what-is-mongodb) is the database we will be teaching in the course. Every app needs a database to store its information. There are many different databases, each with its pros and cons — more on this during the course.
To install MongoDB you need to go to the [MongoDB Windows Installation Website](https://docs.mongodb.com/manual/tutorial/install-mongodb-on-windows/) and follow these steps:
- Click on **Install MongoDB Community Edition.**
- Click on **MongoDB Download Center.** This will redirect you to another page.
- Click on the big green **Download** button. Same as with Node.js, this will download the MongoDB installer for Windows to your computer. Open the file and keep following the next steps.
- Accept the _Terms and Conditions._
- Select the _Complete option_ and click _Next_.
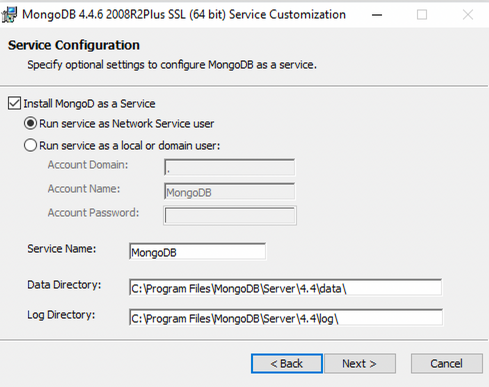
- In the **Service Configuration** step, you need to select the following options to enable MongoDB to start automatically as a background service:
<details style="font-size: 14px; cursor: pointer; outline: none;">
<summary> Check the image inside </summary>
<br>
</details>
- Select _Install MongoD as a Service_.
- Select the sub-option _Run service as Network Service user_.
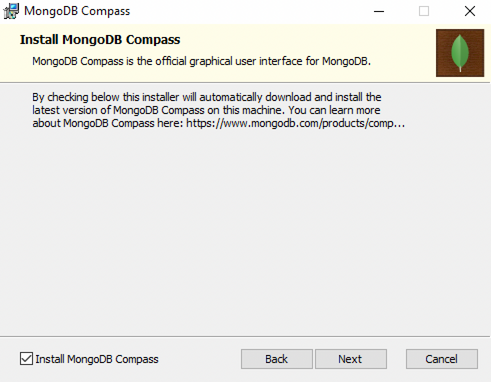
- In the **Install MongoDB Compass** step, check :ballot*box_with_check: the box \_Install MongoDB Compass*.
<details style="font-size: 14px; cursor: pointer; outline: none;">
<summary> Check the image inside </summary>
<br>
</details>
- Click _Next_ and _Install_ in the remaining steps.
After that, you will have MongoDB and MongoDB Compass installed on your machine.
<br>
### Using the mongo database
<br>
:::info
:checkered_flag: Now, when you start your computer, MongoDB will start the database automatically as a background service.
:::
We can access the MongoDB database in two different ways:
- Using _MongoDB Compass_ graphical user interface
- Using the _MongoDB shell_, terminal interface
<br>
#### Opening the MongoDB shell
<br>
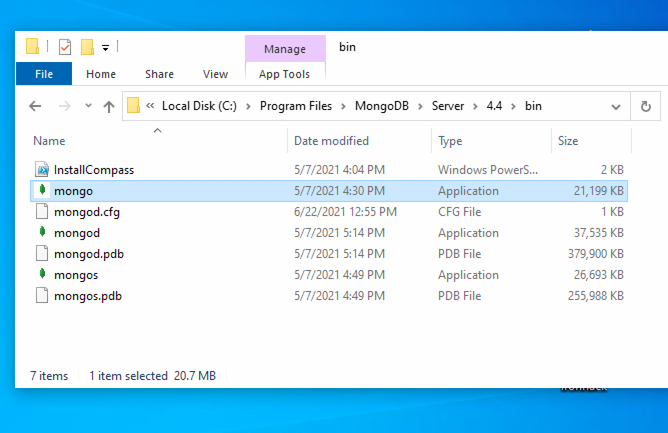
To open the _MongoDB shell_, you will need to do these steps:
- Go to your _Program Files_ in your _C:_ drive - the local disk
- In _Program Files_ go to the _MongoDB_ folder
- Inside the _MongoDB_ folder, follow this path `Server/4.4/bin`. The version number on your system (`4.4`) may be slightly different for the newer installations.
- Double-click on the file named **mongo** to open the _MongoDB shell_.
<details style="font-size: 14px; cursor: pointer; outline: none;">
<summary> Check the image inside </summary>
<br>
</details>
<br>
#### Opening the MongoDB Compass
<br>
To open the _MongoDB Compass_ graphical user interface, simply run the MongoDB Compass available on the Desktop or in the Windows start menu.
:::warning
:warning: It is important to take a note and have handy the above instructions for _Opening the MongoDB shell_ and _Opening the MongoDB Compass_. You will need these instructions later in the course when working with the databases.
:::
<br>
You are good to go. Good luck! :heart:
## Extra resources
- [Why passwords are not visible in the terminal?](https://askubuntu.com/questions/112069/nothing-shows-up-in-the-terminal-when-i-type-my-password)
 Sign in with Wallet
Connect another wallet
Sign in with Wallet
Connect another wallet