
# Basic Windows OS installations
<br />
## Introduction
This document will guide you through the process of installing all the necessary tools to be able to finish your prework successfully.
:::danger
:rotating_light: It is **absolutely essential** that your Windows user account **has Admin rights**. You won't be able to install and use everything you need without those rights. If you are using a work computer with limited privileges, contact your IT person.
:::
### Important to know beforehand
- **You won't be able to see the password as you type it in the terminal.**
Sometimes you will be prompted to type a password in the terminal for security reasons. Keep in mind one thing:
:::info
:closed_lock_with_key: **In the terminal, passwords are invisible.**
:::
This means that the _password is not going to be revealed_ as you type. The main reason for this is security. Passwords won't be visually represented, not even with asterisks. If asterisks are shown, then others can see the length of the password, and that could lead to easier guessing what could be the password.
- **Don't type the dollar sign (`$`) in the terminal when adding commands.**
:grin::question: What's up with those **dollar signs `$`** you might see before lines of code? Those are used to visually distinguish **terminal commands** from other kinds of code. **Remember, you shouldn't type the `$`**.
:::info
So for
```shell
$ some-command
```
you only have to write **`some-command`** in your terminal.
:::
If all this sounds pretty vague at this moment, do not worry. Soon you will exactly know what we are talking about.
Let's go!
## Step #1: Update your computer
We know, updating your computer is annoying. However, if you want to do great work, you need to keep your tools sharp. For computers, that means updating them. We will also use software that requires more recent versions of your operating system.
<br>
<details style="font-size: 14px; cursor: pointer; outline: none;">
<summary> Check the image inside </summary>
</details>
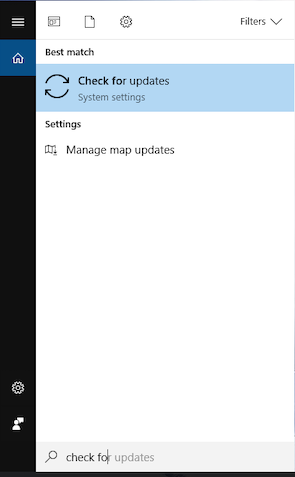
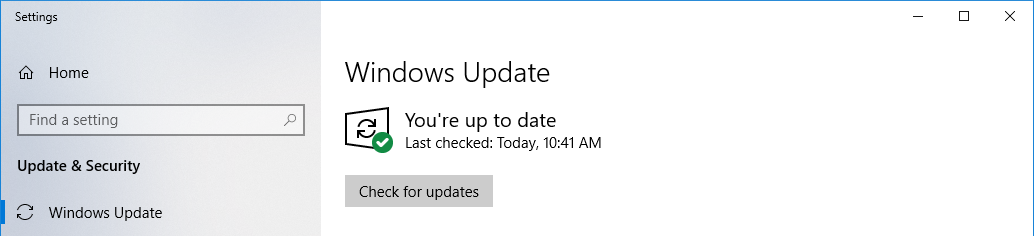
- Press the Windows key and type _check for_ to search.
- Click on the _Check for updates_ result.
- Follow the instructions to update and restart your computer.
- Repeat the previous three steps until you have no more updates.
<details style="font-size: 14px; cursor: pointer; outline: none;">
<summary> Check the image inside </summary>
<br>
</details>
## Step #2: Install [Visual Studio Code](https://code.visualstudio.com/)
**Visual Studio Code** (VS Code for short) is a source code editor, an application that facilitates writing code. It is not just a text editor—it has a bunch of features specially made for editing the source code of computer programs. This will be your fundamental programming tool when writing and editing code.
VS Code’s site will detect your [OS](https://en.wikipedia.org/wiki/Operating_system) automatically. Visit [https://code.visualstudio.com/](https://code.visualstudio.com/) and download it by clicking on the _Download_ button.
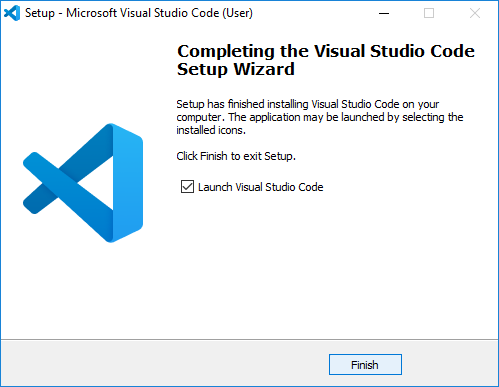
- Download the installer from [https://code.visualstudio.com/](https://code.visualstudio.com/).
- Click on the installer to open it.
- Follow the installation steps to install VS Code on your computer.
- When you click _Finish_, it will open the VS Code automatically.
<details style="font-size: 14px; cursor: pointer; outline: none;">
<summary> Check the image inside </summary>
<br>
</details>
## Step #3: Install [Google Chrome](https://www.google.com/chrome/)
Google may not be the best company for privacy, but their browser is one of the best for Web development.
To install Google Chrome, follow these steps:
- Visit [the Google Chrome website](https://www.google.com/chrome/).
- Click the _Download Chrome_ button.
- Download the Chrome installer by clicking on the _Accept and Install_ button.
- Once downloaded, run the installer to get Google Chrome installed.
## Step #4: Install [Git](https://www.atlassian.com/git/tutorials/install-git#windows)
**Git** is a version control system used for keeping track of changes you make to files and folders in your projects. Don't get confused; later we will talk about GitHub - while _git lives on your computer_, _GitHub is the online platform that serves as a "storage" where you will keep your work and be able to share it with your collaborators_.
To install Git on [Windows](https://www.atlassian.com/git/tutorials/install-git#windows), follow these steps:
1. Download the latest [Git for Windows installer](https://gitforwindows.org/).
2. When you have successfully started the installer, you should see the Git Setup wizard screen. Follow the _Next_ prompts to complete the installation. As default options are pretty sensible for most users you should stick to the default recommended settings provided by the installer.
3. Once you click _Install_, Git and Git Bash will be installed.
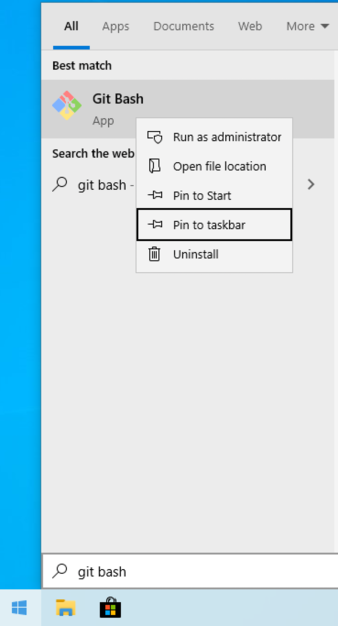
4. Once installed, press the Windows key and type _Git Bash_ to search.
5. Select _Git Bash_ by pressing the _right-click_, then select _Pin to taskbar_ to create a shortcut for easy access.
<details style="font-size: 14px; cursor: pointer; outline: none;">
<summary> Check the image inside </summary>
</details>
:::info
:computer: _Git Bash_ is the terminal emulator that allows you to use Unix terminal commands on Windows.
:dart: From now on you will be using _Git Bash_ as your default terminal to run the terminal commands.
:::
### Basic configuration
The first thing you should do after installing Git is to set your **user name** and **email address** (meaning, you are establishing yourself as a user).
:::info
This is important because every _git commit_ uses this information to identify the user who made changes in the document.
:::
You might ask yourself - what is _git commit_ but we promise - _this all will make much more sense when you get familiarized with git and start using it daily._
To do the above, let's open **Git Bash**.
You will be using the Git Bash terminal for accessing files and folders, as well as using **git** and other tools you will learn during the bootcamp.
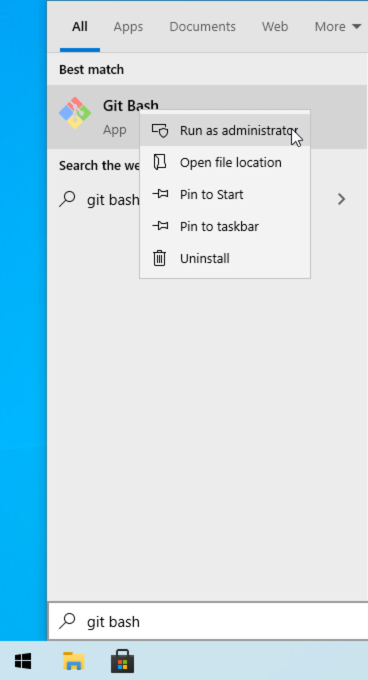
- Press the Windows key and type **_git bash_** to search.
- Right-click the **_Git Bash_** result to **_Run as administrator_**.
<details style="font-size: 14px; cursor: pointer; outline: none;">
<summary> Check the image inside </summary>
</details>
- In the Git Bash window, paste and run the following two lines, one after another: (**without the `$` and replacing "John Doe" and "johndoe@example.com" with your info**):
```bash
$ git config --global user.name "John Doe"
$ git config --global user.email "johndoe@example.com"
```
<br>
You are good to go! :heart:
 Sign in with Wallet
Connect another wallet
Sign in with Wallet
Connect another wallet