
# AXIOS | GET Request
## Learning Goals
In this learning unit, you will:
- know how to use Axios library to make HTTP GET requests to the 3rd party APIs,
- be able to use data received from web APIs in your app.
## Introduction
There are plenty of resources on the Internet that can be used in our applications, not only for retrieving data but for enabling functionalities too. Think of Google Maps, [MailChimp](https://mailchimp.com/), and many others.
To be able to communicate with external APIs, getting and posting data (basically performing all CRUD operations), we can use **axios**.
## Axios
Axios is a **promise-based** HTTP client for JavaScript which can be used in the frontend application (in browsers) and the Node backend. There are no limitations where and how to use Axios - from plain JavaScript applications to complex frontend frameworks (as you will see soon, we will be using Axios heavily when working with React). Using Axios in Node backend is possible, as you will learn how to do it now.
### Features
As stated in the official [axios](https://github.com/axios/axios) GitHub page, here is the full list of main features:
- Make [XMLHttpRequests](https://developer.mozilla.org/en-US/docs/Web/API/XMLHttpRequest) from the browser,
- make `HTTP` requests from [Node.js](https://nodejs.org/api/http.html),
- supports the [Promise API](https://developer.mozilla.org/en-US/docs/Web/JavaScript/Reference/Global_Objects/Promise),
- intercept requests and responses,
- transform requests and responses data,
- cancel requests,
- automatically transforms JSON into JS objects,
- client-side support for protecting against [XSRF](https://en.wikipedia.org/wiki/Cross-site_request_forgery).
## Installation
Axios can be installed with **NPM** or added through a **CDN**.
Since we are creating a simple page with just **HTML**, **JS** & **CSS** (no **node**) it will be easier and faster for us to use the **CDN** :wink:. If we were building a more complex app we would choose the **NPM** version.
**Using CDN**
```html
<script src="https://unpkg.com/axios/dist/axios.min.js"></script>
```
**Using NPM**
```bash
$ npm install axios
```
## Axios calls
### Axios GET call
A standard Axios call for any HTTP request is a method `axios()` that receives a JavaScript object that specifies different options of the request.
Since **Axios** are Promise based, we need to add the `.then()` to process the response, and the `.catch()` method in case there is an error in the response.
These are the most common options:
```javascript
axios({
method: 'The HTTP method (verb) we are going to use, e.g. GET, POST, PUT, etc.',
url: 'The url the server is going to receive.',
params: 'URL parameters to be sent with the request'
})
.then(response => {
// Here we can do something with the response object
})
.catch(err => {
// Here we catch the error
});
```
There are many other options we can configure in the **Axios** requests. You can check all of them in the [official Axios documentation](https://github.com/axios/axios#request-config). Check the official documentation to see the full list of available options.
Mostly, we will be using a bit shorter and cleaner syntax:
```javascript
axios.get(url)
.then(responseFromApi => /* do something with response */)
.catch(error => /* do something with the error */)
```
## API testing
The Internet is filled with free APIs available for developers. Google, YouTube, Yahoo, Instagram, Twitter, Flickr, LinkedIn, and many more huge and famous applications provide an open API to integrate into our platform.
To demonstrate how Axios actually works, we will use the **[restcountries](https://restcountries.com/) API**.
### The REST COUNTRIES API
The [restcountries](https://restcountries.com/) is a REST API created by Faydel Florez and acquired by [apilayer](https://apilayer.com/).
REST COUNTRIES provides a simple API for getting information about the world's nations via REST calls. These calls allow users to retrieve data about all available countries or a single country, based on the user's search query. The API gives information about the country's currency, its capital, calling code, region, sub-region, ISO 639-1 language, name, or country code.
If we visit [restcountries end points](https://restcountries.com/#api-endpoints-v2-all) we can see which REST endpoints are available for us to use to search for countries.
Some examples are:
- search by country name: `https://restcountries.com/v2/name/{name}`
- search by capital city: `https://restcountries.com/v2/capital/{capital}`
- search by currency: `https://restcountries.com/v2/currency/{currency}`
Let's test this in practice.
### API testing through the browser's navigation bar
If you copy any of the links into the browser's navigation bar and replace the part within `{}` with real value, you can test any endpoint.
After inputting this URL: https://restcountries.com/v2/name/spain, you should see something like this:
<br>
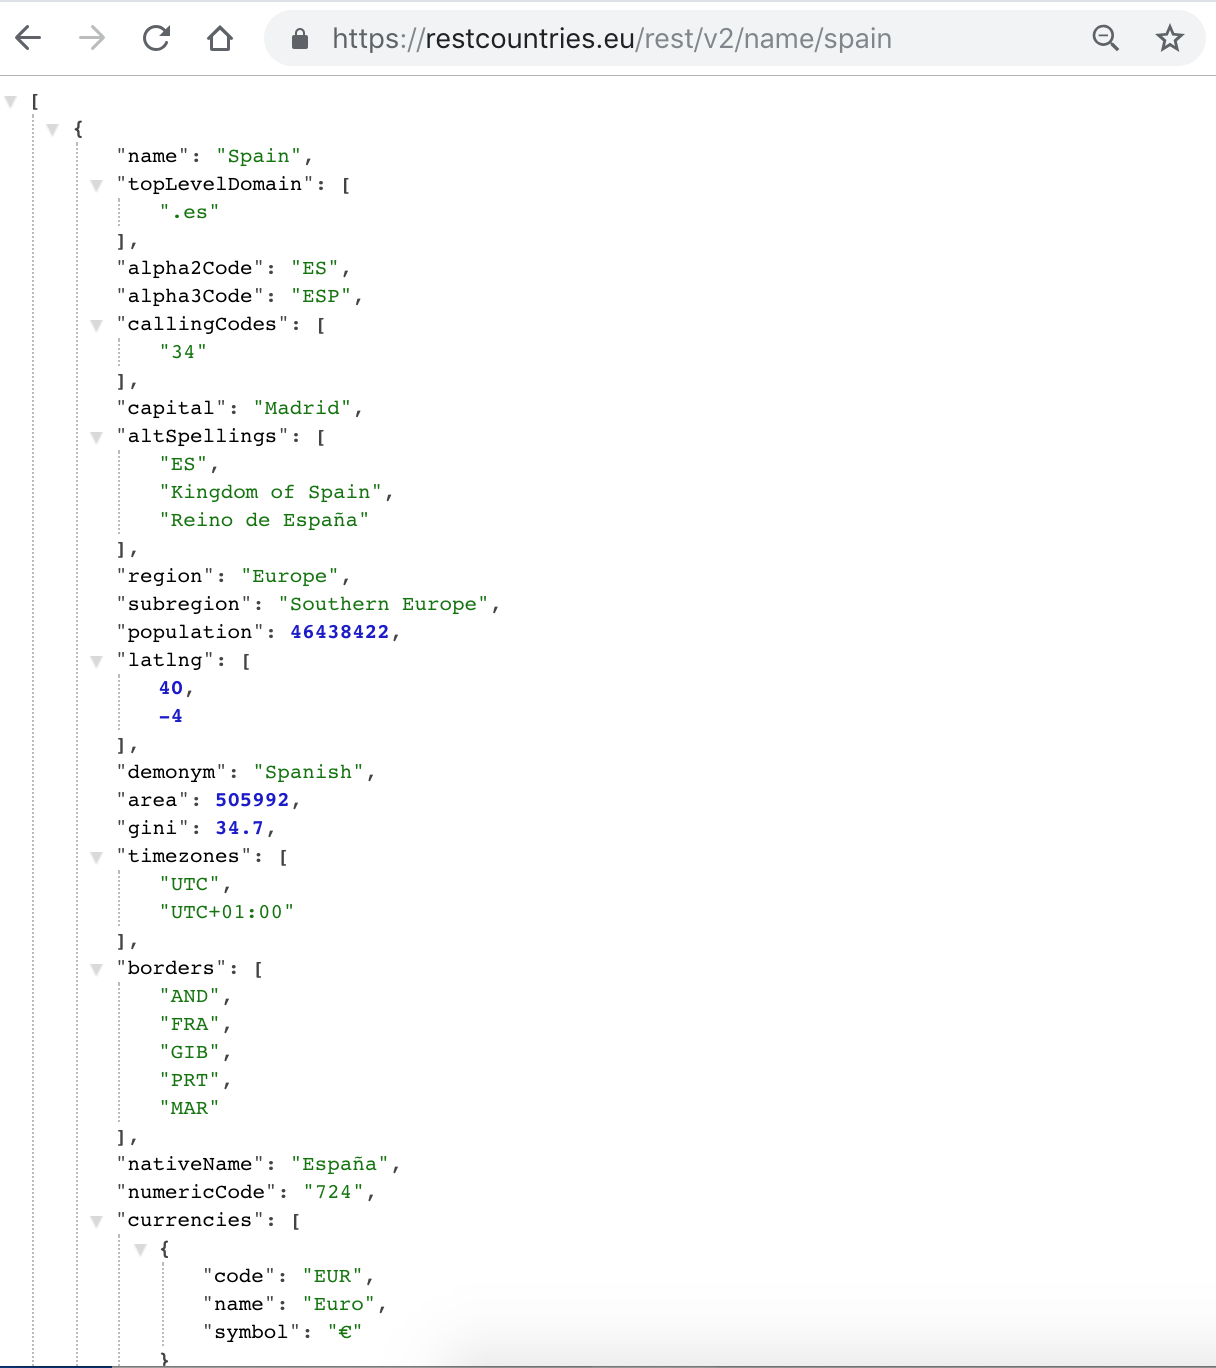
<br>
:::info
It might be possible that your browser shows a different and unformatted object. If that happens, try installing the **[JSON Viewer](https://chrome.google.com/webstore/detail/jsonview/chklaanhfefbnpoihckbnefhakgolnmc?hl=en)** extension.
:::
### Postman
[Postman](https://www.getpostman.com/docs) is a platform that allows us to test Web API requests. We could use it similarly to the browser, which we just demoed with the GET request. However, not just that, we can use any HTTP verb for the request, and we can handle any amount of parameters.
#### Installing Postman
Go to [the official website](https://www.getpostman.com) and download Postman. Make sure you select the right operating system for your computer.
We can use Postman as a Google Chrome extension too, but we will use the [GUI](https://en.wikipedia.org/wiki/Graphical_user_interface) version since it is more intuitive.
Alternatively, you can use [Insomnia](https://insomnia.rest) which is a platform very similar to Postman.
#### API testing with Postman - the GET request
Open Postman. You should see an interface similar to this:
<br>
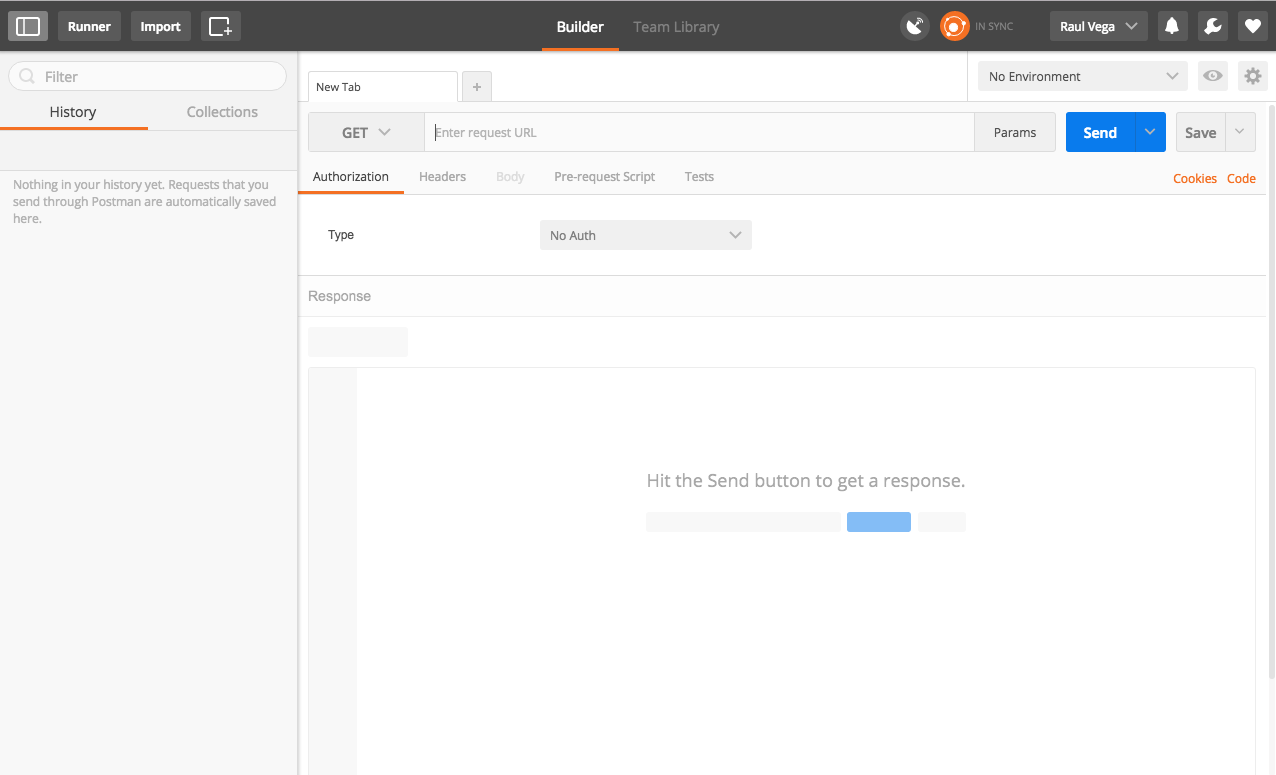
<br>
For now, we will focus on the navigation bar.
The _navigation bar_ simulates the browser's navigation bar:
- **_select_** input on the left indicates the HTTP verb you want to use in the request,
- **_params_ button** on the right is for specifying parameters in the request. If we use GET HTTP verb, it will add the parameters in the URL's _query string_,
- **_save_** button allows you to save the request, in case you want to repeat the same request. This is useful when you are introducing the same data repeatedly,
- **_send_** button will create the request and send it.
Let's input the request to search by a country name. We will use _spain_ as an example.
When the _send_ button is clicked, Postman will display the information related to the response in the panel below.
<br>
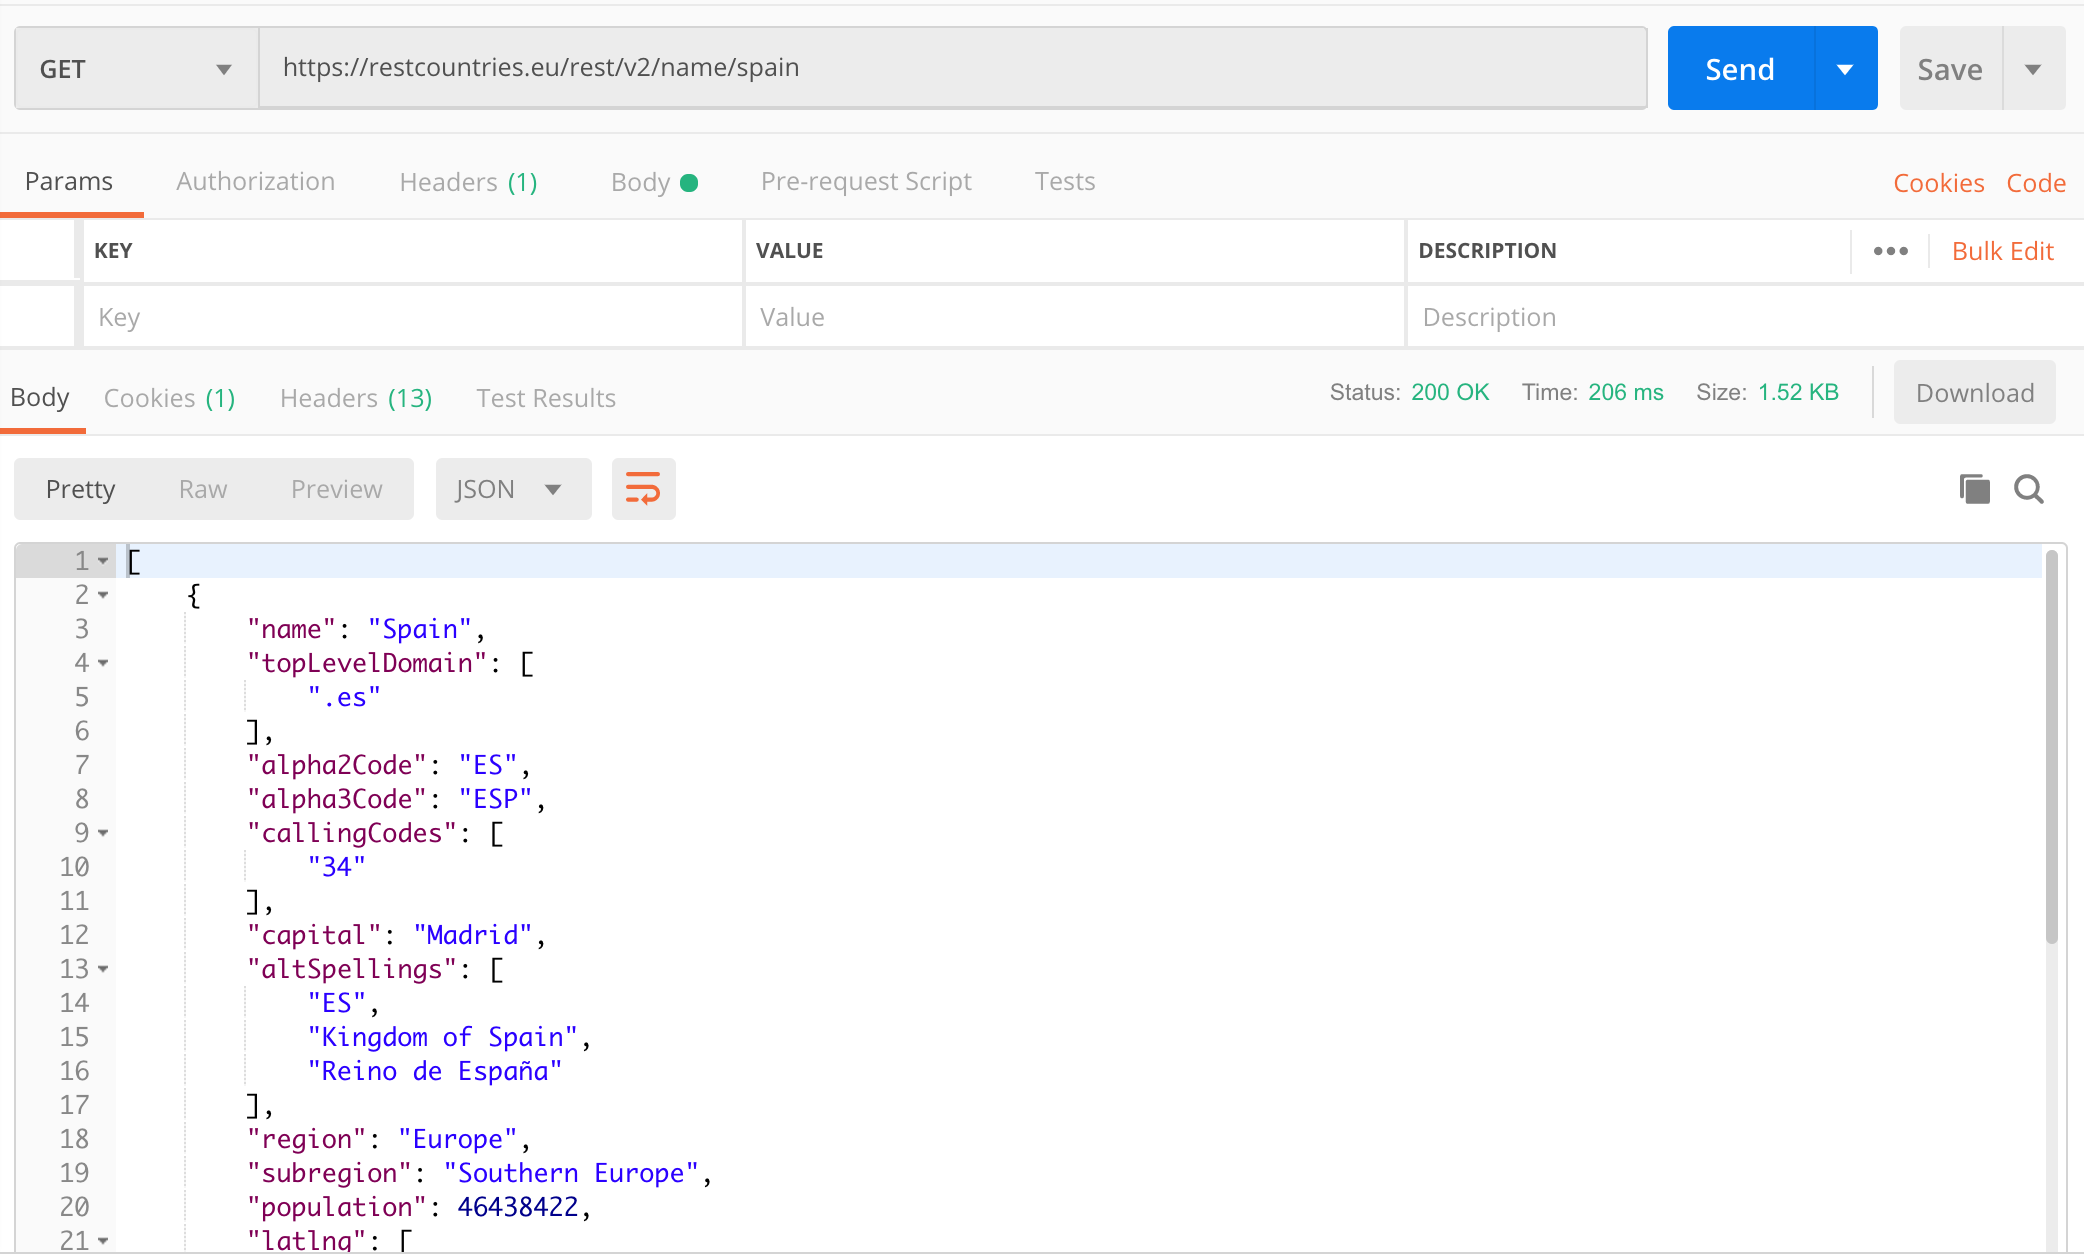
<br>
In the same way, as with REST Countries API, you can try to get the data from any other API and its available endpoints. Super easy, right? :100:
### Making a GET request to a REST API
Let's demo how to make an Axios GET request. We won't be using the Node environment to demo, but a simplified approach with pure JavaScript. Go ahead and create a folder named `rest-countries` and inside create two files: `index.html` and `index.js`.
```shell
$ mkdir rest-countries
$ cd rest-countries
$ touch index.html index.js
# the structure should look like this:
rest-countries
├── index.html
└── index.js
```
Now add this code to `index.html`.
```html
<!-- index.html -->
<!DOCTYPE html>
<html lang="en">
<head>
<meta charset="UTF-8" />
<meta name="viewport" content="width=device-width, initial-scale=1.0" />
<meta http-equiv="X-UA-Compatible" content="ie=edge" />
<title>Axios GET demo with Countries Rest API</title>
</head>
<body>
<h1>Countries Info</h1>
<div>
<input id="country-name-input" type="text" />
<button id="get-country-btn">Get the country</button>
</div>
<h2 id="country-name"></h2>
<p id="country-capital"></p>
<div>
<img id="country-flag" src="" height="200px" />
</div>
<script src="https://unpkg.com/axios/dist/axios.min.js"></script>
<script src="index.js"></script>
</body>
</html>
```
Notice that we did not put the input with the _id_ _country-name-input_ inside a _<form>_ element. The reason why is because the default behavior of the form element is to reload the page on submit. We will address later how to avoid this while keeping with the _W3C_ standard.
And now add some code to the `index.js`:
```javascript
// index.js
const getCountryInfo = countryName => {
axios
.get(`https://restcountries.com/v2/name/${countryName}`)
.then(response => {
console.log('Response from API is: ', response);
const countryDetail = response.data[0];
console.log('a single country details: ', countryDetail);
})
.catch(err => console.log(err));
};
document.getElementById('get-country-btn').addEventListener('click', () => {
const userInput = document.getElementById('country-name-input').value;
getCountryInfo(userInput);
});
```
If you input **Spain** and click the button, you will see this array of object(s) in the browser's console:
<br>
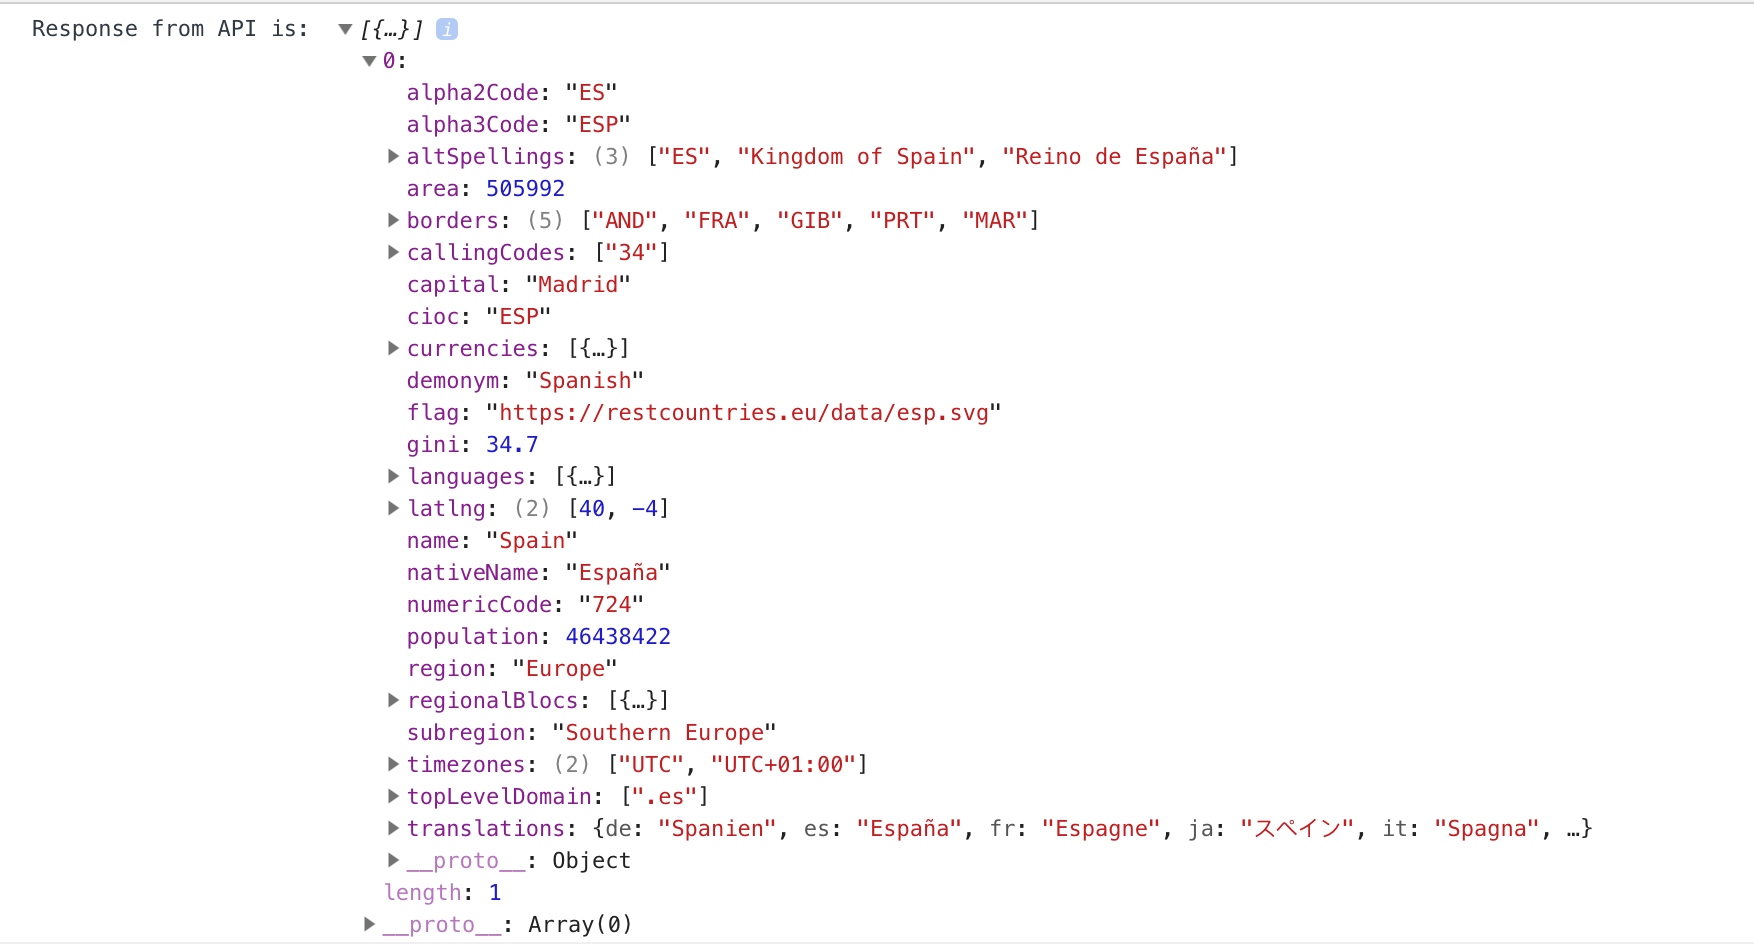
<br>
The cool thing about Axios is that **there is no page reload!** If you keep changing the countries. You will get the data without refreshing the page. As a reminder, after every HTTP request, the page is refreshed with a full new page to render. If you wish to test it, know that is it would be refreshed, the console would be empty.
Let's do an extra step and display the data in the browser, not just in the console. Update the code in `index.js` with the following:
```js
// index.js
const getCountryInfo = countryName => {
axios
.get(`https://restcountries.com/v2/name/${countryName}`)
.then(response => {
const countryDetail = response.data[0];
document.getElementById('country-name').innerText = countryDetail.name;
document.getElementById('country-capital').innerText = countryDetail.capital;
document.getElementById('country-flag').setAttribute('src', countryDetail.flag);
})
.catch(err => {
console.log(err);
err.response.status === 404 ? alert(`The country ${countryName} doesn't exist.`) : alert('Server error! Sorry.');
});
};
document.getElementById('get-country-btn').addEventListener('click', () => {
const userInput = document.getElementById('country-name-input').value;
getCountryInfo(userInput);
});
```
With just a dash of DOM manipulation knowledge, we were able to display in the browser the received data from the API. Isn't this amazing! Opens up so many opportunities for reusing cool APIs.
:::info
To get the full working code, check this **[repository](https://github.com/ironhack-labs/lesson-code-axios-get)**.
:::
#### Checking for understanding
Try to get the information hitting the endpoint that returns a response based on the `currency` that's officially being used.
## More practice
Let's keep practicing a bit! In this case, we will retrieve stock data from an [IEX Trading API](https://iextrading.com/developer/), and display it on a chart.
### ChartJS
For displaying our data, we will use a library called [ChartJS](http://www.chartjs.org/), that help us to print impressive charts we few lines of code.
<br>

<br>
### Set up
Create a `stock-chart` folder. Inside the folder, create an `index.html` and an `index.js`.
```bash
$ mkdir stock-chart
$ cd stock-chart
$ touch index.html index.js
└── stock-chart
├── index.html
└── index.js
```
Let's create a basic HTML structure in our `index.html` and don't forget to link our `javascript` file.
We will divide our assignment into two steps: (1) getting the data using the GET request and (2) print the chart that displays the data we got in step 1.
### Step 1: Get the data
To get the data from the API, we need to do a GET request using Axios, so go ahead and add the Axios CDN on the `<head>` tag of our HTML.
```html
<script src="https://unpkg.com/axios/dist/axios.min.js"></script>
```
Connect you `index.js` with your `index.html`. On our `index.js`, we should have the necessary code to make the GET request.
We will build our example around the [ALPHA VANTAGE](https://www.alphavantage.co/) which is a leading provider of free APIs for real-time and historical data on stocks, forex (FX), and digital/crypto currencies. The primary key to our success, like in every other case when working with APIs is the **[Alpha Vintage API documentation](https://www.alphavantage.co/documentation/)**.
Let's do it. Based on the docs, we have multiple options - do we want the daily data, weekly data, data at specified intervals, and so on. We will go for the **daily** option.
```javascript
// index.js
const key = 'demo';
const functionName = 'TIME_SERIES_DAILY';
const symbolName = 'MSFT';
const apiUrl = `https://www.alphavantage.co/query?function=${functionName}&symbol=${symbolName}&apikey=${key}`;
axios
.get(apiUrl)
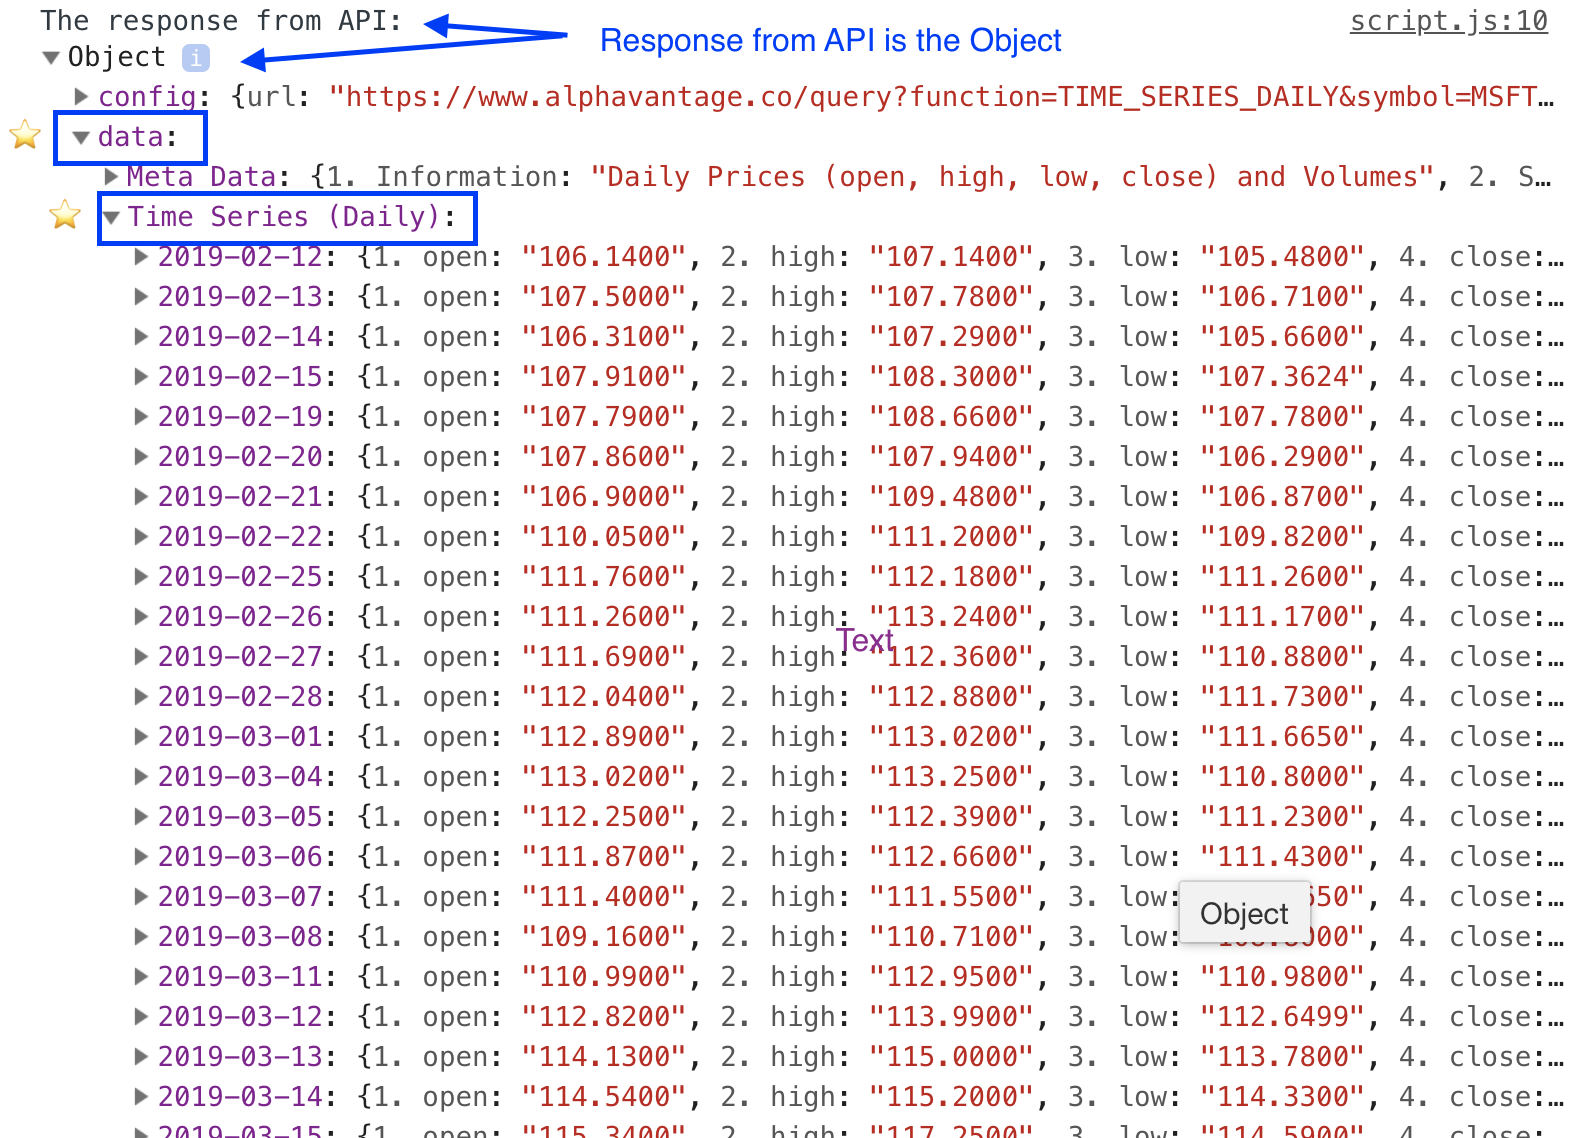
.then(responseFromAPI => console.log('The response from API: ', responseFromAPI))
.catch(err => console.log('Error while getting the data: ', err));
```
Now open your browser on `index.html` and open the console. Check the result you're getting. It should be something along these lines:
<br>
<br>
This was quite easy, don't you think so? :wink:
### Step 2: Add the ChartJS
We have several ways to add ChartJS to our project. In this case, we will use the CDN, so go ahead and add it to the `<head>` of our `index.html` file:
```html
<script src="https://cdnjs.cloudflare.com/ajax/libs/Chart.js/2.4.0/Chart.min.js"></script>
```
According to [ChartJS Documentation](http://www.chartjs.org/docs/latest/getting-started/) we also need to add a `canvas` in our HTML file, so place it inside the `body`.
```html
<canvas id="my-chart"></canvas>
```
We are ready to print our Chart. In the `index.js`, let's add a `printTheChart()` function. We will call this function after we get the data from the API and pass that data to function.
```javascript
axios
.get(apiUrl)
.then(responseFromAPI => {
printTheChart(responseFromAPI.data); // <== call the function here where you used to console.log() the response
})
.catch(err => console.log('Error while getting the data: ', err));
function printTheChart(stockData) {
const dailyData = stockData['Time Series (Daily)'];
const stockDates = Object.keys(dailyData);
const stockPrices = stockDates.map(date => dailyData[date]['4. close']);
const ctx = document.getElementById('my-chart').getContext('2d');
const chart = new Chart(ctx, {
type: 'line',
data: {
labels: stockDates,
datasets: [
{
label: 'Stock Chart',
backgroundColor: 'rgb(255, 99, 132)',
borderColor: 'rgb(255, 99, 132)',
data: stockPrices
}
]
}
}); // closes chart = new Chart()
} // closes printTheChart()
```
That is it! If you navigate to the `index.html` on the browser, you should be able to see the chart with the data:
<br>
<br>
As you may notice, on the `dataset` property of the chart, we can change the `backgroundColor` or the `borderColor`. We have several options to display the Chart. We encourage you to check the ChartJS documentation to customize it as much as you want.
:::info
To get the full code, check this **[repository](https://github.com/ironhack-labs/lesson-code-axios-get-with-chartjs)**.
:::
#### Checking for understanding
Create a chart that shows currency exchange rates of American Dollar (USD).
## Summary
In this lesson, you have learned about _axios_ and got familiar with the way they work asynchronously, making the **promise based** HTTP requests to any server. This server could be our server or any remote server.
We learned how to create Axios requests using `axios.get()` method.
Finally, we learned that with Axios, we could retrieve data which we can use in our views **without refreshing the page**.
## Extra Resources
- [AXIOS Docs](https://github.com/axios/axios)
- [Postman - Official documentation](https://learning.postman.com/docs/postman/launching-postman/introduction/)
- [ChartJS Docs](https://www.chartjs.org/docs/latest/)
 Sign in with Wallet
Connect another wallet
Sign in with Wallet
Connect another wallet