# 2020q3 Homework1 (lab0)
contributed by < `JimmyLiu0530` >
###### tags: `進階電腦系統理論與實作`
## 工具簡介
- 學習 [GNU/Linux 開發工具](https://hackmd.io/@sysprog/gnu-linux-dev)
- [Cppcheck](http://cppcheck.sourceforge.net/): 靜態程式碼分析工具
- [Valgrind](https://valgrind.org/): 動態程式分析工具
- 學習使用 Git 與 GitHub
- [clang-format](https://clang.llvm.org/docs/ClangFormat.html): 確保一致的程式風格
- 使用方式:
```shell
$ clang-format -i *.[ch]
```
- [Valgrind](https://valgrind.org/): 動態分析記憶體工具
- 使用方法:
```shell
$ make valgrind
```
- [AddressSanitizer ](https://github.com/google/sanitizers/wiki/AddressSanitizer): 強化執行時期的記憶體檢測
- 開啟方式:
```shell
$ make SANITIZER=1
```
詳細介紹請至[進階電腦系統理論與實作 lab0](https://hackmd.io/@sysprog/2020-lab0) 觀看
## 作業要求
用鏈結串列(linked list)來實作佇列(queue),依據指示著手修改 `queue.[ch]` 和連帶的檔案
- `q_new`: 建立新的「空」佇列
- `q_free`: 釋放佇列所佔用的記憶體
- `q_insert_head`: 在佇列開頭 (head) 加入 (insert) 給定的新元素 (以 LIFO 準則)
- `q_insert_tail`: 在佇列尾端 (tail) 加入 (insert) 給定的新元素 (以 FIFO 準則)
- `q_remove_head`: 在佇列開頭 (head) 移除 (remove) 給定的元素
- `q_size`: 計算佇列中的元素數量
- `q_reverse`: 以反向順序重新排列鏈結串列,該函式不該配置或釋放任何鏈結串列元素,換言之,它只能重排已經存在的元素
- `q_sort`: 以==遞增順序==來排序鏈結串列的元素。可參閱 [Linked List Sort](https://npes87184.github.io/2015-09-12-linkedListSort/) 得知實作手法
## 實作
### Queue structure
- `tail` 在`q_insert_tail`會提到它的用途
- `size` 在`q_size`會提到它的用途
```c=
typedef struct {
list_ele_t *head;
list_ele_t *tail;
int size;
} queue_t;
```
### Linked list element
```c=
typedef struct ELE {
/* Pointer to array holding string.
* This array needs to be explicitly allocated and freed
*/
char *value;
struct ELE *next;
} list_ele_t;
```
### 各函式開發流程
- **`q_new`**
- 建立一個空的佇列,若沒有足夠空間則回傳 NULL
```c=
queue_t *q_new()
{
queue_t *q = malloc(sizeof(queue_t));
if (!q)
return NULL;
q->head = NULL;
q->tail = NULL;
q->size = 0;
return q;
}
- `q_size`
- 需在 O(1) 時間下,回傳此佇列的大小
- 最直觀的方法就是從頭到尾算一遍 -> O(n)
- 思考: O(1) 代表`與佇列大小無關`,卻要算它的大小?
- 只能在每`新增`一個 node 時,計數器`+1`,每`刪除`一個 node 時,計數器`-1`,
而這裡的計數器就是 `queue_t` 中的 `size`
```c=
int q_size(queue_t *q)
{
if (!q || !q->head)
return 0;
return q->size;
}
```
- **`q_free`**
- 釋放佇列使用的所有記憶體空間
- `tmp` 用來記錄這次要釋放的空間
- 小心!!第 8、9 行順序不可顛倒
```c=
void q_free(queue_t *q)
{
if (!q)
return;
while (q->head) {
list_ele_t *tmp = q->head;
q->head = q->head->next;
free(tmp->value);
free(tmp);
}
free(q);
}
```
- **`q_insert_head`**
- 將新元素加到佇列的`前端`
- 先檢查 `q` 是否為 NULL,再檢查是否有足夠空間可配置
- 若記憶體不足無法成功配置,則收回之前給 `new` 的空間
- **第11行** `+1`是因為字串尾端會有 NULL 當作結束字符
- [snprintf](http://www.cplusplus.com/reference/cstdio/snprintf/) 功用在於將 `s 所指的字串`最多存入`(length-1)`個字元到 `newh->value 所指的 buffer` 中,而且會自動先將 buffer 清空,`s 所指的字串`補"\0"後才寫入
(補充)[c語言字串複製函式介紹](https://medium.com/@cashbooktw/c-%E8%AA%9E%E8%A8%80%E7%9A%84%E5%AD%97%E4%B8%B2%E8%A4%87%E8%A3%BD-94da3884dc6e):這是有關 strcpy、strncpy、sprintf 跟 snprintf的介紹跟常見的問題
- **第 19 行** 記得 size 值+1
- **第 21-23 行** 考慮到加入一個原本為空的佇列,需改變`q->tail`,否則加到前端是不需要改動 `q->tail`
```c=
bool q_insert_head(queue_t *q, char *s)
{
if (!q)
return false;
list_ele_t *newh;
newh = malloc(sizeof(list_ele_t));
if (!newh)
return false;
int length = strlen(s) + 1;
newh->value = (char *) malloc(length * sizeof(char));
if (!newh->value) {
free(newh);
return false;
}
snprintf(newh->value, length, "%s", s);
newh->next = NULL;
q->size++;
/*newEle is the first element in queue*/
if (!q->tail) {
q->tail = newh;
}
newh->next = q->head;
q->head = newh;
return true;
}
```
- **`q_insert_tail`**
- 思路與`q_insert_head`相似,但並非全抄!!!
- **第21-22行** 考慮到加入一個原本為空的佇列,需改變`q->head`,否則加到尾端是不需要改動 `q->head`
> 在跑 `make test` 時,這個function出現以下的錯誤提示:
> Segmentation fault occurred. You dereferenced a NULL or invalid pointer
> 我一直去跟上面 `q_insert_head` 函式對,明明都長一樣啊... 對!就是因為都長一樣才錯。後來再仔細畫圖跑過一次,原來是因為~~複製`q_insert_head`複製太高興~~,導致第24行
> ```c=
> q->tail->next = newElej;
> ```
> 忘記放到 else 中
```c=
bool q_insert_tail(queue_t *q, char *s)
{
if (!q)
return false;
list_ele_t *newEle;
newEle = malloc(sizeof(list_ele_t));
if (!newEle)
return false;
int length = strlen(s) + 1;
newEle->value = (char *) malloc(length * sizeof(char));
if (!newEle->value) {
free(newEle);
return false;
}
snprintf(newEle->value, length, "%s", s);
newEle->next = NULL;
q->size++;
// newEle is the first element in queue
if (!q->tail) {
q->head = newEle;
} else {
q->tail->next = newEle;
}
q->tail = newEle;
return true;
}
```
- **`q_remove_head`**
- 題目要求將刪除的字串複製到 `*sp`,最多複製 `bufsize-1` 個字元(**第6行**)
- **第7-10行** 跟上面提到的`q_free`函式一樣釋放空間
- 記得要將 `q->size` -1
```c=
bool q_remove_head(queue_t *q, char *sp, size_t bufsize)
{
if (!q || !q->head)
return false;
snprintf(sp, bufsize, "%s", q->head->value);
list_ele_t *tmp = q->head;
q->head = q->head->next;
free(tmp->value);
free(tmp);
q->size--;
return true;
}
```
- **`q_reverse`**
- 將佇列中的元素反向,又佇列是用`鏈結串列`實作出來的,所以這裡的反向其實就跟 [quiz1](https://hackmd.io/@JimmyLiu0530/Hkwvpkc4D/edit) 鏈結串列的 reverse 概念一樣
- **核心想法**: 將 `cursor` 視為指向 head 的前一個節點,`next` 視為指向 head 的後一個節點。不斷更新(往後挪)三個指標 cursor、head、next 直到 linked list 的尾端
- 與 `quiz1` 稍微不同的是**不用回傳**鏈結串列新的 head ,因為可以直接 `q->head = cursor` 作更新
```c=
void q_reverse(queue_t *q)
{
if (!q || !q->head)
return;
q->tail = q->head;
list_ele_t *cursor = NULL;
list_ele_t *head = q->head;
while (head) {
list_ele_t *next = head->next;
head->next = cursor;
cursor = head;
head = next;
}
q->head = cursor;
}
```
- **`q_sort`**
> 題目說明 "Sort elements of queue in ascending order",一開始不太清楚題目的意思,不知道是要`比字串的字母順序`還是`比字串的長度`。後來詢問同學的看法,他的解讀是`前者`,因此我就往`比較字串的字母順序`方面去寫了
- 因為有測 `worst case` 的測資,所以我選擇了在 worst case 仍保持 O(nlog(n))的 `Merge Sort`
- `Merge Sort` 核心觀念:
- 用 `divide and conquer` 方法,不斷將鏈結串列切半,再將這兩半遞迴的呼叫 `mergeSort`,直到無法在切為止
- 之後在呼叫 `merge` 函式將兩個==已排序==的鏈結串列合併成一個排序好的鏈結串列
- 在 `q_sort` 函式中呼叫 `mergeSort`,會在下方介紹
- **第6行** 更新鏈結串列的開頭
- **第8-9行** 更新鏈結串列的尾端。這邊之所以不從q->head 開始找而是從 q->tail 是因為有機會能`節省更新時間`。因為經過排序後,在最壞的情況下 q->tail 指向鏈結串列的開頭,此時就等於從 q->head 找。也就是說,q->tail 最爛的情況跟 q->head 一樣,所以平均來看,從 q->tail 會比從 q->head 找還來的快!
```c=
void q_sort(queue_t *q)
{
if (!q || !q->head || q->size == 1)
return;
q->head = mergeSort(q->head);
// update q->tail
while (q->tail->next)
q->tail = q->tail->next;
}
```
- **`mergeSort`**
- **第3-4行** 遞迴的邊界條件,(i.e. 此鏈結串列只有一個或沒有元素時)。
- **第7-18行** 如同上面所說,Merge Sort 會將鏈結串列`對半切`,此段落就是在做這件事
> 我原本用最徒法煉鋼的方法找中間節點,後來在網路上看到這個如此`優美`、`有品味`的作法,因而改成現在你現在看到的這個
- 它的想法就是一人每次走兩步,另一人走一步。當走兩步的人到尾端,則走一步的人就會在中間
- **第21-22行** 切半之後,分別遞迴呼叫 `mergeSort`
- **第24行** 最後在呼叫 `merge` 將兩已排序的鏈結串列做合併
```c=
list_ele_t *mergeSort(list_ele_t *head)
{
if (!head || !head->next)
return head;
// divide into two halves
list_ele_t *twoStep = head->next;
list_ele_t *oneStep = head;
while (twoStep) {
twoStep = twoStep->next;
if (twoStep) {
twoStep = twoStep->next;
oneStep = oneStep->next;
}
}
twoStep = oneStep->next;
oneStep->next = NULL;
// recursively call mergeSort
list_ele_t *ll = mergeSort(head);
list_ele_t *rl = mergeSort(twoStep);
// merge two ordered lists
return merge(ll, rl);
}
```
- **`merge`**
- 合併兩已排序的字串
- merge 有`遞迴`跟`迭代`兩種方法,因為如果用遞迴去寫,在 AddressSanitizer 分析下顯示 `stack-overflow`,因此後來乾脆改寫成迭代的方法
- **第7-12行** 當只剩`其中一邊`的鏈結串列還有元素,將它直接加入到 `res`
- **第14-17行** 去比較兩字串的字母順序 (strcmp),再呼叫 `MoveNode` 函式將擁有字母順序較小的字串加到 `res`
```c=
list_ele_t *merge(list_ele_t *ll, list_ele_t *rl)
{
list_ele_t *res = NULL;
list_ele_t **indirect = &res;
while (1) {
if (!ll) {
*indirect = rl;
break;
} else if (!rl) {
*indirect = ll;
break;
}
if (strcmp(ll->value, rl->value) <= 0)
MoveNode(indirect, &ll);
else
MoveNode(indirect, &rl);
indirect = &((*indirect)->next);
}
return res;
}
```
```c=
void MoveNode(list_ele_t **dest, list_ele_t **src)
{
list_ele_t *tmp = *src;
*src = tmp->next; // src sublist goes forward
tmp->next = *dest;
*dest = tmp;
}
```
## 執行自動評分程式
1. 先編譯程式碼,產生測試程式 `qtest`
```shell
$ make
```
2. 執行自動評分程式
```shell
$ make test
```
也可以查看 `qtest` 所使用的例子
```shell
$ make check
```
## 除錯(記憶體方面)
- 使用 `make SANITIZER=1` 去跑 `./qtest -f traces/trace-17-complexity.cmd` 時,發現出現以下有關記憶體的錯誤訊息:
```shell
==13138==ERROR: AddressSanitizer: global-buffer-overflow on address 0x55bcd42fe9e0 at pc 0x55bcd42ed9e5 bp 0x7ffe90de2710 sp 0x7ffe90de2700
READ of size 4 at 0x55bcd42fe9e0 thread T0
#0 0x55bcd42ed9e4 in do_option_cmd /home/jimmy/linux2020/lab0-c/console.c:368
#1 0x55bcd42ec572 in interpret_cmda /home/jimmy/linux2020/lab0-c/console.c:220
#2 0x55bcd42ecfb9 in interpret_cmd /home/jimmy/linux2020/lab0-c/console.c:243
#3 0x55bcd42edc64 in cmd_select /home/jimmy/linux2020/lab0-c/console.c:569
#4 0x55bcd42ee032 in run_console /home/jimmy/linux2020/lab0-c/console.c:628
#5 0x55bcd42eb0ad in main /home/jimmy/linux2020/lab0-c/qtest.c:772
#6 0x7fb8881120b2 in __libc_start_main (/lib/x86_64-linux-gnu/libc.so.6+0x270b2)
#7 0x55bcd42e888d in _start (/home/jimmy/linux2020/lab0-c/qtest+0x788d)`
0x55bcd42fe9e1 is located 0 bytes to the right of global variable 'simulation' defined in 'console.c:20:6' (0x55bcd42fe9e0) of size 1
'simulation' is ascii string ''
SUMMARY: AddressSanitizer: global-buffer-overflow /home/jimmy/linux2020/lab0-c/console.c:368 in do_option_cmd
Shadow bytes around the buggy address:
0x0ab81a857ce0: 00 00 00 00 00 00 00 00 00 00 00 00 00 00 00 00
0x0ab81a857cf0: 00 00 00 00 00 00 00 00 00 00 00 00 00 00 00 00
0x0ab81a857d00: 00 00 00 00 00 00 00 00 00 00 00 00 00 00 00 00
0x0ab81a857d10: f9 f9 f9 f9 00 f9 f9 f9 f9 f9 f9 f9 00 f9 f9 f9
0x0ab81a857d20: f9 f9 f9 f9 00 f9 f9 f9 f9 f9 f9 f9 00 f9 f9 f9
=>0x0ab81a857d30: f9 f9 f9 f9 00 f9 f9 f9 f9 f9 f9 f9[01]f9 f9 f9
0x0ab81a857d40: f9 f9 f9 f9 00 00 00 00 01 f9 f9 f9 f9 f9 f9 f9
0x0ab81a857d50: 04 f9 f9 f9 f9 f9 f9 f9 00 00 00 00 00 00 00 00
0x0ab81a857d60: 00 00 00 00 00 00 00 00 00 00 00 00 00 00 00 00
0x0ab81a857d70: 00 f9 f9 f9 f9 f9 f9 f9 01 f9 f9 f9 f9 f9 f9 f9
0x0ab81a857d80: 01 f9 f9 f9 f9 f9 f9 f9 04 f9 f9 f9 f9 f9 f9 f9
Shadow byte legend (one shadow byte represents 8 application bytes):
Addressable: 00
Partially addressable: 01 02 03 04 05 06 07
Heap left redzone: fa
Freed heap region: fd
Stack left redzone: f1
Stack mid redzone: f2
Stack right redzone: f3
Stack after return: f5
Stack use after scope: f8
Global redzone: f9
Global init order: f6
Poisoned by user: f7
Container overflow: fc
Array cookie: ac
Intra object redzone: bb
ASan internal: fe
Left alloca redzone: ca
Right alloca redzone: cb
Shadow gap: cc
==13138==ABORTING
```
根據它給的提示 `READ of size 4 at thread T0`,我去檢查 `console.c` 的第 368 行
```c=
int oldval = *plist->valp;
```
因為提示給 `READ`,而這行會執行讀的動作就只有 deference plist->valp 這個指標而已,因此我就朝這個方向走。在`console.c` 的第 365 行
```c=
param_ptr plist = param_list;
```
`plist` 會指向 `param_list` 這個全域變數指的空間,所以也就是說,`param_list` 指的這個空間有問題。
接下來一一去看所有會改動到 `param_list` 所指的空間的函式。發現在`add_param` 函式中也有 `int *valp` 這個參數,而且只有 `init_cmd` 這個函式會呼叫 `add_param` 函式,因此我就在 `init_cmd` 這個函式中發現了下面的問題。
這是`add_param`函式的 prototype:
```c=
void add_param(char *name,
int *valp,
char *doccumentation,
setter_function setter);
```
他的 valp 會指向一個 int 空間的位址,但在 `init_cmd` 函式中傳入的卻是
```c=
add_param("simulation", (int *) &simulation, "Start/Stop simulation mode",NULL);
```
強制從 bool 轉型到 int 的 `(int *) &simulation`,所以才會造成 `*plist->valp` 會 overflow。同理,下面 echo 的傳入值 `(int *) &echo` 也會造成 overflow。最後,將 `simulation` 跟 `echo` 都改成 `int` 就可以解決了!
## Git相關
### 說明 (有任何錯誤的地方還請指教)
這次作業讓我有機會去學習如何去使用 git。Git 是一個版本控制系統,簡單來說就是能紀錄檔案的修改內容、修改者、修改時間...等資訊,不管是讓自己或是其他合作的人能清楚了解檔案的來龍去脈,而 Github只是使用 Git 為核心基礎的雲端服務平台。
還有一些 GUI 工具來讓我們更了解或是更方便使用 git,像是 [SourceTree](https://www.sourcetreeapp.com/) 跟 [GitHub Desktop](https://desktop.github.com/)
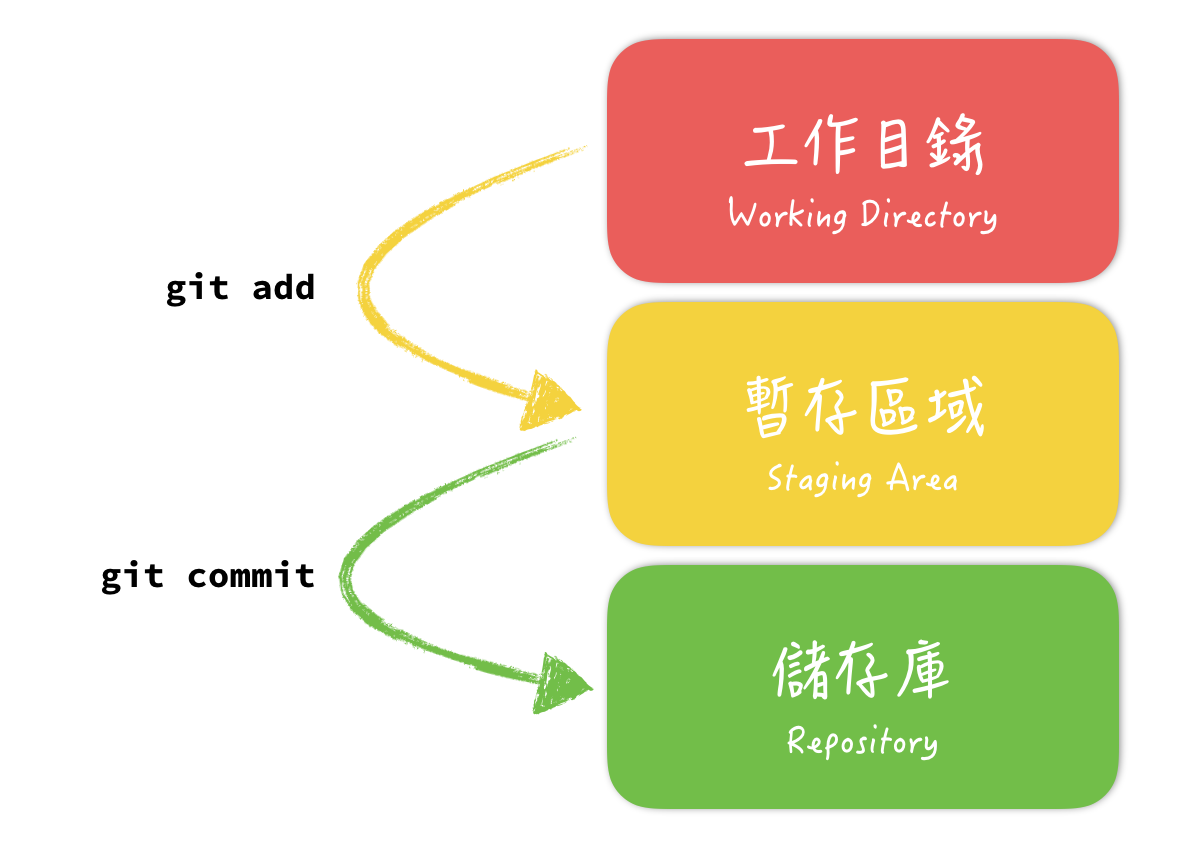
說明 git add 跟 git commit 的作用
### 指令
以下是我在這個作業使用到的 git 指令:
- 把修改過的檔案從工作目錄加入到暫存區
```shell
$ git add [Filename]
```
- 把修改過的檔案從暫存區加入到儲存庫,並記錄 commit message ([如何寫一個 Git Commit Message](https://blog.louie.lu/2017/03/21/%E5%A6%82%E4%BD%95%E5%AF%AB%E4%B8%80%E5%80%8B-git-commit-message/))
```shell
$ git commit -a
```
- 將本機 repository 和遠端 Github repository 同步
- 打開空的 repository,Github 會指示你如何將本機 repository 的 remote 設定為遠端的 repository 目錄,並輸入以下命令,即可連線並把目前的 repository 同步到 Github 上面了。
```shell
$ git remote add origin git@github.com:你的帳號名稱/你的專案名稱.git
$ git push -u origin master
```
- 將 Commit 送出去
- 將本地端的 master branch 與遠端的 master branch 作 fast-forward 合併
- 如果出現 [rejected] 錯誤的話,表示你必須先作 pull。
```shell
$ git push
```
- 從遠端更新
- 先 git fetch 遠端的 branch,然後與本地端的 branch 做 merge,產生一個 merge commit 節點
```shell
$ git pull
```
- clone 其他使用者專案
```shell
$ git clone https://github.com/Username/repository.git
```