# Introduction
- What is OO
- Why learn OO
- [Example](https://www.canva.com/design/DAGbDMnYmks/Be1tmFOVpqubOsY71vo4jg/edit?utm_content=DAGbDMnYmks&utm_campaign=designshare&utm_medium=link2&utm_source=sharebutton)
Note:
[clang-uml](https://github.com/bkryza/clang-uml)
[plantUML web editor](https://www.plantuml.com/plantuml/umla/SoWkIImgAStDuNBCoKnELT2rKt3AJx9IS2mjoKZDAybCJYp9pCzJ24ejB4qjBk42oYde0jM05MDHLLoGdrUSoeLkM5u-K5sHGY9MGw6ARNHryQb66EwGcfS2T300)
[github](https://github.com/JeffBla/art-center-local-sys/tree/main/src/models)
[cpp ref](https://cplusplus.com/reference/)
---
# 第一堂:函式與遞迴
---
- **學習目標:**
- 認識函式基本結構與使用方式
- 理解遞迴原理並學會實作遞迴函式
---
## 🔖 函式的基本概念
- 函式是一段可重複呼叫的程式碼區塊。
- 好處:
- 重用程式碼(Code reuse)
- 增進程式可讀性
- 容易維護與除錯
---
## 📌 函式的基本語法
```cpp
return_type function_name(parameter_list) {
// 函式主體
return value;
}
```
- return_type:回傳資料型態
- function_name:函式名稱
- parameter_list:參數清單(可有可無)
---
### 🚩 函式範例
```cpp
// 計算兩數之和
int add(int a, int b) {
return a + b;
}
int main() {
int result = add(5, 3); // <-- 5, 3 稱為 argument
cout << "5 + 3 = " << result; // 輸出 5 + 3 = 8
}
```
---
### 📗 函式參數傳遞方式
兩種參數傳遞方式:
- 傳值(`Call by value`):傳遞複製值給函式
- 傳參考(`Call by reference`):傳遞參考,直接修改原值
Note:
- 一般來說,call by ref 的方式較好,尤其對於龐大的資料結構如:long long[100000],避免重複資料複製,造成記憶體不足。
----
### 🚩 傳值範例
```cpp
void increment(int x) {
x = x + 1;
}
int main() {
int num = 5;
increment(num);
cout << num; // 輸出仍為 5
}
```
----
### 🚩 傳參考範例
```cpp
void increment(int &x) {
x = x + 1;
}
int main() {
int num = 5;
increment(num);
cout << num; // 輸出為 6
}
```
----
傳指標
```cpp
void increment(int *x) {
*x = *x + 1; // x = &num
}
int main() {
int num = 5;
increment(&num); // &num 是一個 int 指標
cout << num; // 輸出為 6
}
```
---
### 🎲 函式重載(`Overloading`)
- 函式重載允許同名稱函式透過不同參數進行區別:
```cpp
int square(int x) { return x * x; }
double square(double x) { return x * x; }
int main() {
cout << square(5); // int 版本
cout << square(3.5); // double 版本
}
```
---
## 🔄 遞迴函式(`Recursion`)
- 遞迴函式定義:
- 一個函式在函式內部直接或間接呼叫自己。
- 遞迴需具備:
- 終止條件(Base Case)
- 遞迴步驟(Recursive Step)
Note:
- 在 linux kernel 上通常不用 recursion,而是用 loop 或是展開,因為 kernel 能用的記憶體空間很小,recursion 容易造成記憶體空間不足,但優點是簡單易讀。
----
### 🚩 遞迴範例:階乘函式
階乘定義:$n!=n \cdot (n-1)!$
```cpp
int factorial(int n) {
if (n == 0) return 1; // Base case
int c = n * factorial(n - 1); // Recursive step
return c;
}
```
----
### 🎯 遞迴執行流程圖示
```text
factorial(3)
= 3 × factorial(2)
= 3 × (2 × factorial(1))
= 3 × (2 × (1 × factorial(0)))
= 3 × (2 × (1 × 1))
= 3 × (2 × 1)
= 3 × 2
= 6
```
---
### ⚠️ 遞迴使用注意
- 如迴圈一樣,必須設立明確終止條件
- 遞迴可能導致效能問題(Stack overflow)
Note:
- 在 linux kernel 上通常不用 recursion,而是用 loop 或是展開,因為 kernel 能用的記憶體空間很小,recursion 容易造成記憶體空間不足,但優點是簡單易讀。
---
### 🚩 經典練習:費氏數列
定義: $F(n)=F(n−1)+F(n−2)$
```cpp
int fib(int n) {
if(n <= 1) return n;
return fib(n-1) + fib(n-2);
}
```
----
實驗一下遞迴導致的 stack overflow
---
## 🛠️ 課堂練習 (Lab)
- 實作一個函式,計算兩數的最大公因數(`GCD`),並使用遞迴方式完成。
Note:
```cpp
int gcd(int a, int b) {
if(b == 0) return a;
return gcd(b, a % b);
}
```
---
## 💡 作業
- 撰寫一個函式,可判斷輸入的整數是否為質數 `Prime Number`。
- 用遞迴撰寫 `Fibonacci` 函式,並比較遞迴版與迴圈版的效率差異。
Note:
補充:`recursion` 的概念需搭配演算法與資料結構才好融會貫通,可以看一下 binary tree 的 preorder/inorder/postorder traversial
---
# 第二堂:陣列與向量
(Array & Vector)
---
- **學習目標:**
- 熟悉陣列與向量的基本觀念與操作
- 學習如何透過陣列與向量處理資料
---
## 🔖 陣列 `Array` 基本概念
- 陣列:一系列具有相同資料型態的元素集合。
- 優點:
- 存取元素速度快(使用索引直接存取)
- 缺點:
- 長度固定,無法動態調整
---
## 📌 陣列宣告與初始化
```cpp
// 宣告並初始化陣列
int arr1[5] = {1, 2, 3, 4, 5};
// 不指定大小,自動推導大小
int arr2[] = {1, 2, 3, 4, 5};
arr2[0] = 10; // 修改第一個元素
cout << arr2[2]; // 輸出第三個元素 (3)
```
----
### 利用 `Object-orient program` 技巧
```cpp
int arr3[5]{1, 2, 3, 4, 5};
cout << arr3[2];
```
---
### 🚩 陣列與迴圈搭配使用
使用迴圈快速操作陣列:
```cpp
int scores[5] = {80, 75, 90, 85, 70};
int sum = 0;
for(int i = 0; i < 5; i++) {
sum += scores[i];
}
cout << "平均成績:" << sum / 5.0;
```
---
### 🔖 二維陣列(多維陣列)
常用於處理矩陣資料:
```cpp
int matrix[2][3] = {
{1, 2, 3},
{4, 5, 6}
};
cout << matrix[1][2]; // 輸出 6
```
---
### 🔖 向量(Vector)基本概念
- 向量 (std::vector) 為動態大小的陣列
- 優點:
- 可自動調整大小
- 操作靈活且方便
- 📌 建議:一般情況多使用 vector 提高程式彈性。
---
## 📌 向量基本操作
```cpp
#include <vector>
using namespace std;
vector<int> v; // 宣告空向量
v.push_back(10); // 加入元素 10
v.push_back(20); // 加入元素 20
cout << v.size(); // 輸出元素個數 (2)
cout << v[0]; // 存取第一個元素 (10)
vector<int> vec{1,2,3}; // 宣告存有 1,2,3 的向量
```
---
### 🚩 遍歷向量的方法
方法一:使用 `for` 迴圈
```cpp
for (int i = 0; i < v.size(); i++) {
cout << v[i] << " ";
}
```
方法二:範圍 `for (Range-based for loop)`
```cpp
for(int num : v) {
cout << num << " ";
}
```
方法三:利用 `iterator`
```cpp
for (auto it = v.begin(); it!=v.end(); it++){
cout << v[i] << " ";
}
```
Note:
iterator 是 cpp 獨有的物件,利用此物件來優化/統整/自訂迴圈運算。
---
### 🎯 範例:找出向量中的最大值
```cpp
#include <vector>
#include <iostream>
using namespace std;
int main() {
vector<int> nums{2, 9, 5, 7, 4};
// vector<int> nums = {2, 9, 5, 7, 4} 也是等效 *注1
int maxVal = nums[0];
for (int num : nums) {
if (num > maxVal) maxVal = num;
}
cout << "最大值:" << maxVal;
}
```
> **\*注1**:由於其根本是指定,因此底層實作是先建立 `vector<int>{2, 9, 5, 7, 4}` 在指定給 `nums`,因此較慢
---
### 🚩 二維向量(Vector of Vectors)
```cpp
vector<vector<int>> matrix = {
{1, 2, 3},
{4, 5, 6}
};
matrix[1][1] = 10; // 修改元素
for (auto &row : matrix) {
for (int val : row) {
cout << val << " ";
}
cout << endl;
}
```
---
### 🛠️ 課堂練習 (Lab)
- 練習一:
- 將 vector 內的元素由小到大排序
Note:
```cpp
#include <vector>
#include <iostream>
#include <algorithm>
using namespace std;
void printVector(vector <int> &target){
for(auto v : target){
cout << v << " ";
}
cout << endl;
}
int main() {
vector<int> nums{2, 9, 5, 7, 4};
for(int i = 0; i < nums.size(); i++){
for(int j = 0; j < nums.size(); j++){
if(nums[i] < nums[j]){
swap(nums[i], nums[j]);
}
}
}
printVector(nums);
}
```
---
# 第三堂:指標
(Pointer)
---
- **學習目標:**
- 了解指標與記憶體管理的概念
- 學習指標與陣列的關係與動態記憶體配置
---
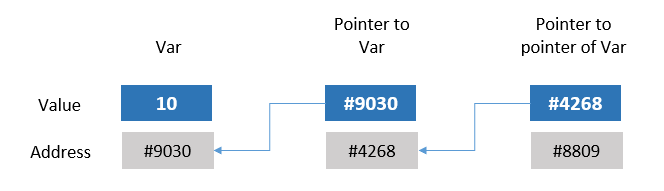
## 🔖 指標的基本概念
- 指標是一種變數,用來存放**記憶體位址**。
- 透過指標可以間接存取其他變數。
- 📌 優點:
- 有效處理動態記憶體
- 實現更複雜的資料結構
----
---
## 📌 指標變數宣告
指標的宣告方式:
```cpp
int *ptr; // 整數型別的指標
double *dptr; // 浮點數型別的指標
vector<int> *vec; // vector<int> 的指標 -> 物件的指標
```
---
### 🚩 取得記憶體位址(& 運算子)
```cpp
int num = 100;
int *ptr = # // 存放num的位址
cout << # // 輸出 num 的記憶體位址
cout << ptr; // 同上,ptr 存放 num 位址
```
---
### 🚩 存取指標所指內容(* 運算子)
```cpp
int num = 100;
int *ptr = #
cout << *ptr; // 透過指標取得 num 的值 (100)
*ptr = 200; // 修改 num 的值為 200
cout << num; // 輸出變為 200
```
---
### 🎯 指標與陣列的關係
陣列名稱本身即為位址:
```cpp
int arr[3] = {10, 20, 30};
int *ptr = arr; // arr即為 &arr[0]
cout << ptr[1]; // 20
cout << *(arr+2); // 30
```
---
### 📗 指標的算術運算
指標可透過加減運算移動到相鄰元素
```cpp
int arr[3] = {10, 20, 30};
int *ptr = arr;
ptr++; // 指向 arr[1]
cout << *ptr; // 20
ptr += 1; // 指向 arr[2]
cout << *ptr; // 30
```
---
### 進階:pointer to pointer
```cpp
#include <iostream>
using namespace std;
int main() {
// 建立三筆資料
const char *data1 = "Alice";
const char *data2 = "Bob";
const char *data3 = "Charlie";
// 建立一個陣列來模擬「下一個」的關係(鏈結)
const char **links[3];
links[0] = &data1; // 第 1 個指向 data1
links[1] = &data2; // 第 2 個指向 data2
links[2] = &data3; // 第 3 個指向 data3
// 遍歷所有資料
for (int i = 0; i < 3; ++i) {
cout << "節點 " << i + 1 << ": " << *(links[i]) << endl;
}
return 0;
}
```
----
### 進階: function as a pointer
- 在 C++ 中,函式本身也可以被當作一種「可以指向的東西」。這就像是指向變數的指標,不同的是它指向的是一個函式的起始位置,可以用來:
1. 傳遞函式當作參數
2. 動態決定要呼叫哪個函式
3. 實作 callback(回呼函式)
----
### 🧪 範例:簡單的函式指標
```cpp
#include <iostream>
using namespace std;
void greet() {
cout << "Hello!\n";
}
int main() {
void (*funcPtr)() = greet; // 宣告一個指向 greet 的函式指標
funcPtr(); // 呼叫函式(就像呼叫 greet 一樣)
return 0;
}
```
----
### 🧠 說明
- void (*funcPtr)() 表示一個「指向回傳 void、無參數」的函式指標。
- 把 greet 指給它,就能用 funcPtr() 呼叫。
- 和普通函式呼叫沒兩樣,但可以讓程式在執行時選擇呼叫哪個函式。
----
### 🧪 範例:計算機功能選單
```cpp
#include <iostream>
using namespace std;
int add(int a, int b) { return a + b; }
int sub(int a, int b) { return a - b; }
int mul(int a, int b) { return a * b; }
int divide(int a, int b) { return b != 0 ? a / b : 0; }
int main() {
// 定義一個陣列,裡面放四個函式指標
int (*ops[4])(int, int) = {add, sub, mul, divide};
int a = 10, b = 2;
int choice;
cout << "請選擇操作:0加 1減 2乘 3除: ";
cin >> choice;
if (choice >= 0 && choice < 4) {
cout << "結果為: " << ops[choice](a, b) << endl;
} else {
cout << "無效選項" << endl;
}
return 0;
}
```
---
### 🚩 動態記憶體配置(new 與 delete)
- 用於物件建立
- 動態配置可於執行期間決定大小:
```cpp
int *ptr = new int; // 動態配置整數記憶體
*ptr = 100;
cout << *ptr; // 100
delete ptr; // 釋放記憶體
```
----
```cpp
#include <iostream>
using namespace std;
class Student {
private:
string name;
int score;
public:
Student(string name):name(name){};
void setInfo(string n, int s) {
name = n;
score = s;
}
void printInfo() {
cout << name << " 成績: " << score << endl;
}
string getName(){
return name;
}
};
int main() {
Student *me = new Student("Jeff");
cout << me->getName() << endl;
}
```
----
## 重要
- new 必須要搭配 delete,因為 new 是在記憶體中分配空間,沒有用到時,必須手動釋放空間,以免空間占滿沒有記憶體使用。
---
### 🚩 動態配置陣列
```cpp
int n;
cin >> n;
int *arr = new int[n]; // 動態陣列配置
for(int i = 0; i < n; i++)
arr[i] = i + 1;
delete[] arr; // 釋放陣列記憶體
```
---
### 📌 指標與函式參數傳遞
- 透過指標傳遞參數:
- 可以把它看成一種 call by ref
```cpp
void swap(int *a, int *b) {
int temp = *a;
*a = *b;
*b = temp;
}
int main() {
int x = 5, y = 10;
swap(&x, &y);
cout << x << ", " << y; // 10, 5
}
```
---
### ⚠️ 常見指標錯誤
未初始化指標:
```cpp
int *p;
*p = 10; // 未初始化,危險!
```
使用已釋放的記憶體:
```cpp
int *p = new int;
delete p;
*p = 5; // 錯誤!
```
----
### Pointer 進階技巧
- 利用 pointer 改變取用元素屬性
```cpp
#include <iostream>
#include <bitset>
using namespace std;
int main() {
int a = 2147483647; // 2^31-1
char *c_1 = (char *)&a, *c_2 = c_1 + 1, *c_3 = c_1 + 2, *c_4= c_1 + 3;
cout << "Binary: " << bitset<32>(a) << endl; // 8 表示用 8 位元顯示
cout << "Pointer4: " << bitset<32>((unsigned char)*c_4) << endl;
cout << "Pointer3: " << bitset<32>((unsigned char)*c_3) << endl;
cout << "Pointer2: " << bitset<32>((unsigned char)*c_2) << endl;
cout << "Pointer1: " << bitset<32>((unsigned char)*c_1) << endl;
cout << "Pointer: " << bitset<8>((unsigned char)*c_4) << bitset<8>((unsigned char)*c_3)
<< bitset<8>((unsigned char)*c_2) << bitset<8>((unsigned char)*c_1) << endl;
return 0;
}
```
---
## 🛠️ 課堂練習 (Lab)
- 練習一:
- 建立一個 linkedlist 並印出儲存元素
Note:
```cpp
#include <iostream>
using namespace std;
// Define a node structure
struct Node {
int data;
Node* next;
};
void append(Node*& head, int value) {
Node* newNode = new Node{value, nullptr};
if (head == nullptr) {
head = newNode;
return;
}
Node* current = head;
while (current->next != nullptr) {
current = current->next;
}
current->next = newNode;
}
void printList(Node* head) {
while (head != nullptr) {
cout << head->data << " -> ";
head = head->next;
}
cout << "null" << endl;
}
void freeList(Node* head) {
while (head != nullptr) {
Node* temp = head;
head = head->next;
delete temp;
}
}
int main() {
Node* head = nullptr;
append(head, 10);
append(head, 20);
append(head, 30);
printList(head); // Output: 10 -> 20 -> 30 -> null
freeList(head); // Clean up memory
return 0;
}
```
{"title":"遞迴 vector 與 pointer","description":"C++課程教材|函式定義與遞迴函式","contributors":"[{\"id\":\"01487228-6720-47a9-875f-2f01b5d455ad\",\"add\":14800,\"del\":2740,\"latestUpdatedAt\":1753864677262}]"}