# 模型基本開發流程

模型開發流程主要可分四大步驟
1. Data Pre-processing: 資料處理
2. Training: 定義模型、訓練機制(損失函數)
3. Evaluate: 評估與校正模型
4. Inference: 推論
---
## naiive project learning

### 結構化程式說明
```
Tensorflow 2.3
```
1. Data Pre-processing
1-1. Data Labeling
x放入輸入資料(題目),y放對應的標籤(答案)
```python=
x = mnist.data.values
x = x.reshape(-1, 28, 28, 1)#x重塑成(第幾筆, 長, 寬, 單通道)四維tensor
x = np.pad(x, ((0,0),(2,2),(2,2),(0,0)), 'constant')#28x28(長x寬)零填充至32x32 Lenet模型要求
x = x/255.#縮放資料至0~1之間(可略)
y = np.array(mnist.target.values)
y = to_categorical(y, 10)#one-hot encoding
```
1-2. Data splitting
訓練資料 : 測試資料 = 7 : 3
```python=
from sklearn.model_selection import train_test_split
x_train, x_test, y_train, y_test = train_test_split( x, y, test_size=0.3, random_state=1)
#x_train, x_temp, y_train, y_temp = train_test_split( x, y, test_size=0.3, random_state=1)
#x_train, x_test, y_train, y_test = train_test_split( x_temp, y_temp, test_size=0.3, random_state=1)
```
2. Training
2-1. Model define
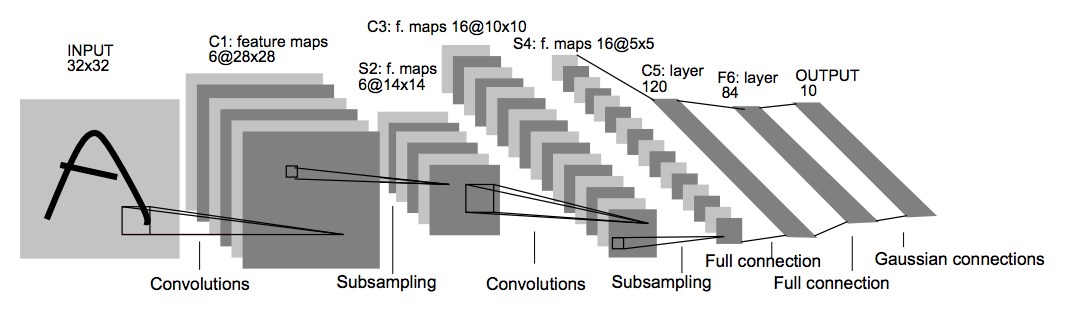
```python=
model = Sequential()
model.add(layers.Conv2D(filters=6, kernel_size=(5, 5), activation='relu', input_shape=(32,32,1)))
model.add(layers.AveragePooling2D())
model.add(layers.Conv2D(filters=16, kernel_size=(5, 5), activation='relu'))
model.add(layers.AveragePooling2D())
model.add(layers.Flatten())
model.add(layers.Dense(units=120, activation='relu'))
model.add(layers.Dense(units=84, activation='relu'))
model.add(layers.Dense(units=10, activation = 'softmax'))
```
2-2. Define loss & opt
loss: 計算模型作答與正確答案的誤差
opt: 模型修正的手段
metrics: 人監控模型的狀況(一般用精準度來觀察)
```python=
model.compile(loss="categorical_crossentropy", optimizer="adam", metrics=["accuracy"])
```
2-3. Training
```python=
model.fit(x_train, y_train, batch_size=batch_size, epochs=epochs, validation_split=0.1)
```
3. Evaluate
- evaluate
只看的到模型預測的誤差與精準度兩個值
```python=
test_loss, test_acc = model.evaluate(x_test, y_test)
print('test acc: {:.2f}%'.format(test_acc*100))
```
- predict(get probabilities)
單純輸出模型每次預測的機率值
就手寫辨識而言,每筆資料會有0~9共10個類別的機率值
```python=
y_prob = model.predict(x_test)
y_prob_argmax = np.argmax(y_prob, axis=1)#紀錄單筆資料機率值最大的index,以此作為模型預測的類別
# ex: y = [0.01, 0.01, 0.01, 0.01, 0.9, 0.01, 0.01, 0.01, 0.01, 0.02]
# print( np.argmax(y) )
# output: 4
```
- metrics
將模型預測的類別與正確的類別做一個10x10表格的統計結果
縱軸為正確類別,橫軸為模型預測的類別
```python=
from sklearn.metrics import classification_report, confusion_matrix
cm = confusion_matrix(np.argmax(y_test, axis=1), y_prob_argmax)
print(cm)
```
4. Inference
```python=
image_path = 'c:/Users/user/Desktop/test.png'
image_shape = (28, 28)
x_new = Image.open(image_path)
x_new = x_new.resize(image_shape)
x_new = np.array(x_new)
x_new = x_new/255
x_new = x_new[:,:,0:1]
x_new = np.expand_dims(x_new, axis=0)
x_new = np.pad(x_new, ((0,0),(2,2),(2,2),(0,0)), 'constant')
```
```python=
y_new_prob = model.predict(x_new)
y_new_prob_argmax = np.argmax(y_new_prob, axis=1)
```
```python=
print('ML: It is number :', y_new_prob_argmax[0])
plt.imshow(x_new[0], cmap='gray', interpolation=None)
plt.show()
```
### 補充說明 - 做AI專案過程中的必備技能
- 程式能力
- trace code能力
- 有效率的debug
- 框架&套件
- 頻繁上官網查指令
- keras: https://keras.io/guides/
- sklearn: https://scikit-learn.org/stable/user_guide.html
- 基本元素結構多半由numpy所組成
- 熟記numpy的tensor format、與常用指令
- python list與numpy 格式傳換
- 基本視覺化工具
- matplotlib需要用的時候,能快速google搜尋
- AI素養
- 參考書(魚骨頭、keras大神等聖經)
- YT(Hung-yi Lee): https://www.youtube.com/c/HungyiLeeNTU
### 完整code
basic_dl_flow.ipynb
{%gist JackyPro/10c5ee7ca09c1a5e3969d2f6dd682f7b %}
 Sign in with Wallet
Connect another wallet
Sign in with Wallet
Connect another wallet