###### `Front-End` `React` `Next.js` `Router`
# 【學習筆記】Next.js 路由系統:App Router vs Page Router
[](https://hackmd.io/Q8Wd_vHkSzCVXgtSVZw0Vw)
> Ref: [Next.js - Parallel Routes](https://nextjs.org/docs/app/building-your-application/routing/parallel-routes#streaming)
[toc]
## 前言
接續上篇文章 [【學習筆記】談談 Next.js:基於 React 的 SSR 框架](https://heidiliu2020.github.io/next-react-ssr/),初步瞭解 Next.js 這套框架的特性以及網頁渲染方式,本篇將實際建立 Next.js 專案,以及介紹 Page Router 與 APP Router 兩種路由系統的差異。
## Getting Started
詳細步驟可參考[官方文件](https://nextjs.org/docs/getting-started/installation),注意目前版本的 Next.js v14 需要安裝 [Node.js v18.17](https://nodejs.org/) 或以上版本才支援。
### nvm:Node Version Manager
若已經安裝過 Node.js 卻顯示版本不符,可透過 [nvm](https://github.com/nvm-sh/nvm) 這項 Node.js 版本管理工具,在不同專案中切換 Node.js 版本。
首先在終端機輸入下方指令安裝 nvm:
```
$ curl -o- https://raw.githubusercontent.com/nvm-sh/nvm/v0.39.1/install.sh | bash
```
接著透過下方指令,即可安裝與套用指定版本的 Node.js:
```=
$ nvm install v18.17.0
// 安裝指定版本 Node.js
$ nvm use v18.17.0
// 套用指定版本的 Node.js
```
也可透過以下指定確認目前版本,以及已安裝的版本:
```=
$ node -v
// 確認目前 Node.js 版本
$ nvm ls
// 列出所有本機端已安裝的 Node.js 版本
$ nvm ls-remote
// 列出目前遠端可使用的 Node.js 版本
```
### 專案建置
依照下方指令建立 next 專案,在後方加上 `--ts` 或 `--typescript` 即可支援 TypeScript 語法:
```=
$ npx create-next-app
or
$ npx create-next-app --ts
```
接著會依序出現下列幾個提問,分別如下:
```=
What is your project named? my-app
// 專案名稱,格式需為英文小寫
Would you like to use TypeScript? No / Yes
// 是否支援 TypeScript
Would you like to use ESLint? No / Yes
// 是否使用 ESLint(用來規範 Coding Style 的套件)
Would you like to use Tailwind CSS? No / Yes
// 是否使用 Tailwind CSS
Would you like to use `src/` directory? No / Yes
// 是否在 /app 外加一層 src 資料夾
Would you like to use App Router? (recommended) No / Yes
// 是否使用 App Router
Would you like to customize the default import alias (@/*)? No / Yes
// 是否自訂 alias 調整預設的 baseURL 匯入路徑
What import alias would you like configured? @/*
// alias 預設使用 @ 是否修改
```
建置完成後,初始專案架構主要分成以下三大類:
+ app:放置 components、pages 與 api 等檔案
+ layout.tsx:在多個頁面之間定義共用 UI,其狀態將會被保存,如:nav、header、footer 等元件
+ page.tsx:在資料夾底下需包含 `page.tsx` 檔案,才會被定義為一個 route segment,如:`app/blog/page.tsx`
+ globals.css:定義全域樣式
+ public:放置靜態檔案,如圖片等
+ 需要引入 `/public/next.svg` 檔案時,路徑可直接指向 `/next.svg`
+ 設定檔:包含 `next.config.js`、`tsconfig.json`、`package.json` 等用於設定專案配置的檔案
接著輸入 `cd my-app` 指令移動到專案根目錄,再以 `npm run dev` 指令運行開發伺服器,進入 `http://localhost:3000/` 即可看到初始頁面如下,也就是 `app/page.tsx` 的內容:
## Router System 路由系統
過去我們在 React 專案中,曾使用 `react-router-dom` 這項套件來實現路由功能,詳細可參考這篇筆記:[[week 22] React:用 SPA 架構實作一個部落格(一)- Router](https://heidiliu2020.github.io/react-router/)。
由於 Next.js 使用基於檔案系統的路由(file-system based router),會依照專案的檔案結構自動定義路由。
而根據版本不同,Next.js 提供兩種管理頁面路由的方式,分別是舊版本適用的 Pages Router 以及 v13 後推出的 App Router,兩者差異在於:
+ Pages Router
+ 定義頁面層級的路由
+ 所有元件為 React Client Component(客戶端元件)
+ 只能使用 Next.js 提供的預設規則,如:檔案名稱即為路徑
+ App Router
+ 定義應用程式層級的路由
+ 所有元件預設為 React Server Component(伺服器端元件)
+ 可自定義路由規則,如:使用正則表達式匹配特定路徑
如上所言,在 App Router 中所有元件預設為 React Server Component(RSC),意思是由伺服器將 React Component 準備好,再傳給 Client 顯示在畫面上。
而 RSC 的優缺點如下:
+ 優點
+ 整合後端操作,如存取資料庫(DB)、讀取檔案(File System)
+ 降低資料間的依賴關係,改善請求瀑布流(Waterfall)導致的效能問題
+ 降低 JS Bundle Size 以提升頁面效能
+ 缺點
+ 無法使用 React Hooks
+ 無法使用瀏覽器 API
+ 無法操作 DOM 事件監聽
面對上述缺點,Next.js 可依照使用情境不同,將元件定義為 Server Component 或 Client Component。舉例來說,當某個元件需要使用 Hooks 管理時,可透過在程式碼開頭加上 `'use client'` 來標示元件類型,該元件底下的子元件也會自動視為 Client Component。
但也因為如此,相較於 Page Router,新版的 App Router 學習曲線會較高,需瞭解 Server 如何運作,以及判斷哪些元件適合放在 Server 或 Client 端,在使用時須特別注意。
介紹完 Page Router 和 App Router 之間的差異,接著談談兩者專案架構,以及對應路由的方式。
### Page Router:基於檔案的路由系統
檔案架構示意:
```
└── pages
├── index.tsx
├── login.tsx
├── api
│ └── user.tsx
├── posts
│ └── [id].tsx
└── blog
├── index.tsx
└── setting.tsx
```
檔案與對應的頁面路由如下:
+ `pages/index.tsx` → `/`
+ `pages/blog/index.tsx` → `/blog`
+ `pages/blog/setting.tsx` → `/blog/setting`
+ `pages/posts/[id].tsx` → `/posts/[id]`
+ 檔名可作為動態路由的參數,透過 [useRoute](https://nextjs.org/docs/pages/api-reference/functions/use-router) 這個 Hook 取得 route 相關資訊
+ 呼叫 API:`page/api/user.tsx`
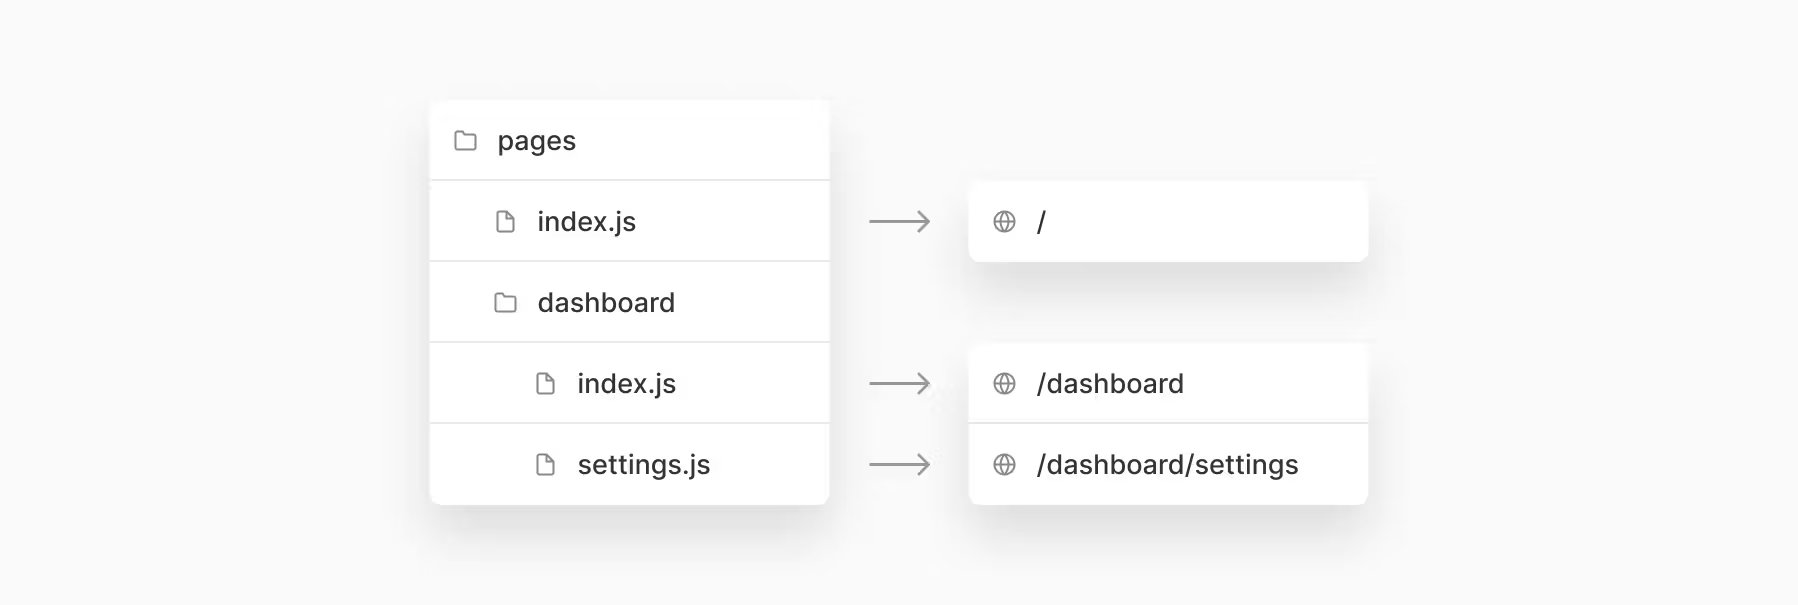
可參考官方部落格的這篇文章[《Layouts RFC》](https://nextjs.org/blog/layouts-rfc),包含以下檔案對應頁面路由的示意圖:
### App Router:基於目錄的路由系統
目錄架構示意:
```
└── app
├── blog
│ └── [slug]
│ └── page.tsx
├── login
│ └── page.tsx
├── @analytics
│ ├── page.tsx
│ ├── error.tsx
│ └── loading.tsx
├── api
│ └── user
│ ├── index.ts
│ └── route.ts
├── components
│ ├── loading.tsx
│ └── button.tsx
├── globals.css
├── layout.tsx
└── page.tsx
```
文件目錄與對應的頁面路由如下:
+ `app/page.tsx` → `/`
+ `app/login/page.tsx` → `/login`
+ `app/blog/[slug]/page.tsx` → `/blog/[slug]`
+ 目錄可作為動態路由的參數,並以 props 傳入元件
+ 呼叫 API:`app/api/user/route.tsx`
+ `@` 開頭的 folder 不會對路由造成影響:
+ `app/@analytics/page.tsx` 實際渲染的路由為 /,這個特殊的檔案夾是用來切分同一個路由底下的不同邏輯區塊。
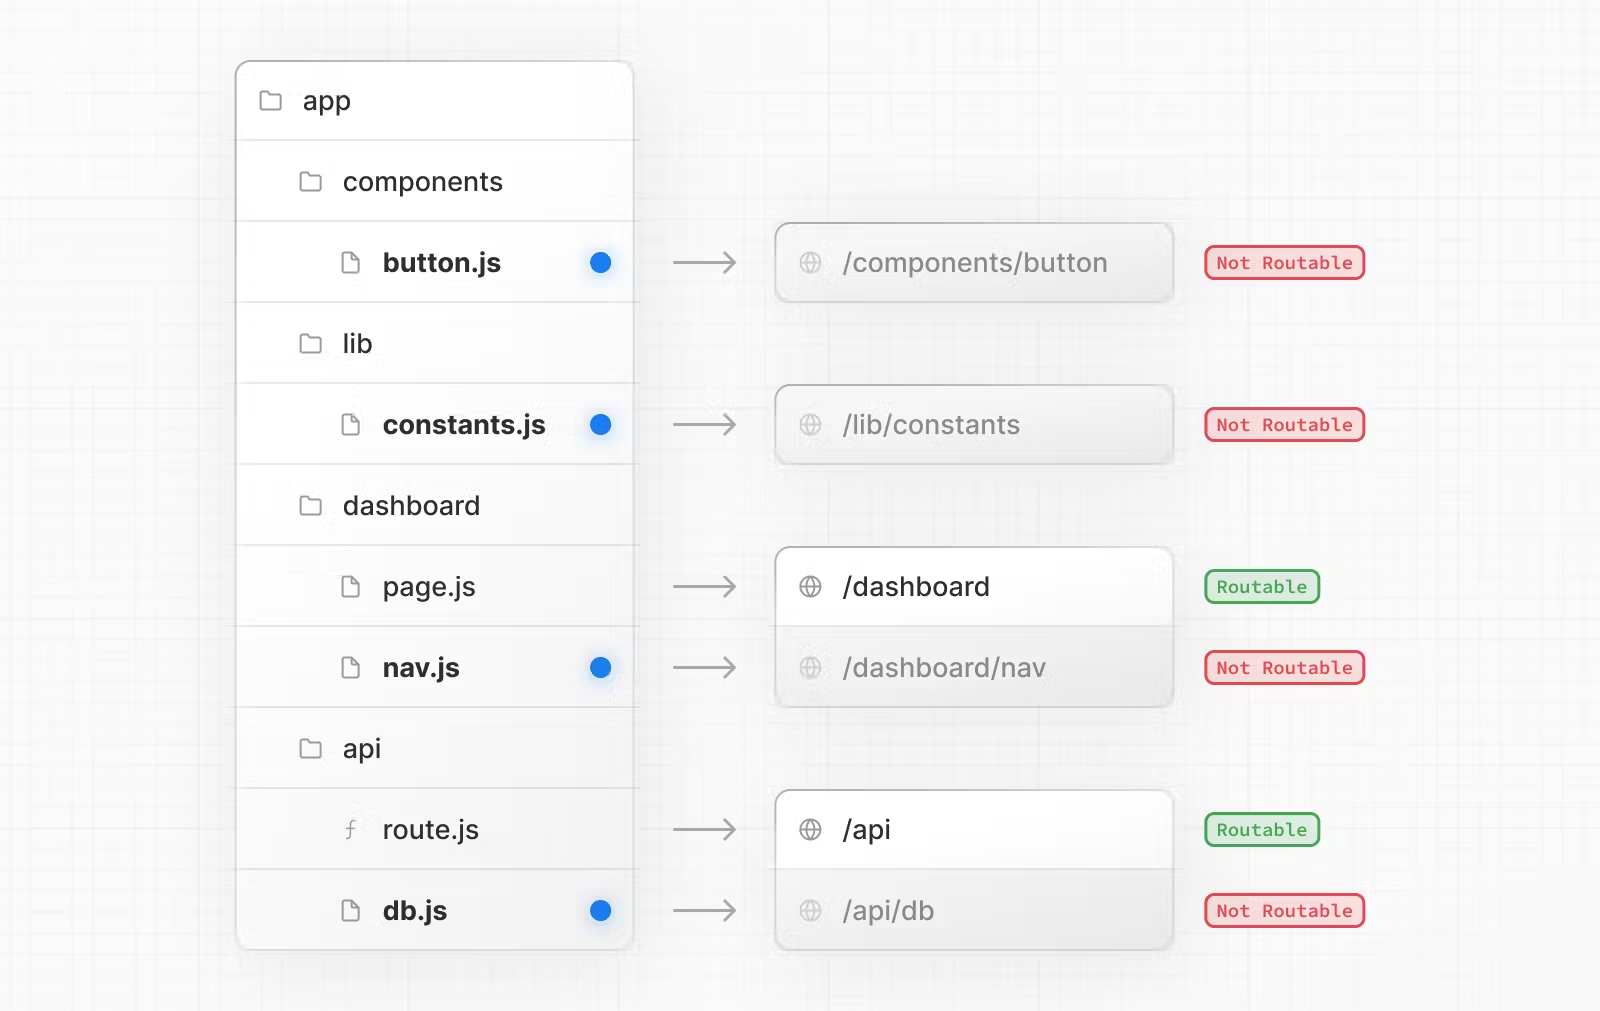
可參考[官方文件](https://nextjs.org/docs/app/building-your-application/routing),以下是目錄對應頁面路由的示意圖:
## File Convention 檔案規則
詳細的路由架構,可參考[官方文件](https://nextjs.org/docs/app/building-your-application/routing),也可以直接在頁面左上方切換查看 App Router 或 Page Router。
此外,Next.js 有設定[保留字](https://nextjs.org/docs/app/building-your-application/routing#file-conventions)給特殊檔案,以建立具有特定行為的 UI,以下副檔名為 `.js`、`.jsx`、`.tsx` 可視專案而定:
+ [layout.js](https://nextjs.org/docs/app/api-reference/file-conventions/layout):定義共用 UI 元件
+ [template.js](https://nextjs.org/docs/app/api-reference/file-conventions/template):類似 layout,處理需要重新渲染的 Layout UI
+ [page.js](https://nextjs.org/docs/app/api-reference/file-conventions/page):建立路由的主要 UI,並使路徑可公開存取
+ [route.js](https://nextjs.org/docs/app/api-reference/file-conventions/route):建立伺服器端 API 端點
+ [loading.js](https://nextjs.org/docs/app/api-reference/file-conventions/loading):在載入時顯示載入中 UI
+ [not-found.js](https://nextjs.org/docs/app/api-reference/file-conventions/not-found):處理 notFound error(HTTP 404)或任何未知路徑錯誤
+ [error.js](https://nextjs.org/docs/app/api-reference/file-conventions/error):顯示錯誤 UI,必須為 Client Components
+ [global-error.js](https://nextjs.org/docs/app/building-your-application/routing/error-handling):全域錯誤 UI
+ [default.js](https://nextjs.org/docs/app/api-reference/file-conventions/default):處理 [Parallel Routes(平行路由)](https://nextjs.org/docs/app/building-your-application/routing/parallel-routes) 遇到渲染問題時,用來替代顯示的 UI(fallback UI)
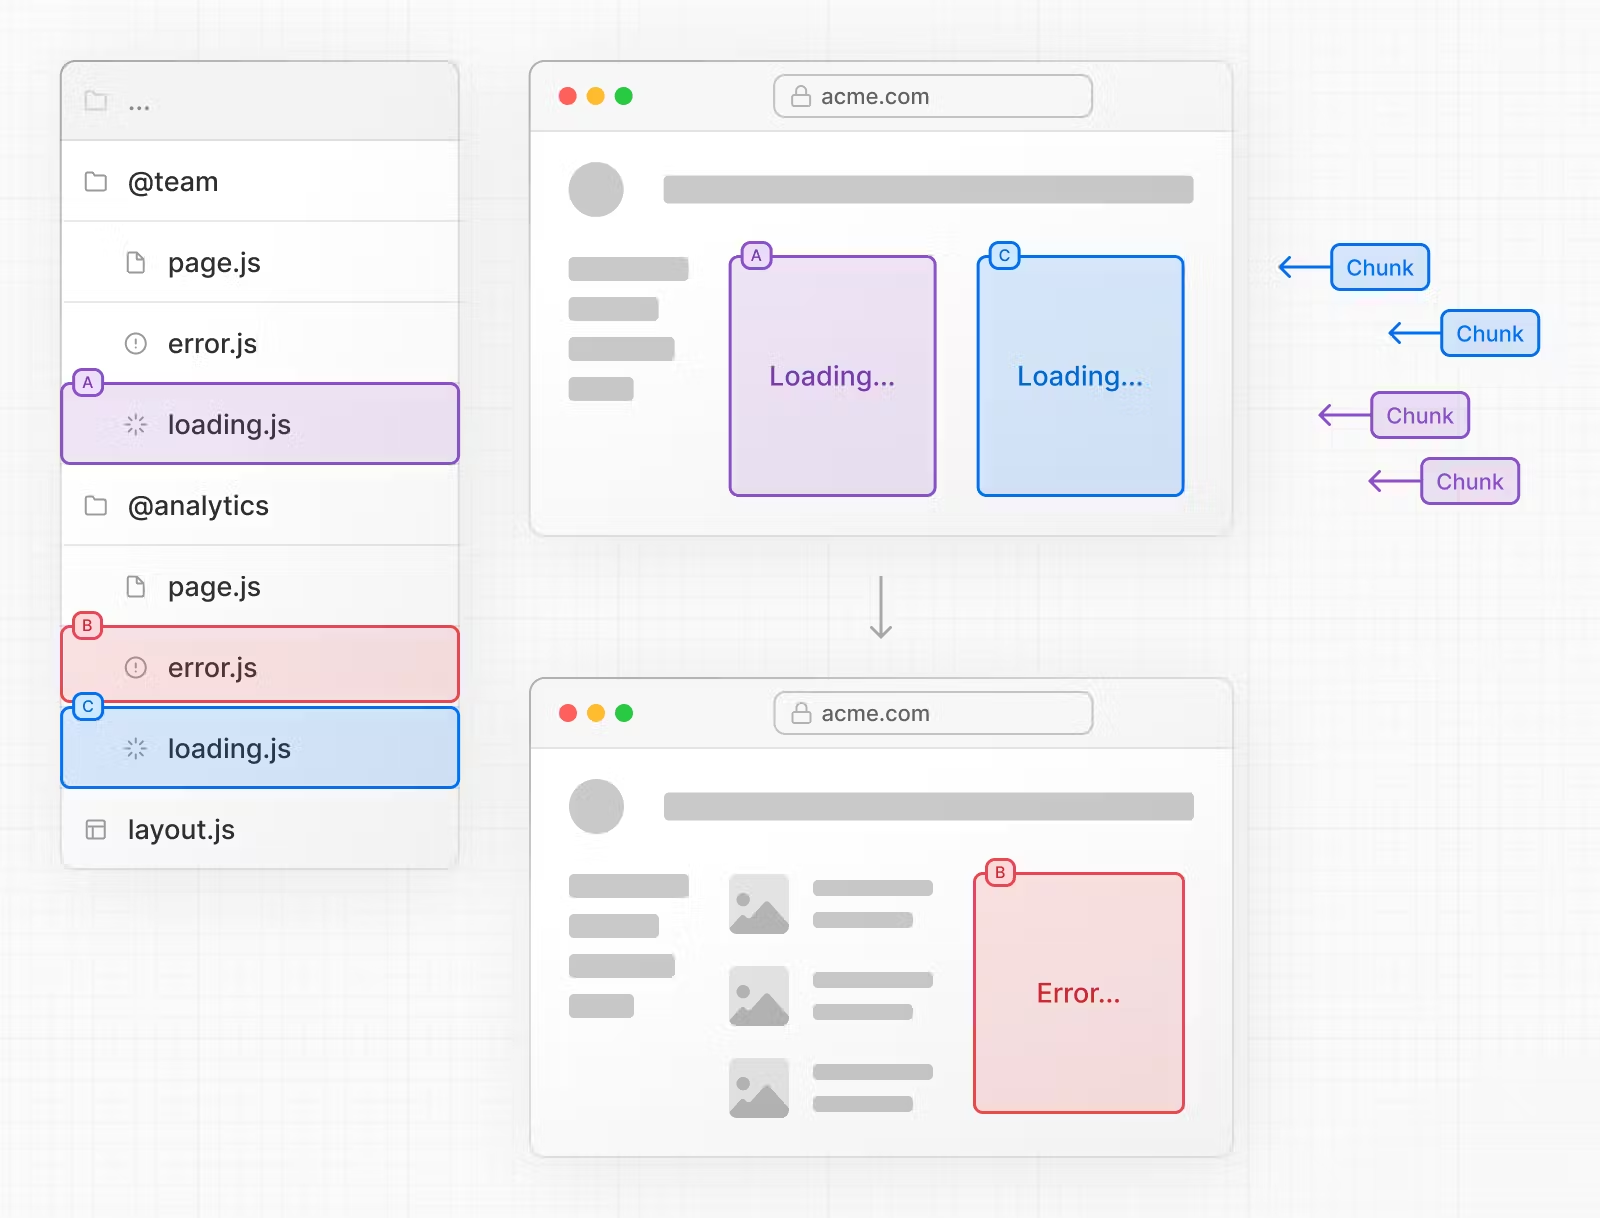
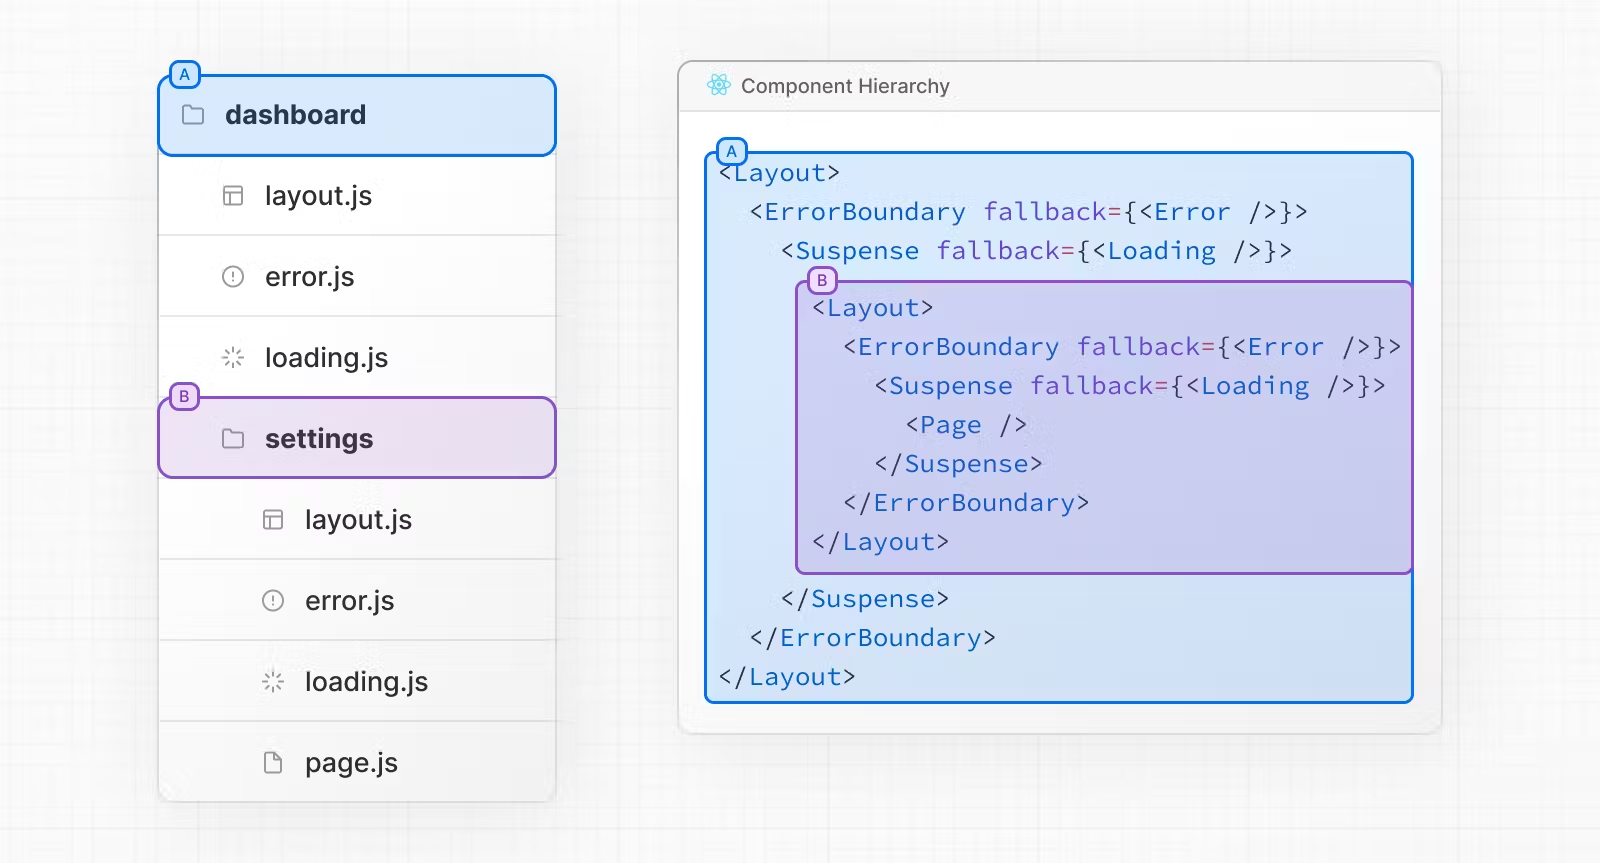
以下是官方文件提供的路由範例架構,可以看到父層和子層均有 layout、error 以及 loading 元件,用來處理各自的邏輯:
## 結語
在查路由相關的資料時,會發現因為 App Router 是 Next.js v13 後才推出的路由系統,架構上和 Page Router 不相容,規則也有所差異,因此特別列出來進行比較,實際開發時使用預設的 App Router 即可。
接下來預計會實作一個的部落格,希望包含簡易的登入機制、API 串接、顯示文章列表等功能。
## 參考資料
+ Next.js 官方文件:[App Router](https://nextjs.org/docs/app/building-your-application) & [Page Router](https://nextjs.org/docs/pages)
+ [快速入門 Next.Js 13 App Router, RSC(React Server Component), SEO相關說明](https://blog.typeart.cc/nextjs13-quick-guide/)
+ [Day 19 - Parallel Routes 路由的平行宇宙 - iT 邦幫忙](https://ithelp.ithome.com.tw/articles/10334425)