---
title: 'Pioneer 環境考察 preMIT #7'
date: 2023-08-24 12:09:57
tags:
- "MiohitoKiri5474"
cover: "https://guildmagesforum.tw/images/RB-Mice.png"
thumbnail: "https://guildmagesforum.tw/images/RB-Mice.png"
excerpt: "老鼠準備稱霸環境⋯⋯嗎?"
authors:
- "MiohitoKiri5474"
categories:
- "Construct"
- "Pioneer"
---
## Before We Start
好久沒寫環境考察文章了(?
雖然最一開始有說希望是一個週期性文章,隔週發近代/先驅這樣。
不過說到底還是沒空寫,而且環境演變速度有點慢,說實在隔兩週通常不會有太大的變化。
同時每一季比賽的內容不同,注意力自然也不同,像是我七月初打到 MIT #7 的資格之後,就把我的先驅丟到櫃子裡了,最近才又拿出來。
老樣子,線上環境跟 RC 跟 PT 一定不同,所以只有採計 RC 的套牌。
## City Class Games Showdown VII | Ciclo 1 Ano 3
[Melee 連結](https://melee.gg/Tournament/View/136231)
首先先來看一下最早開始的巴西,這次辦在聖保羅,共 211 人參賽,打八輪瑞士後取八強單淘汰。
> 一天內要打完八輪 + 單淘汰真的好硬 = =
> 雖然台灣的七輪 + 單淘汰好像也沒有比較軟就是。
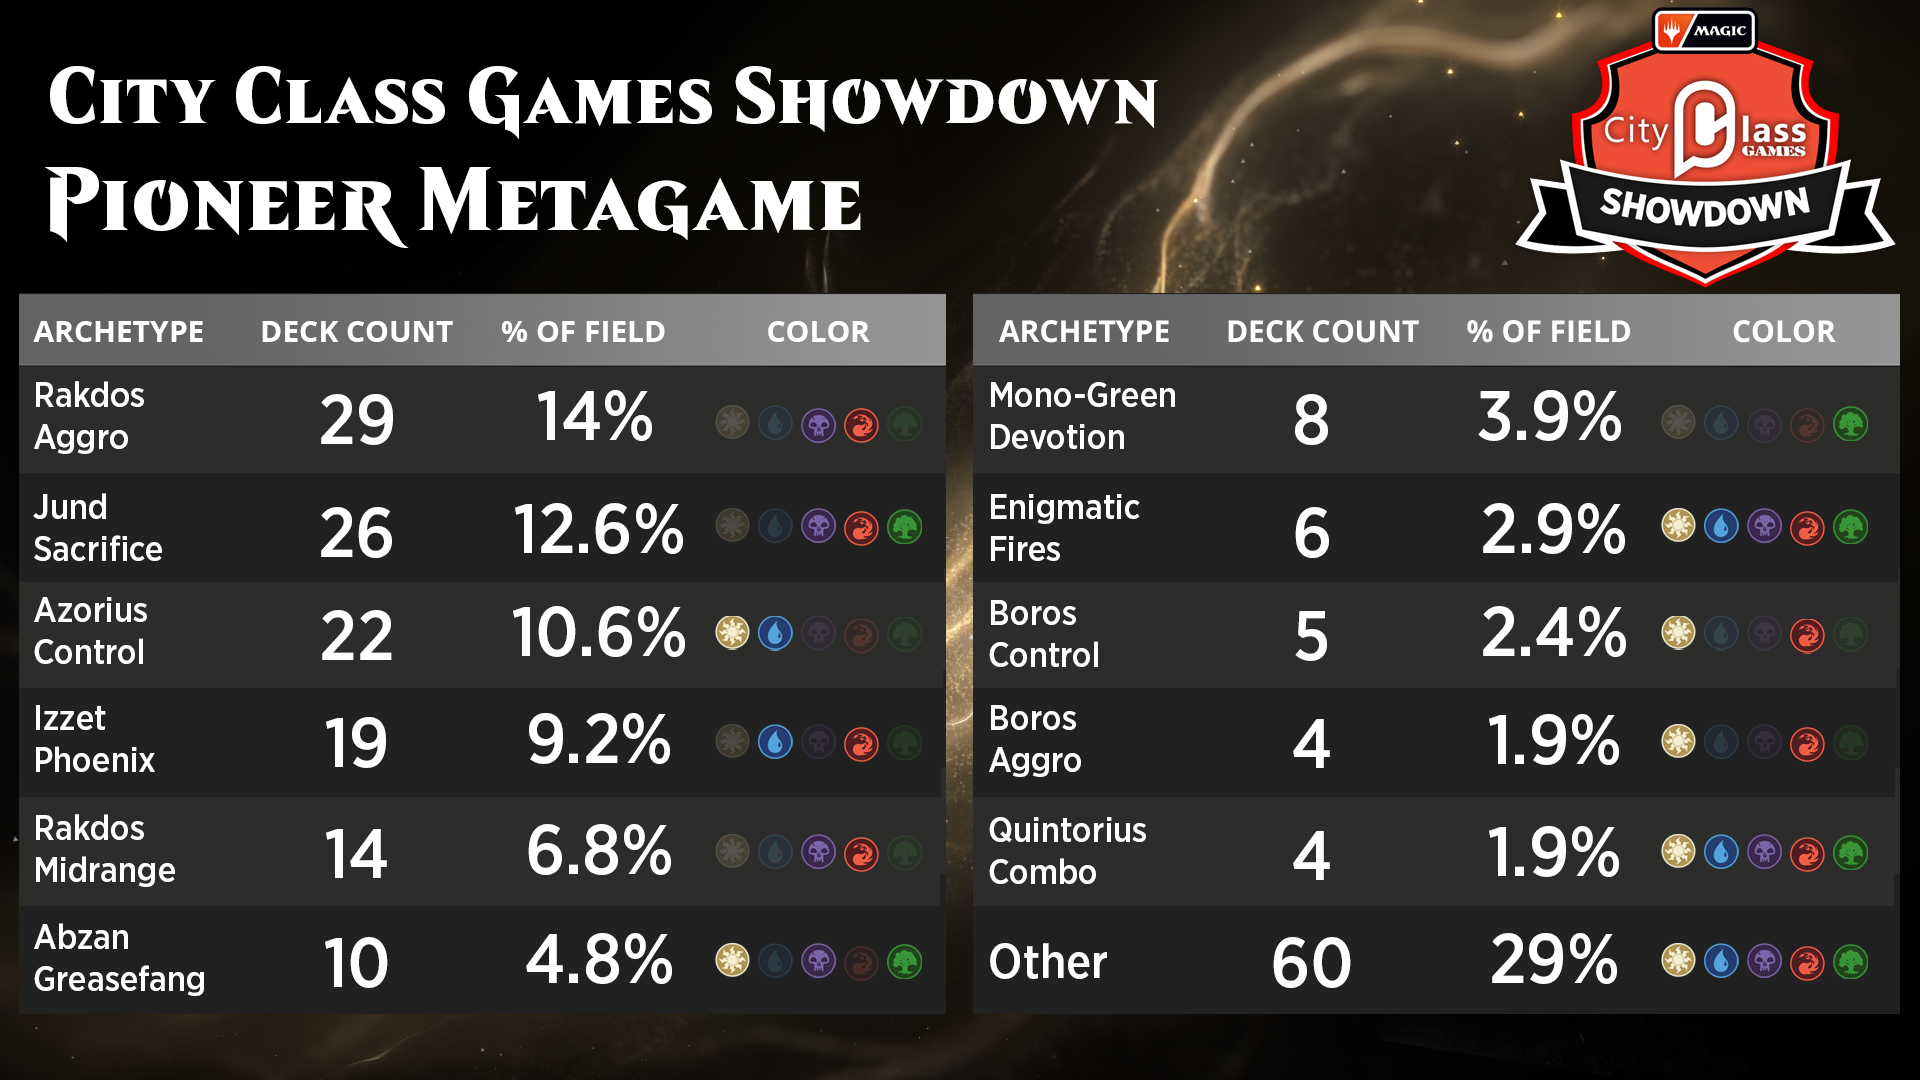
其中 Rakdos Aggro 佔 14% 最多,其次是 Jund Sacrifice 12.6% 和 Azorius Control 的 10.6%。
這個數字比我預期的略低一些,原先我預期這邊大概都會佔個 50%(美國就佔了 46%),不過還算是正常範圍。
然後看一下八強套牌(成績取自預賽):
| Rank | Player | Decklist | Record |
| :-: | :-: | :-: | :-: |
| 1 | Vinícius Karam | [Azorius Control](https://melee.gg/Decklist/View/432613) | 7-1 |
| 2 | Jonathan Lobo Melamed | [5C Emgmatic Incarnation](https://melee.gg/Decklist/View/432652) | 6-0-2 |
| 4 | William Bossaneli Araujo | [Rakdos Aggro](https://melee.gg/Decklist/View/432681) | 6-0-2 |
| 4 | MARCOSHBF | [Rakdos Aggro](https://melee.gg/Decklist/View/432189) | 7-1 |
| 8 | Gabriel Souza | [Rakdos Transmogrify](https://melee.gg/Decklist/View/432451) | 7-1 |
| 8 | XanderB | [Rakdos Midrange](https://melee.gg/Decklist/View/432646) | 6-0-2 |
| 8 | gabriel martinez | [Jund Sacrifice](https://melee.gg/Decklist/View/432473) | 6-1-1 |
| 8 | Pedro Guilherme Lemes | [Dimir Rouges](https://melee.gg/Decklist/View/432511) | 6-1-1 |
這次不知道為什麼 MTGGoldfish 沒有紀錄本場賽事的資料,所以也沒有牌張使用數量統計。
不過其實看上面的 list 應該就知道哪幾張牌使用率特別高。
呃,沒有錯,像是 {% mtgcard "Thoughtseize" tooltip=true %} 跟 {% mtgcard "Fatal Push" tooltip=true %} 還有 {% mtgcard "Ob Nixilis, the Adversary" tooltip=true %} 一定是使用量最多、使用比例最高的。
總之來看看八強套牌們吧。
### Azorius Control
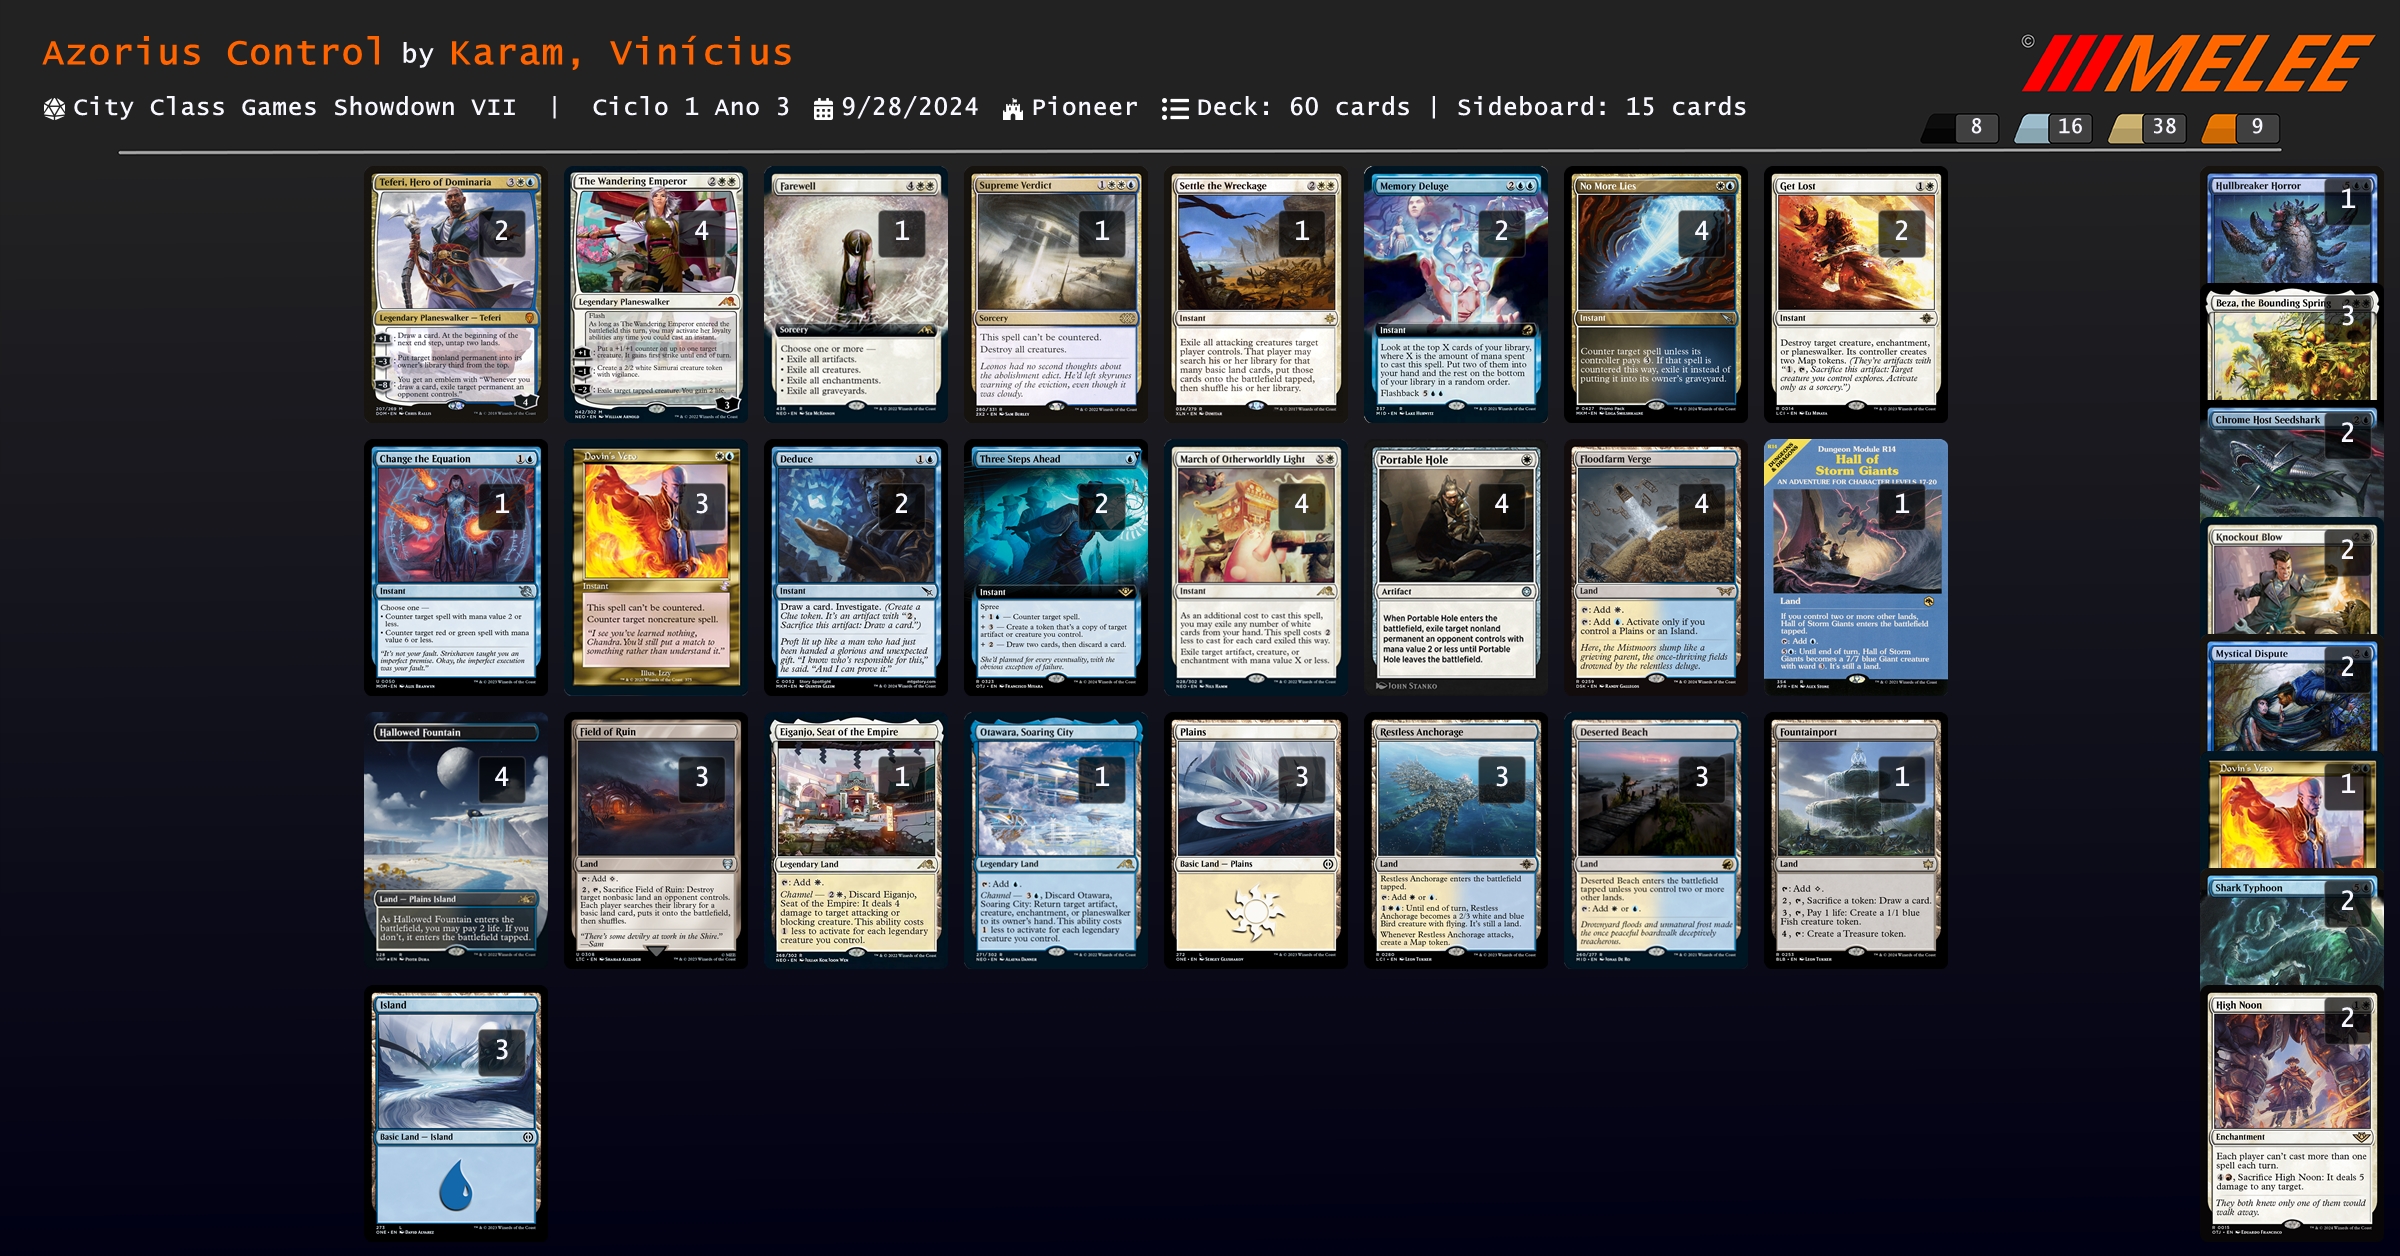
現在的 UWx Control 可以說是版本解答,左打 Phoenix 右踢 Rakdos Aggro,構築基本上和之前的結構差不多,不過冠軍牌表比起抽濾放了更多的解牌,打前面提到兩套牌時比較不用花前兩三個回合找解答,畢竟現在 Rakdos Aggro 三回就能斬人了,二回還在做 {% mtgcard "Deduce" tooltip=true %} 有那麼億點爛⋯⋯
但這樣的代價是,預期在打 Control mirror 和 5C Enigmatic Incarnation 的時候不太舒服,像是 {% mtgcard "Portable Hole" tooltip=true %} 在這個對局中根本是辣雞⋯⋯
{% mtgcard "High Noon" %}
另外值得注意的是,現在不管是在正編或是備牌,幾乎都可以看到 {% mtgcard "High Noon" tooltip=true %},一回合只能做一個咒語非常適合控制和當前的 meta,雖然這樣在對手的回合只能做一張咒語,不過控制最期望的節奏就是一換一將對局拖到大後期,同時也能阻止 Phoenix 和 Rakdos Aggro 前三回合的超絕展開。
### 5C Enigmatic Incarnation

雖然 list 上面還是寫作 Enigmatic Fires,不過現在其實都不會帶 {% mtgcard "Fires of Invention" tooltip=true %} 了。
主要理由和前面講 Azorius Control 時一樣,作為慢速套牌 {% mtgcard "High Noon" tooltip=true %} 相當適合,同樣的可以阻止 Phoenix 和 Rakdos Aggro 的超絕展開,並且需要的時候也能給 {% mtgcard "Enigmatic Incarnation" tooltip=true %} 吃掉找三費的生物工具箱。
另外紅霸主 {% mtgcard "Overlord of the Boilerbilges" tooltip=true %} 和綠霸主 {% mtgcard "Overlord of the Hauntwoods" tooltip=true %} 都非常適合這套牌,一來是節奏上適合,同時也能搭配 {% mtgcard "Up the Beanstalk" tooltip=true %} 做到解場 + 抽牌,同時可以被 {% mtgcard "Enigmatic Incarnation" tooltip=true %} 找也能當其肥料、又能搭配 {% mtgcard "Fable of the Mirror-Breaker" tooltip=true %} 做展開/斬殺,可說是一卡多用。
> 是說 Overload 配 {% mtgcard "Up the Beanstalk" tooltip=true %} 究竟會不會在標準甚至於先驅被 ban 呢,二回 {% mtgcard "Up the Beanstalk" tooltip=true %} 三回 {% mtgcard "Overlord of the Hauntwoods" tooltip=true %} 抽一張 ramp,怎麼好像有種似曾相識的感覺({% mtgcard "Uro, Titan of Nature's Wrath" tooltip=true %}:放我出去)。
### Rakdos Aggro
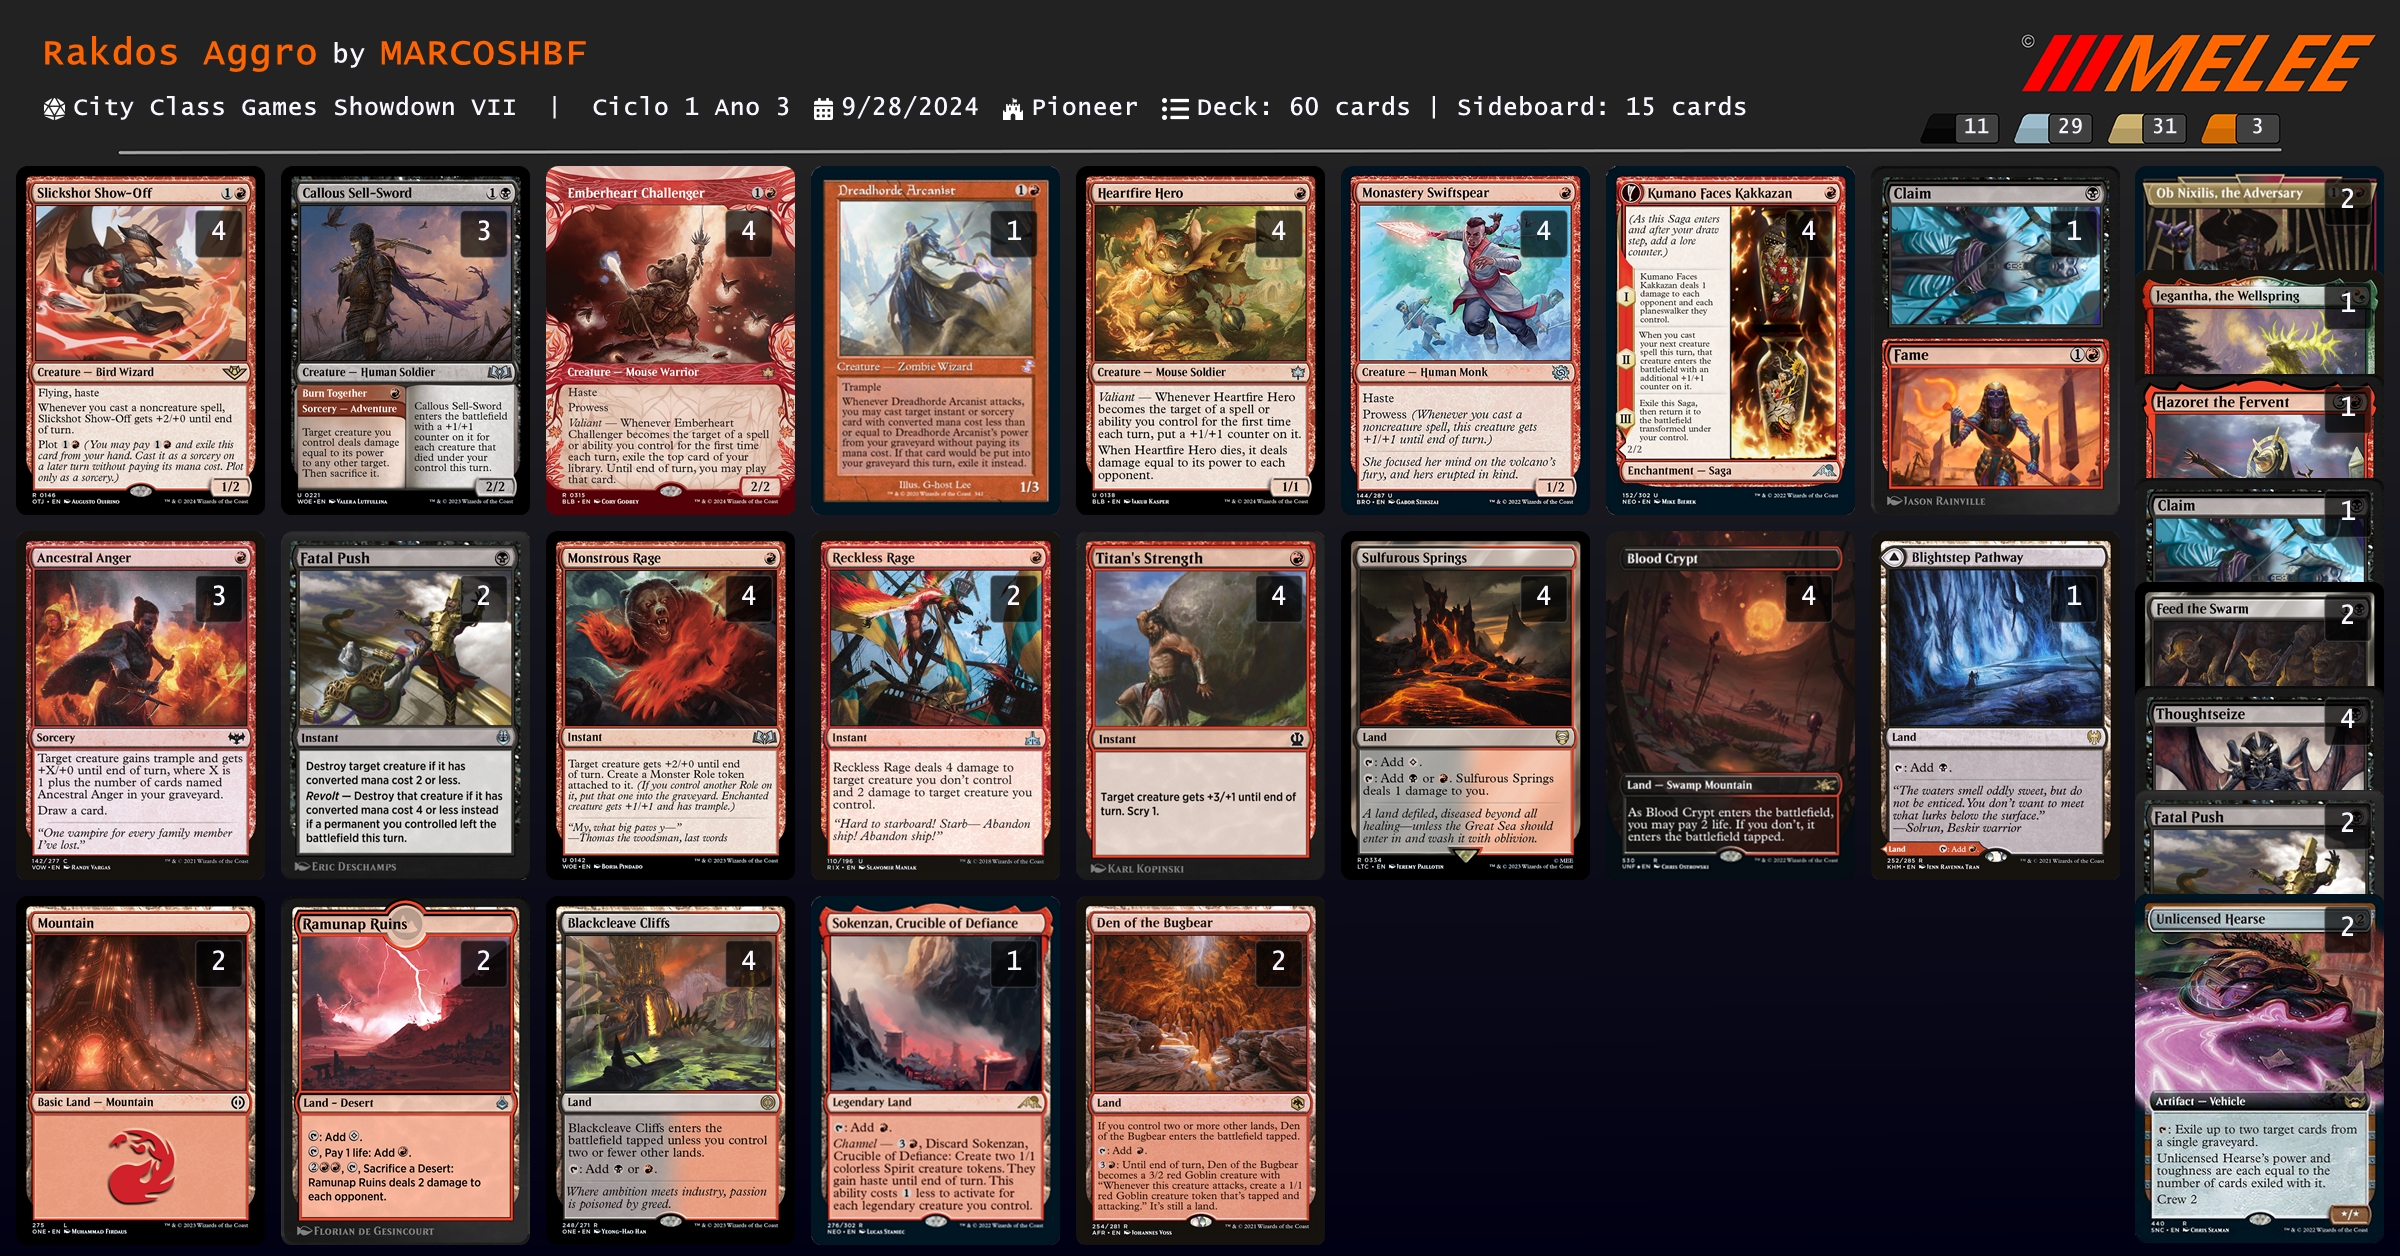
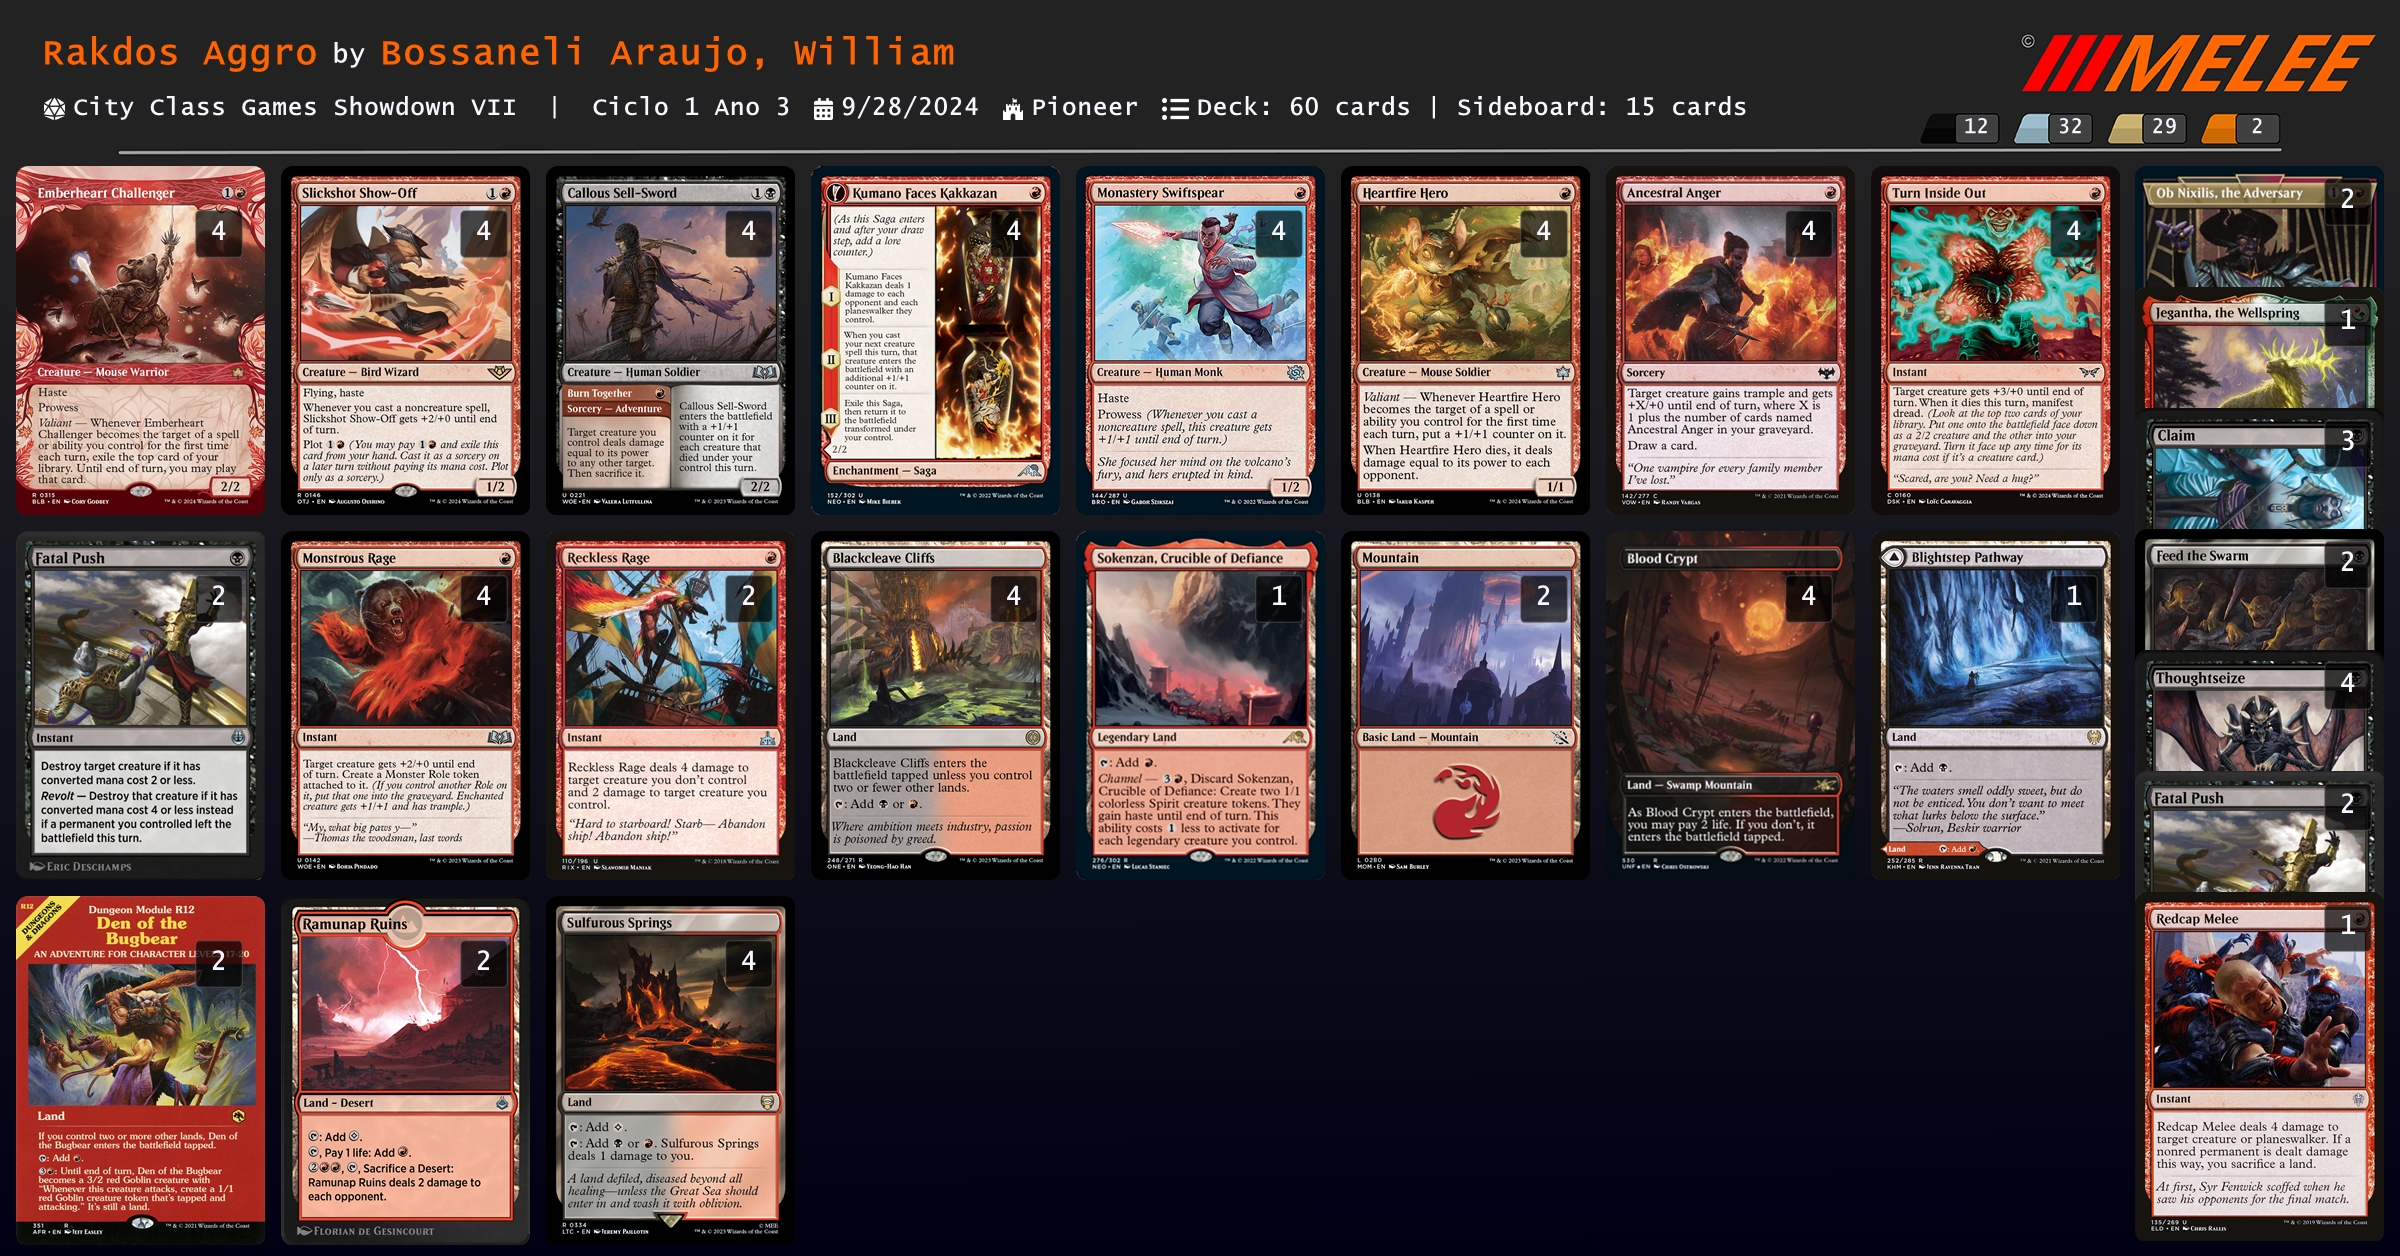
Rakdos Aggro 也算是現在的環境新寵兒,基本上可以將其看作是完全沒有保護也沒有後續資源的 Gruul Aggro,但換來的是更高的傷害上限。
雖然如同標準搭配新的地脈 {% mtgcard "Leyline of Resonance" tooltip=true %} 可以打到更高的上限,不過有鑒於先驅比起標準有更多的低費去除({% mtgcard "Fatal Push" tooltip=true %}、{% mtgcard "March of Otherworldly Light" tooltip=true %}、{% mtgcard "Play with Fire" tooltip=true %}),拼這個上限的回報太低。
這兩套構築都大同小異,都是正編拼上限、備牌才在防守,不過可能是考慮到會有不少內戰所以都在正編帶了兩張 {% mtgcard "Fatal Push" tooltip=true %} 和兩張 {% mtgcard "Reckless Rage" tooltip=true %}。
另外為了對應 {% mtgcard "High Noon" tooltip=true %},都選擇在備牌帶 {% mtgcard "Feed the Swarm" tooltip=true %}。
對應中速和控制等套牌則是選用 {% mtgcard "Ob Nixilis, the Adversary" tooltip=true %},拉長戰局時歐尼醬壓縮對手血量的同時 clock 對手,真的很舒服。
### Rakdos Transmogrify
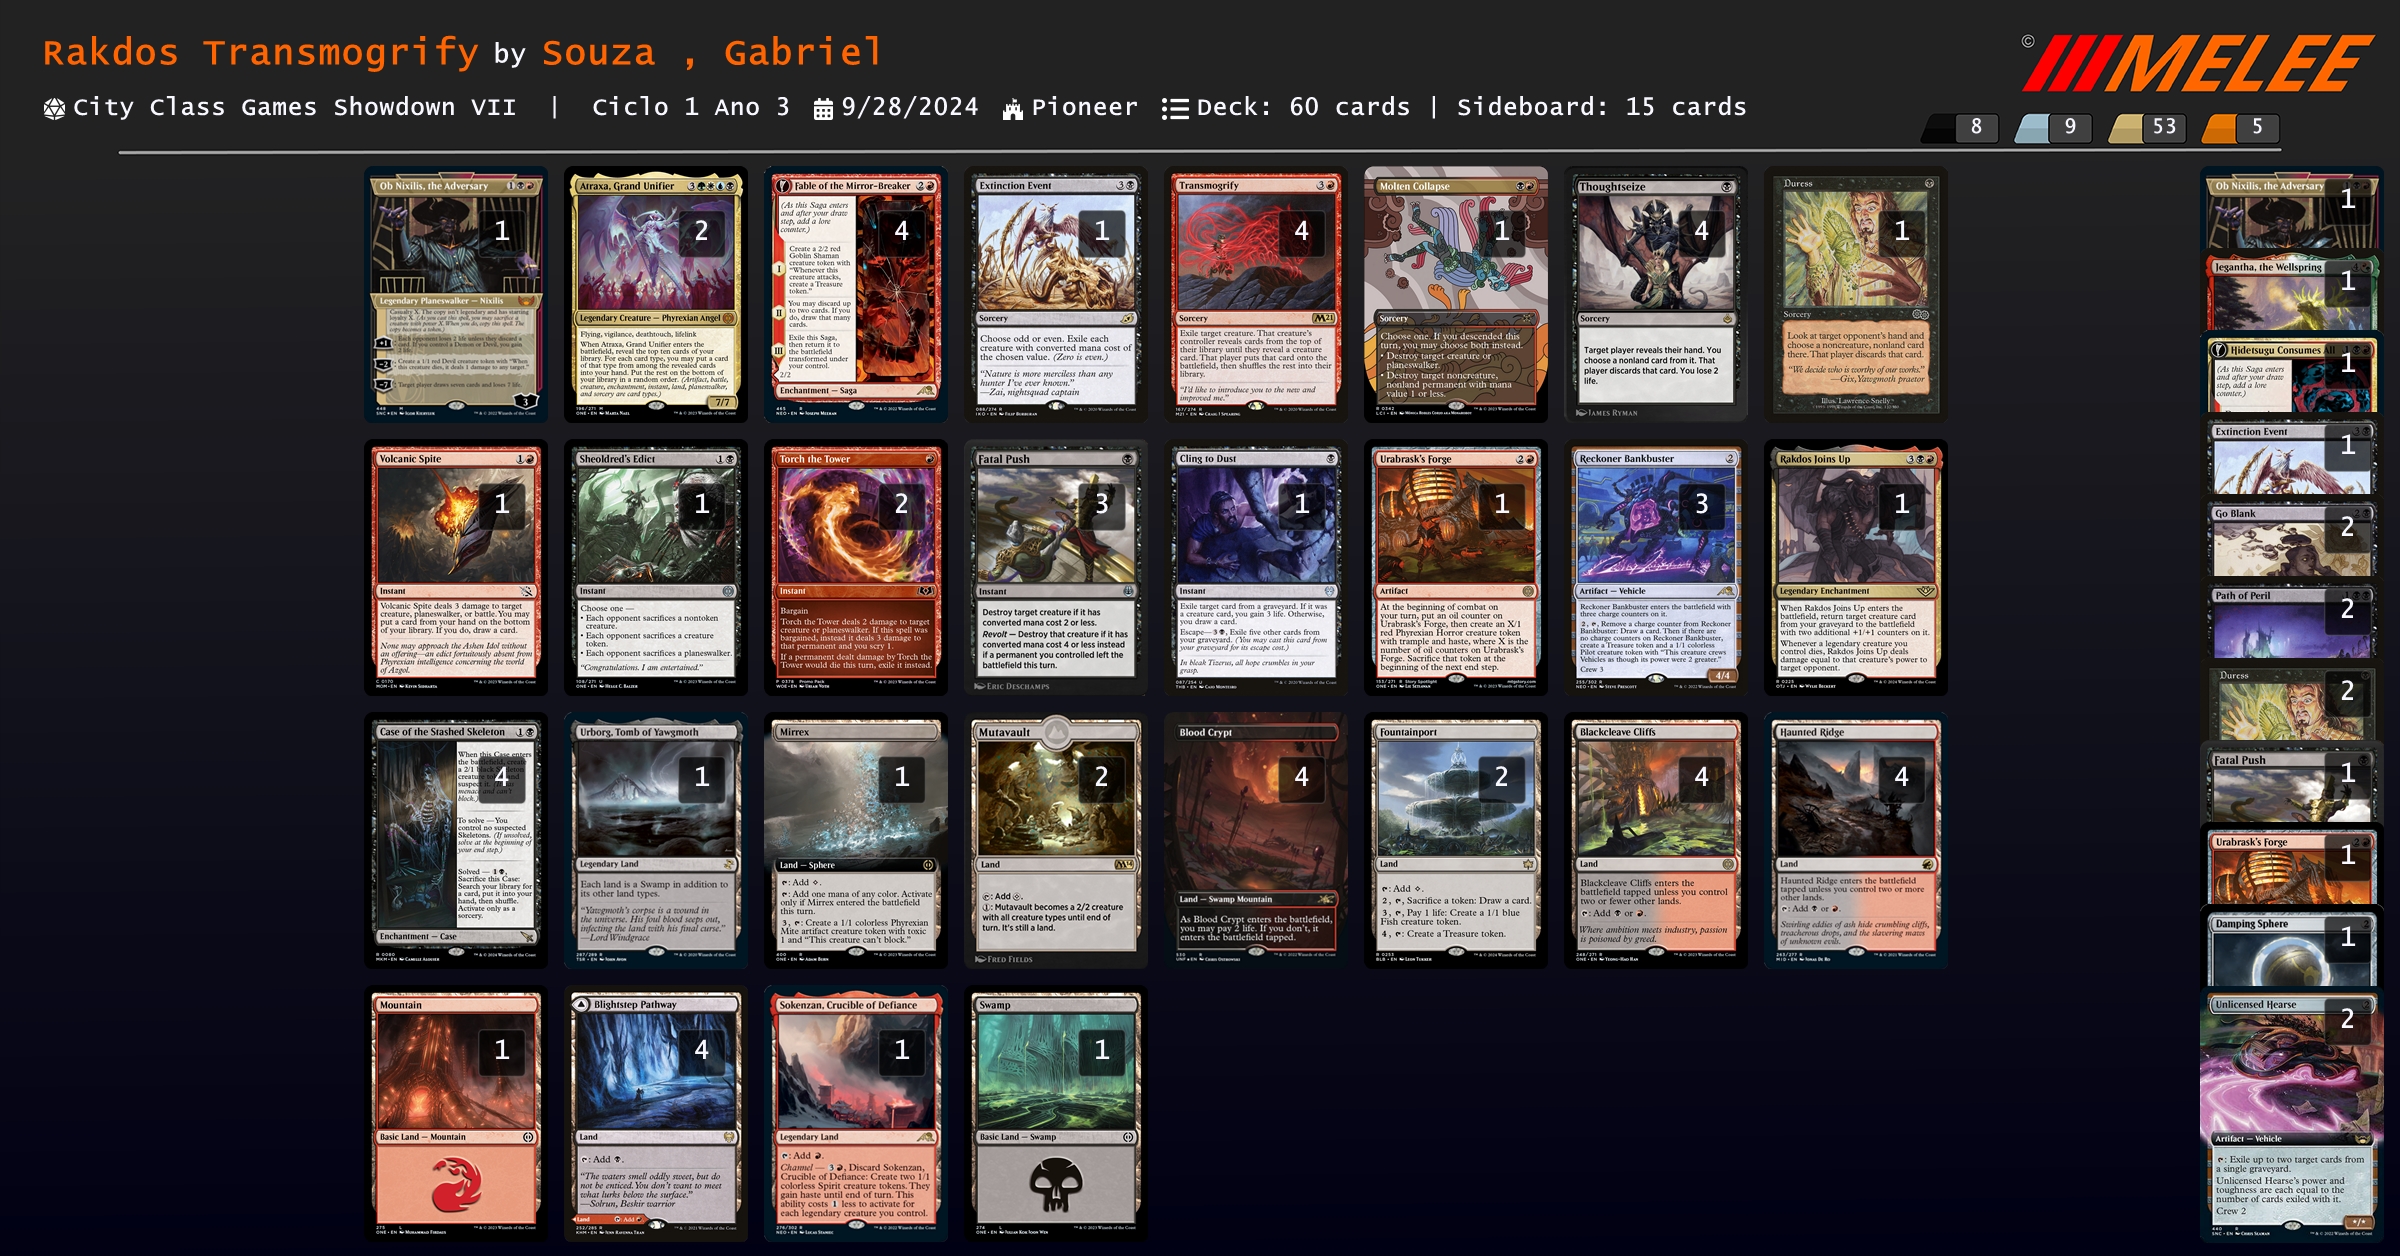
Rakdos Transmogrify 是利用 {% mtgcard "Transmogrify" tooltip=true %} 低費轉 {% mtgcard "Atraxa, Grand Unifier" tooltip=true %} 出來、並且靠大量的去除和掉手壓制對手行動。
可以視為紅黑版本的 {% mtgcard "Indomitable Creativity" tooltip=true %},不過做出來並不會馬上贏,取而代之的是更舒服的高下限。
至於收頭手段,可以用 {% mtgcard "Atraxa, Grand Unifier" tooltip=true %} 敲個一兩下收工,或是找到 {% mtgcard "Ob Nixilis, the Adversary" tooltip=true %} 後犧牲 {% mtgcard "Atraxa, Grand Unifier" tooltip=true %}、用 {% mtgcard "Ob Nixilis, the Adversary" tooltip=true %} 的複製品,開大打對手七點血。
另外我很喜歡 {% mtgcard "Rakdos Joins Up" tooltip=true %},挖回來再賺一次,被殺也能打對手傷害。
> 有些套牌會選擇改用新牌 {% mtgcard "Valgavoth, Terror Eater" tooltip=true %},我覺得各有優缺,{% mtgcard "Atraxa, Grand Unifier" tooltip=true %} 進場就能賺資源但是會吃點殺;而 {% mtgcard "Valgavoth, Terror Eater" tooltip=true %} 進場沒有立即資源可用但比較難殺。
### Rakdos Midrange
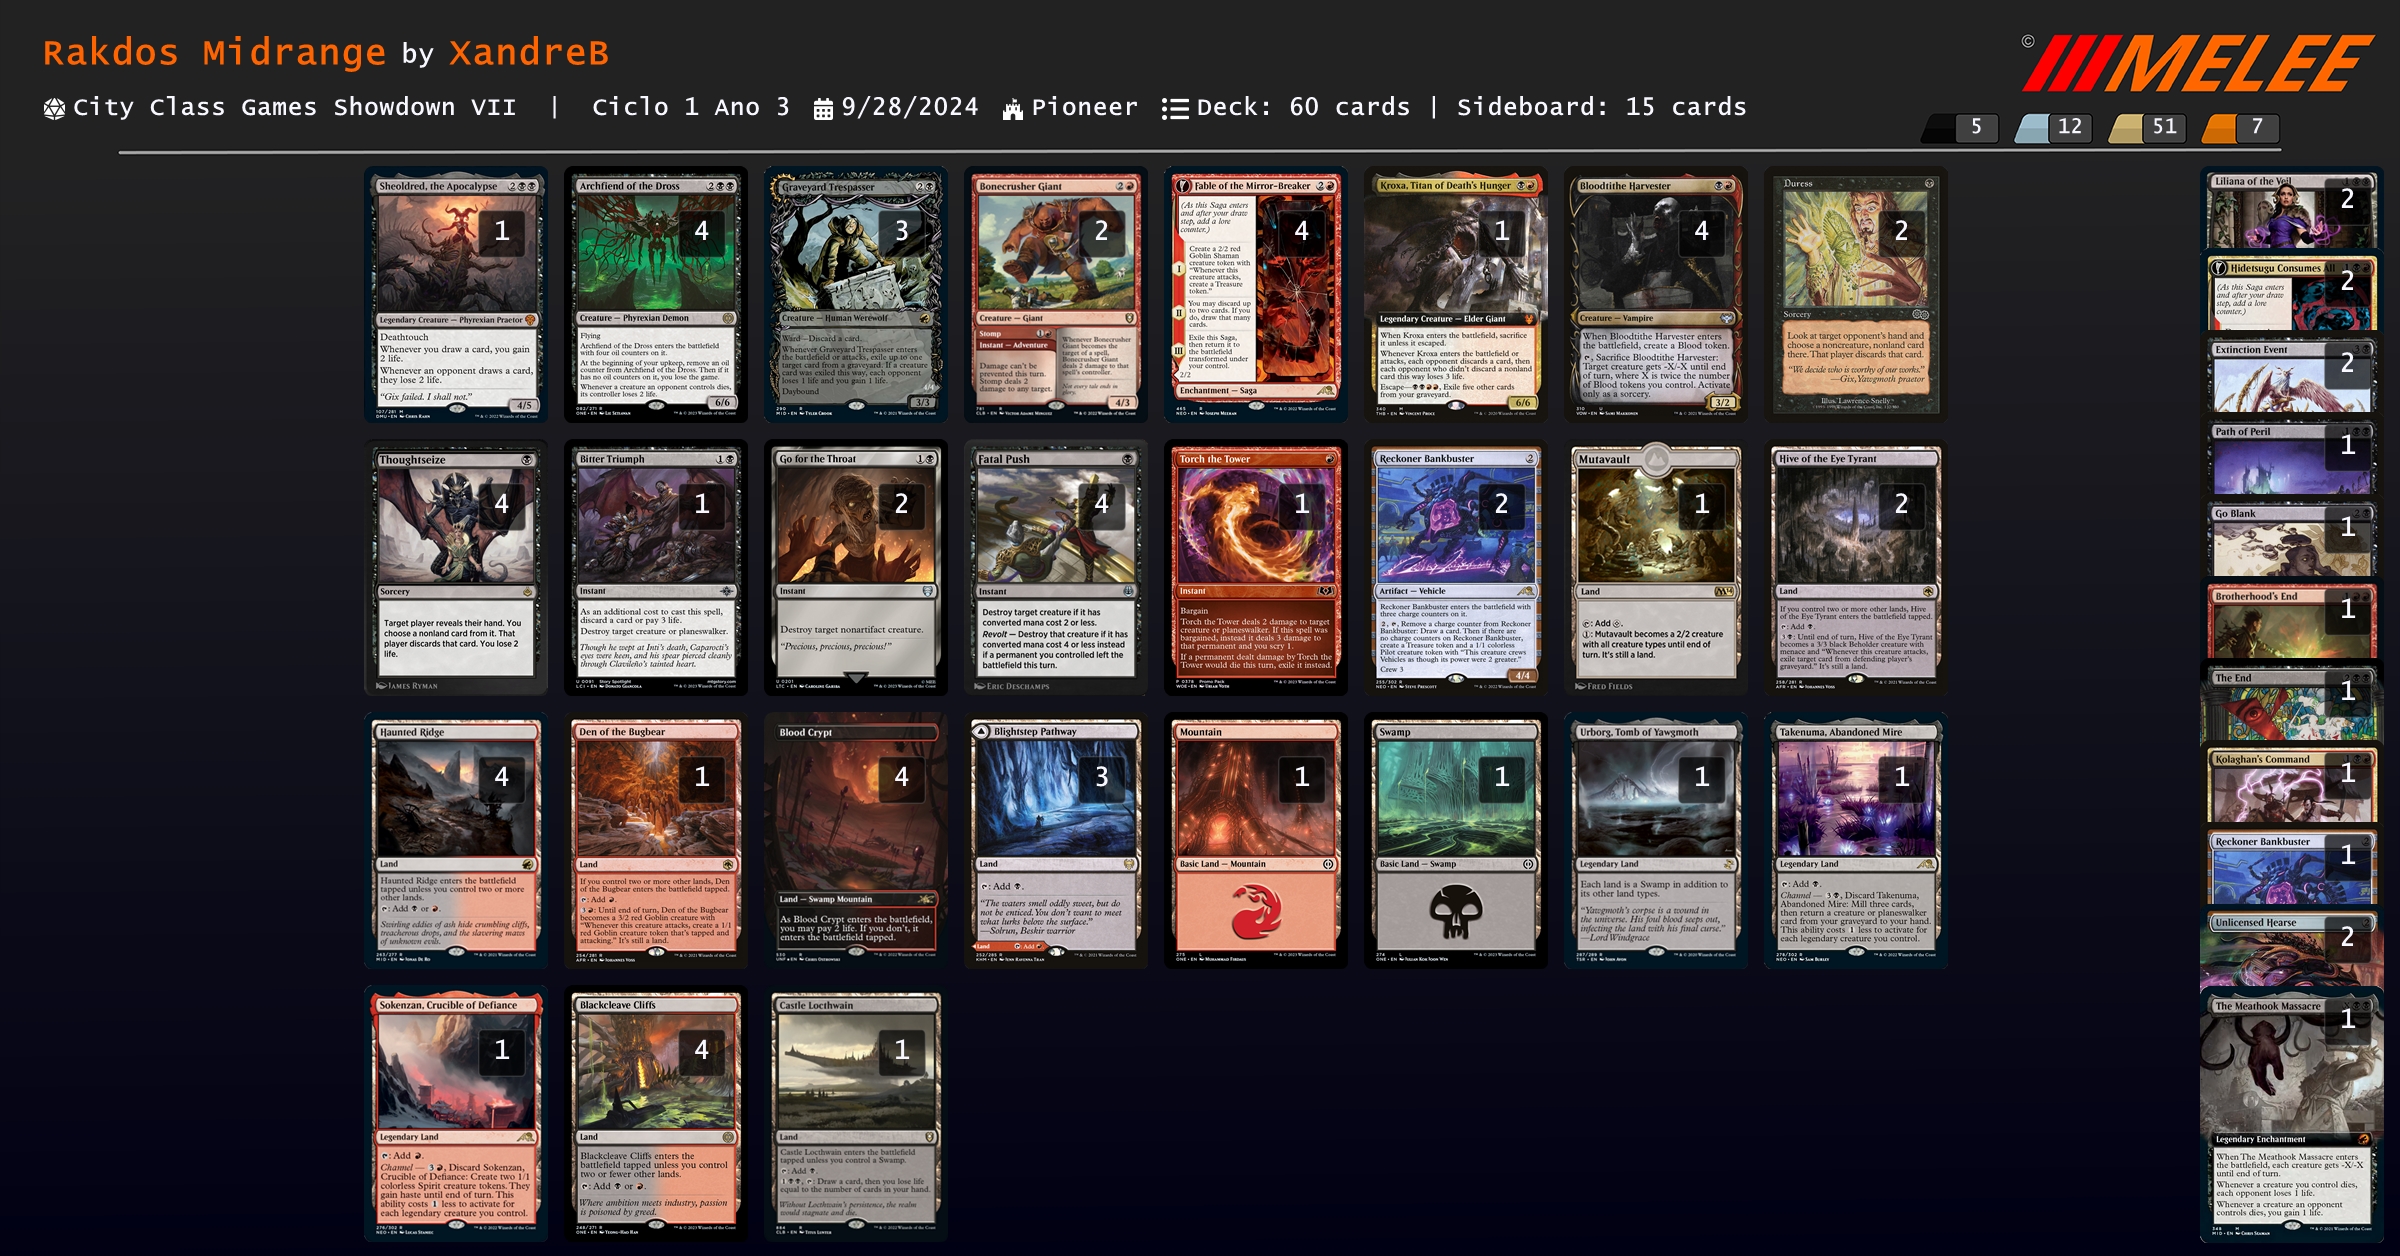
這個版本的 Rakdos Midrange 算是對環境的特化,改用 {% mtgcard "Archfiend of the Dross" tooltip=true %} 快速 clock 對手、並且也能有效的壓制 Sacrifice 套牌,同時加入更多的點殺和更多的 {% mtgcard "Graveyard Trespasser" tooltip=true %} 以應對 Rakdos Aggro。
比起 {% mtgcard "Sheoldred, the Apocalypse" tooltip=true %},{% mtgcard "Archfiend of the Dross" tooltip=true %} 的優點有:
1. 不怕 {% mtgcard "Lightning Axe" tooltip=true %} 一發帶走
2. 會飛不怕被各種 chump
3. 打得贏環境內多數的延勢仔
4. 可以用 {% mtgcard "Reflection of Kiki-Jiki" tooltip=true %} 複製打出單回合傷害上限
但他的弱點也是非常明顯:
1. 非常怕被 {% mtgcard "Heartless Act" tooltip=true %} 拔三顆油
2. 對自己也是一個 clock,三回合內沒斬掉對手就是換自己被斬,必要時需要將殺牌交在自己的生物上
3. 打鳳凰時對手只要能一直飛鳳凰回來 chump,只要被擋住三回合就會輸
其餘的部分我覺得就是很 solid 的構築,不過我個人不太喜歡五張 4 drop 的組法,少了 {% mtgcard "Sheoldred, the Apocalypse" tooltip=true %} 補血源好像不太夠。
另外備牌的兩張 {% mtgcard "Hidetsugu Consumes All" tooltip=true %} 和一張 {% mtgcard "The Meathook Massacre" tooltip=true %},算是對上 Sacrifice 的大殺器。
### Jund Sacrifice
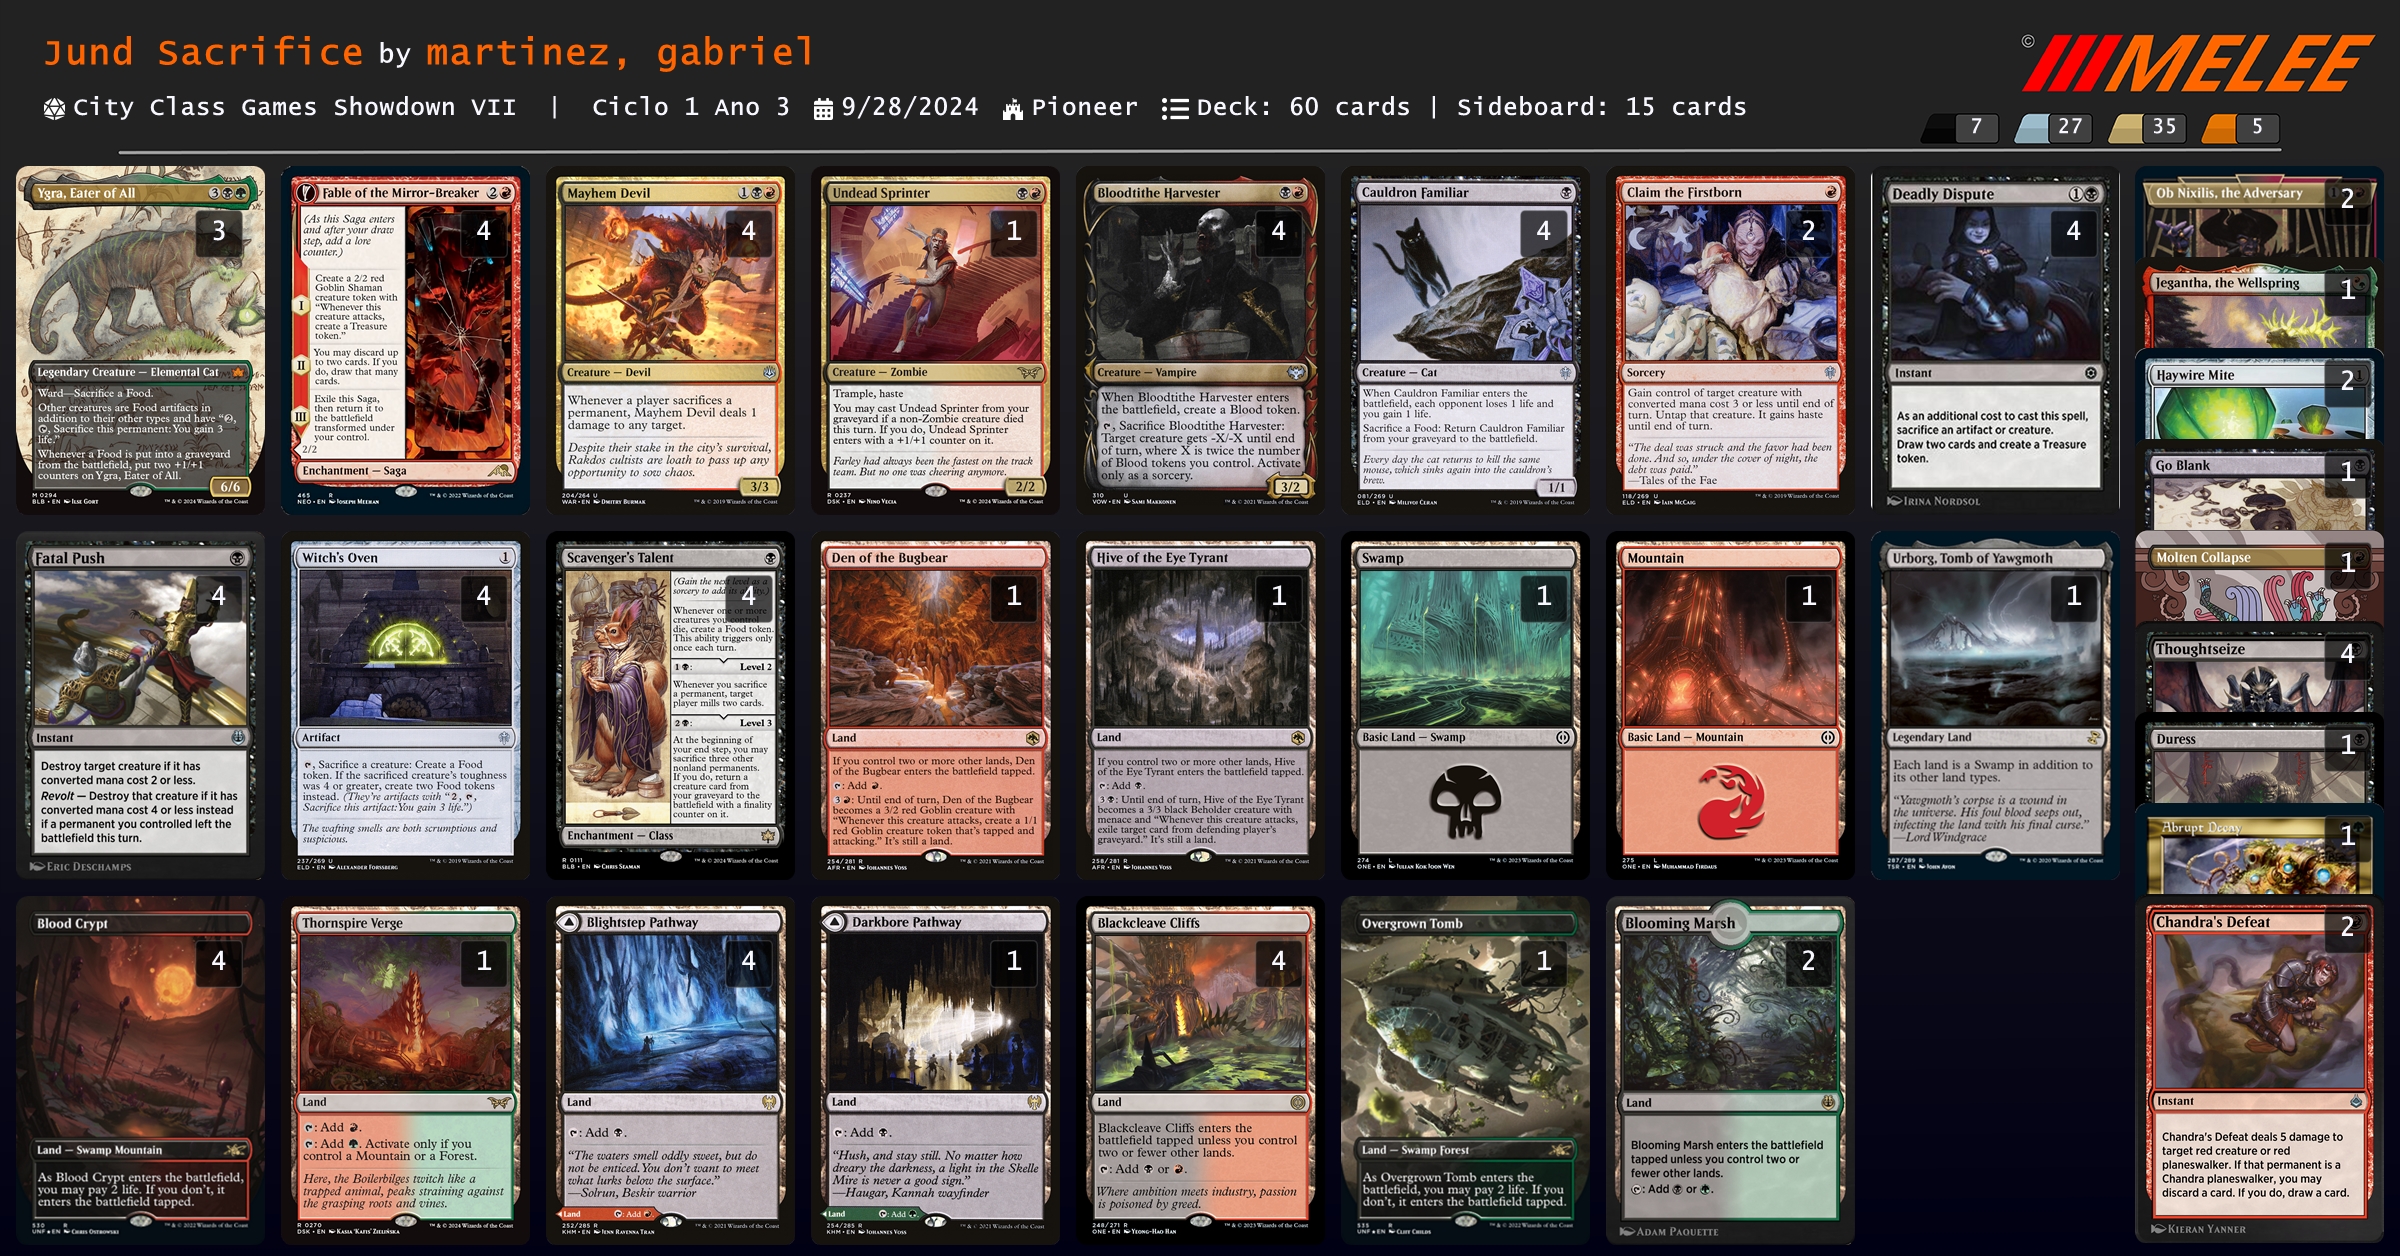
BLB 的兩張新牌 {% mtgcard "Ygra, Eater of All" tooltip=true %} 和 {% mtgcard "Scavenger's Talent" tooltip=true %} 大大的補強 Sacrifice,前者提供了無限組合技,後者則是集 `肥料`、`堆墳`、`挖墳` 為一體。
### Dimir Rouges
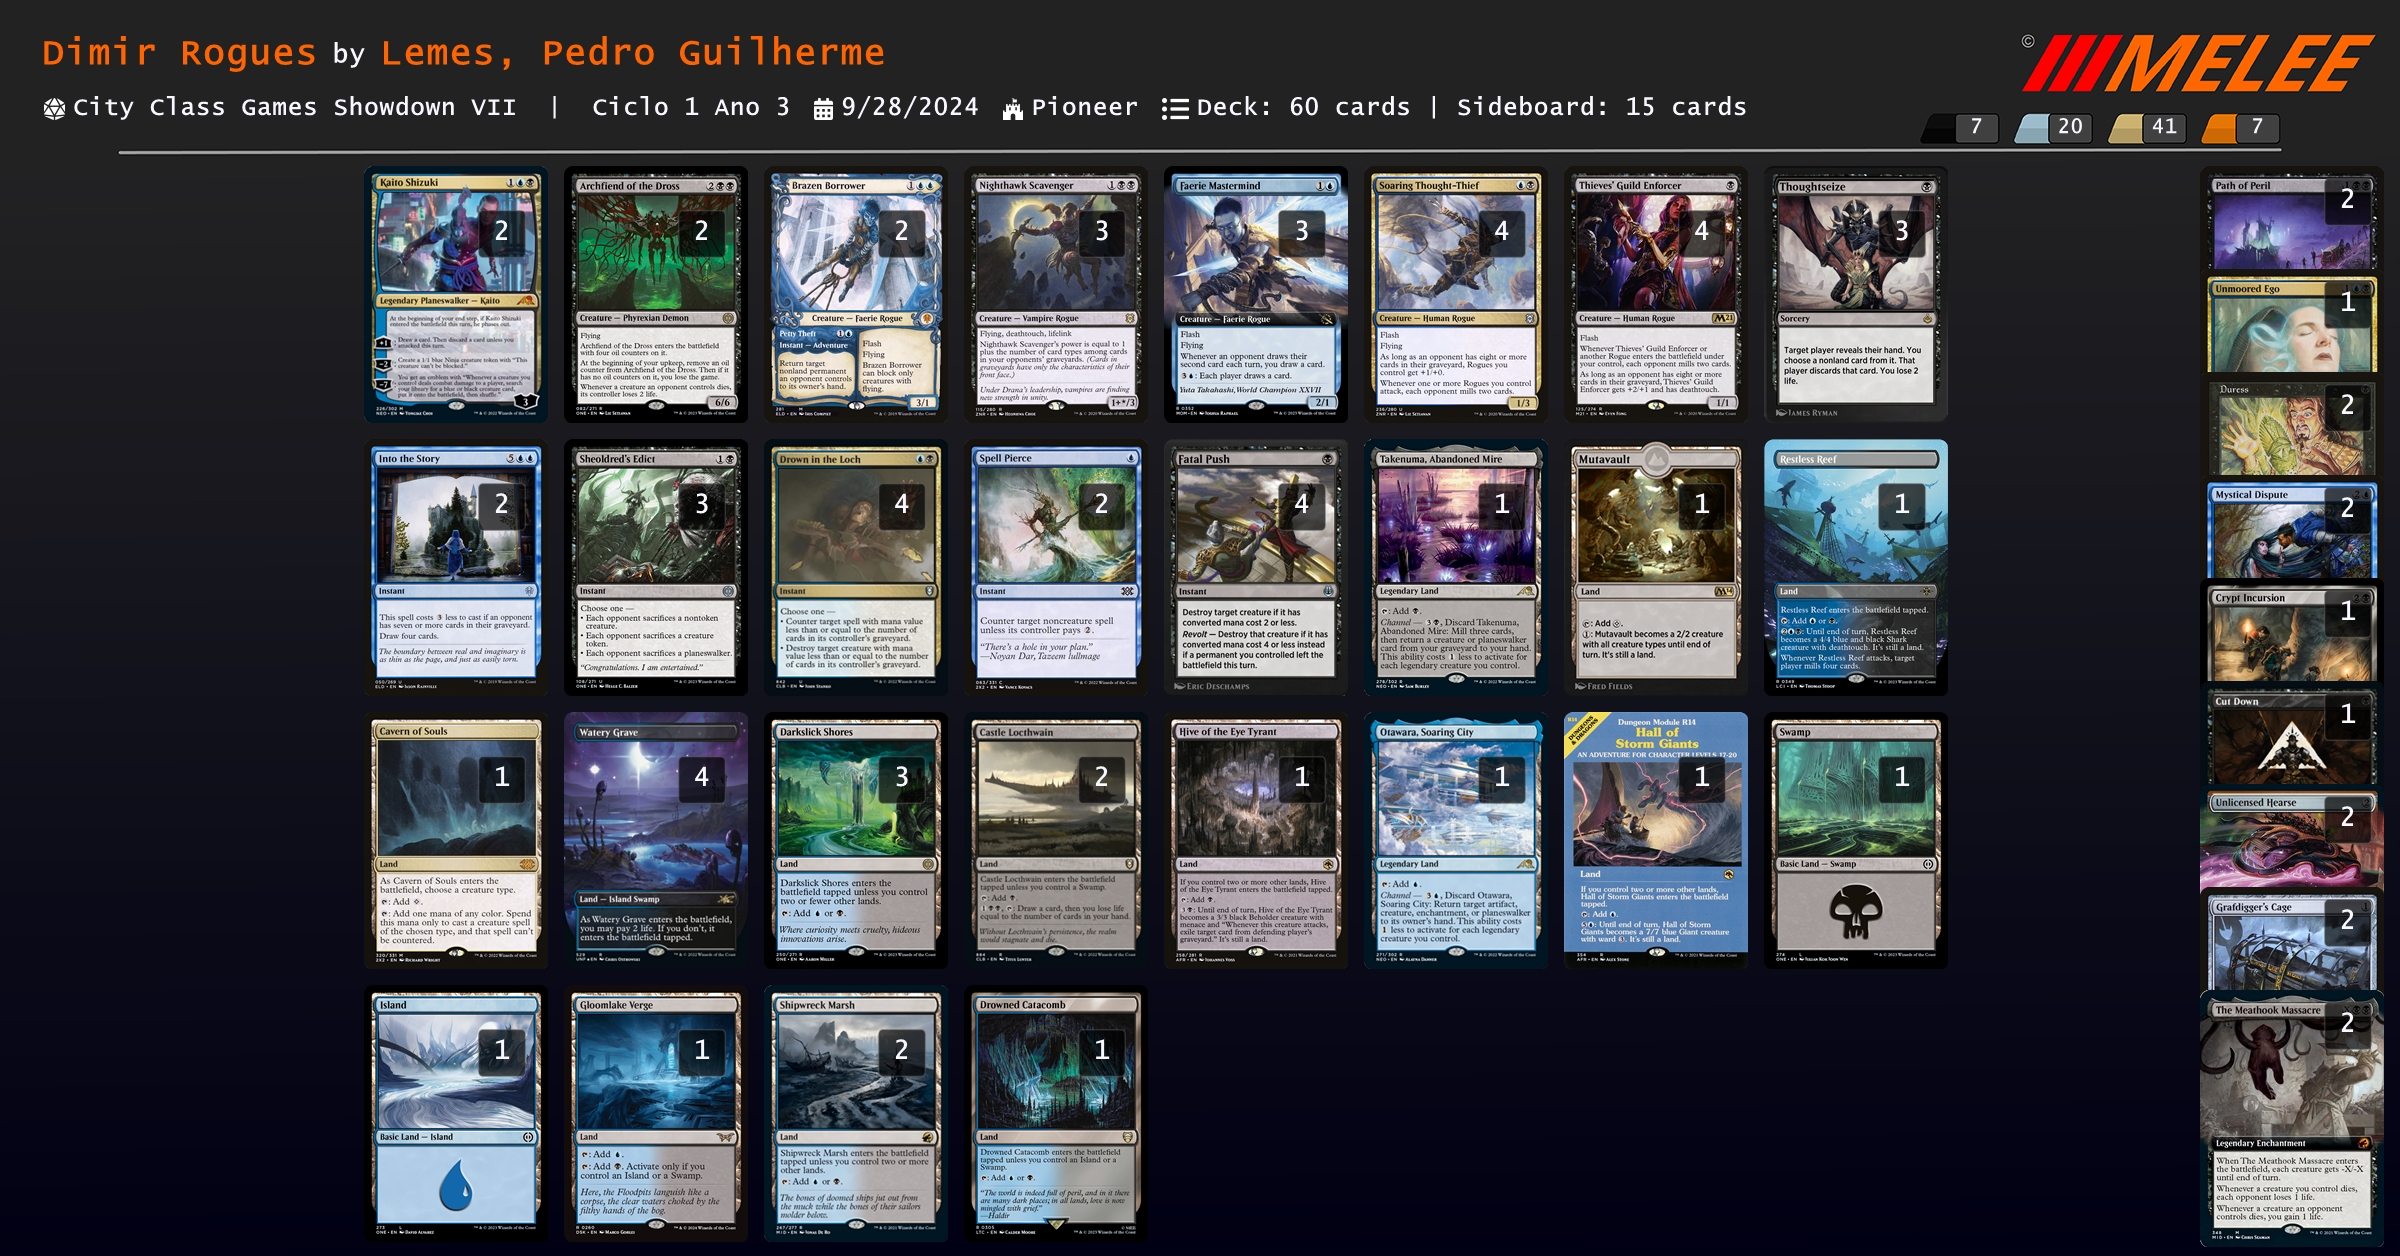
Dimir Rouges 拿到八強了。
⋯⋯Dimir Rouges 拿到八強了?!
都 4202 年了怎麼還有人在打 Dimir Rogues?!
基本上構築就是很標準的浪客大集合,另外選則正編兩張 {% mtgcard "Archfiend of the Dross" tooltip=true %}、備牌兩張 {% mtgcard "The Meathook Massacre" tooltip=true %} 打犧牲。
另外這套牌算是打控制的好選擇,生物幾乎都有閃現的同時也有掉手也有康,都是控制會感覺不舒服的東西。
但打一些對局(例如 Phoenix 還有 Phoenix 或是 Phoenix 以及 Phoenix,外加一個 Greasefang)蠻不舒服的,幫對手堆墳不一定是一件好事。
## Regional Championship - SCG CON Washington DC
[Melee 連結](https://melee.gg/Tournament/View/63398)
再來看看美國的冠軍賽吧,這次一樣是分兩天共打 15 輪瑞制,其中 Day 1 拿到 18 分以上的玩家才能進 Day 2。

一樣先看個環境,應該是鑑於巴西場 5C Enigmatic Incarnation 的成績不錯,所以有不少人選這套牌。
另外犧牲數量蠻少的(跟巴西比起來),猜測是大家覺得犧牲會被嚴重針對(畢竟他也最好針對),因此選擇其他套牌。
八強套牌分別有:
| Rank | Player | Decklist | Record |
| :-: | :-: | :-: | :-: |
| 1 | Cory Lack | [Rakdos Cauldron](https://melee.gg/Decklist/View/435309) | 12-2-1 |
| 2 | Connor Mackenzie | [Rakdos Transmogrify](https://melee.gg/Decklist/View/434714) | 12-2-1 |
| 4 | ERIC GRAY | [Rakdos Aggro](https://melee.gg/Decklist/View/435762) | 12-2-1 |
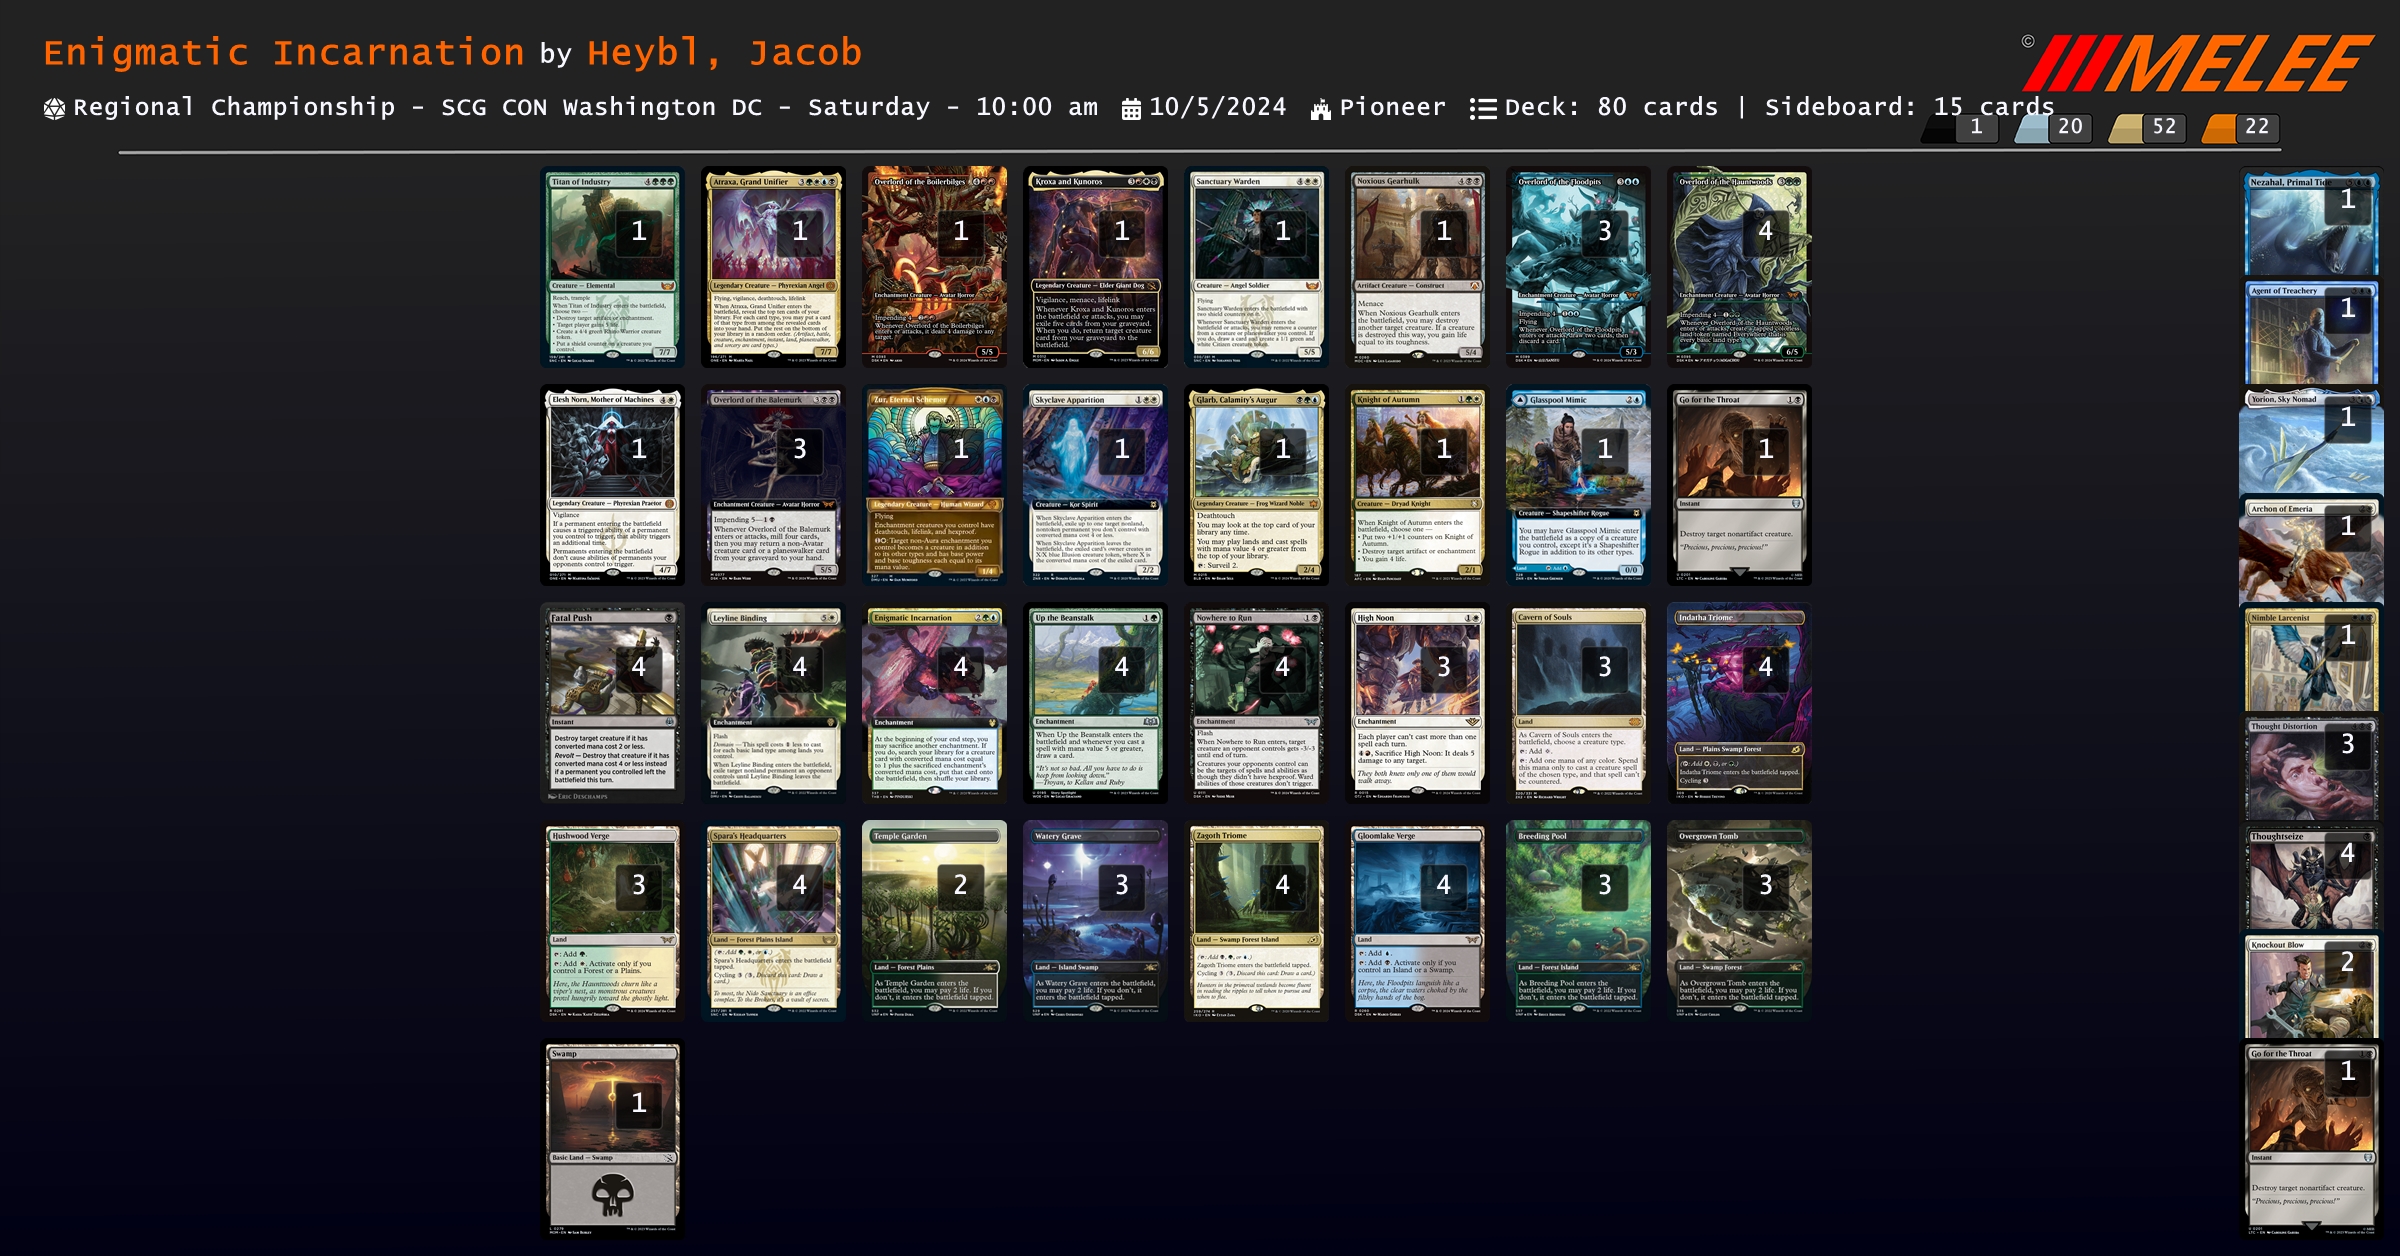
| 4 | Soohwang Yeem | [Enigmatic Incarnation](https://melee.gg/Decklist/View/434234) | 12-2-1 |
| 8 | Ian Robb | [Izzet Phoenix](https://melee.gg/Decklist/View/438209) | 13-1-1 |
| 8 | Zevin Faust | [Selesnya Company](https://melee.gg/Decklist/View/433930) | 13-2 |
| 8 | Inru Goldenberg | [Izzet Phoenix](https://melee.gg/Decklist/View/438127) | 12-2-1 |
| 8 | Patrick We | [Azorius Lotus Field](https://melee.gg/Decklist/View/433792) | 12-2-1 |
### Rakdos Cauldron
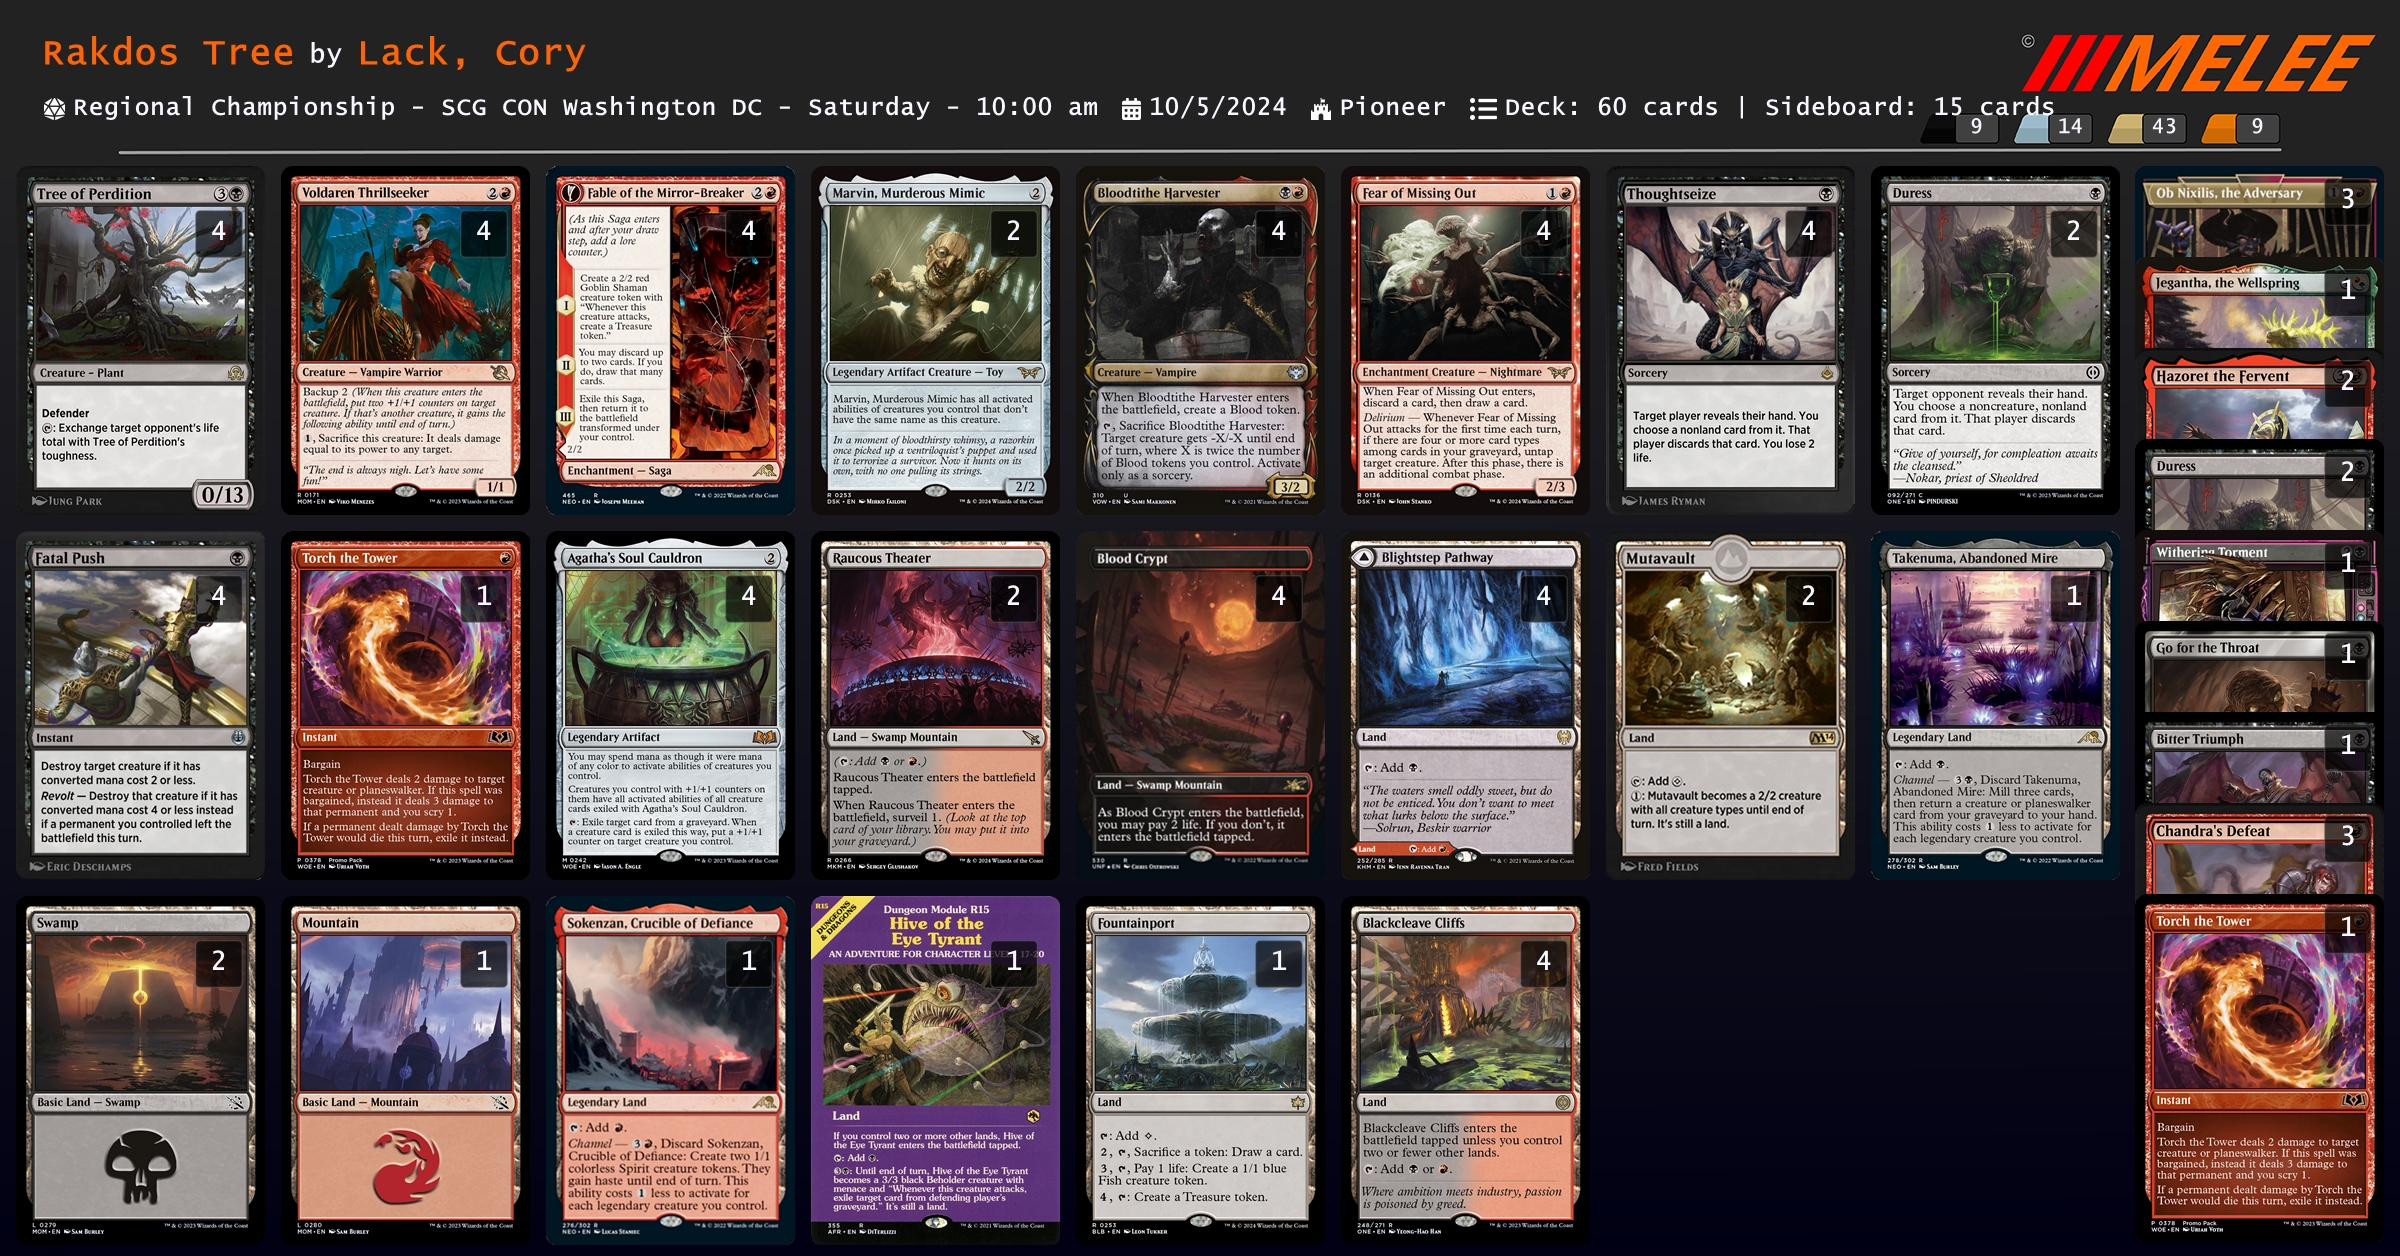
基本上這是一套中速外掛組合技的套牌,組合技的部分用 {% mtgcard "Agatha's Soul Cauldron" tooltip=true %} 吃掉 {% mtgcard "Tree of Perdition" tooltip=true %}、搭配別的生物將對手血量扣低,再用 {% mtgcard "Voldaren Thrillseeker" tooltip=true %} 的 Backup 異能給其他生物投擲能力斬殺對手,也可以同樣用 {% mtgcard "Agatha's Soul Cauldron" tooltip=true %} 吃掉後用一隻有帶 +1/+1 的生物斬殺。
另外提一下在最後一輪 win-and-in 的對局中,他的對手出現一個很醜的操作。
總之這是一個 Rakdos 內戰,一邊打 Cauldron 另一邊打 Transmogrify。Transmogrify 場上有 {% mtgcard "Unlicensed Hearse" tooltip=true %}、而 Cauldron 那邊場上有 {% mtgcard "Agatha's Soul Cauldron" tooltip=true %} 但卡地。
Cauldron 因為卡地只能硬著頭皮抽一棄一把 {% mtgcard "Tree of Perdition" tooltip=true %} 給丟了,但 Transmogrify 在結束階段主動啟動 {% mtgcard "Unlicensed Hearse" tooltip=true %} 要把墳場的 {% mtgcard "Tree of Perdition" tooltip=true %} 放逐掉,然後就被 Cauldron 方回應啟動 {% mtgcard "Agatha's Soul Cauldron" tooltip=true %} 吃掉 {% mtgcard "Tree of Perdition" tooltip=true %} 了。組合技元件蒐集進度(1/2)。
然後 Transmogrify 那邊又在自己的回合殺了一隻生物、並且啟動 {% mtgcard "Unlicensed Hearse" tooltip=true %} 將那隻生物放逐了,Caudron 方在自己的回合將 {% mtgcard "Voldaren Thrillseeker" tooltip=true %} 丟到墳場並且用 {% mtgcard "Agatha's Soul Cauldron" tooltip=true %} 吃掉。組合技元件搜集進度(2/2)。
所以說啊 {% mtgcard "Unlicensed Hearse" tooltip=true %} 在有 {% mtgcard "Agatha's Soul Cauldron" tooltip=true %} 的時候要很被動啊,如果 {% mtgcard "Unlicensed Hearse" tooltip=true %} 一直不動,{% mtgcard "Agatha's Soul Cauldron" tooltip=true %} 的第一發目標一定會失效,Cauldron 方只能在對方的回合先啟動 {% mtgcard "Agatha's Soul Cauldron" tooltip=true %} 逼對手先把 {% mtgcard "Unlicensed Hearse" tooltip=true %} 給橫置了,在自己的回合丟 {% mtgcard "Voldaren Thrillseeker" tooltip=true %} 並吃掉,然後想辦法找到第二張和第三張 {% mtgcard "Tree of Perdition" tooltip=true %} 並且用一樣的方法先騙掉一次才能成功。
### Rakdos Transmogrify
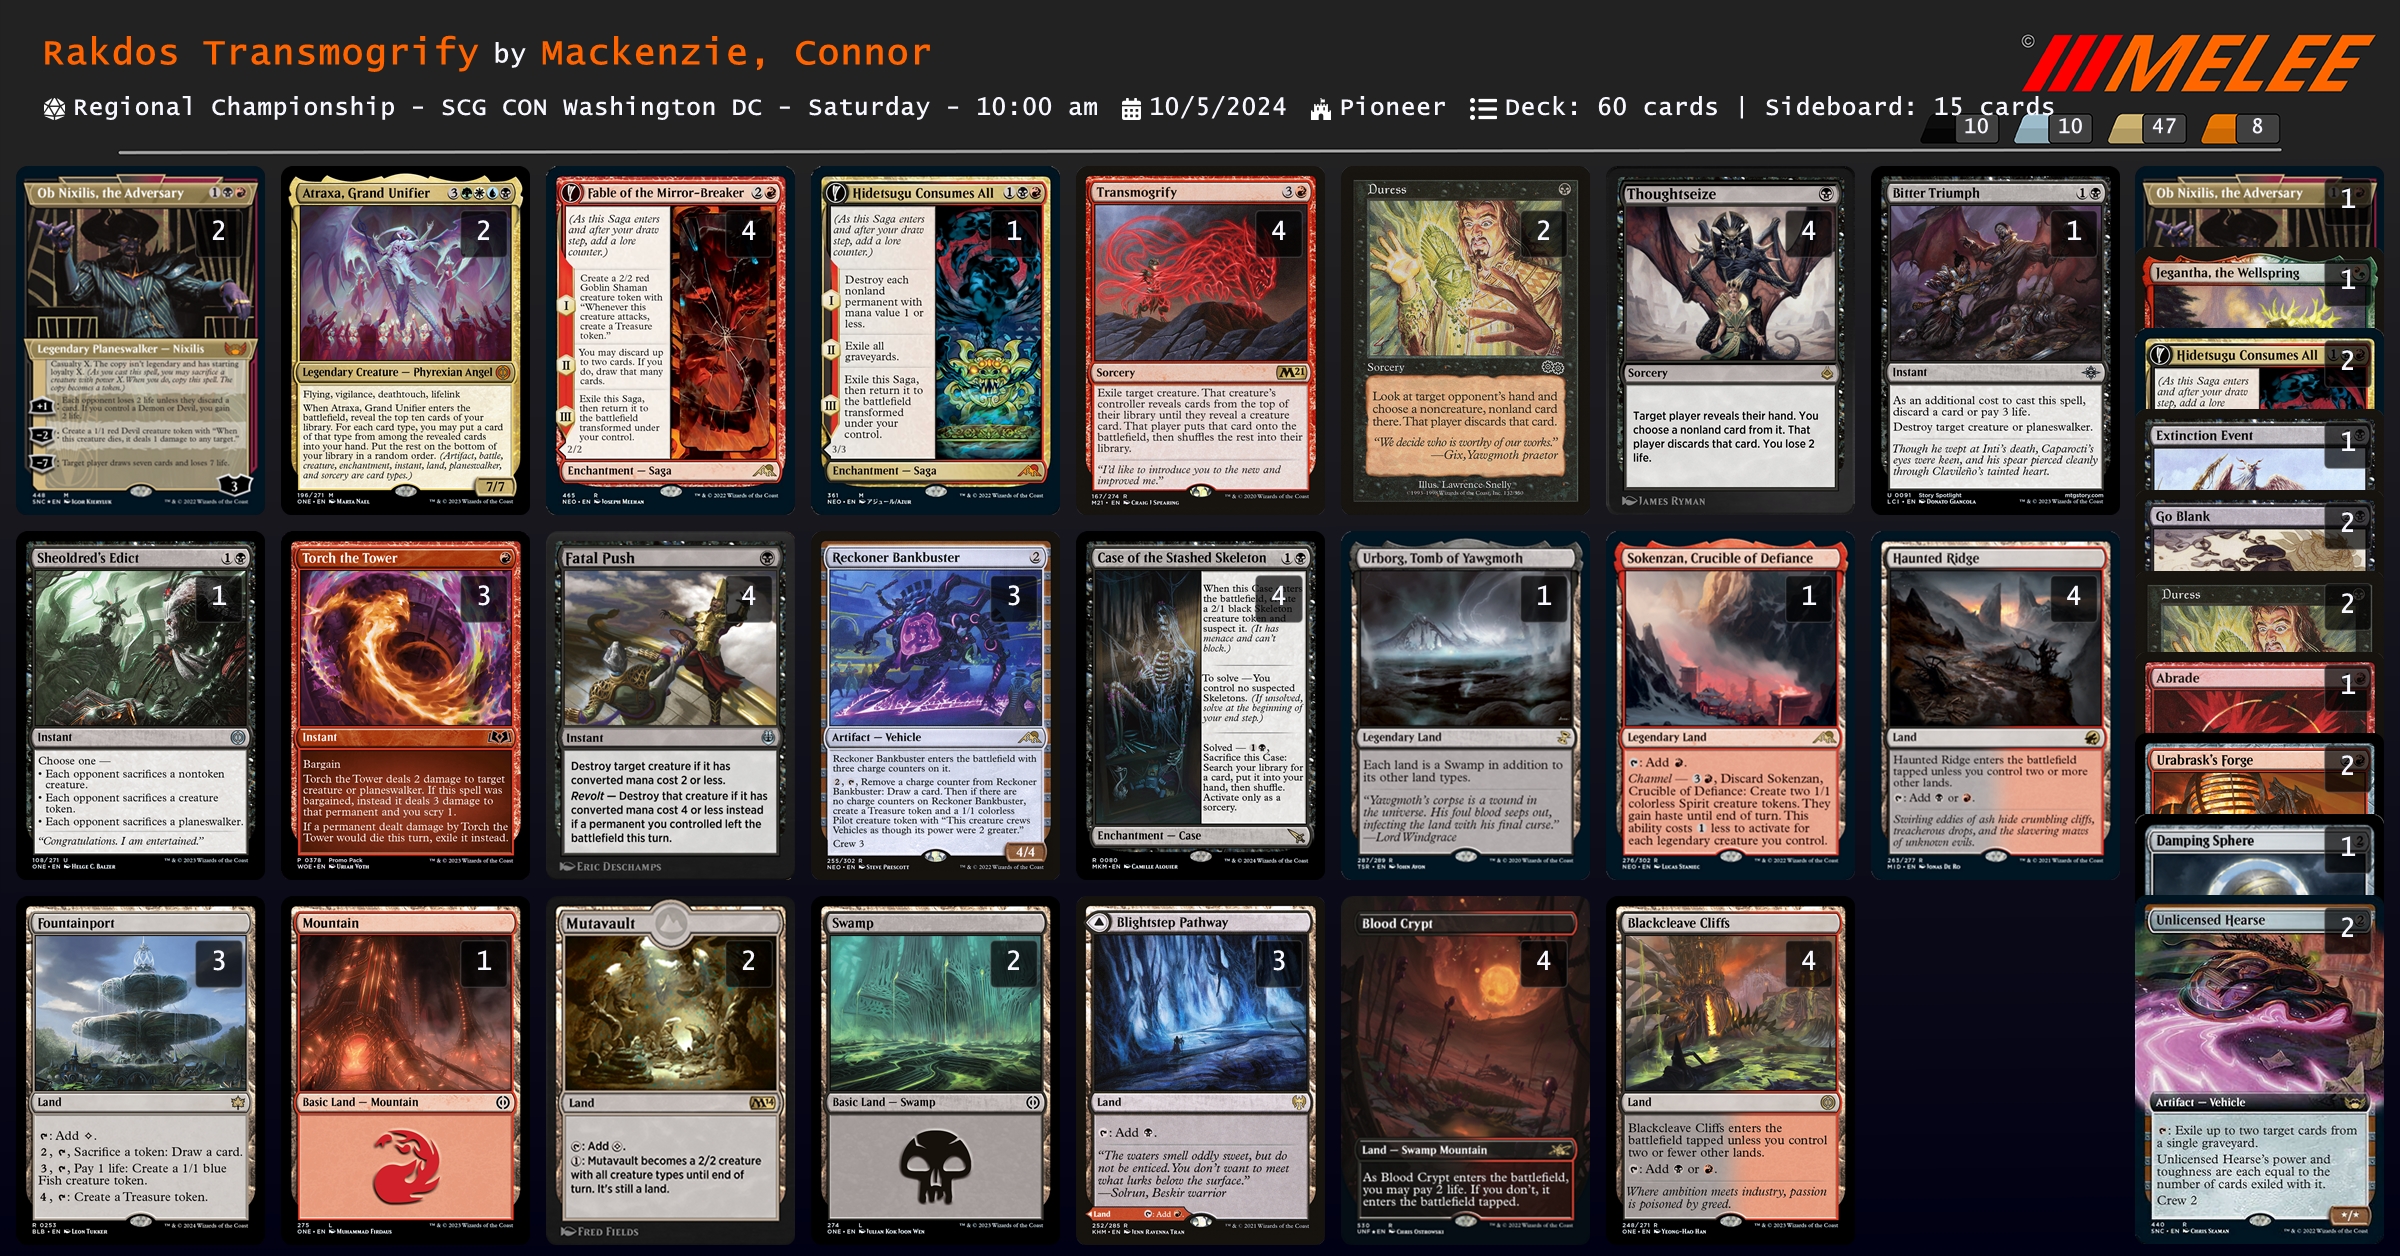
帶了兩張歐尼醬的 Transmogrify,還有正 + 備共計三張 HCA,看來很不想輸犧牲。
### Rakdos Aggro
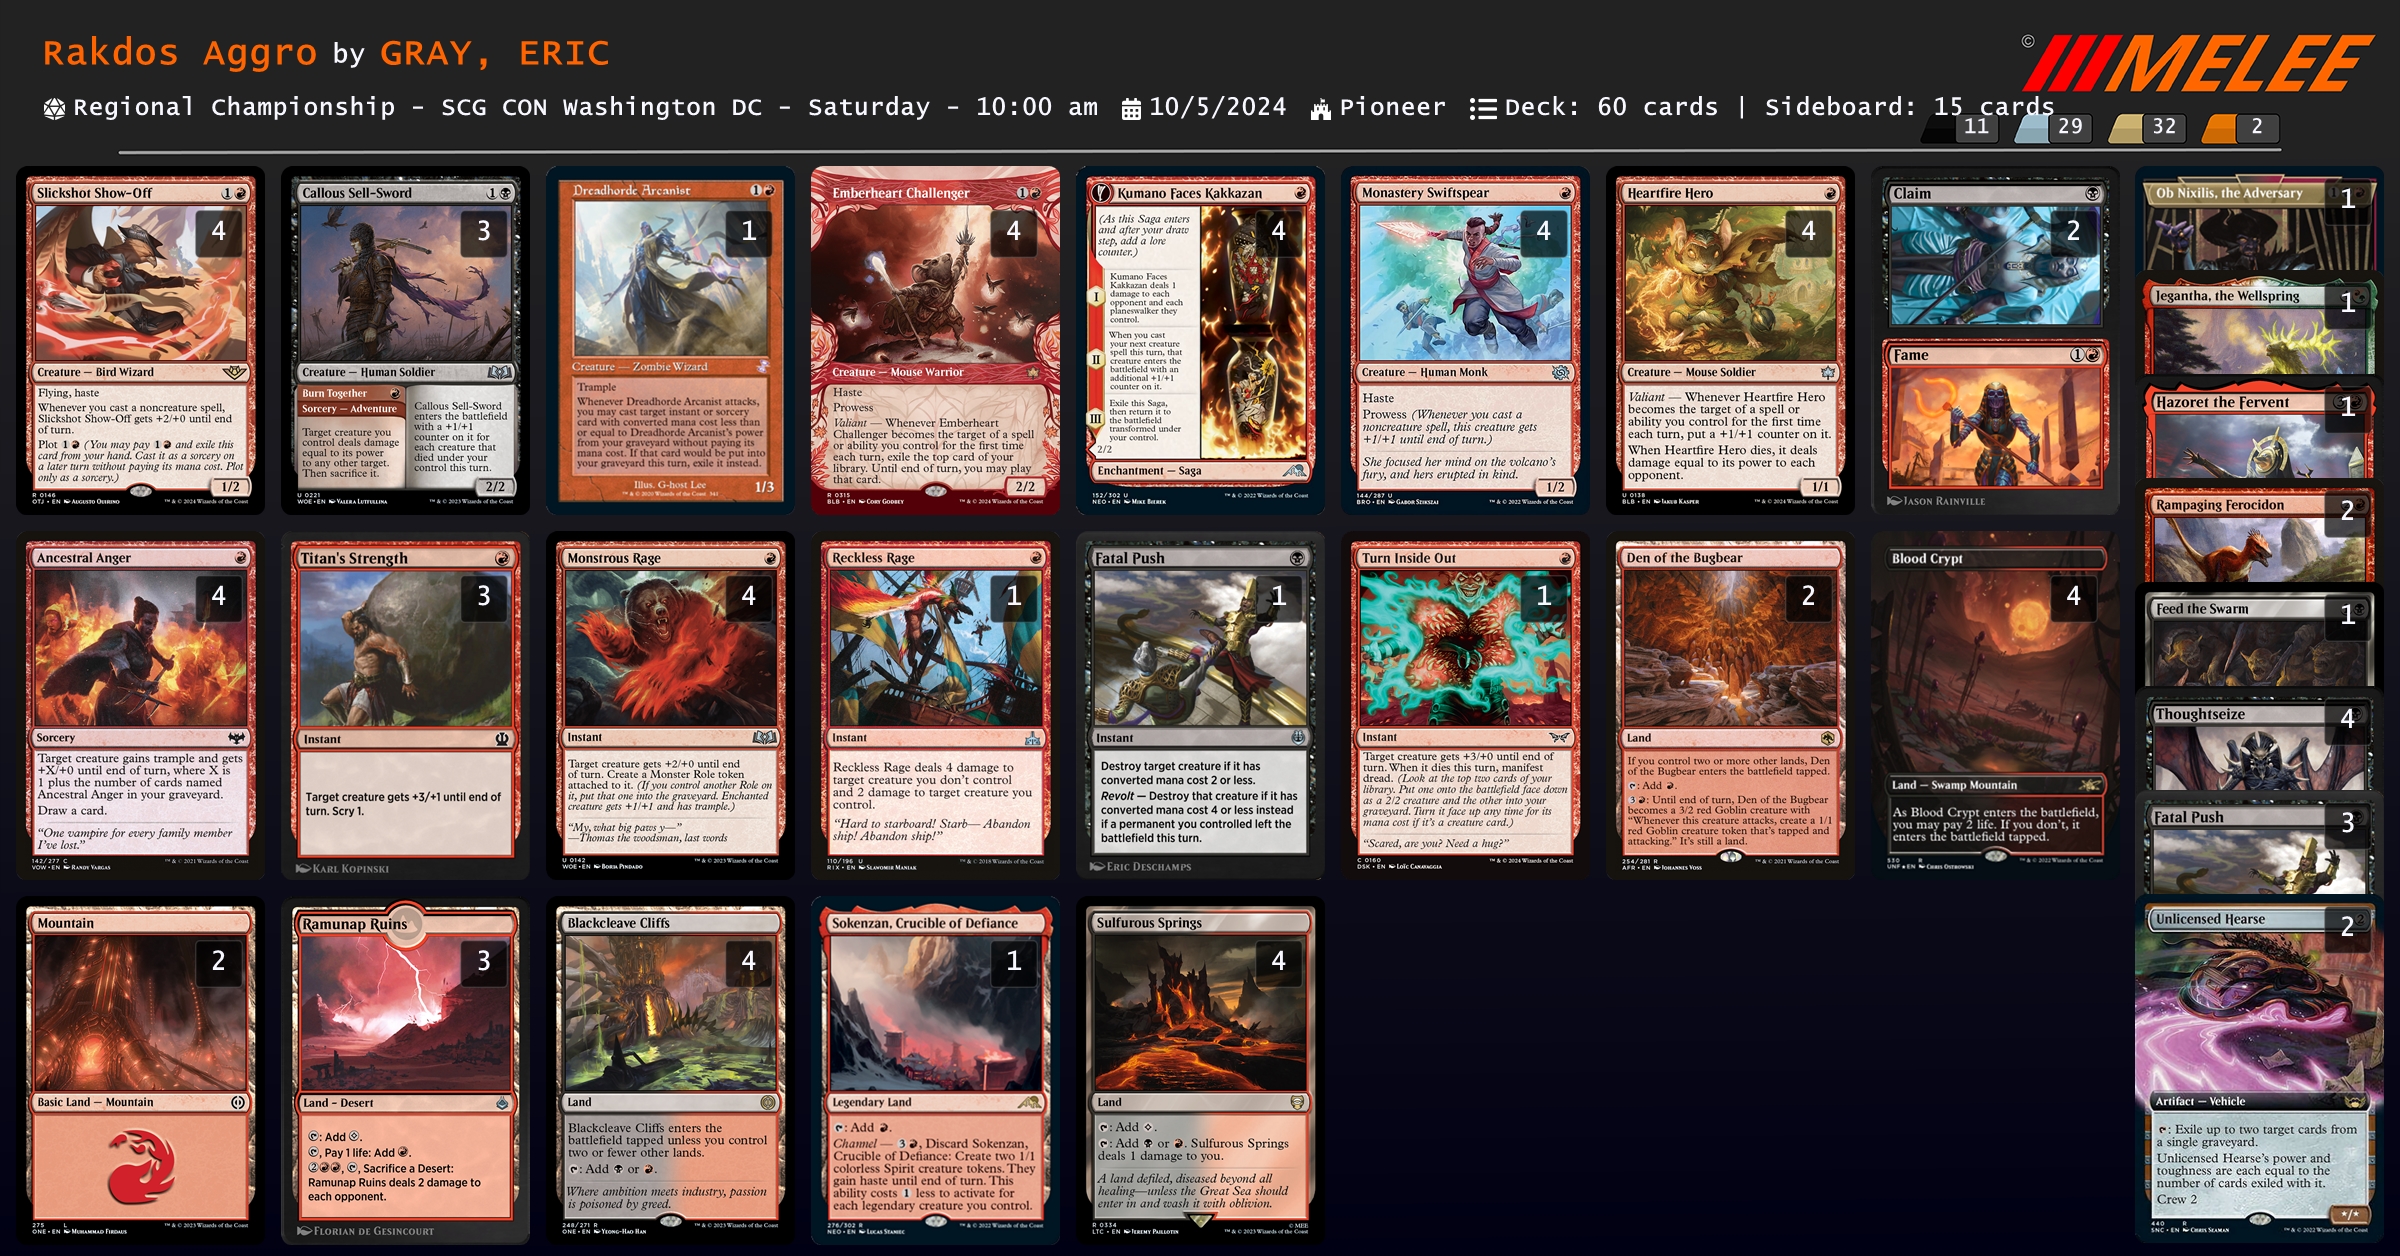
~~很沒創意的 Rakdos Aggro~~
### Enigmatic Incarnation
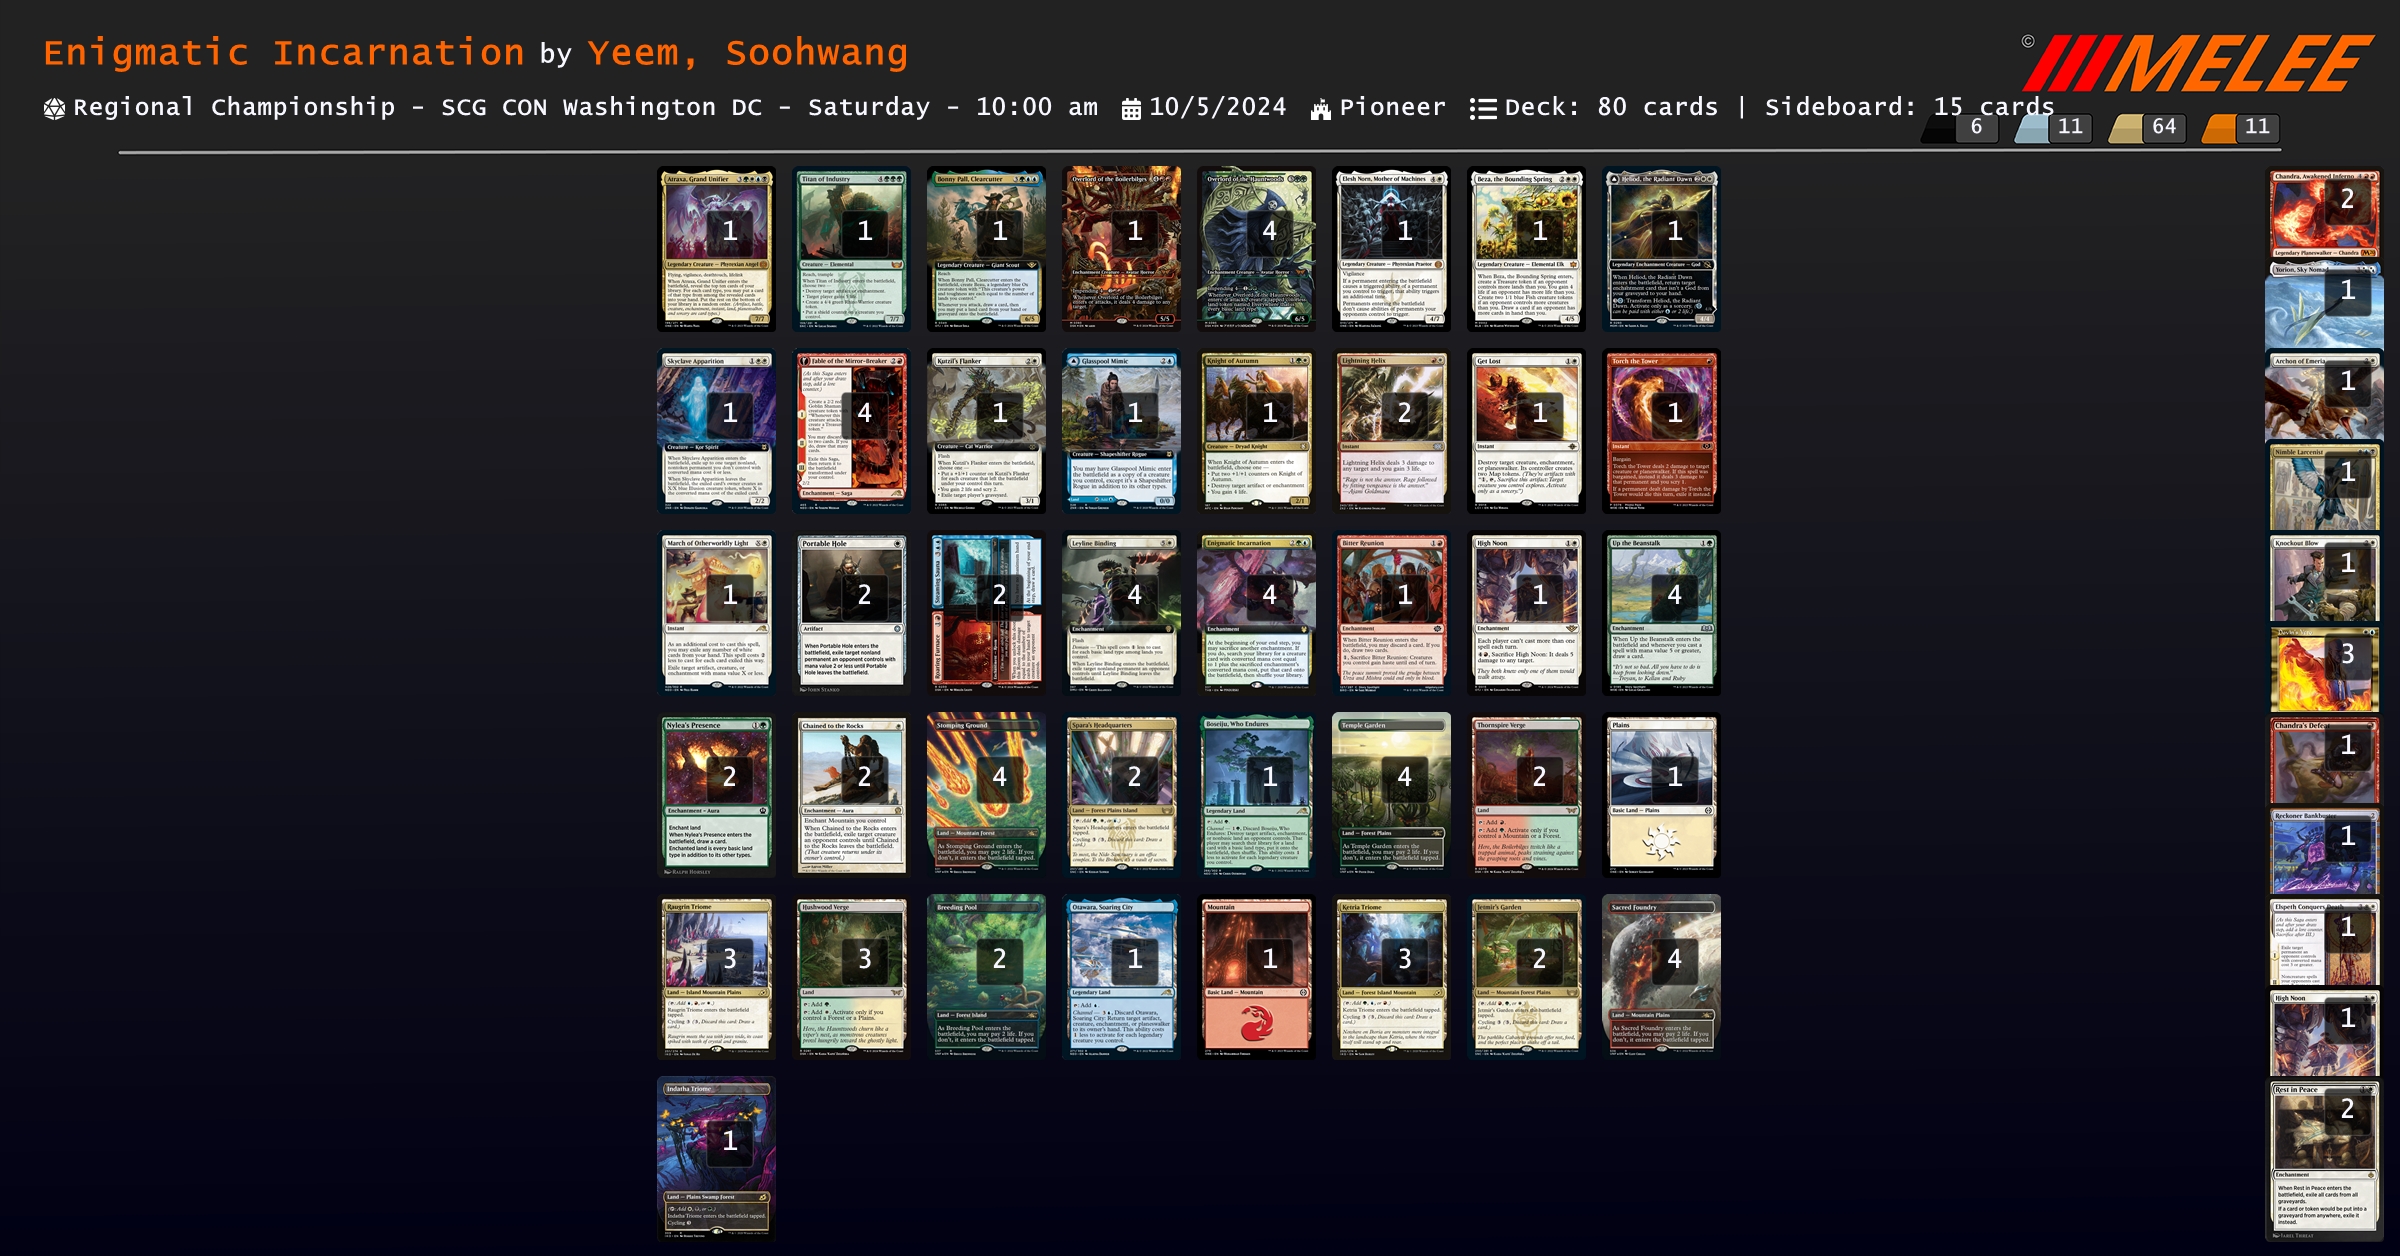
呃,就是 Enigmatic Incarnation 然後不同的工具箱組合,沒啥好說的。
比較特別的是多帶一張 {% mtgcard "Bitter Reunion" tooltip=true %} 加速斬殺。
### Izzet Phoenix
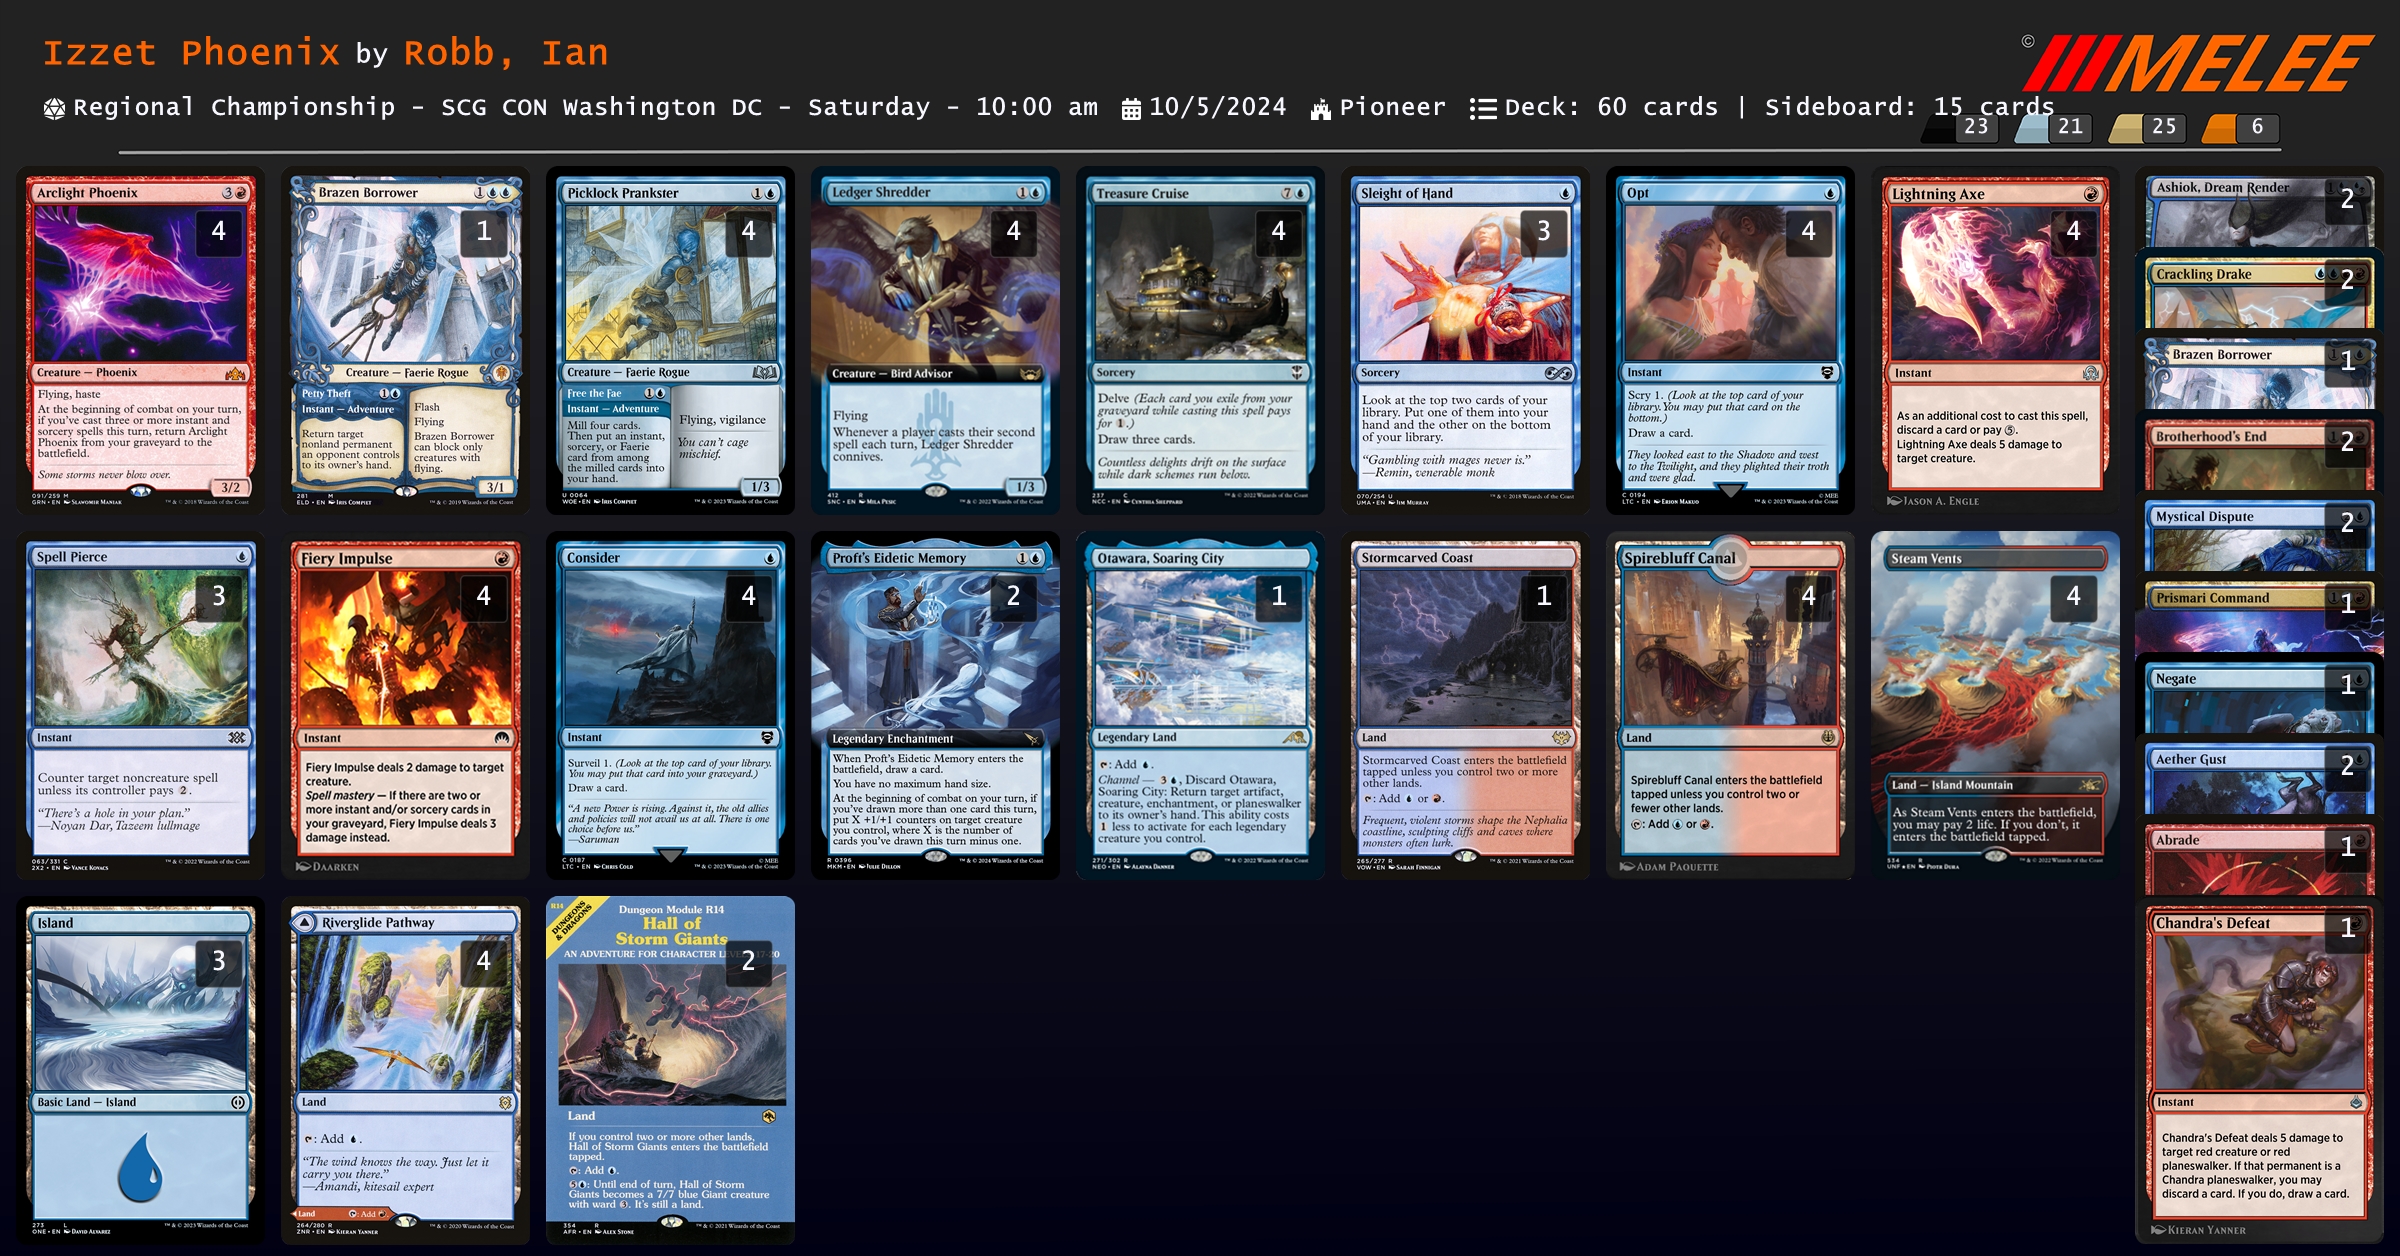
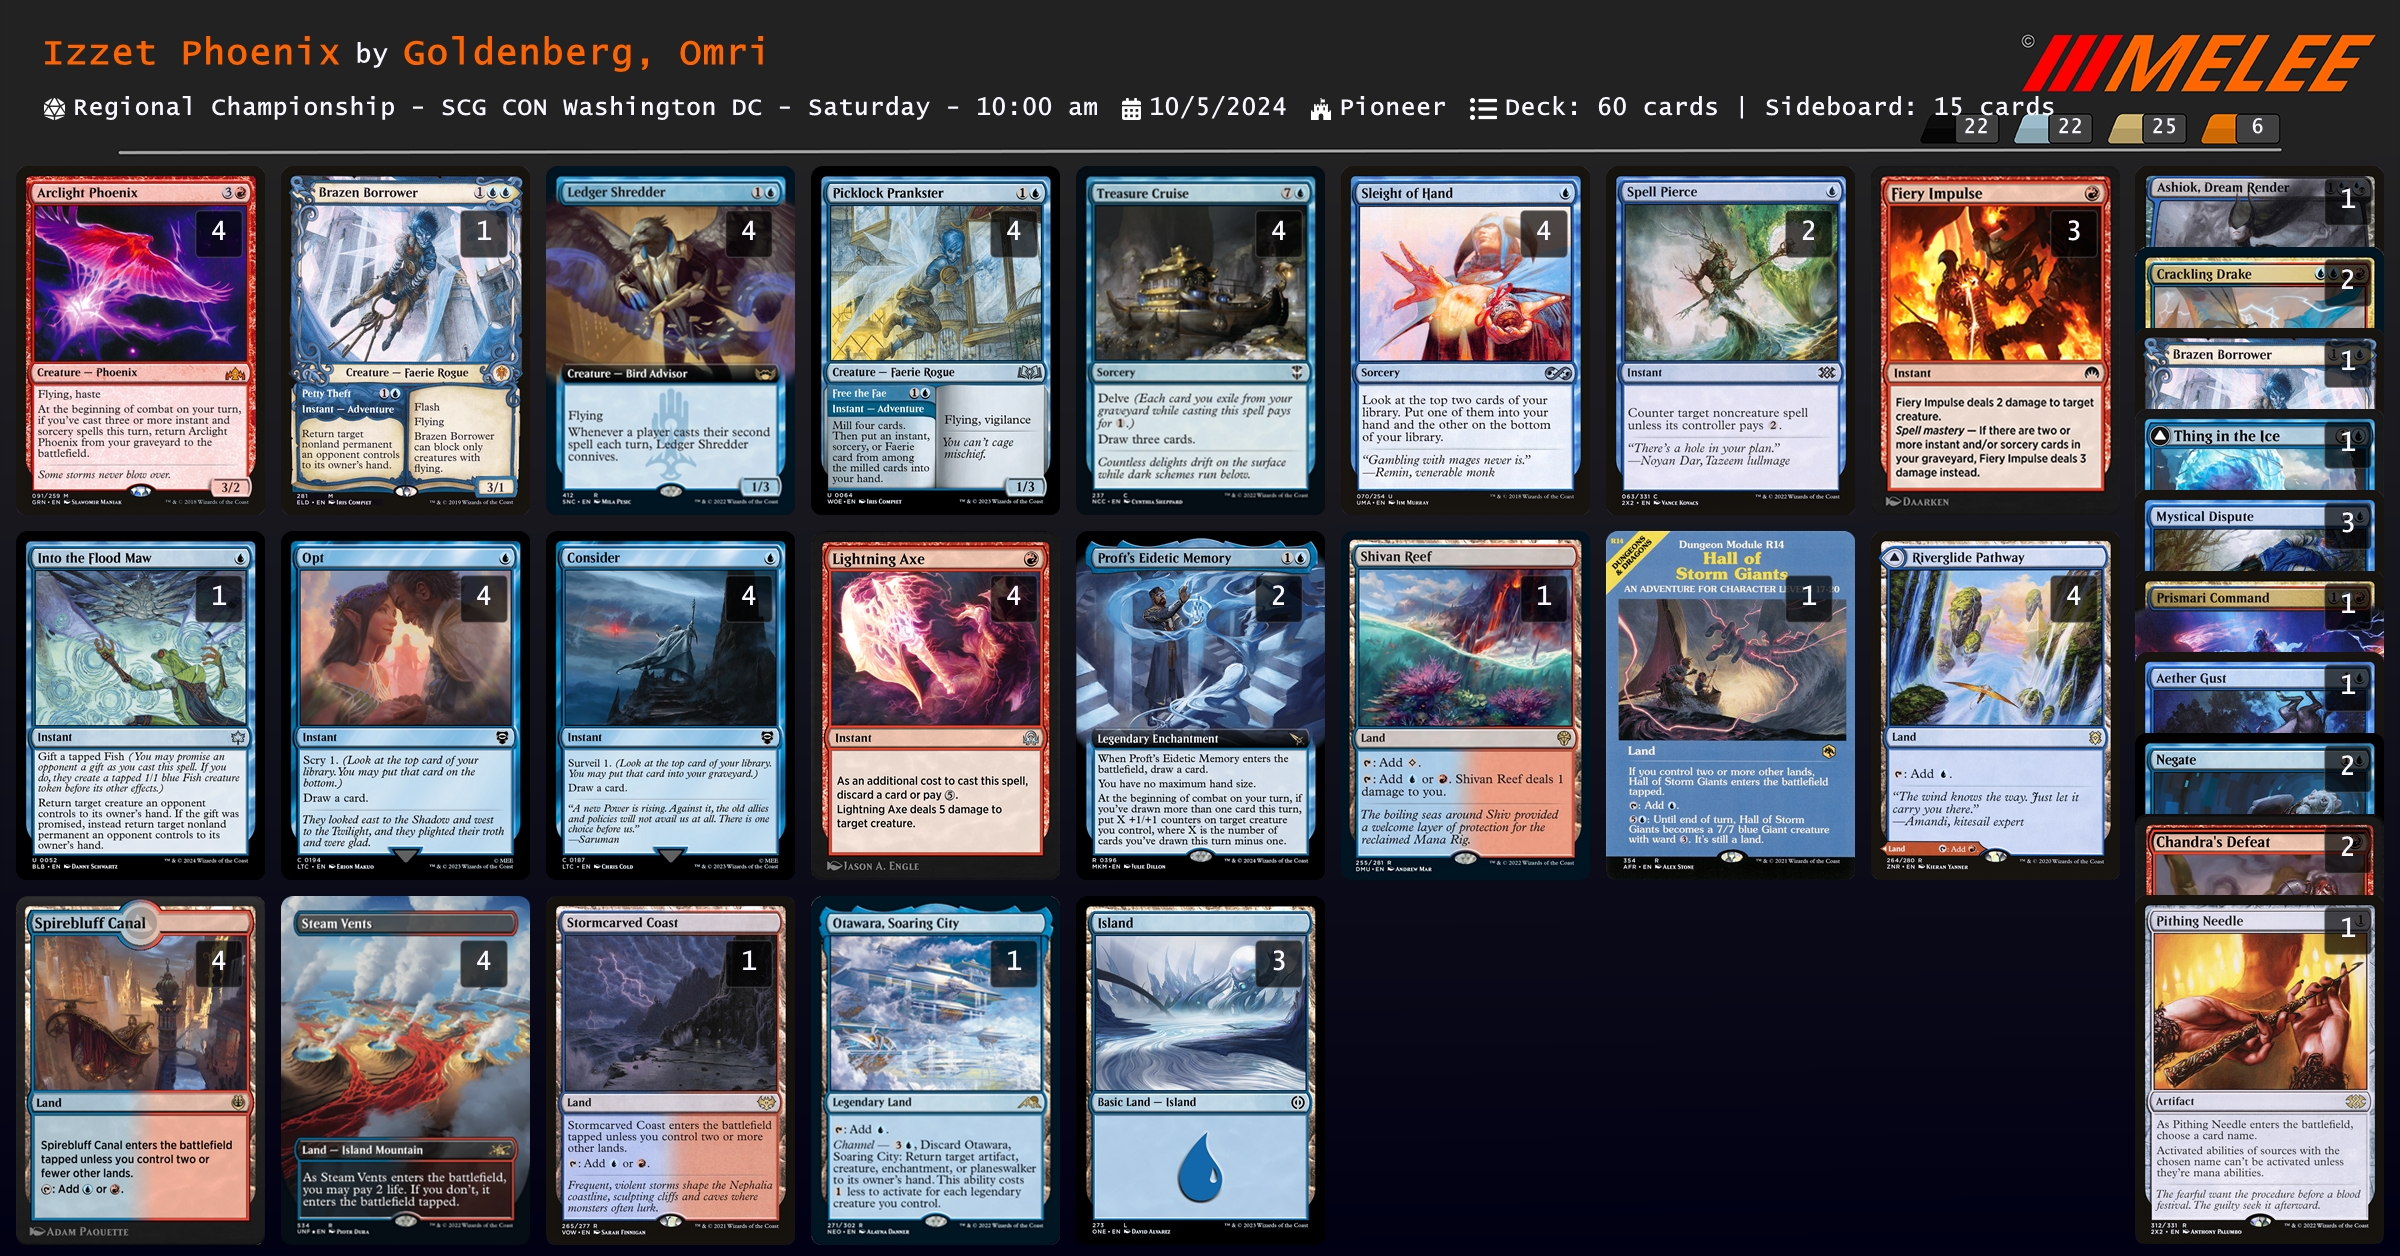
這兩套 Phoenix 長得基本上差不多,只是細節上的差異。
另外現在的 Phoenix 正編局基本上都會帶回手或是拆了,沒辦法 {% mtgcard "High Noon" tooltip=true %} 太多了解不完。
剩下就是備牌選擇了,按照不同的想法有不同的備牌策略。
### Selesnya Company
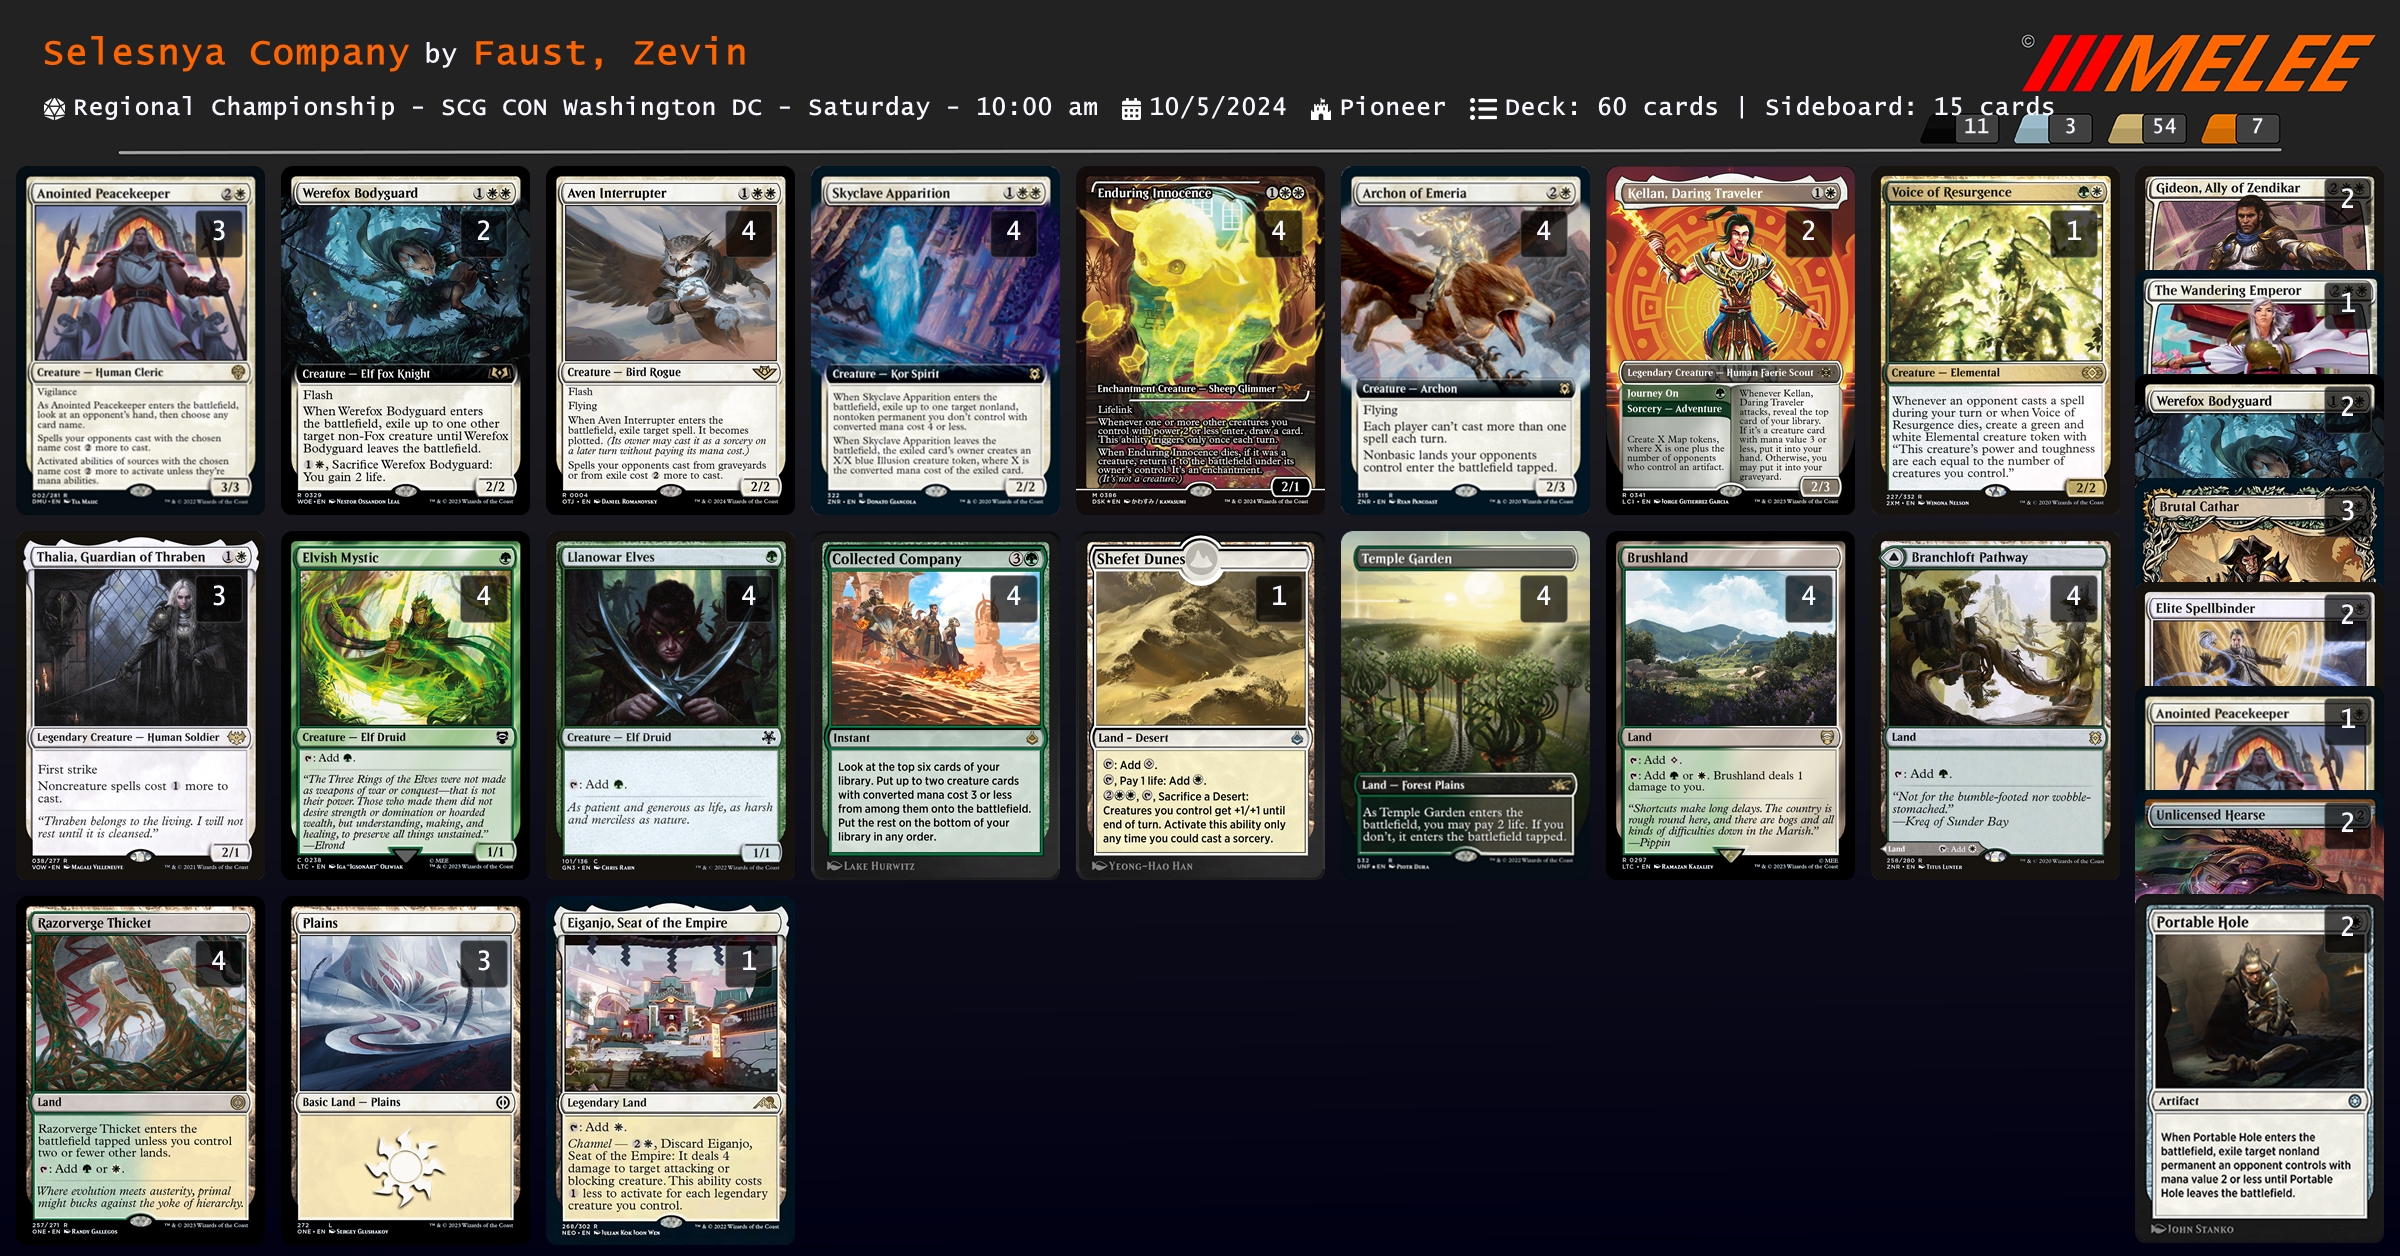
基本上就是薪傳的 Death & Taxes,不過是混綠的先驅版本。
混八張 mana 頭和四張 {% mtgcard "Collected Company" tooltip=true %} 作為加速和 value 手段,並且加入新牌 {% mtgcard "Enduring Innocence" tooltip=true %} 補手牌,除了少數的生物以外、其他生物進場都能抽一張。
這套牌個人蠻看好的,{% mtgcard "Thalia, Guardian of Thraben" tooltip=true %} 可以卡 Phoenix 和 Rakdos Aggro、並且 2/1 先攻可以扛不少環境內的生物。
⋯⋯如果不是我有在關鍵局空翻過兩次 {% mtgcard "Collected Company" tooltip=true %},我可能會組出來帶去 MIT。
### Azorius Lotus Field
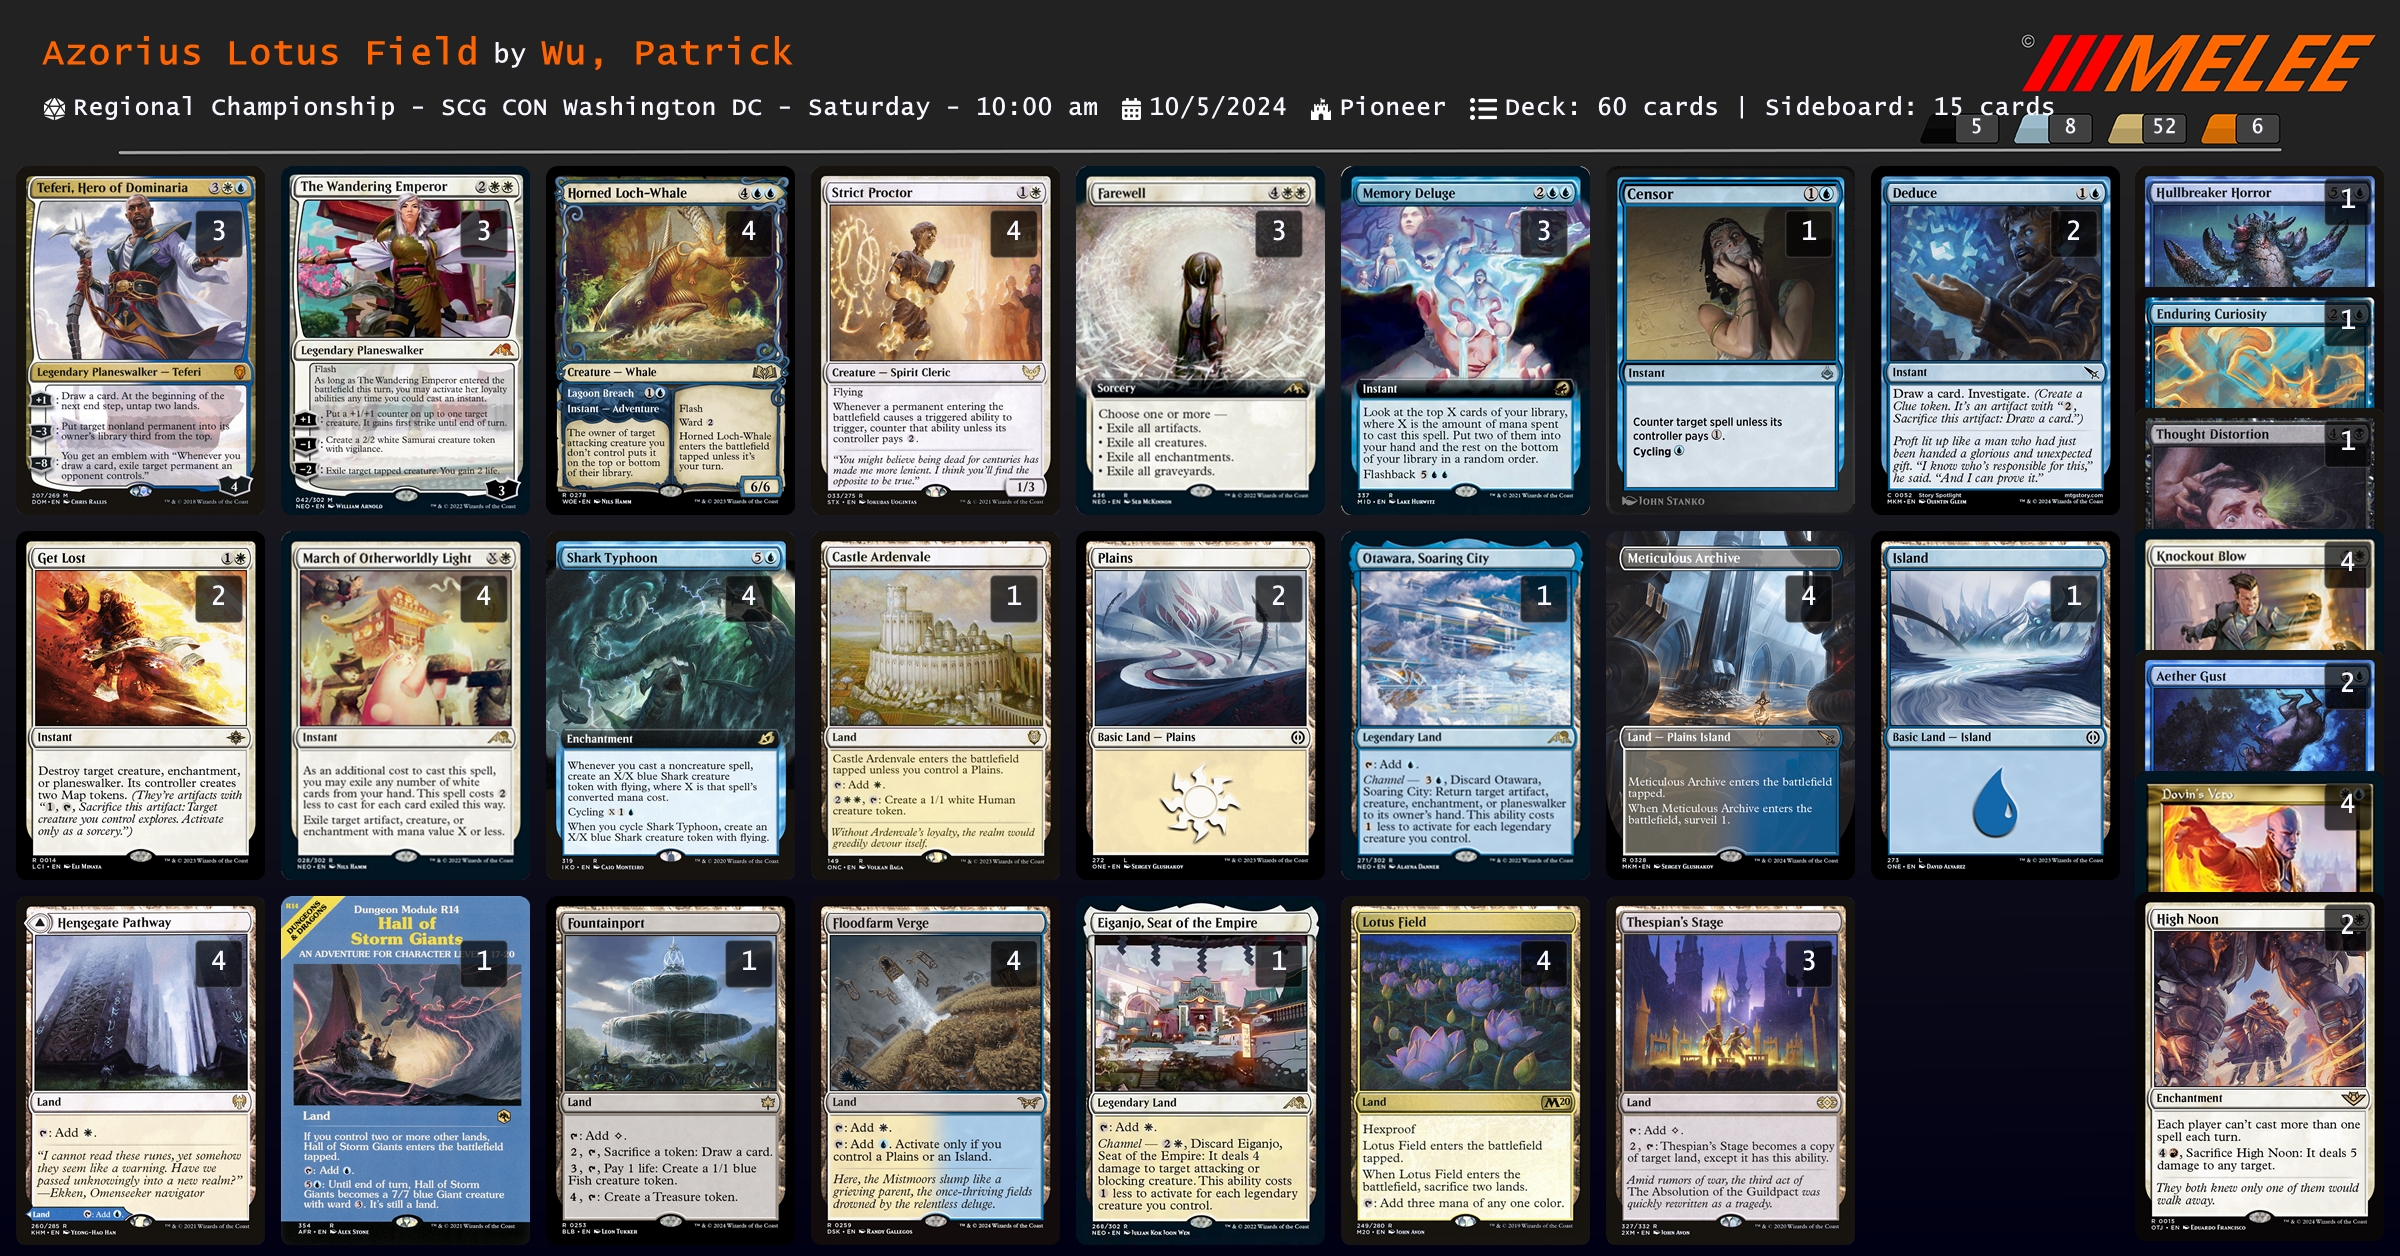
本質上就是一套控制,不過帶了 {% mtgcard "Lotus Field" tooltip=true %} 和 {% mtgcard "Strict Proctor" tooltip=true %} 作 mana cheating,另外掛了三張 {% mtgcard "Thespian's Stage" tooltip=true %} 一路貪到底。
不過雖然說他是控制,但這套牌其實只有帶一張康牌 {% mtgcard "Censor" tooltip=true %},其他都是解牌。
但我覺得這是能理解的選擇,我推測是他認為當前環境不需要那麼多的康牌,威脅可以都用殺牌解決,畢竟這套牌是有可能三回 tapped out 做 {% mtgcard "Strict Proctor" tooltip=true %} + {% mtgcard "Lotus Field" tooltip=true %} 的,康牌沒辦法在後續回合處理威脅,但殺牌可以,因此把康的位置換成殺牌。
同樣的,現在環境中的套牌要嘛掃場來不及要嘛不需要掃,於是只帶三張 {% mtgcard "Farewell" tooltip=true %} 作為打 Enigmatic Incarnation 的手段。
> 寫完這一段後,我跑去他的推特 @WUCtrl,找到了這篇文章:[Regional Championship DC - UW Lotus Field](https://flexslot.gg/article/25f9b253-5c4e-4dbb-b318-23b124830d27),裏面有解釋為什麼這個 list 會變成這樣,理由跟我猜的差不多,我就不翻譯了(?
## MTG SEA Championship Final Season 3 Round 1
[Melee 連結](https://melee.gg/Tournament/View/161645)
這次 SEA Championship 辦在新加坡,前面跟我們一樣是七輪瑞士制,不過八強第二天才打。
| Rank | Player | Decklist | Record |
| :-: | :-: | :-: | :-: |
| 1 | Venom1 | [Rakdos Aggro](https://melee.gg/Decklist/View/441670) | 6-1 |
| 2 | Justin Chin | [Enigmatic Incarnation](https://melee.gg/Decklist/View/442167) | 6-1 |
| 4 | danielelor | [Izzet Phoenix](https://melee.gg/Decklist/View/442033) | 6-1 |
| 4 | Tyng Wei Tan | [Azorius Humans](https://melee.gg/Decklist/View/441752) | 5-0-2 |
| 8 | Allan Fong | [Enigmatic Incarnation](https://melee.gg/Decklist/View/441496) | 6-1 |
| 8 | Danny Seet | [Enigmatic Incarnation](https://melee.gg/Decklist/View/441808) | 5-0-2 |
| 8 | Ronald Joshua Yu | [Mono-Black Demons](https://melee.gg/Decklist/View/440563) | 5-0-2 |
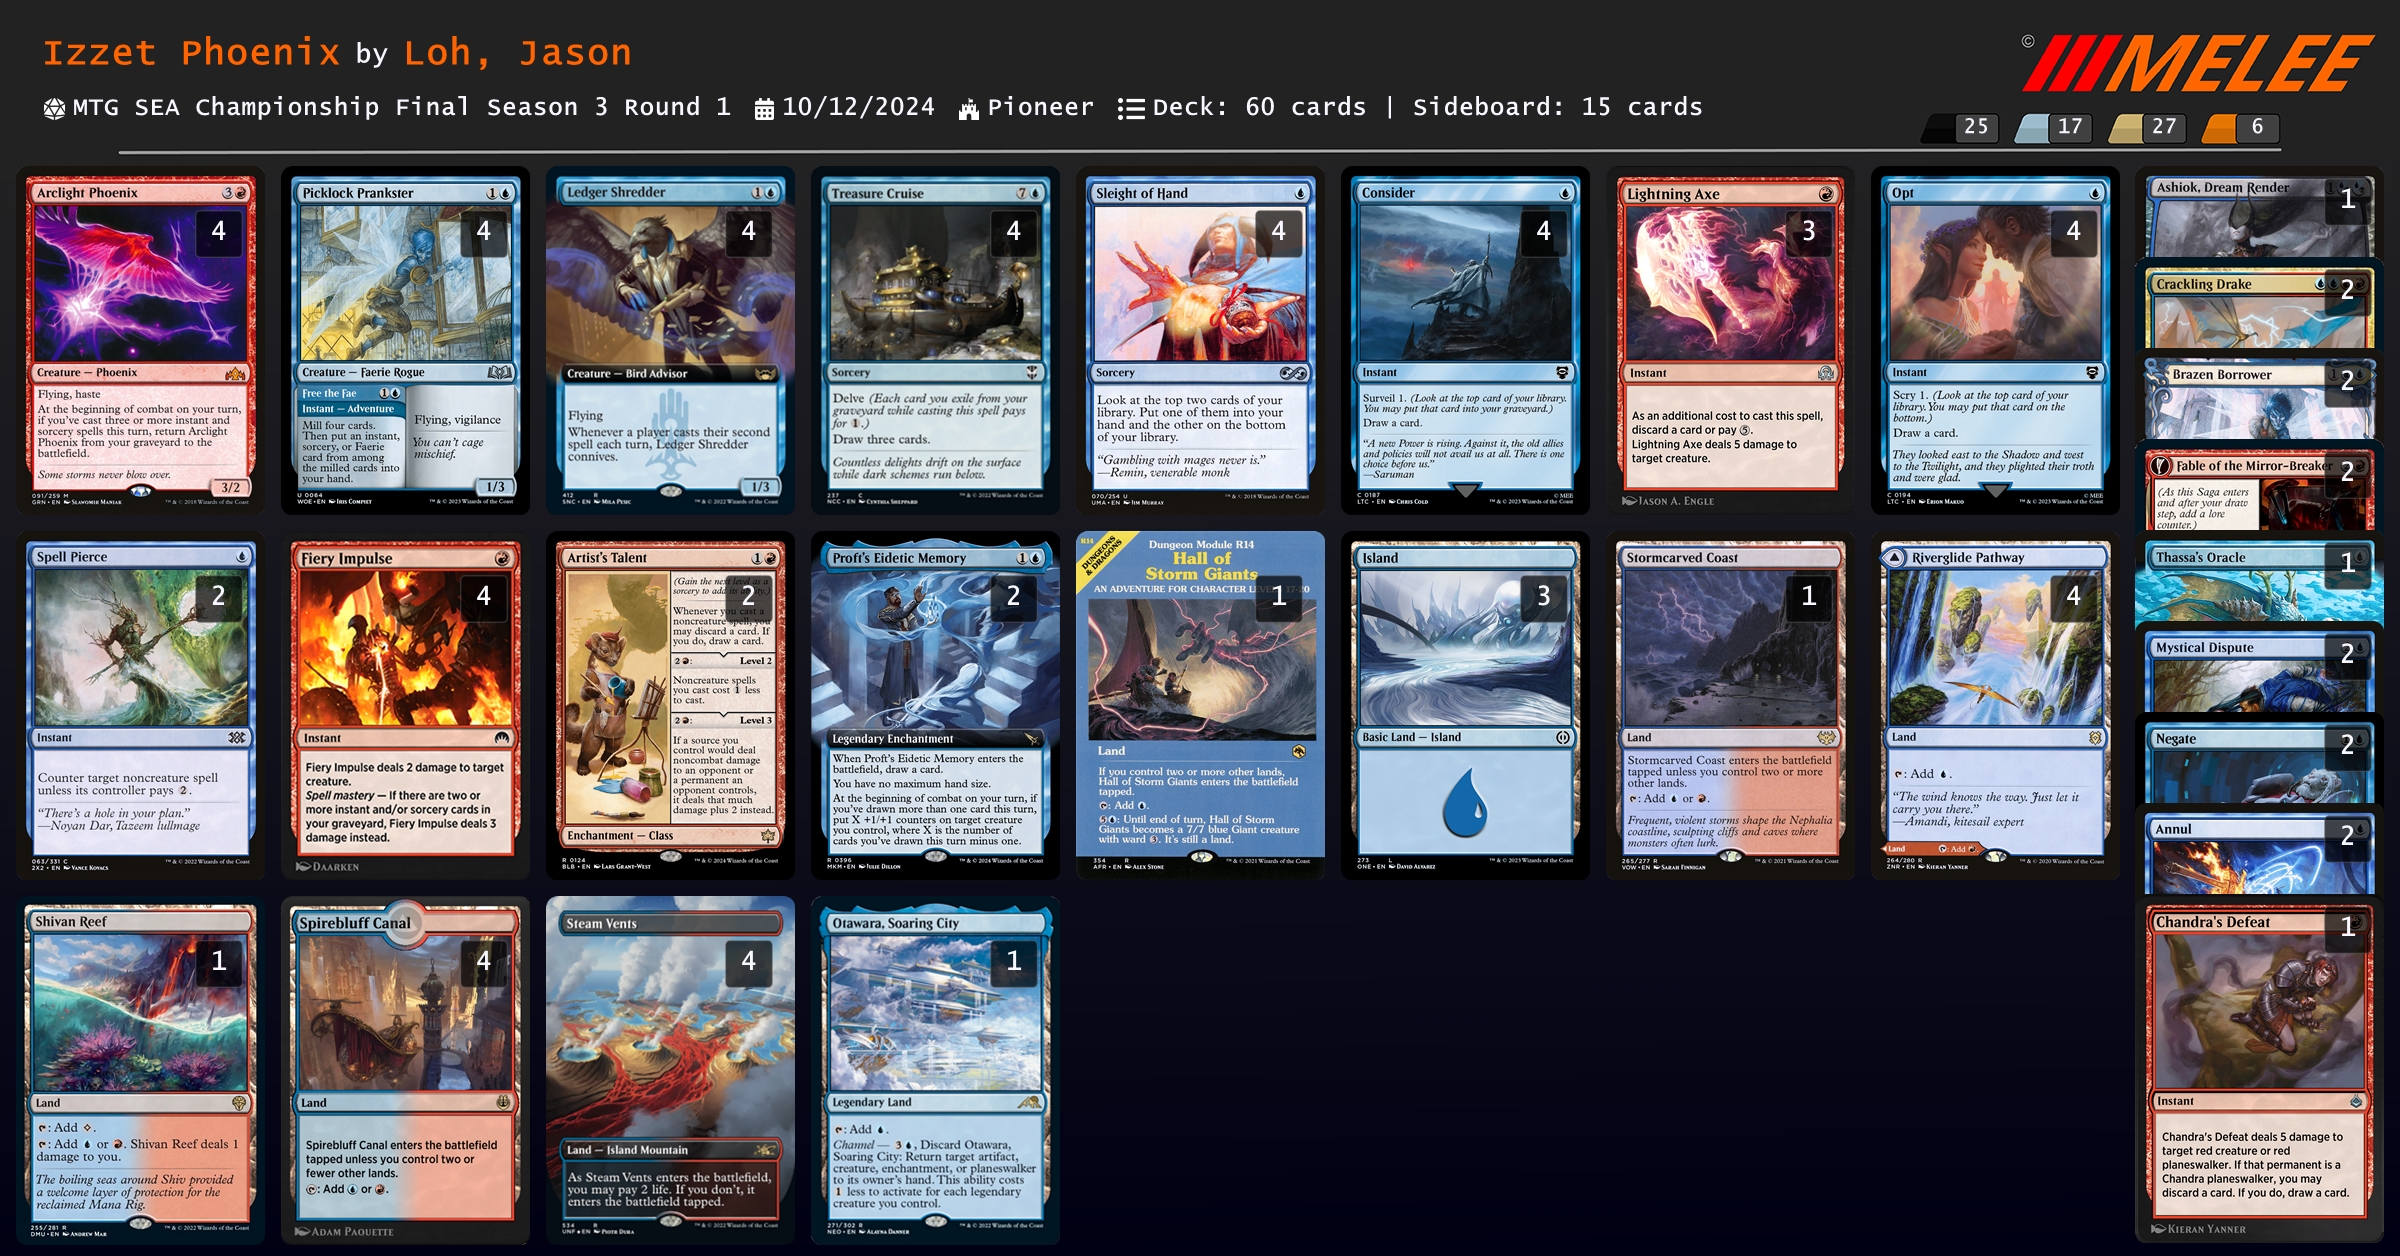
| 8 | Jason Loh | [Izzet Phoenix](https://melee.gg/Decklist/View/442434) | 5-0-2 |
### Rakdos Aggro
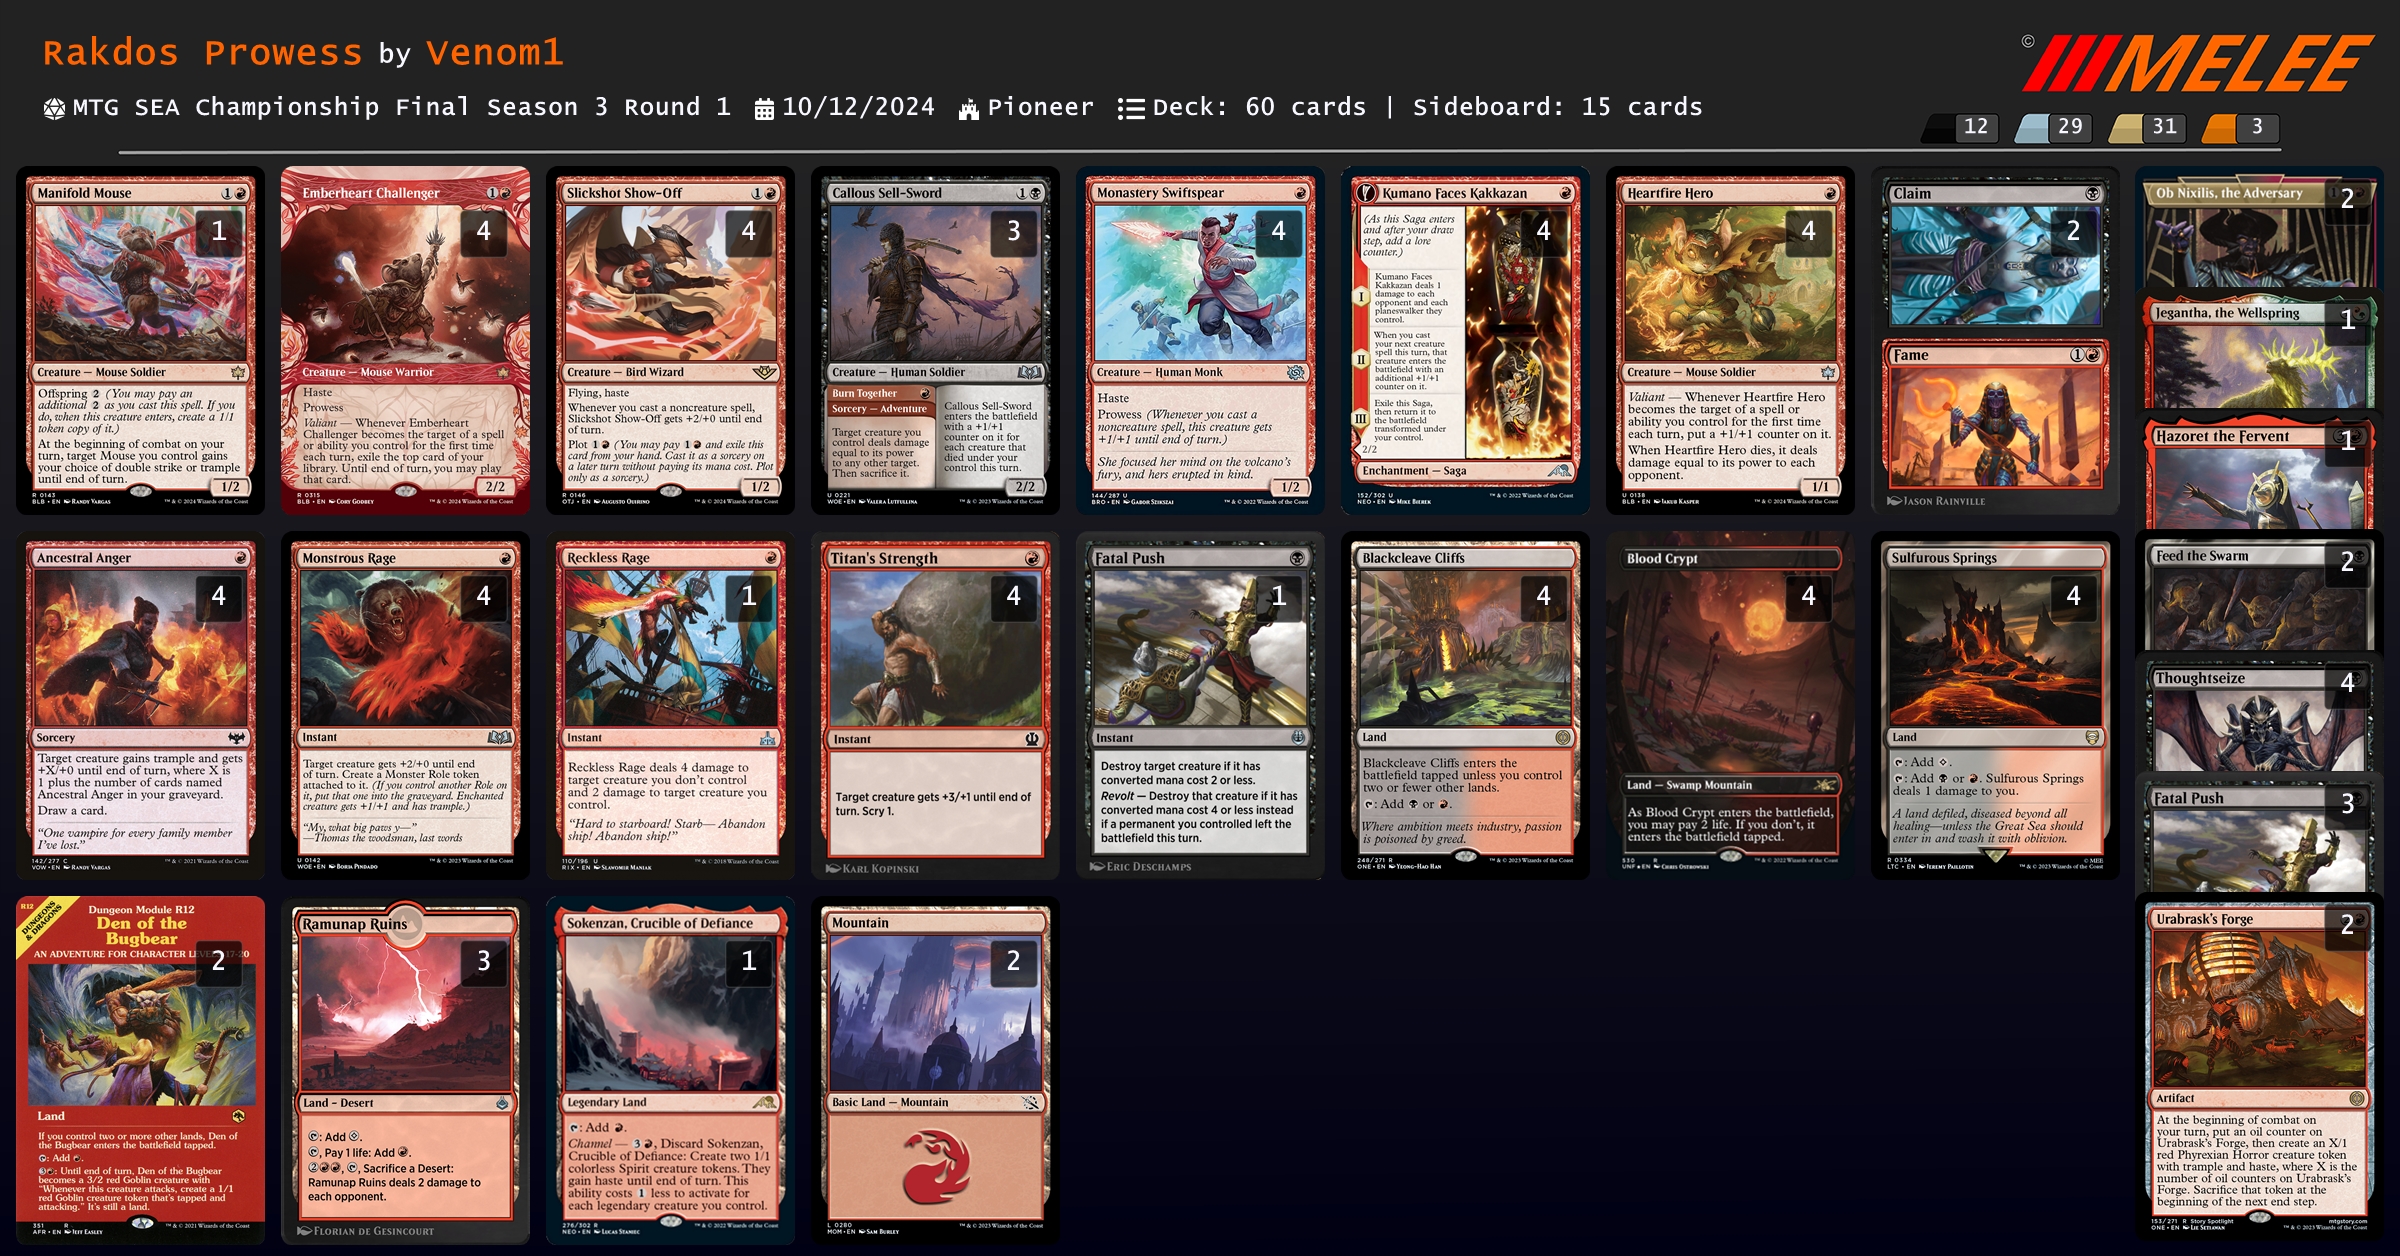
老樣子的 Rakdos Aggro。
### Engimatic Incarnation
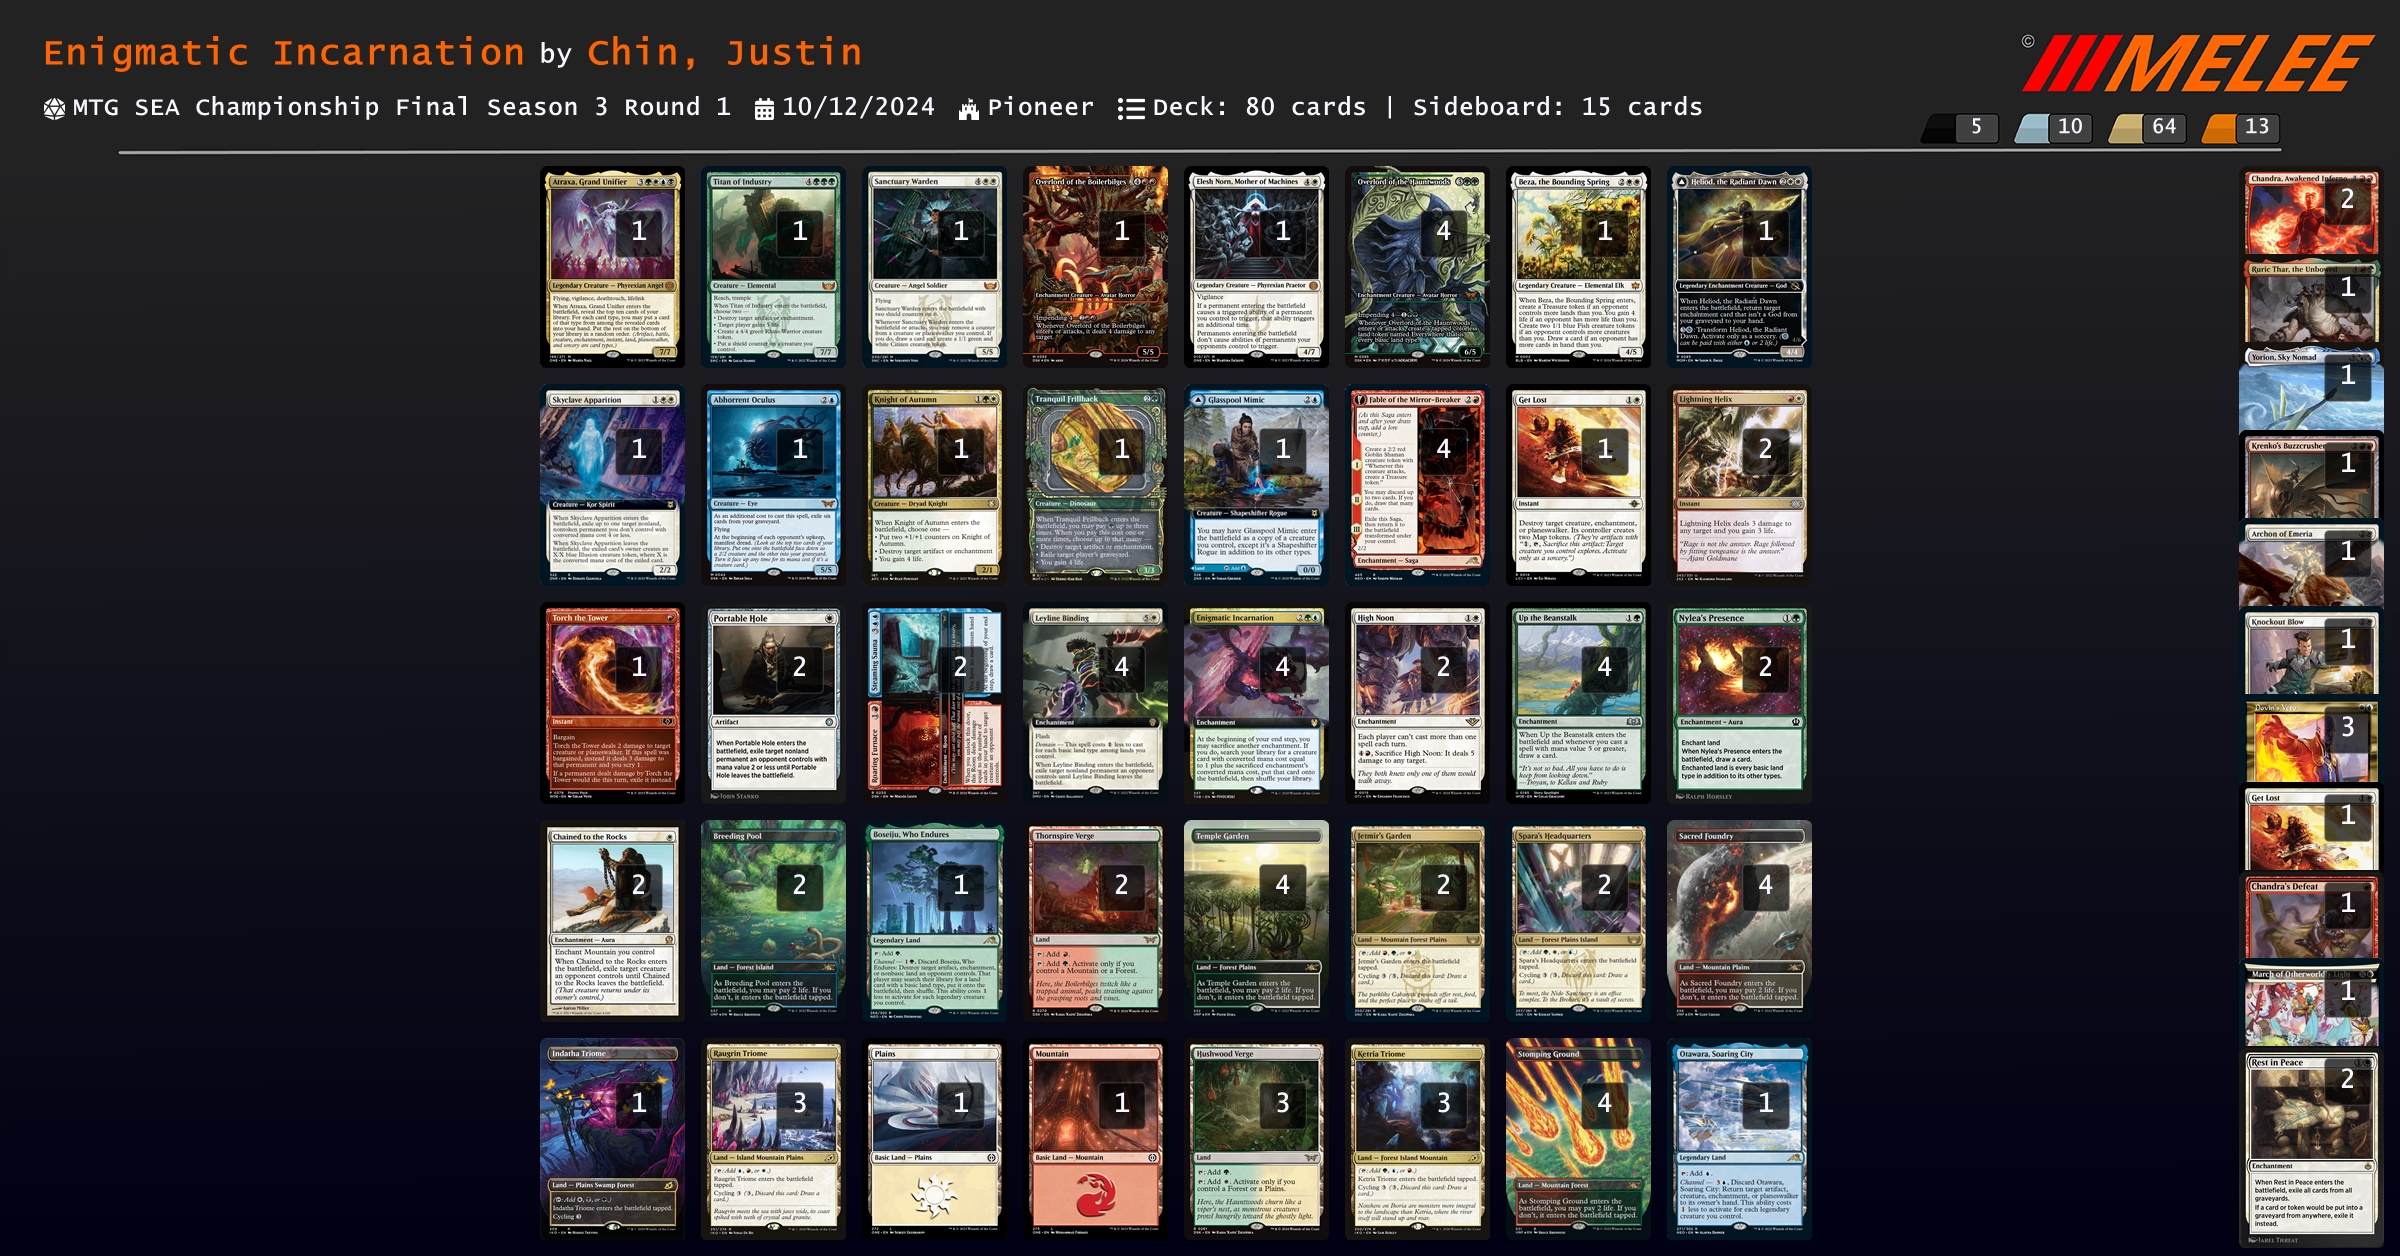
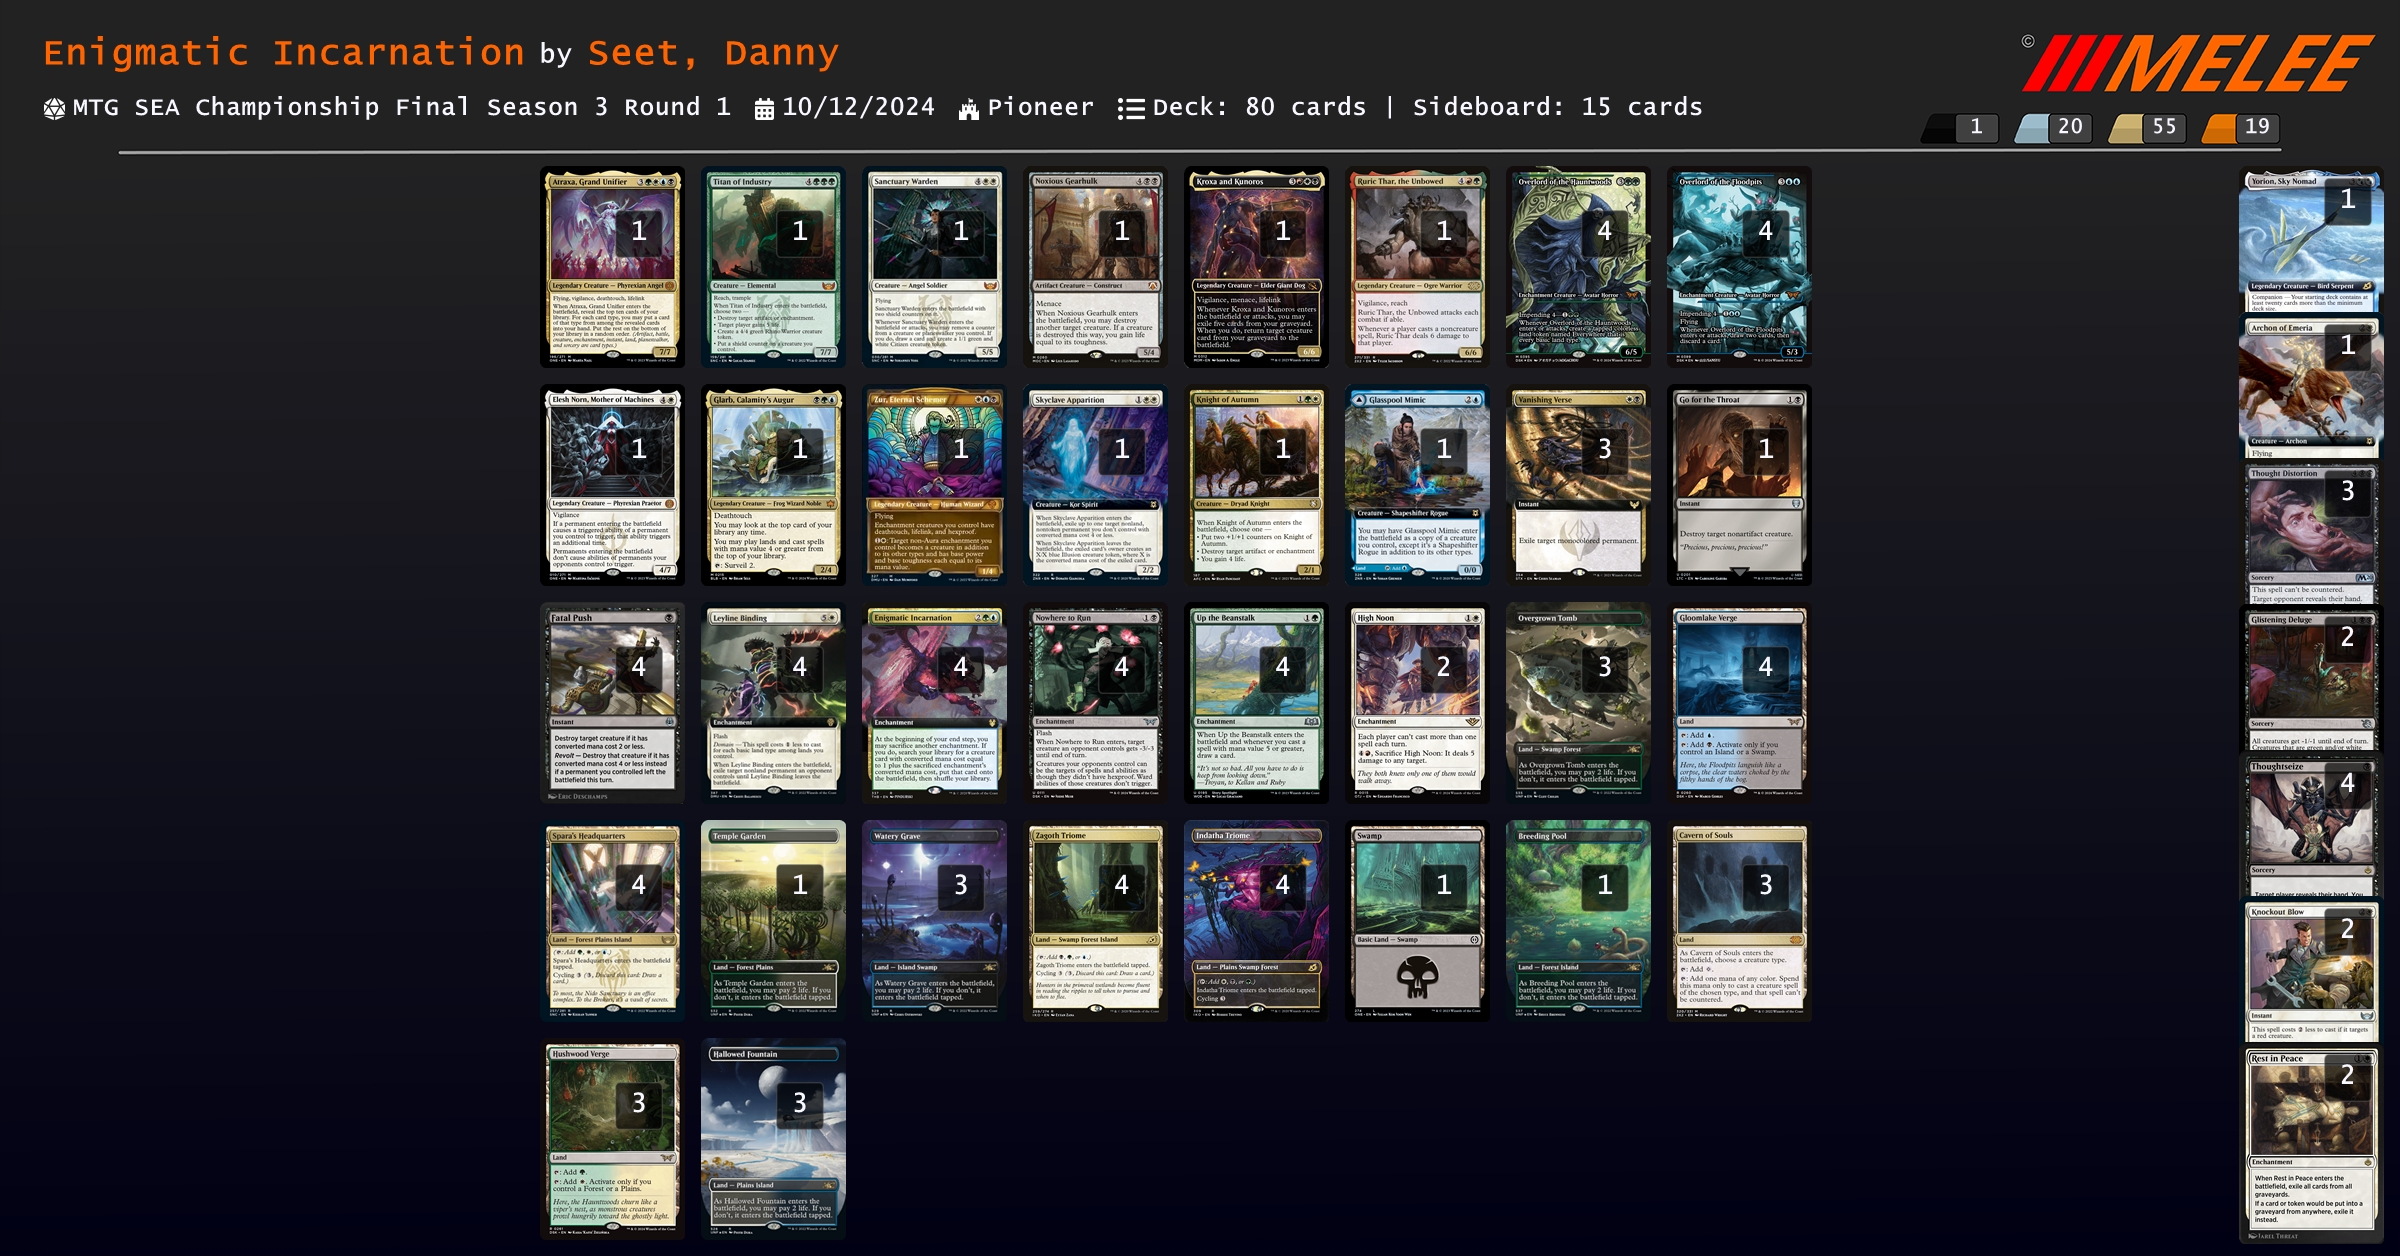
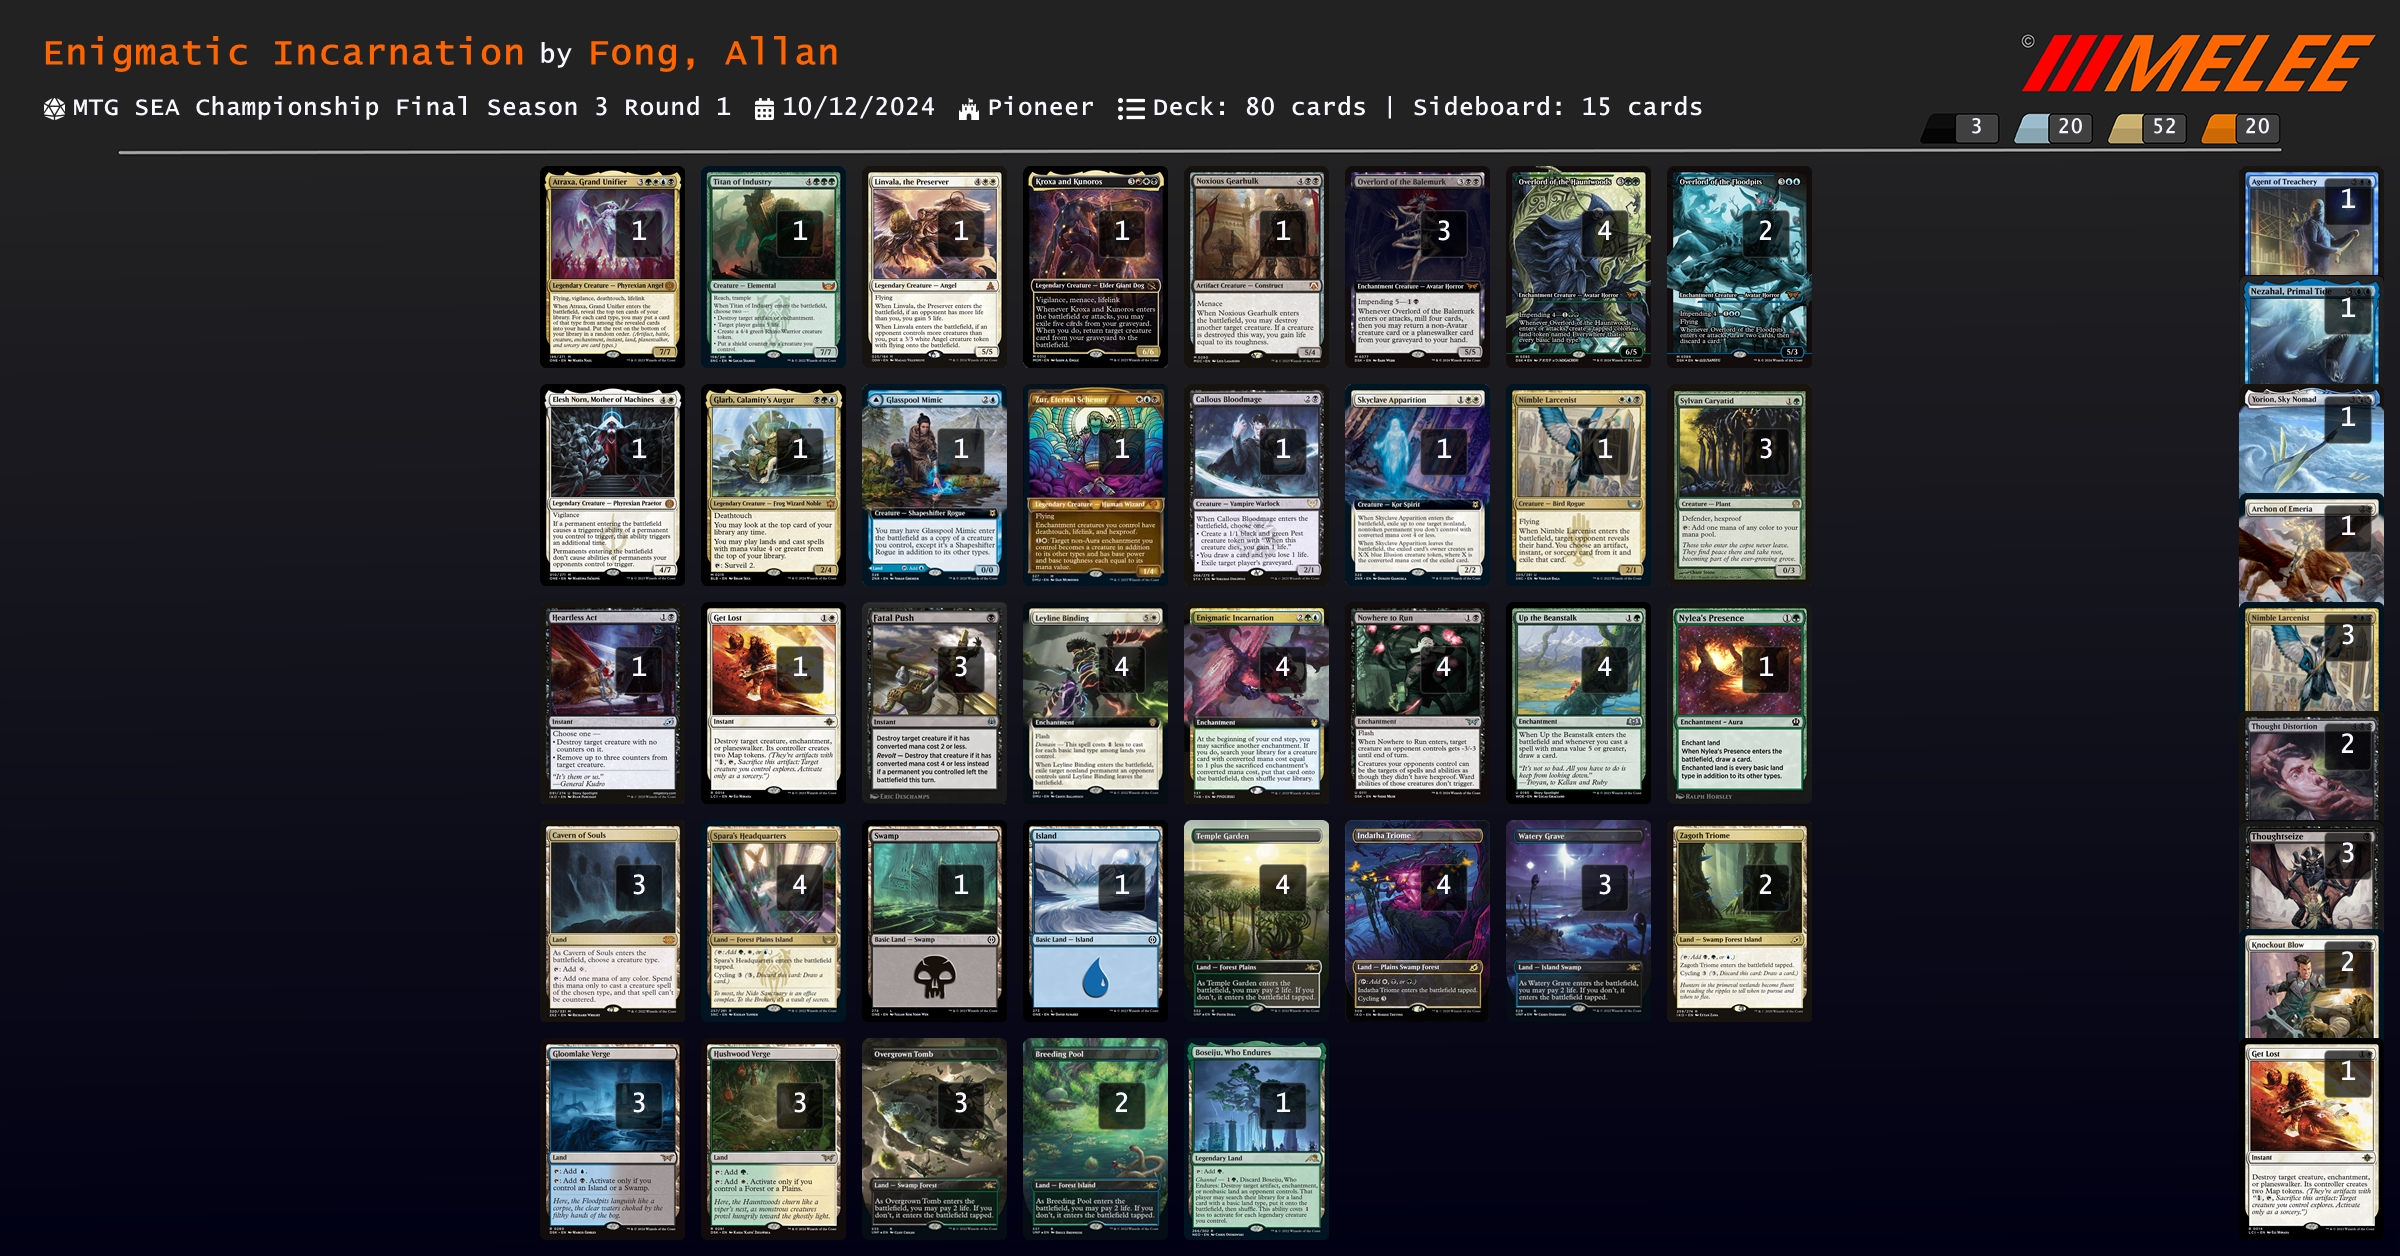
這邊可以注意一下,不同的人會有不同的 Engimatic Incarnation 構築,像是有些選用 {% mtgcard "Lightning Helix" tooltip=true %} 等紅色和白色為主的殺牌,但也有人選用 {% mtgcard "Vanishing Verse" tooltip=true %} 和 {% mtgcard "Fatal Push" tooltip=true %} 這類黑色為主的殺牌。
### Azorius Humans

基本上就是 Mono-White Spash Blue,為了四張 {% mtgcard "Mockingbird" tooltip=true %},副官不夠 {% mtgcard "Mockingbird" tooltip=true %} 來湊。
### Izzet Pheonix
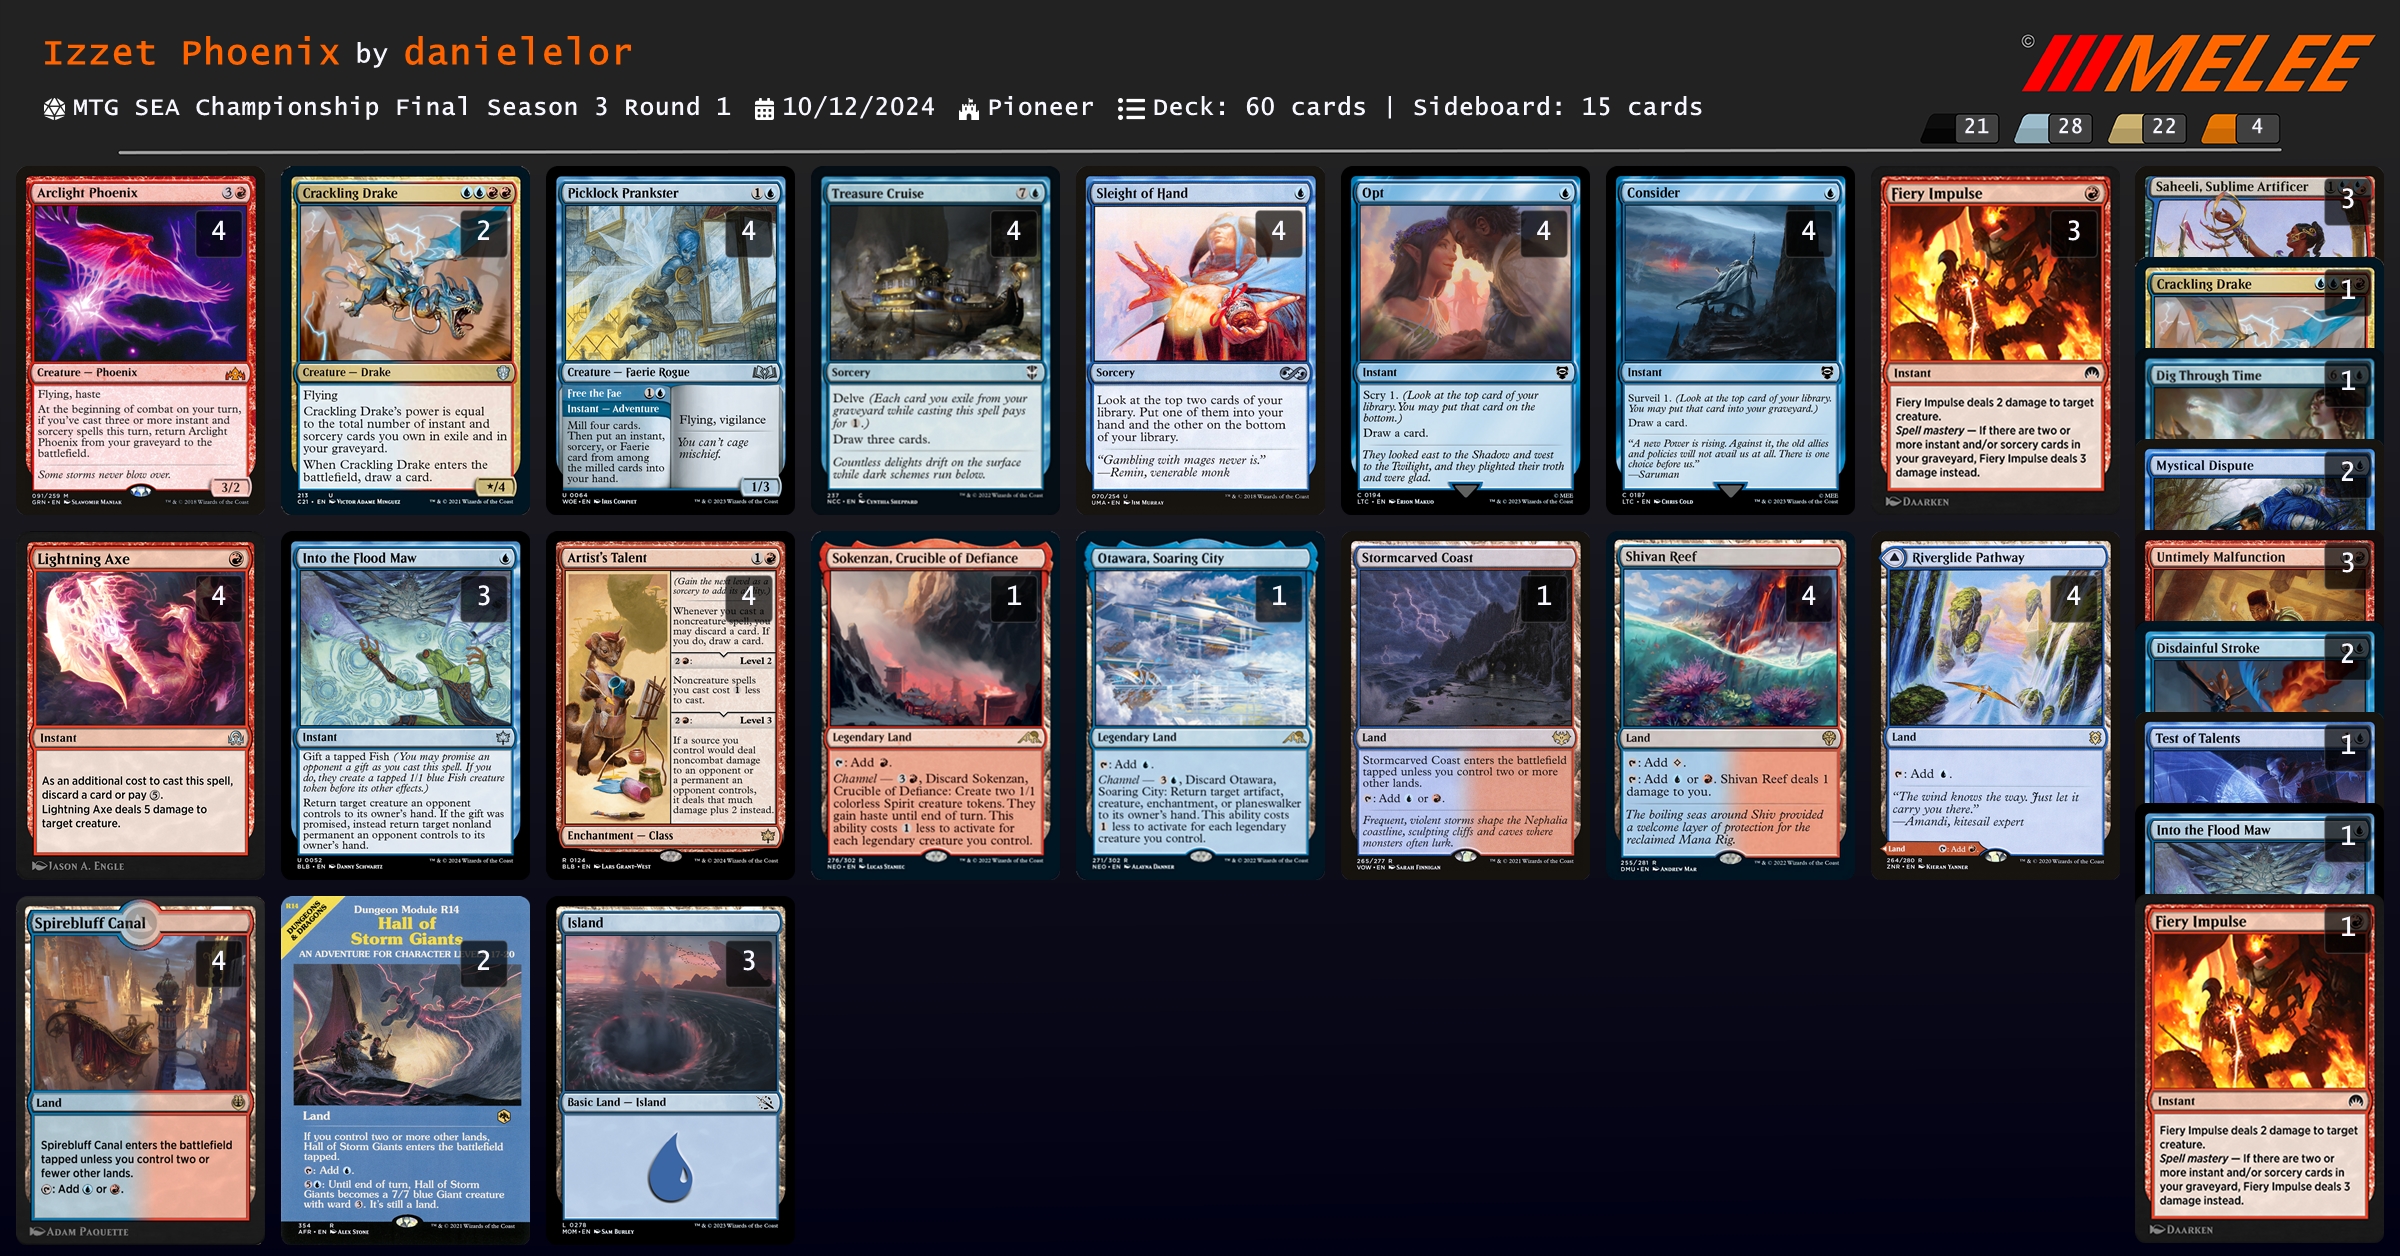
四強的 Pheonix 比較特別的是正編就有 {% mtgcard "Crackling Drake" tooltip=true %} 了,並且帶了四張 {% mtgcard "Artist's Talent" tooltip=true %} 輔助抽濾(對應正常構築的 {% mtgcard "Ledger Shredder" tooltip=true %}),有些同樣帶 {% mtgcard "Artist's Talent" tooltip=true %} 的備牌會多帶一張 {% mtgcard "Thassa's Oracle" tooltip=true %} 作為額外獲勝手段。
另一套構築就比較正常了,不過同樣多帶了 {% mtgcard "Artist's Talent" tooltip=true %} 輔助抽濾,但沒有放那麼多且同樣保留 {% mtgcard "Ledger Shredder" tooltip=true %},並且注意這套就有在備牌放 {% mtgcard "Thassa's Oracle" tooltip=true %} 了。
### Mono-Black Midrange
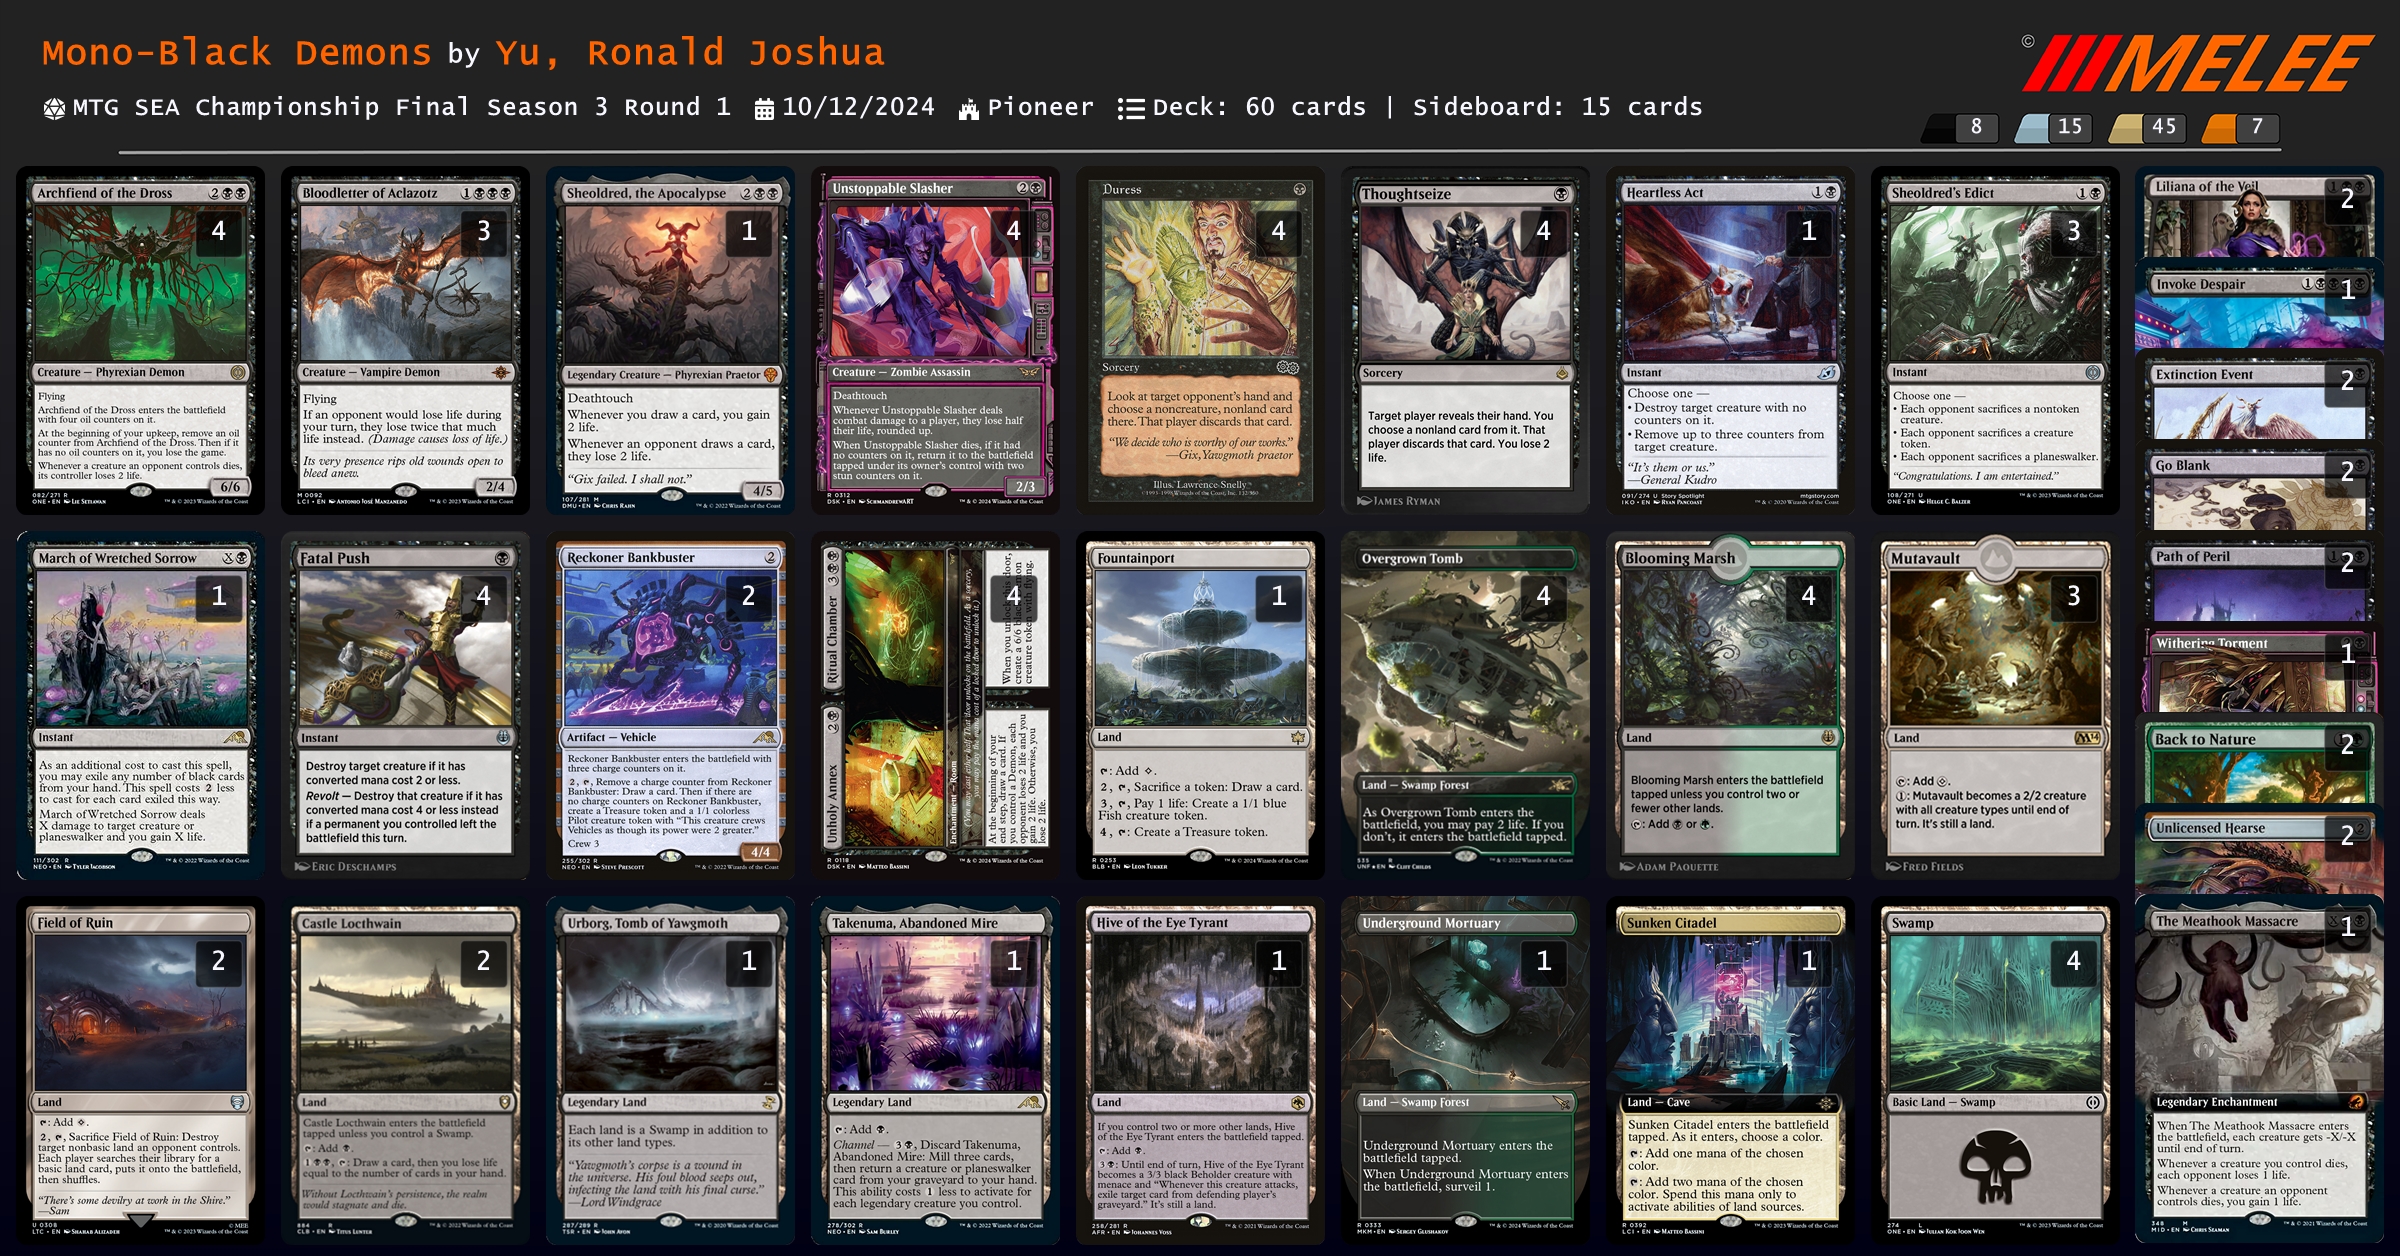
Mono-Black Demons 是利用 {% mtgcard "Unstoppable Slasher" tooltip=true %} 打到扣一半血的效果,搭配 {% mtgcard "Bloodletter of Aclazotz" tooltip=true %} 扣血 double 可以一擊將對手斬殺,加上 DSK 的新牌 {% mtgcard "Unholy Annex // Ritual Chamber" tooltip=true %} 作為良好的資源補點。
不過這個牌表把一張 {% mtgcard "Bloodletter of Aclazotz" tooltip=true %} 換成 {% mtgcard "Sheoldred, the Apocalypse" tooltip=true %},並且帶了一張 {% mtgcard "Heartless Act" tooltip=true %} 打同型內戰(直接將對手 {% mtgcard "Archfiend of the Dross" tooltip=true %} 身上的油拔掉)。
除此之外帶了一些綠地,對應備牌的 {% mtgcard "Back to Nature" tooltip=true %} 打一些帶結界的對局。
## チャンピオンズカップファイナル シーズン3ラウンド1 Champions Cup Final Season 3 Round 1
[Melee 連結](https://melee.gg/Tournament/View/116327)
最後是日韓地區的 RC,分兩天共 12 輪瑞士制後取八強單淘汰。
> 是說日韓也只有 2XX 人參賽,但還要分兩天打 12 輪真的好累 = =
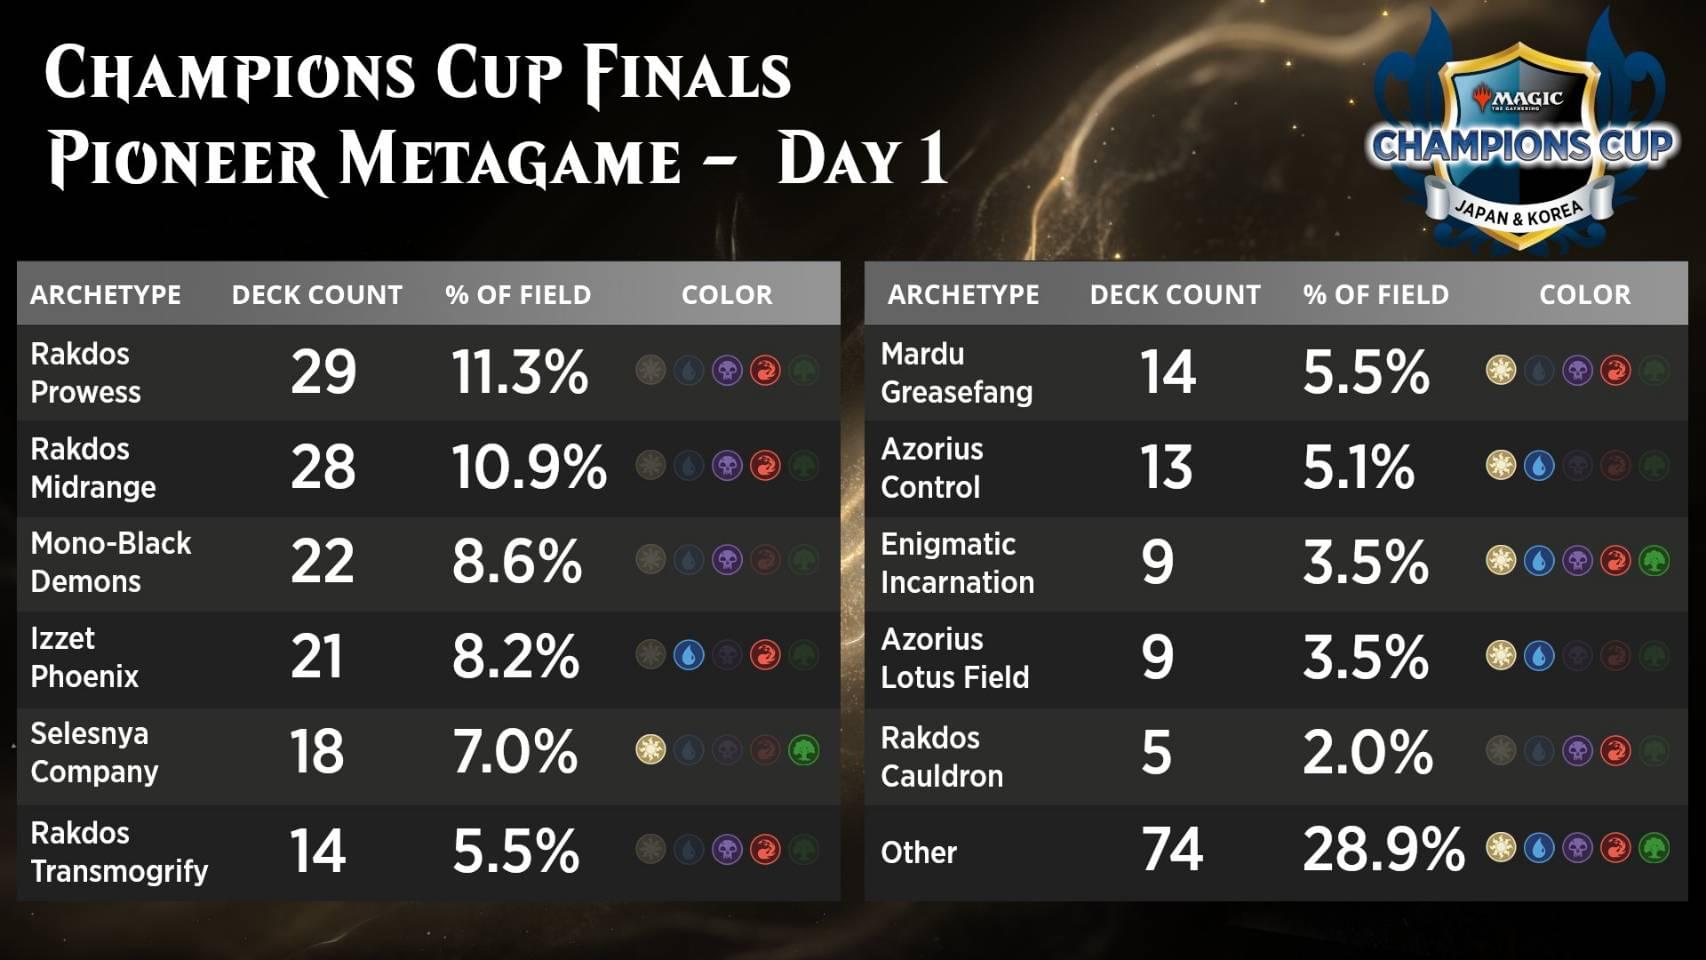
Day 1 的套牌分佈蠻有趣的,沒有想到居然是 Rakdos Midrange 站在第二名,大家熟悉的 Phoenix 和 Control 使用量都特別低。

Day 2 我們則可以看到 Mono-Black Demons 的轉換率最高,再次證明了他是一個好的套牌。
八強套牌分別有:
| Rank | Player | Decklist | Record |
| :-: | :-: | :-: | :-: |
| 1 | Tomoaki Ogasawara | [Mono-Black Demons](https://melee.gg/Decklist/View/441635) | 9-2-1 |
| 2 | TATSURO ASANO | [Mono-Black Demons](https://melee.gg/Decklist/View/441144) | 9-2-1 |
| 4 | sho kamezaki | [Rakdos Transmogrify](https://melee.gg/Decklist/View/441280) | 10-1-1 |
| 4 | amaharak1 | [Rakdos Midrange](https://melee.gg/Decklist/View/441190) | 9-2-1 |
| 8 | Hiroki Toyota | [Mono-Red Aggro](https://melee.gg/Decklist/View/440584) | 9-1-2 |
| 8 | Soichiro Kohara | [Rakdos Aggro](https://melee.gg/Decklist/View/440761) | 9-1-2 |
| 8 | TAICHI MORIKAWA | [Selesnya Company](https://melee.gg/Decklist/View/441073) | 9-2-1 |
| 8 | AKINARI Shimokawabe | [Azorius Humans](https://melee.gg/Decklist/View/441029) | 9-2-1 |
### Mono-Black Demons
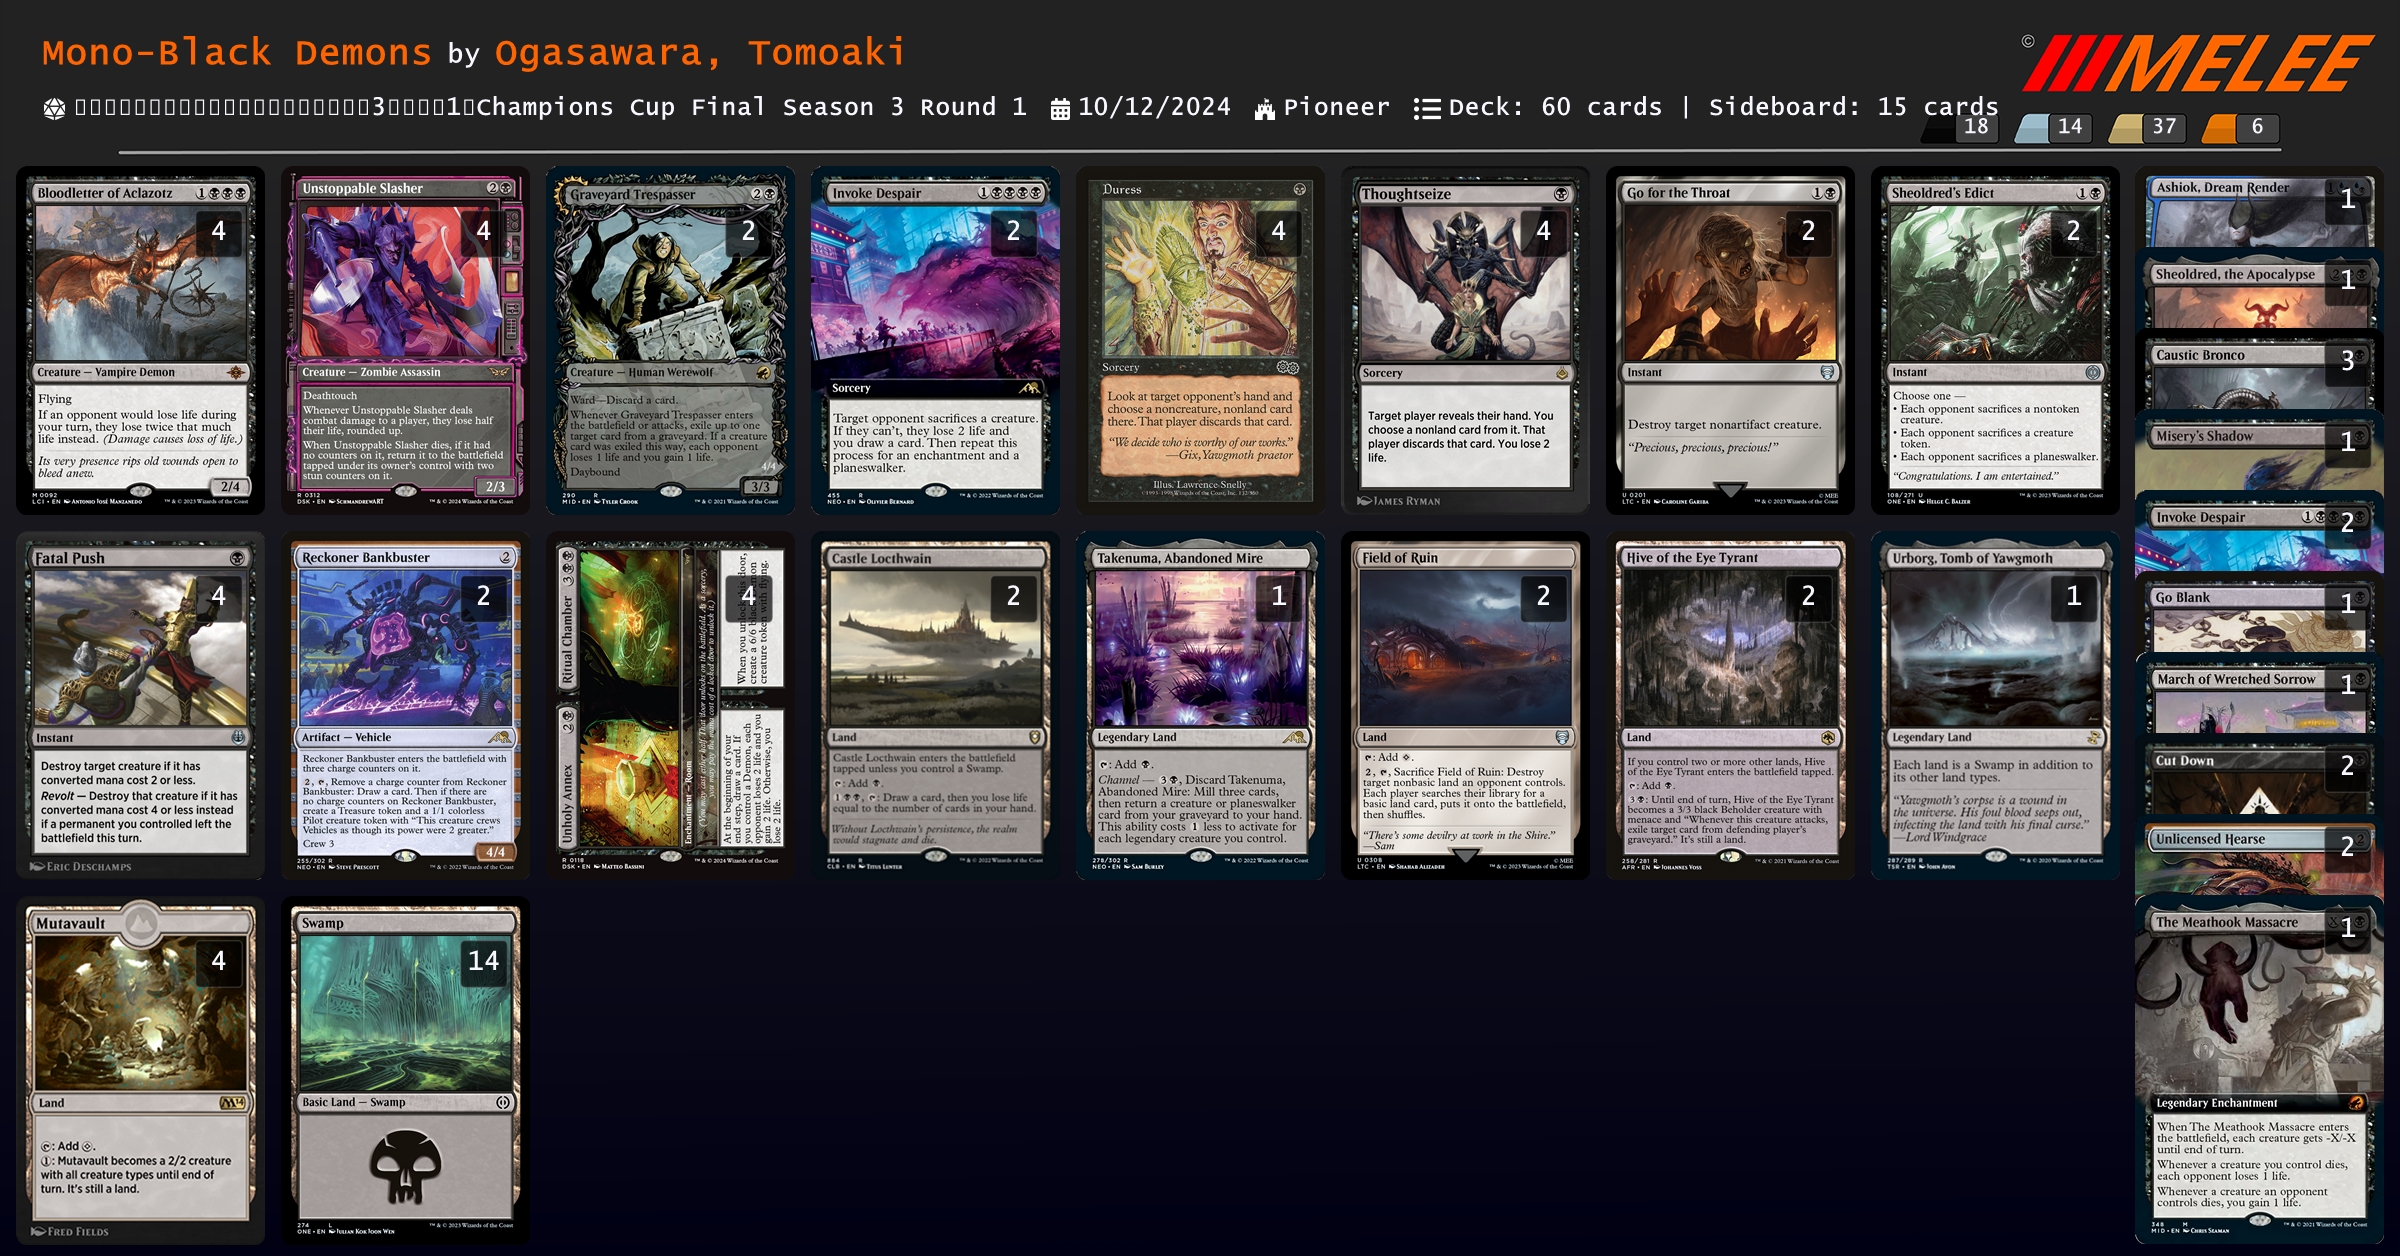
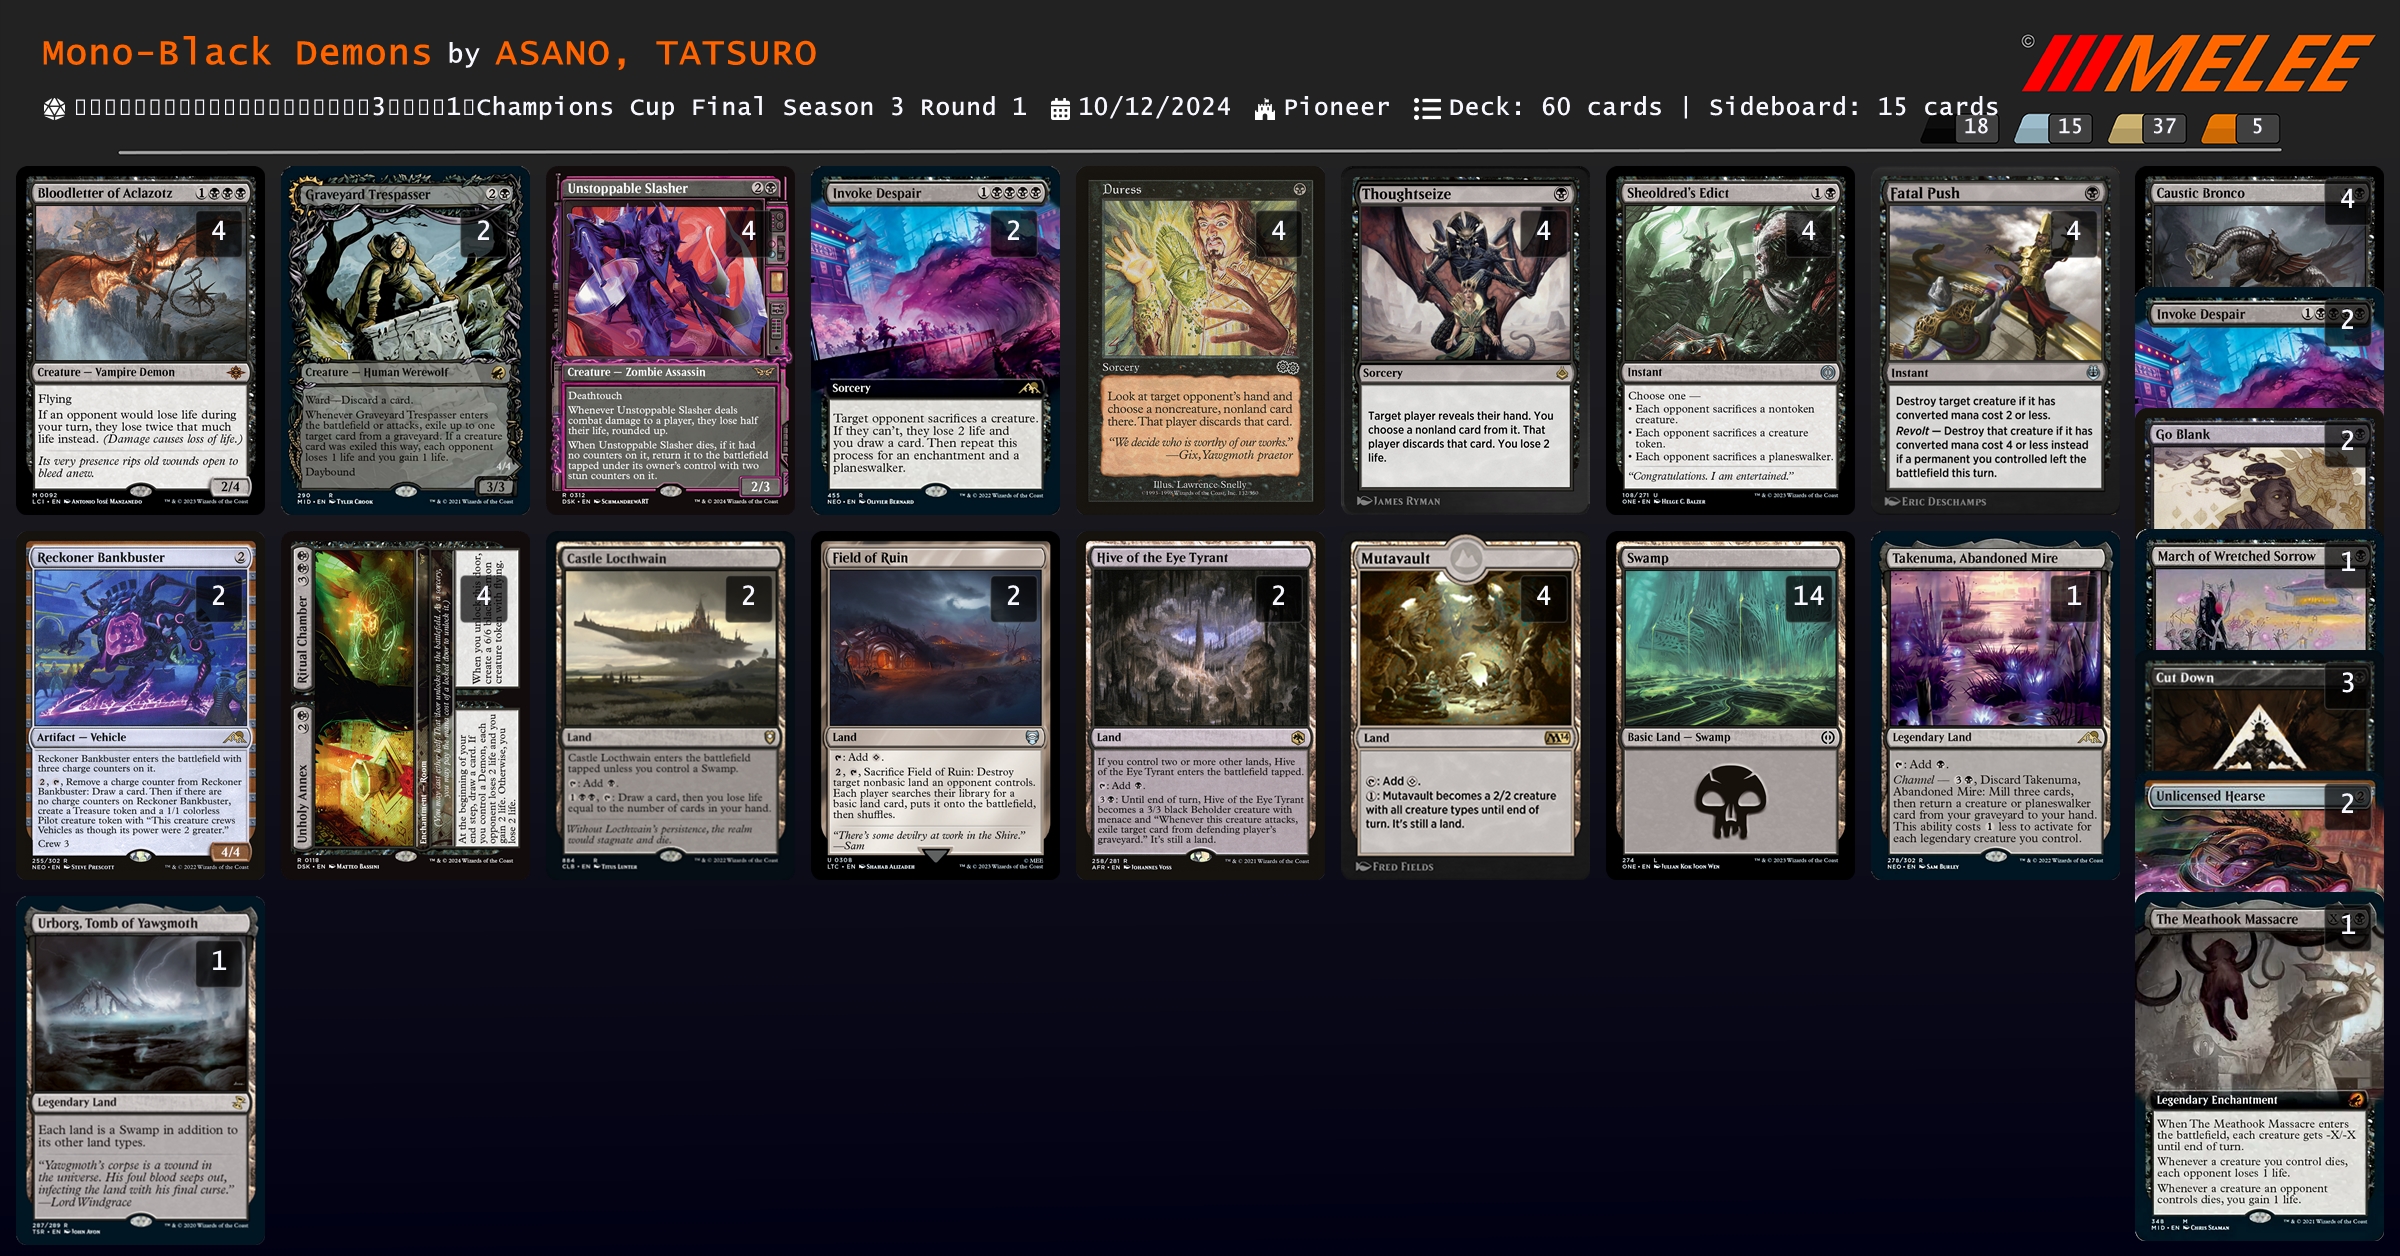
正編不能說很像,只能說是一模一樣,兩套牌只有殺牌的數量組和不同。
備牌選用的東西就比較不同了,但還是常見的那些牌。
### Rakdos Transmogrify
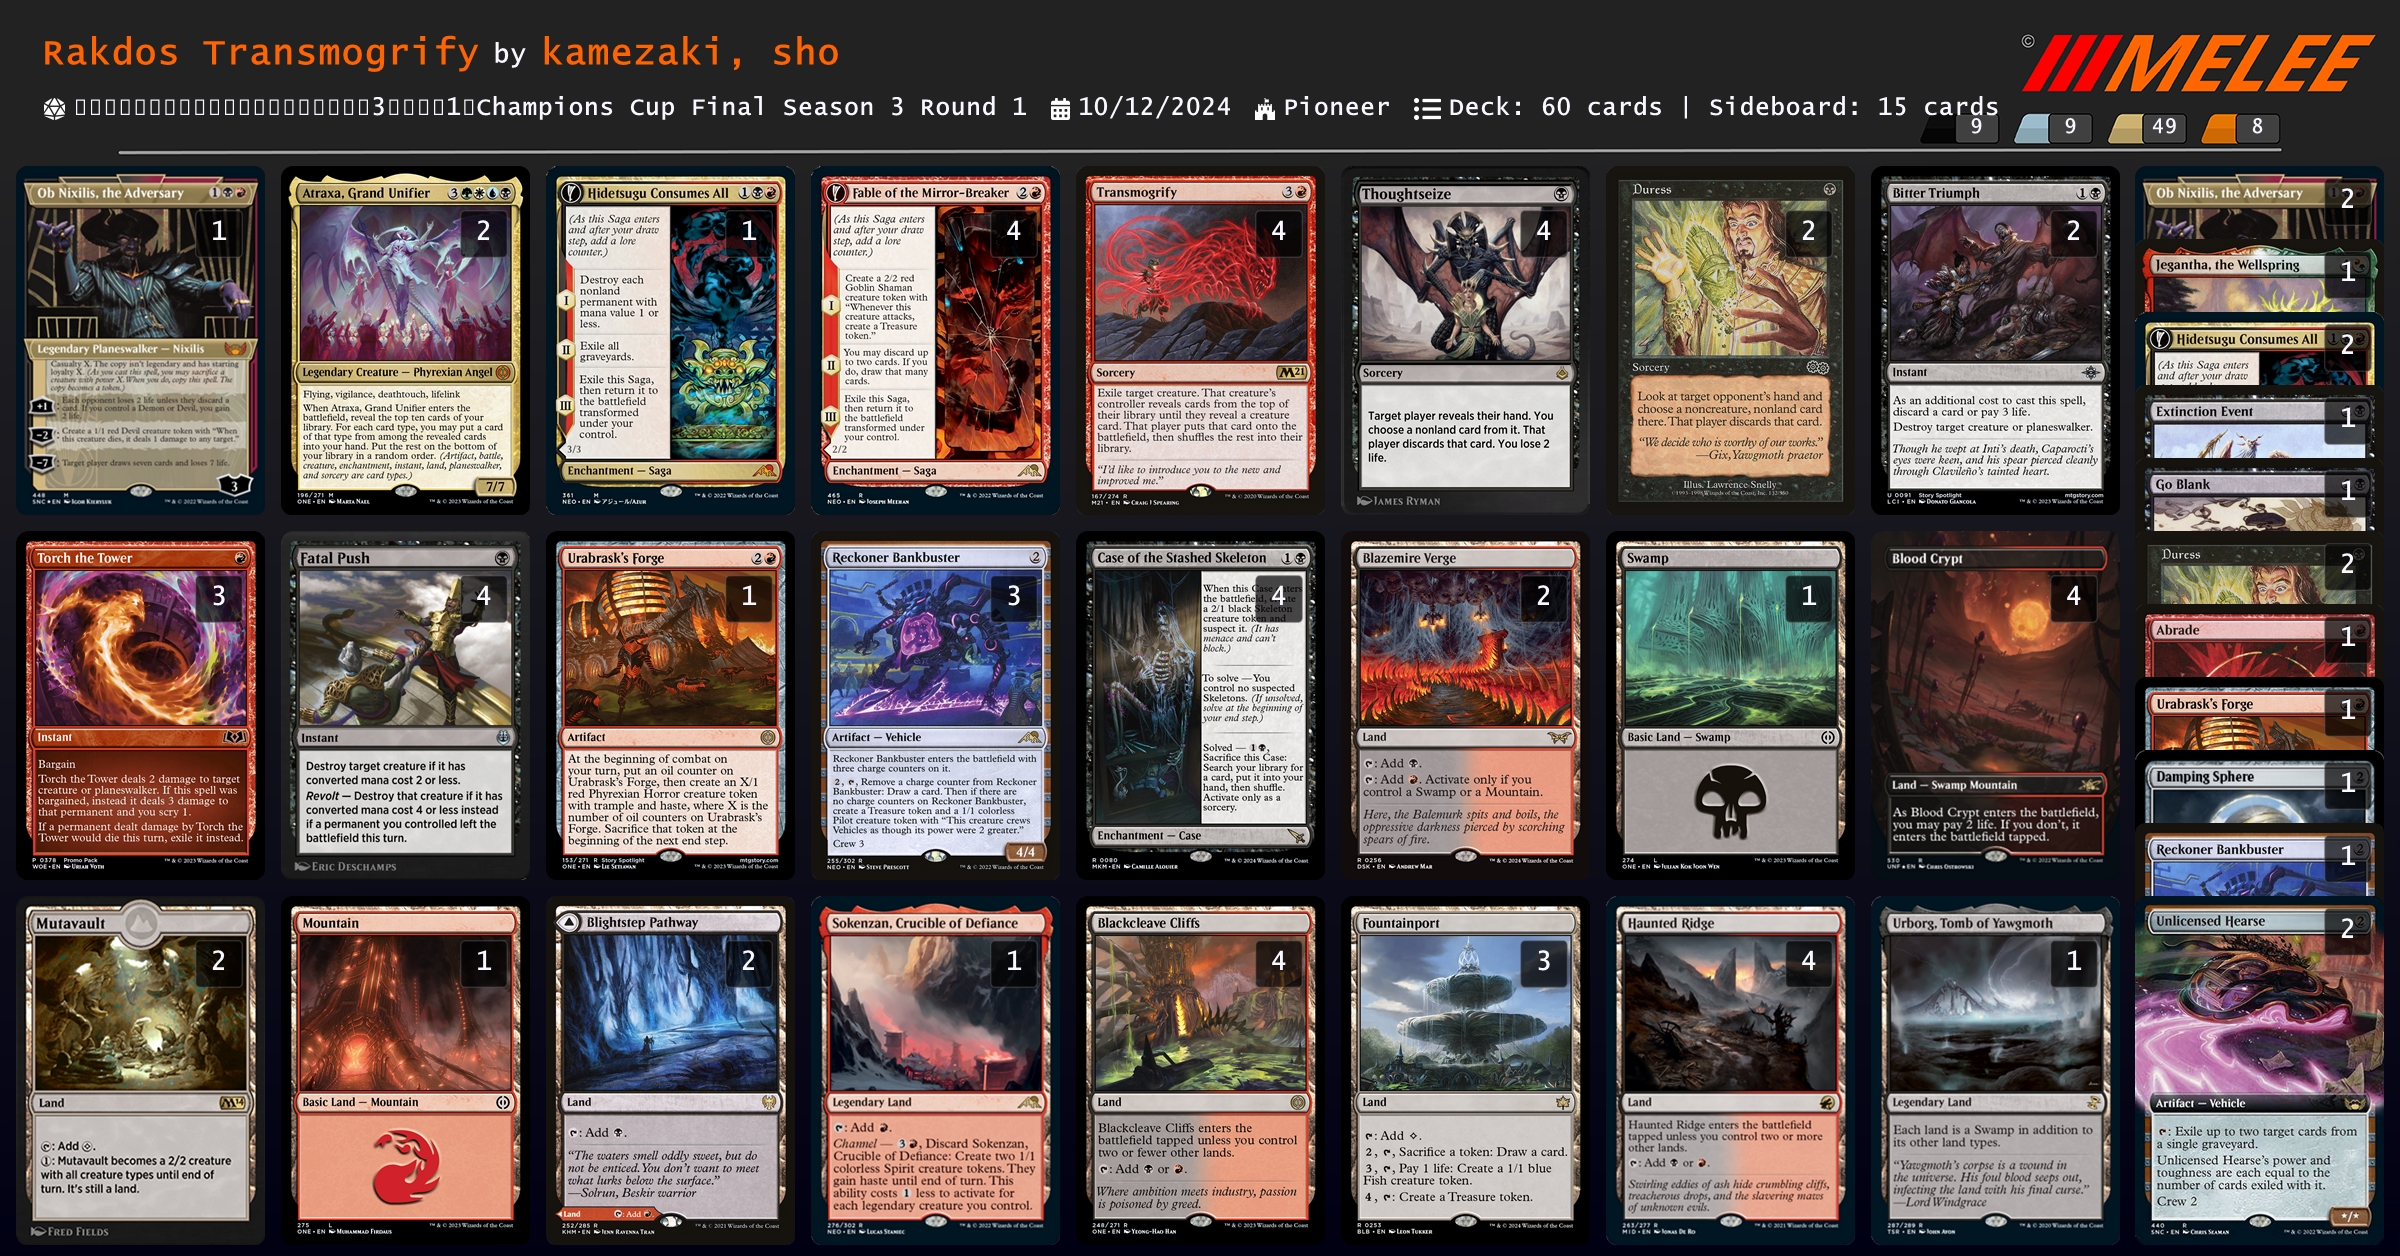
同樣很標準的 Rakdos Transmogrify 構築,不過選擇放一張 {% mtgcard "Hidetsugu Consumes All" tooltip=true %} 放到正編,可以有意識的去找這張牌,或是用結案的 {% mtgcard "Case of the Stashed Skeleton" tooltip=true %} 去找。
### Rakdos Midrange
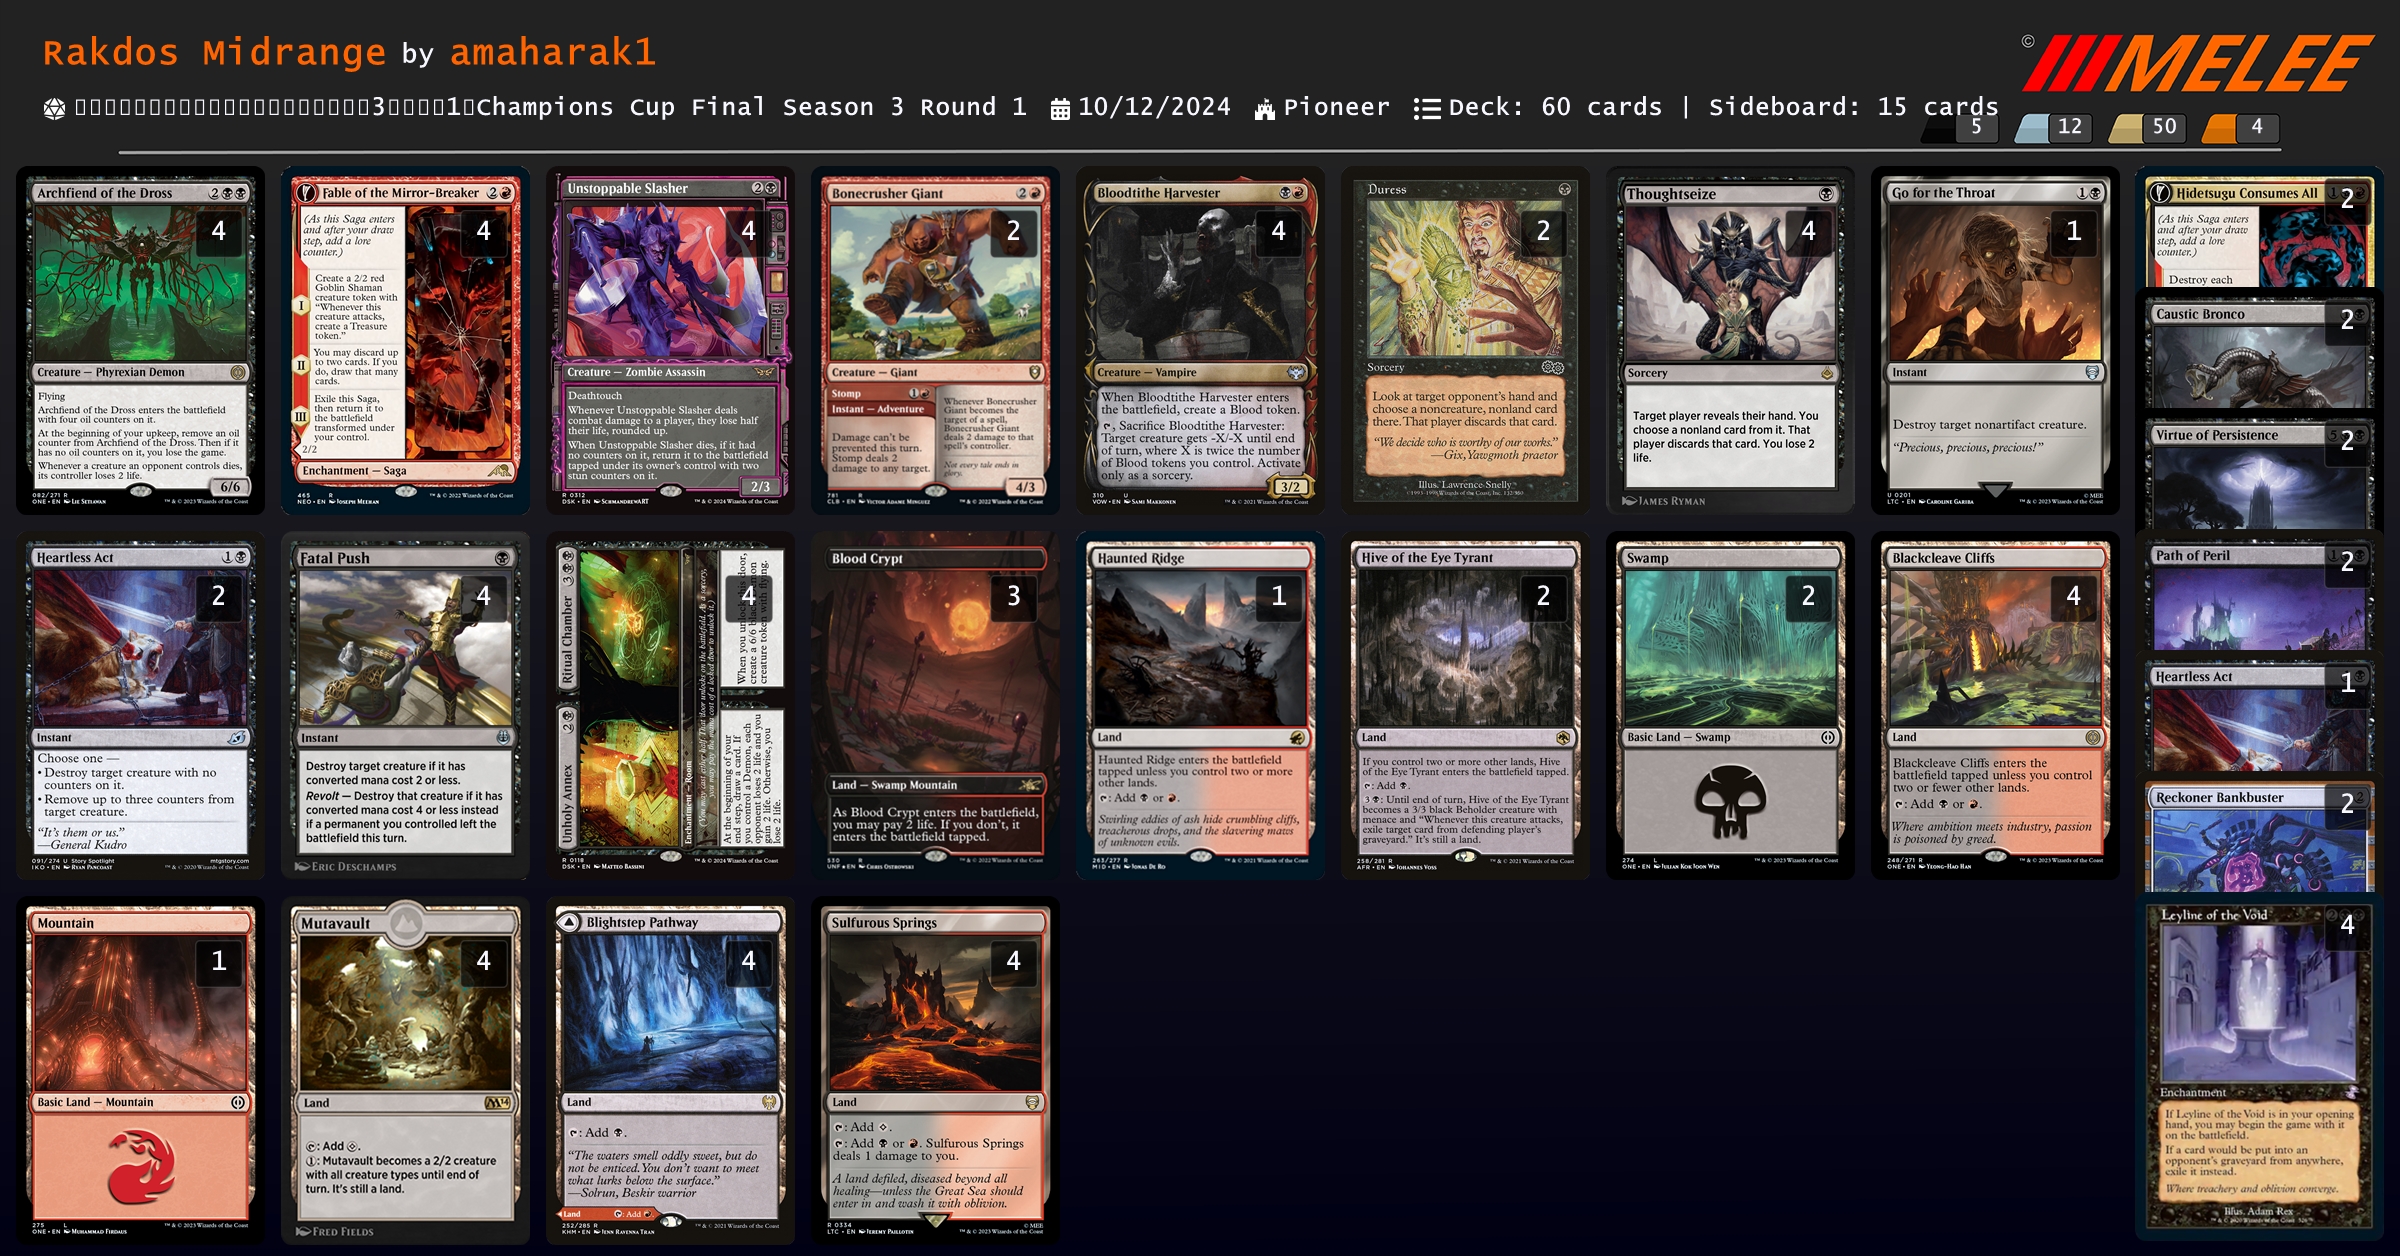
新版本的 Rakdos Midrange,三費曲線改成帶 {% mtgcard "Unstoppable Slasher" tooltip=true %} 加速 clock 對手、同時惡魔變多了因此也跟著用 {% mtgcard "Unholy Annex // Ritual Chamber" tooltip=true %} 替代掉 {% mtgcard "Reckoner Bankbuster" tooltip=true %} 的位置。
### Mono-Red Aggro
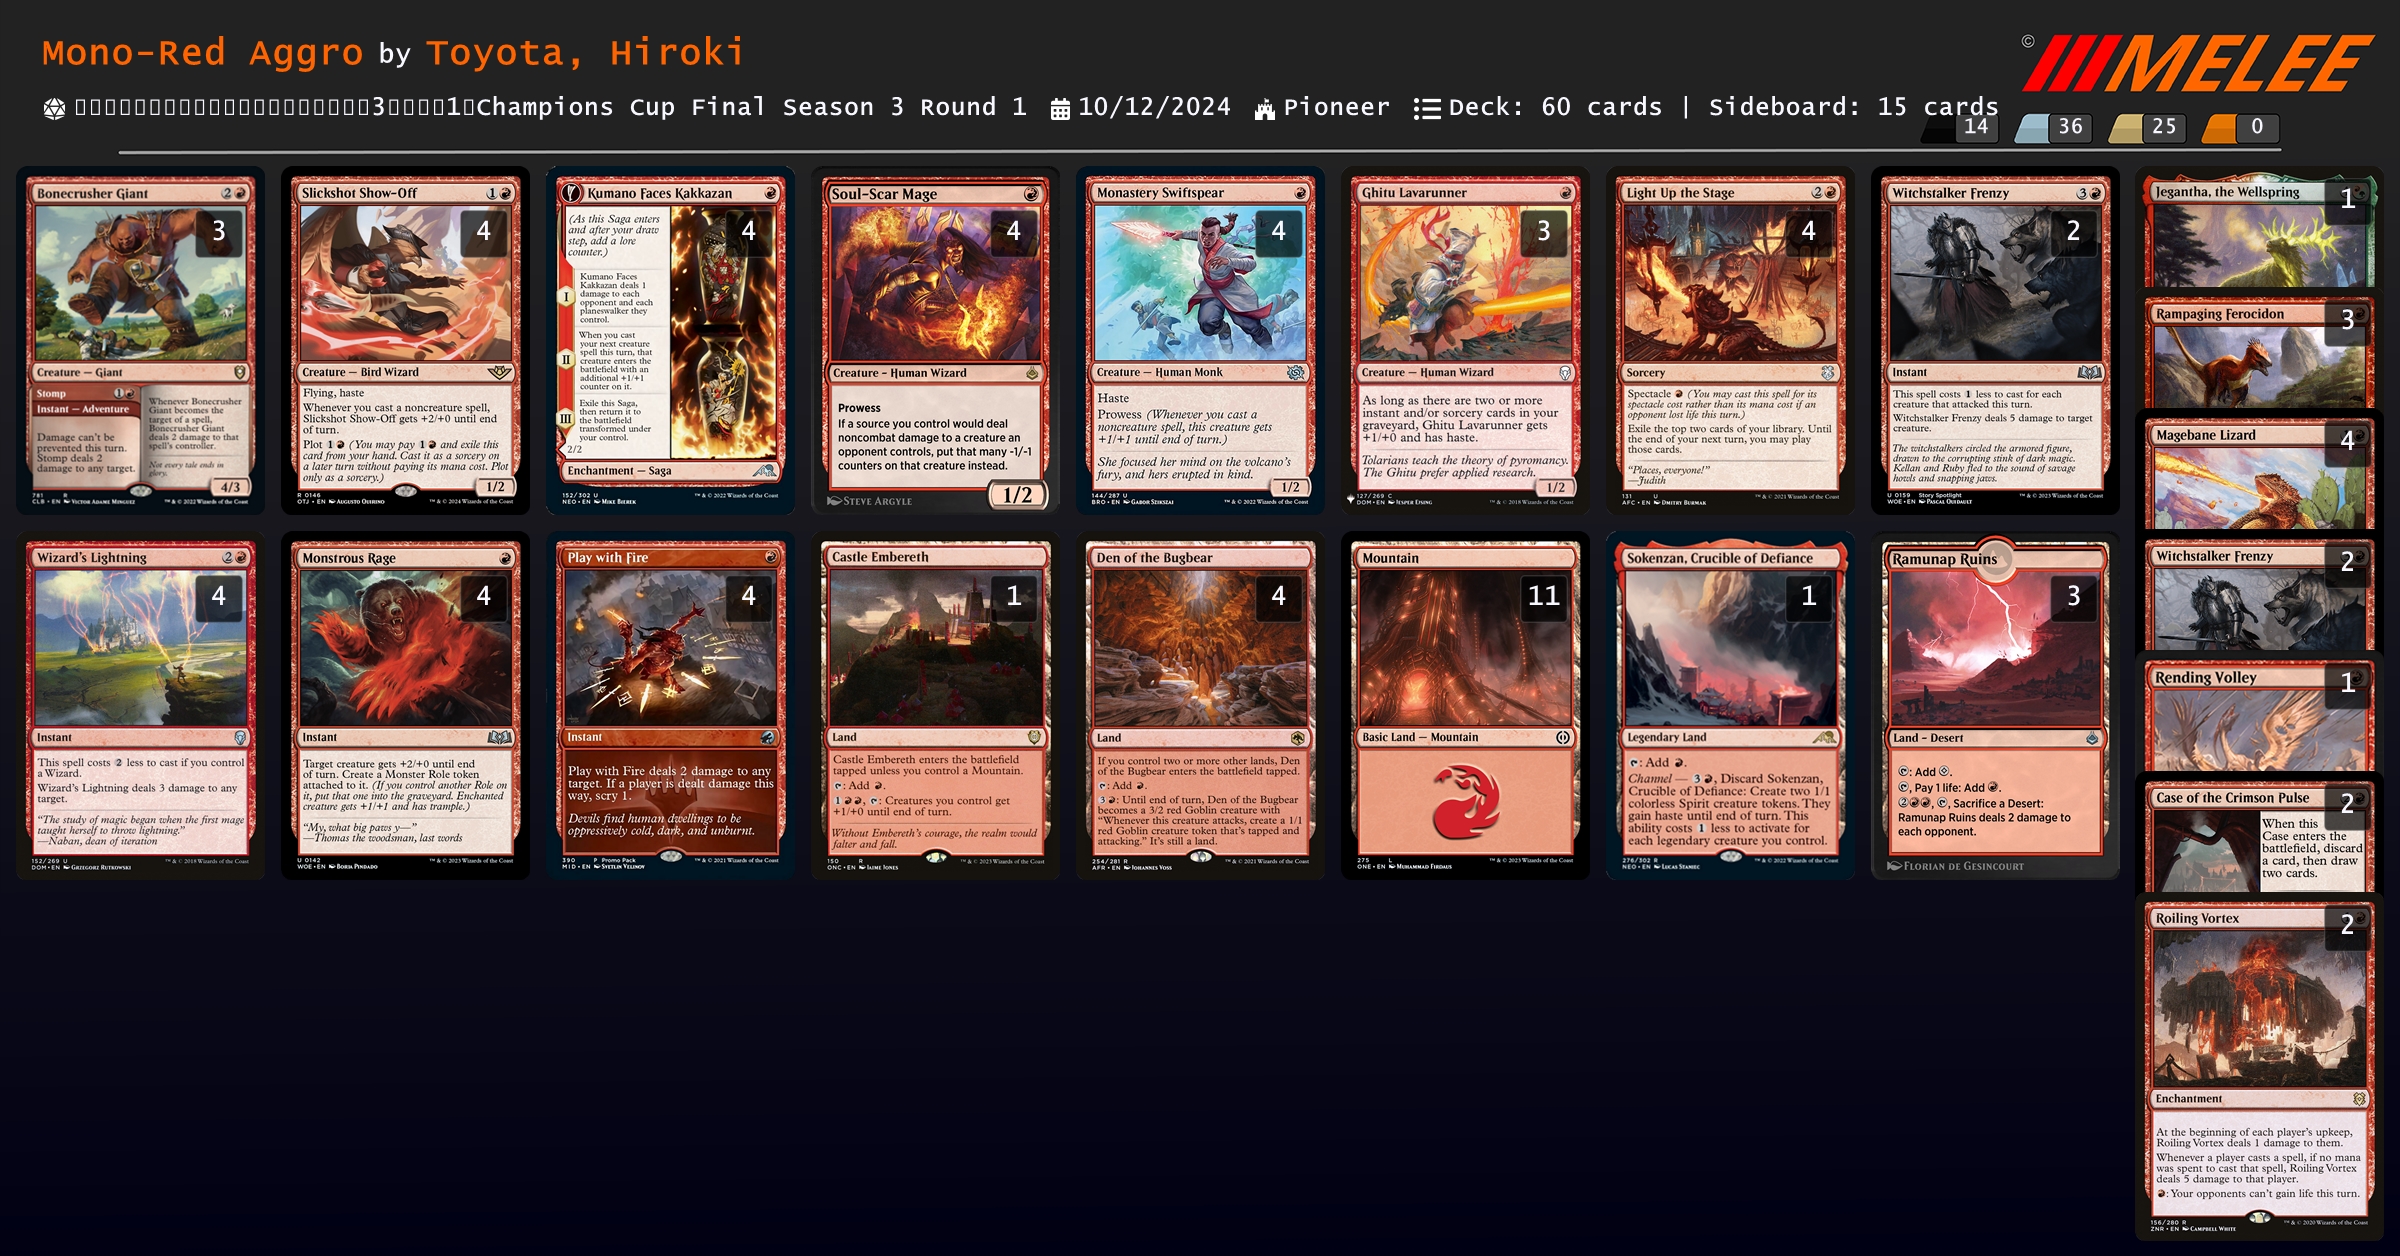
~~都 4202 年了別再打 RDW 了~~
### Rakdos Aggro

就是 Rakdos Aggro,不過比較特別的是正編就有兩張 {% mtgcard "Thoughtseize" tooltip=true %} 了。
### Selesnya Company
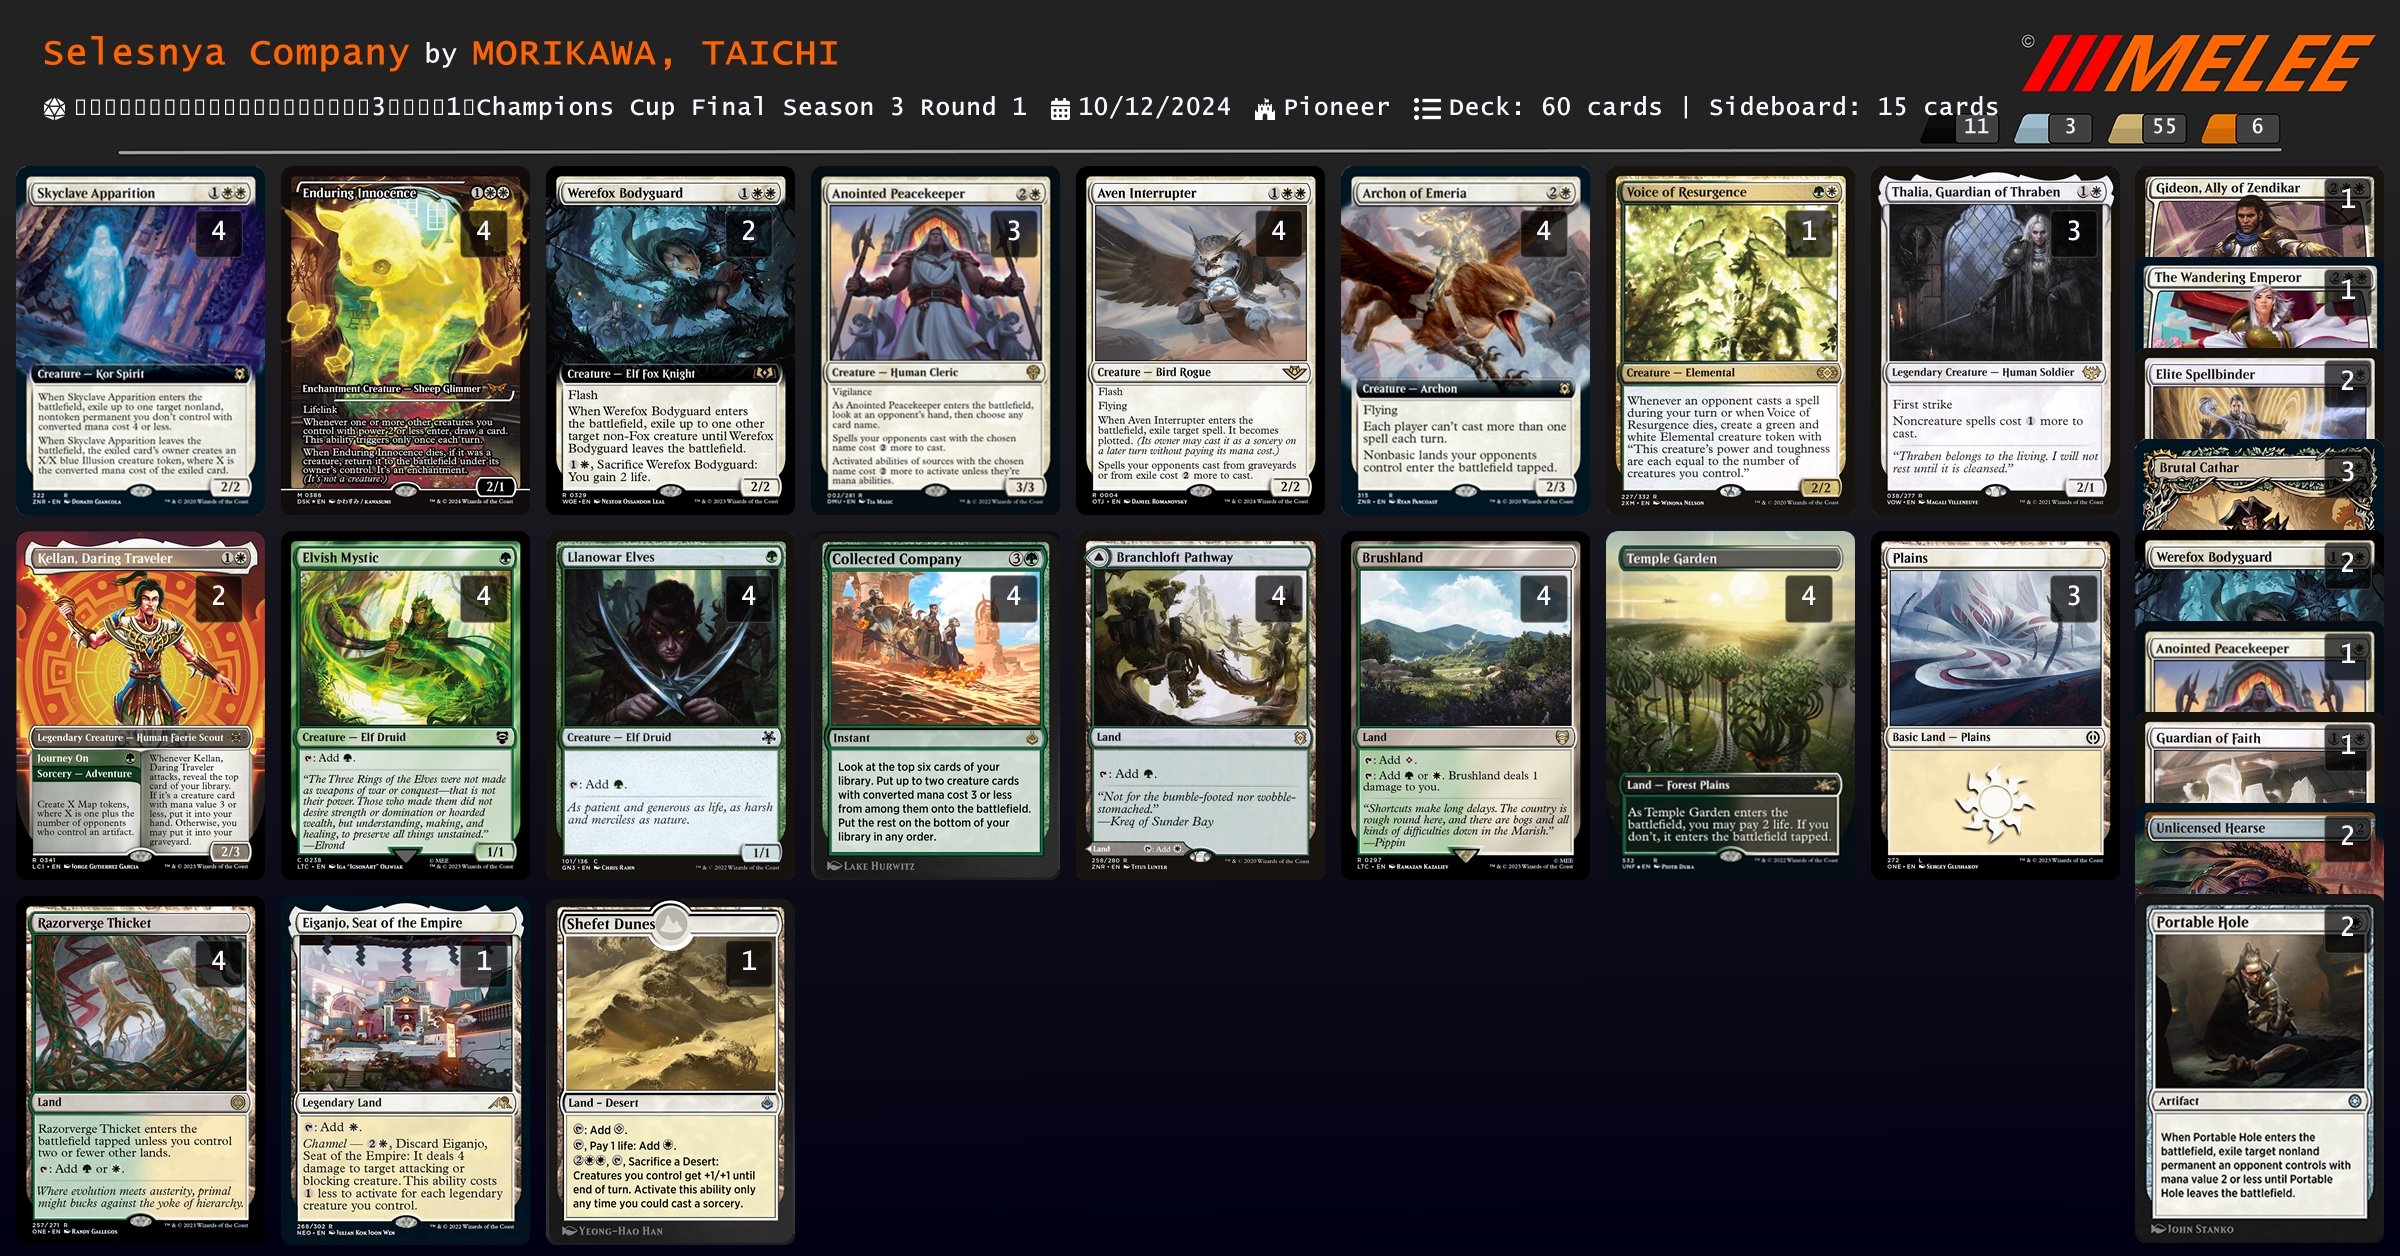
很標準的 Selesnya Company。
### Azorius Humans
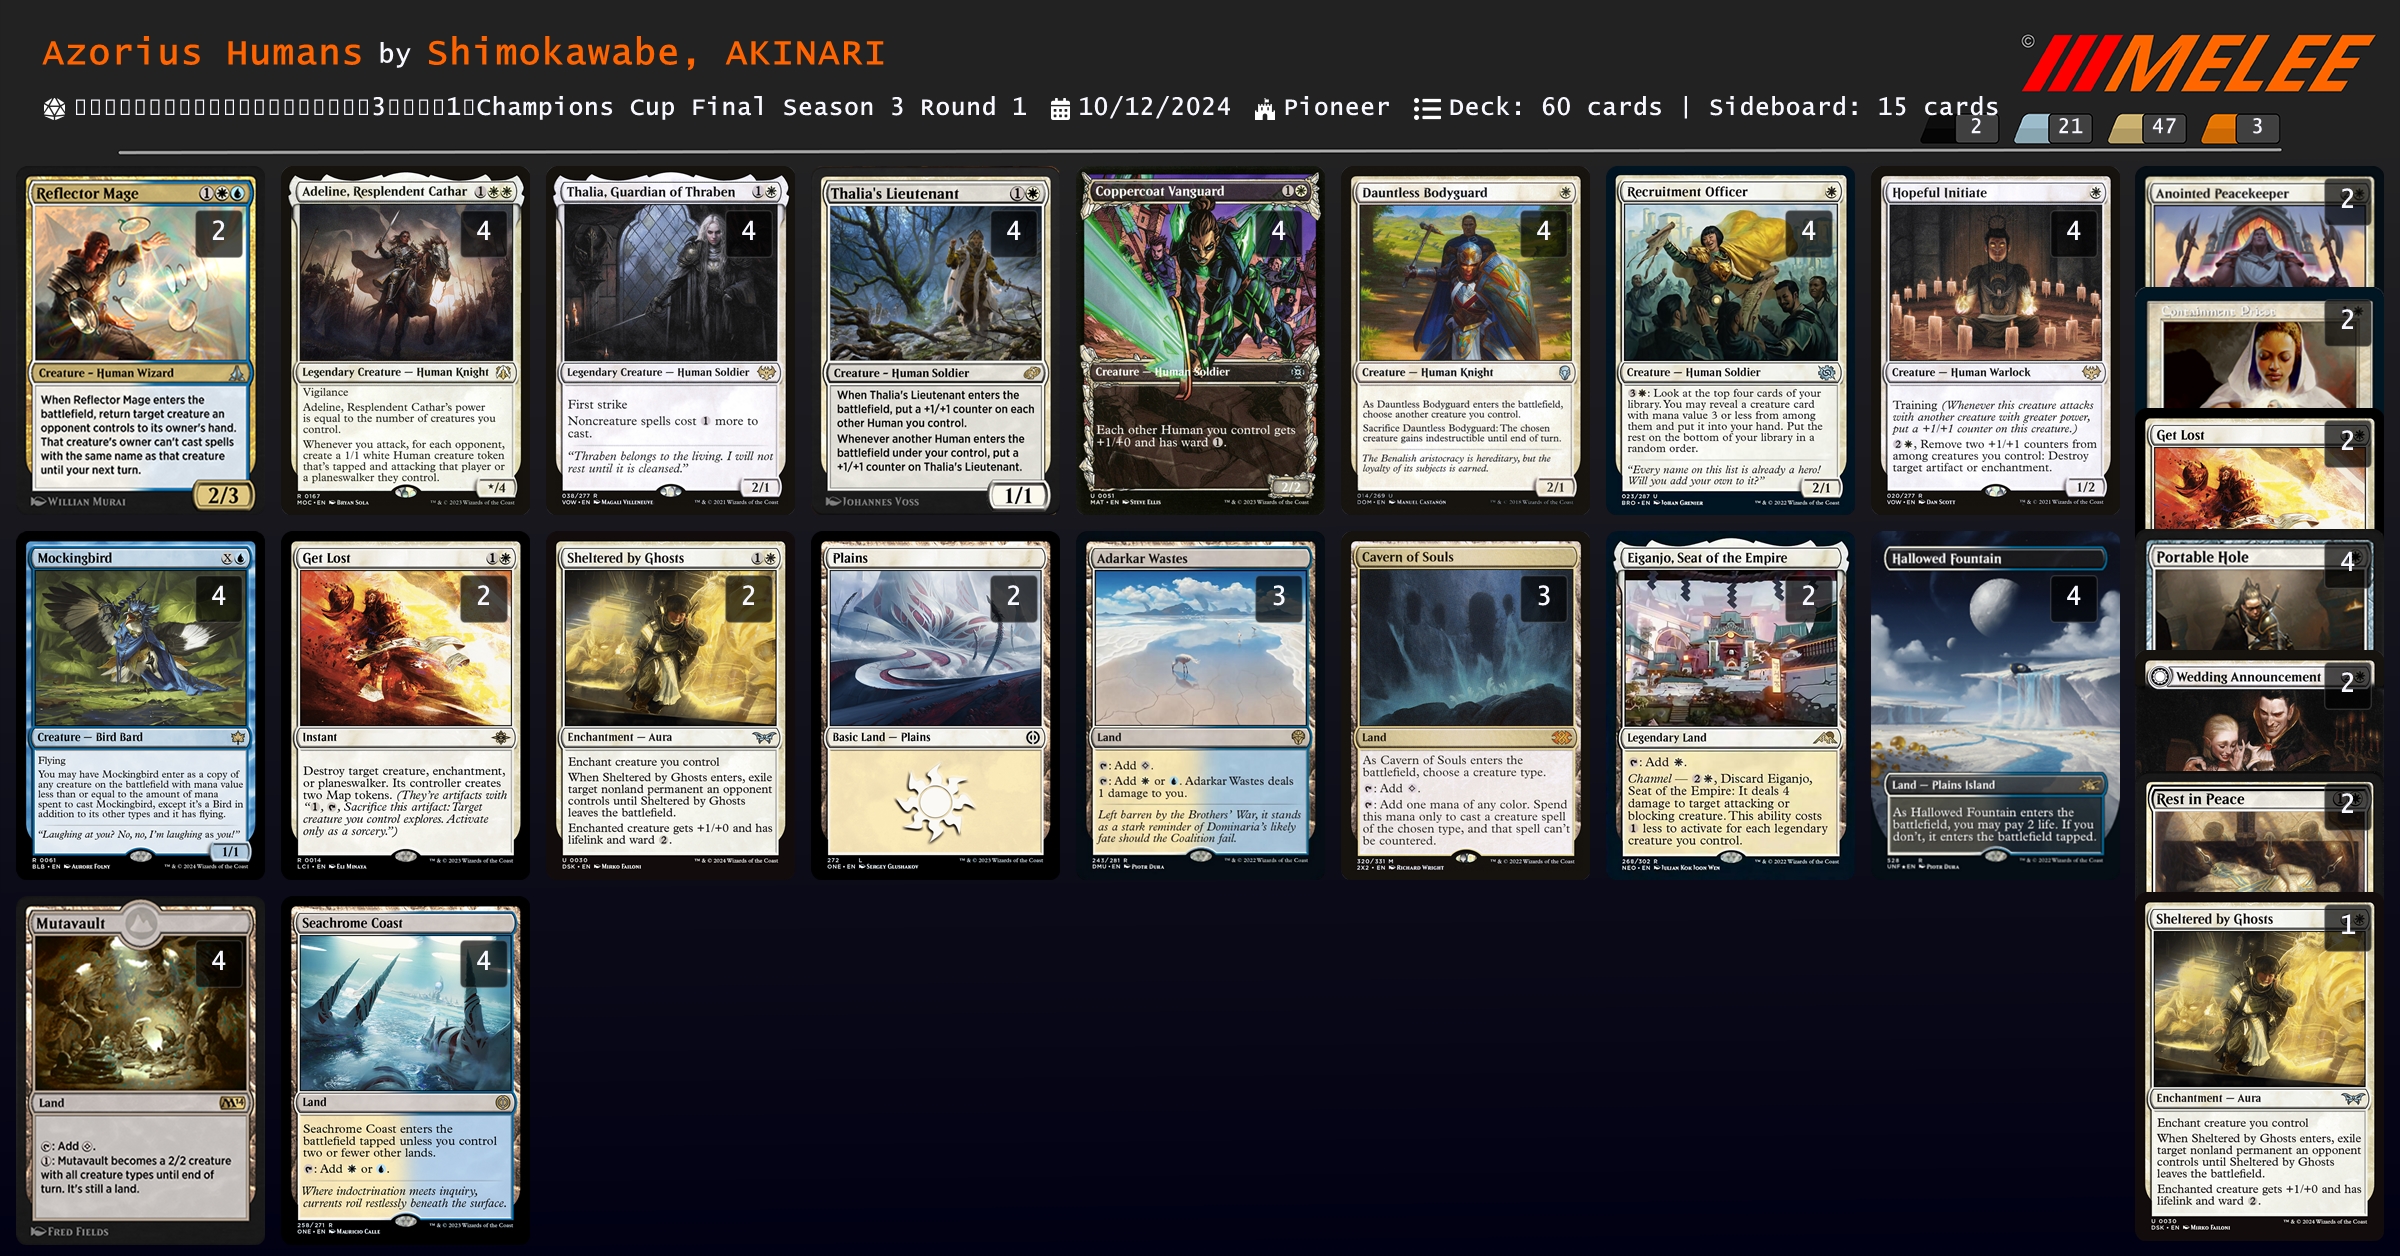
這套 Azorius Humans 除了多掛 {% mtgcard "Mockingbird" tooltip=true %} 以外還有兩張 {% mtgcard "Reflector Mage" tooltip=true %}。
## 神奇的套牌們
講完八強套牌了,現在換來看看其他八強外但依舊強勢/需要注意的牌型。
### Sans-Red Enigmatic Incarnation
現在主要的 Enigmatic Incarnation 構築都會帶紅色,搭配 {% mtgcard "Fable of the Mirror-Breaker" tooltip=true %} 濾牌,還有 {% mtgcard "Overlord of the Boilerbilges" tooltip=true %} 作為解場和最後的收頭手段。
而這套牌在三費曲線上用藍霸主 {% mtgcard "Overlord of the Floodpits" tooltip=true %} 替代掉 {% mtgcard "Fable of the Mirror-Breaker" tooltip=true %} 的抽濾,同時可以觸發 {% mtgcard "Up the Beanstalk" tooltip=true %}。
並且在利用藍霸主 {% mtgcard "Overlord of the Floodpits" tooltip=true %} 和黑霸主 {% mtgcard "Overlord of the Balemurk" tooltip=true %} 堆墳,提供肥料給 {% mtgcard "Kroxa and Kunoros" tooltip=true %} 打出源源不斷的場面。
去除則是以黑色為主,除了 {% mtgcard "Fatal Push" tooltip=true %} 以外,DSK 的 {% mtgcard "Nowhere to Run" tooltip=true %},其中 {% mtgcard "Nowhere to Run" tooltip=true %} 相當適合這套牌,殺完生物後可以變成給 {% mtgcard "Enigmatic Incarnation" tooltip=true %} 犧牲的肥料。
### Abzan Greasefang w/ Overlord of the Balemurk & Say Its Name
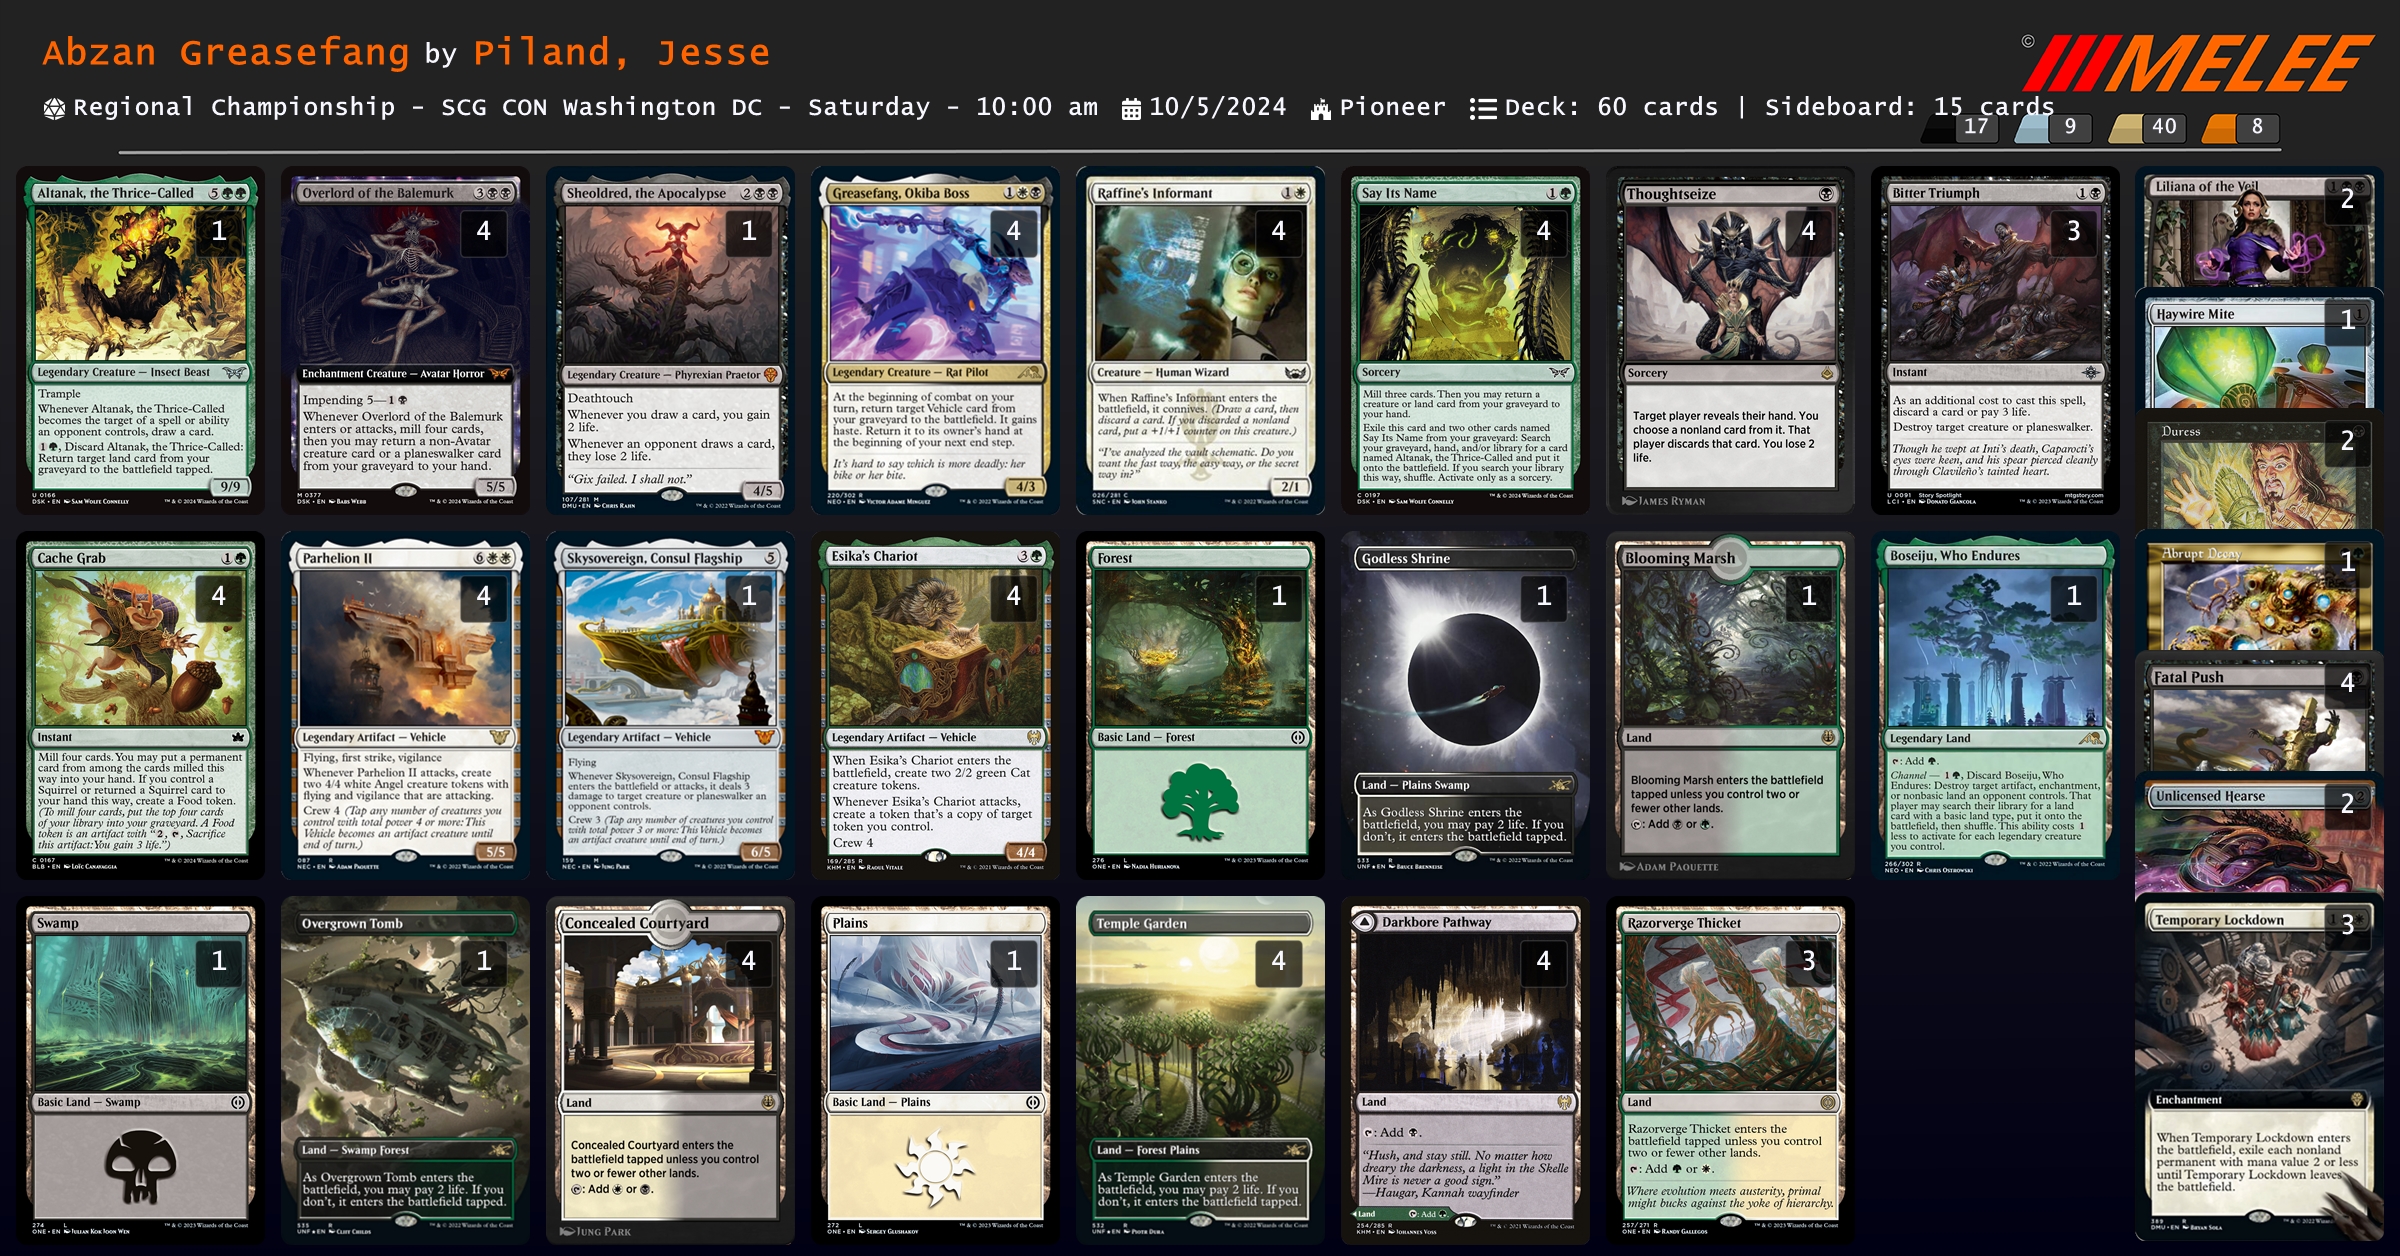
用新牌 DSK 的 {% mtgcard "Say Its Name" tooltip=true %} 和 {% mtgcard "Overlord of the Balemurk" tooltip=true %}、BLB 的 {% mtgcard "Cache Grab" tooltip=true %} 替代掉之前的 {% mtgcard "Grisly Salvage" tooltip=true %} 和 {% mtgcard "Witherbloom Command" tooltip=true %},作為新的堆墳手段。
另外墳場有三張 {% mtgcard "Say Its Name" tooltip=true %} 的時候,可以將這三張都放逐,從牌庫/墳場/手牌中丟一隻 {% mtgcard "Altanak, the Thrice-Called" tooltip=true %} 回來,而且自身就有一條啟動式異能,上手至少可以把它丟了拿去 ramp,不算是澈底的 dead draw。
### Boros Token Control
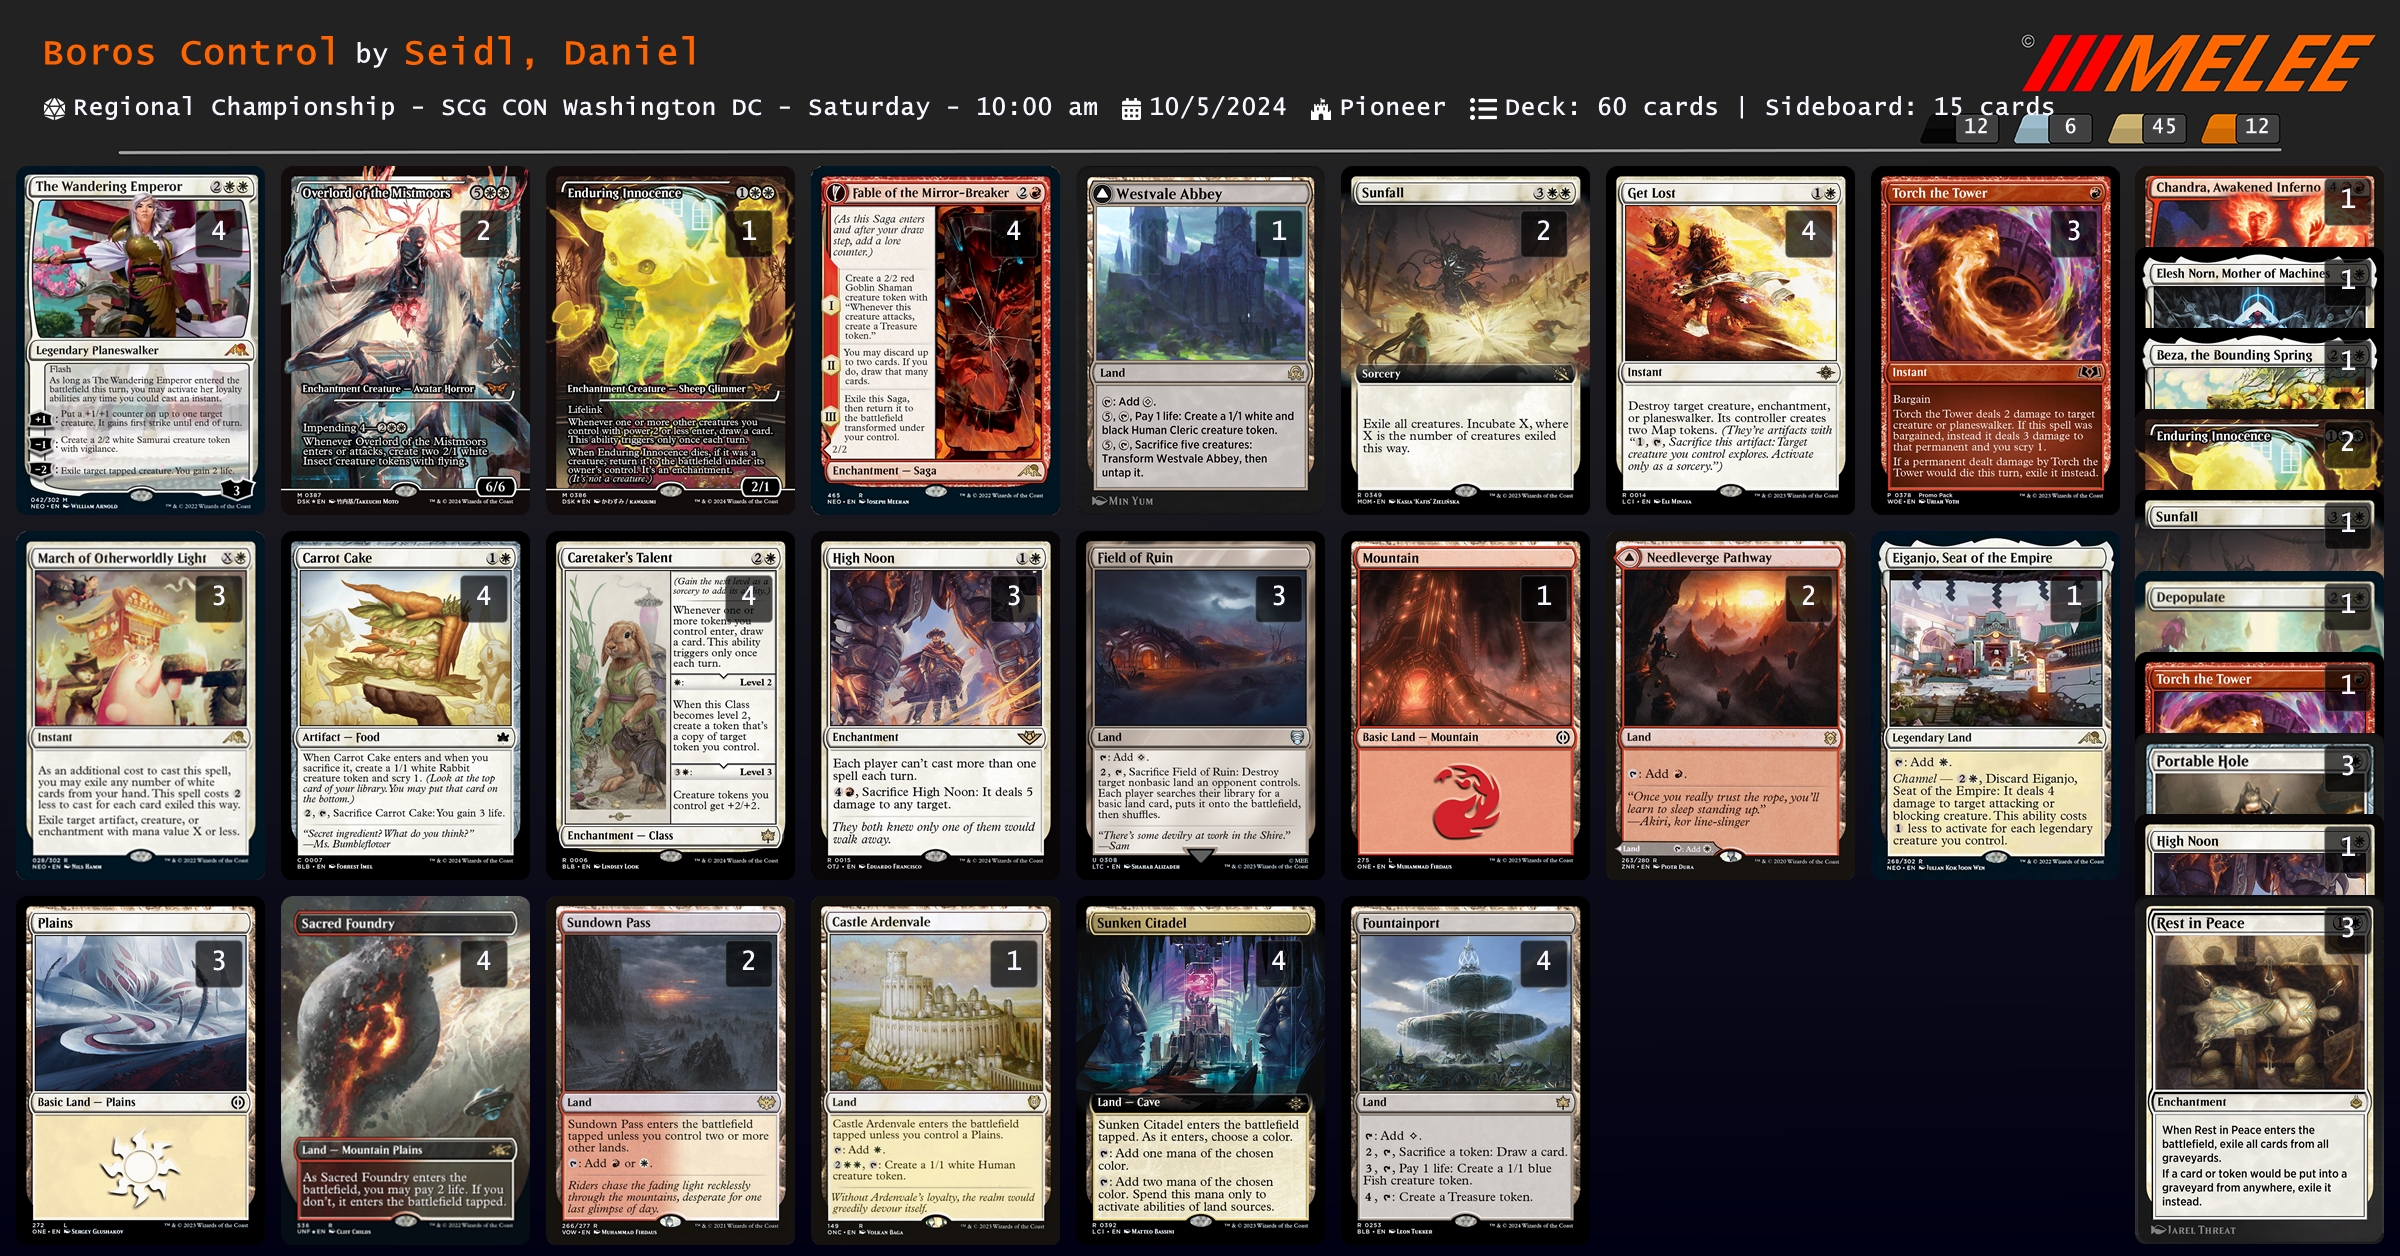
基本上就是標準的 Boros Token Control,然後加上 {% mtgcard "Fable of the Mirror-Breaker" tooltip=true %} 和 {% mtgcard "March of Otherworldly Light" tooltip=true %},有些人會放 {% mtgcard "Wedding Announcement" tooltip=true %}。
打 UW Control 或是中速對局很舒服,資源很難斷。
### Sultai Landfall Combo
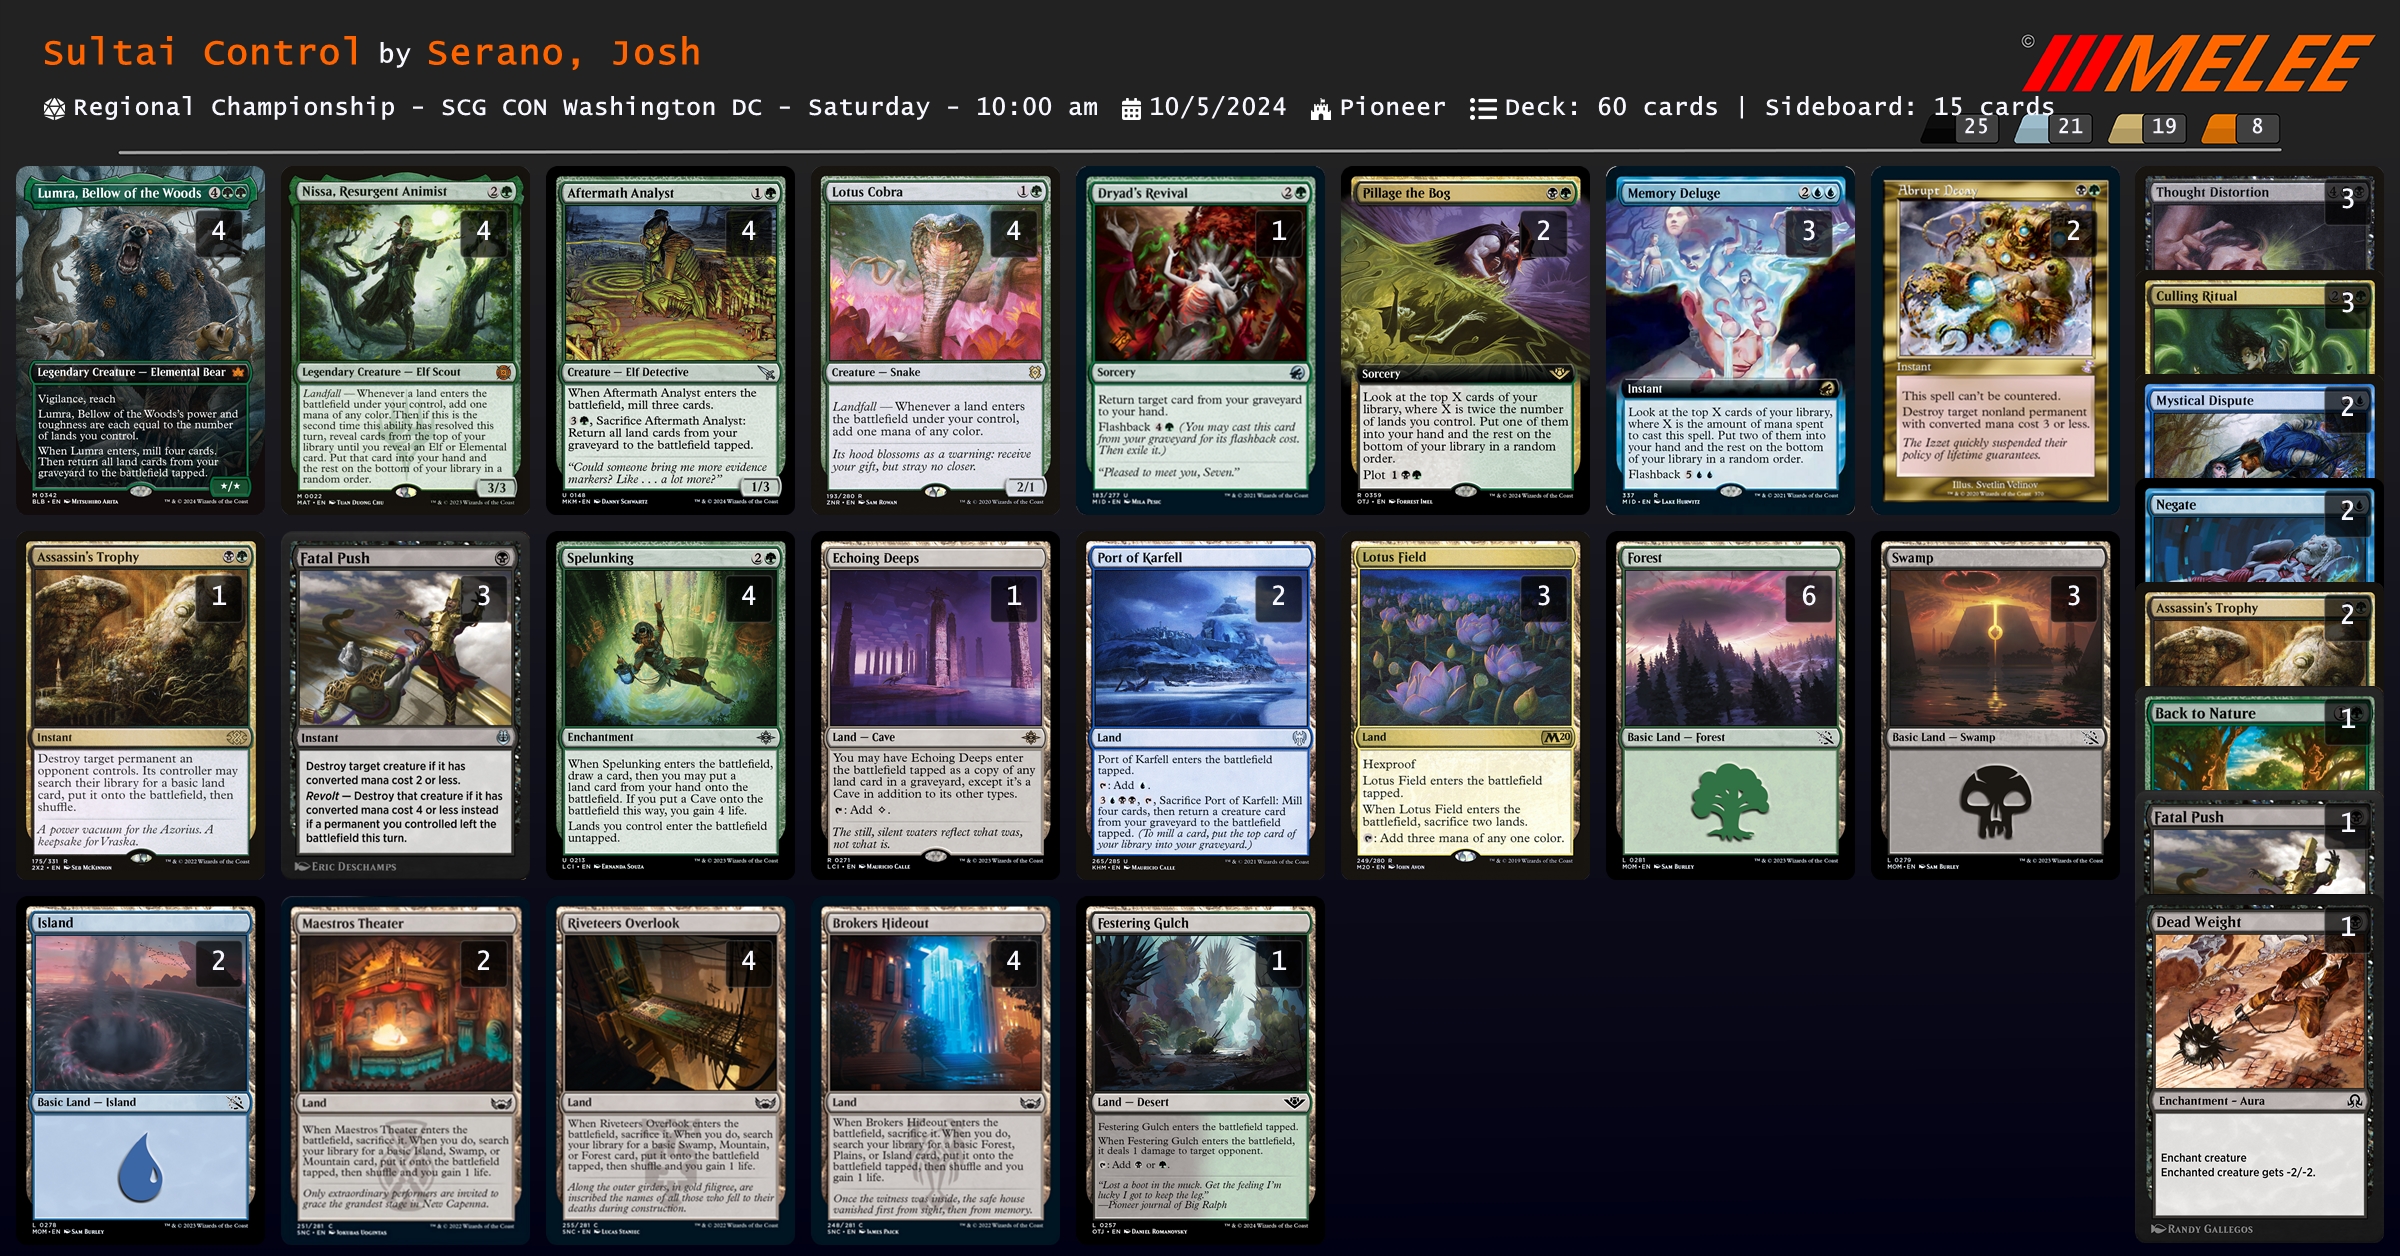
前面各種 ramp,後面用 {% mtgcard "Port of Karfell" tooltip=true %} 將 {% mtgcard "Lumra, Bellow of the Woods" tooltip=true %} 挖回場上,這時 {% mtgcard "Lumra, Bellow of the Woods" tooltip=true %} 的進場效果會將 {% mtgcard "Port of Karfell" tooltip=true %} 也挖回場上。
如果墳場有第二隻 {% mtgcard "Lumra, Bellow of the Woods" tooltip=true %} 的話,可以重複此動作將整套牌都磨進墳場,並且將所有地挖回來,其中就包括 {% mtgcard "Festering Gulch" tooltip=true %} 這張進場會打對手一點的地,並用 {% mtgcard "Lotus Field" tooltip=true %} 將他和 {% mtgcard "Lotus Field" tooltip=true %} 自己吃掉,然後挖回來做無限循環。
不過這個組合技有那麼億點脆弱,如果 {% mtgcard "Festering Gulch" tooltip=true %} 被殺就只能用正攻打死對手,雖然 {% mtgcard "Lumra, Bellow of the Woods" tooltip=true %} 很大隻但他自己沒有踐踏,除了會被殺以外還會被小生物 chump,另外套牌貌似也沒有洗墳手段,如果很不巧的在最後才磨到 {% mtgcard "Festering Gulch" tooltip=true %} 而且被回應放逐,整套牌好像就 GG 了。
個人建議可以考慮放一張 {% mtgcard "Turn the Earth" tooltip=true %},以防萬一對手正編就有放墳。
## 八強數量統計
總結一下各個套牌的八強次數:
| Archetype | Top 8 Count |
| :-: | :-: |
| Rakdos Aggro | 5 |
| Enigmatic Incarnation | 5 |
| Izzet Phoenix | 4 |
| Mono-Black Demons | 3 |
| Rakdos Transmogrify | 3 |
| Azorius Humans | 2 |
| Rakdos Midrange | 2 |
| Selesnya Company | 2 |
| Azorius Control | 1 |
| Azorius Lotus Field | 1 |
| Dimir Rouges | 1 |
| Jund Sacrifice | 1 |
| Mono-Red Aggro | 1 |
| Rakdos Cauldron | 1 |
我覺得 Enigmatic Incarnation 應該是表現最好的,至少 Izzet Phoenix 和 Rakdos Aggro 的基數都多很多。
另外我不確定到底是 Control 其實在現環境表現不好,或是走位都不順,八強轉換率有點低。
Mono-Black 的表現也不錯,但目前樣本數有點少,不確定原因是否為突襲賽場成功。
另外我個人覺得目前的賽場很適合用少見的套牌突襲賽場,例如 Selesnya Company 就是一個很好的例子,構築抓到 Phoenix 和 Rakdos Aggro 的弱點,打出不錯的成績。
## 環境預測
最後是環境預測,我認為台灣應該會是以 Mono-Black Demons, UWx Control, Izzet Phoenix, Rakdos Aggro 為主要構成。
Mono-Black Demons 就是帶組合技的中速,就算單獨將兩個組合技元件拍在場上都是很強力的 clock/防守者。
UWx Control 則是因為有不少台灣人喜歡打控制,Phoenix 則是有不少台灣人已經有的套牌。
而 Rakdos Aggro 則是可能會吸引一些已經有 Rakdos Midrange 的玩家去組。
剩餘的部分應該會有 Rakdos Midrange, Rakdos Transmogrify, Selesnya Company 這些套牌。
另外我覺得 Sacrifice 應該不是一個好選擇,主要原因是太好針對了,即便現在有除了 {% mtgcard "Mayhem Devil" tooltip=true %} 以外的 win-con,但不能改變的是他遇到 {% mtgcard "Leyline of the Void" tooltip=true %} 或 {% mtgcard "Rest in Peace" tooltip=true %} 時都極度不適。
## 結語
這篇文章總計了四場 RC 的八強套牌,我自己對於套牌選擇也是很糾結,本來的 Rakdos Midrange 現在環境表現不太好,但對於其他套牌選擇卻三心二意遲遲無法做決定。
過去兩週我的套牌選擇從 Azorius Control (Yorion) 跳到 Rakdos Midrange,又在幾天後變成 Rakdos Transmogrify,然後是 Azorius Control (Kaheera),練了幾天後變回 Rakdos Transmogrify,但目前除了 Rakdos Transmogrify 還有另外三套在選⋯⋯
有一點想要如 MIT #5 那次一樣直接丟骰子了⋯⋯
那麼我們賽場見!~~歡迎現場拍打和餵食~~
 Sign in with Wallet
Connect another wallet
Sign in with Wallet
Connect another wallet