---
title: Unit 3 Assignment
---
cybersecurity_university/_variations/remote/assignments/project_3.md
## Week 3 Project: Virtualization and Kali Linux
#### **Due:** {{PROJECT(3) | longdatetime}}
A major concern when dealing with offensive security tools is the possibility of inadvertently attacking unintended targets. This could include our own systems at best or military-owned computers located at a nuclear missile silo at worst. In order to isolate our exercises and lower the risk of collateral damage, we'll use something called virtualization.
Virtualization will allow us to create, using software, another computer which is logically separate and distinct from our own physical computer. It'll have its own virtual CPU (processor), GPU (display), RAM (memory), NIC (network interface card), storage (HDD, SSD, DVD-ROM) and input peripherals (mouse & keyboard).
Using virtualization technology we can perform various tasks inside virtual (guest) machines without affecting our physical (host) machine's operating system. A hypervisor is required to be installed in your host machine's operating system in order to provide hardware virtualization services.
:::info
A virtual machine is not hack-proof as there is malware which can directly attack underlying virtualization architecture infrastructure. Afterall, why go after an individual application on a single computer when you could pwn the entire server rack in a data center.
:::
:::warning
You can use any VM enviromnet in this documentations we show two methods one using VirtualBox and other using Docker.
You can follow either Method 1 or Method 2
:::
# Method 1: Using VirtualBox
## Milestone 0: VirtualBox
In this guide, and throughout the course, we will use VirtualBox. It is free and open-source software as well as cross-platform. Other hypervisors such as Hyper-V, VMWare, and KVM may also work for _most_ of the course assignments. However, instructions for other hypervisors will _not_ be covered in the guides.
:::warning
There is a program, **WPDistillery** (covered in a later unit), which has a hard depenency upon VirtualBox. We strongly advise that you use VirtualBox for all assignments throughout the course. We might not be able to provide adequate support if issues arise with other hypervisors.
:::
### Video Walk-through
[](https://www.youtube.com/watch?v=H2qR9Io1BRo "Lab 3 Guide")
### Step-by-Step Instructions
:::info
The following instructions are based on a Windows 10 experience. There will be a major difference in the actual installation process for other platforms. However, most of the post-installation steps will be very similar if not the exact same. Specific instructions for macOS and Ubuntu are included in their respective video walk-throughs.
:::
1. **Download VirtualBox**
- Go to https://www.virtualbox.org/.
- Click the big blue button that says "Download VirtualBox".
- Click on the platform package for your operating system.
- Save the file.
- <img class="center-block border" src="https://i.imgur.com/XAhh873.gif" />
2. **Install VirtualBox**
- **Run** the installer once the download is finished.
- Select **Next** to start the installation.
- Select **Next** to install the default feature set (everything).
- Select **Next** to choose the default options.
- Select **Yes** to install the virtual network interfaces. This will allow VirtualBox to create virtual networks and tap into your physical NIC in order for the guest machines to connect to the Internet.
- Select **Install**.
- Answer **Yes** to the Windows UAC prompt (check for flashing icon in your taskbar)
- Select **Finish**.
- <img class="center-block border" src="https://i.imgur.com/betT3cd.gif" />
## Milestone 1: VirtualBox Extension Pack
The extension pack will add additional functionality in order to provide a more optimal experience. It will also serve to satisfy a requirement for a later assignment.
### Step-by-Step Instructions
1. **Download the VirtualBox Extension Pack**
- Return to https://www.virtualbox.org/wiki/Downloads
- Click the link that says "All supported platforms" under the Extension Pack section.
- Save the file.
2. **Install the VirtualBox Extension Pack**
- Open the Extension Pack file you just downloaded.
- Note: It should open in VirtualBox by default, prompting you to Install. If it doesn't then you may need to manually install it by opening VirtualBox, go through the File menu -> Preferences -> Extensions -> Add new package.
- Agree to the terms by bring the scroll bar down and clicking "I Agree".
- Answer Yes to the Windows UAC prompt (check for a flashing icon in your taskbar).
- Click OK after it successfully installs.
<img class="center-block border" src="https://i.imgur.com/ZbVt3Co.gif" />
## Milestone 2: Kali Linux Installation
Kali is a widely-used Linux distribution (distro) geared toward security professionals. It comes preinstalled with over 600 pentesting and forensics tools and we'll be using a few of them throughout the course. It will also be used to introduce the Linux command line interface (CLI) to those who are unfamiliar.
:::warning Note: We do not recommend you try running an entire VM with just your GPU. Although possible, the performance will not be up to par since the VM will default to the hardware that the GPU uses rather than the one a CPU uses. Additionally, VirtualBox has [removed](https://github.com/mdaniel/virtualbox-org-svn-vbox-trunk/commit/5178e479b2ac1e33454f203854de9fe8f85a9196) these capabilities since this process usually yielded negative performance. This is different than giving your VM access to the GPU, which is possible and could be useful for the later hash cracking unit. :::
### Step-by-Step Instructions
#### Initial Setup
1. **Download the latest Kali ISO Image**
- Go to https://www.kali.org/downloads/.
- Download the image in the first row column. It's 3GB+ and may take a while depending on network speed.
2. **Create a new Virtual Machine (VM)**
- Open VirtualBox and create a New VM.
- Name it _as you wish_, set the Type to **Linux** and Version to **Debian**, as Kali is a derivative.
- Choose a memory size (powers of 2). We recommend allocating a quarter of your total system memory e.g. if you computer has 8G then set it to 2048 MB. If memory is scarce then stick with 1024 MB. You may be able to get by with less but performance will be heavily impacted due to swapping/paging to disk.
:::warning
Be cognizant of your host operating system's memory needs. If you fail to leave enough for your host it may slow to a crawl or even crash (including your VM!). You can monitor the usage in real-time using Resource Monitor. Check what your memory usage looks like with and without applications open in the background. Leave room, at the very least, to run both your web browser (with mutliple sites open) and your Kali VM.
:::
- Create a virtual hard disk, of type **VDI**, **dynamically allocated** with _AT LEAST_ **25GB** of space. If you have plenty of free space we recommend 50GB.
:::info
You can always grow (but not shrink) the drive's capacity, partitions and filesystems later.
:::
3. **Mounting the ISO and Bootstrapping**
- After creating the virtual hard drive you will be back at the main VirtualBox Manager window. From here, make sure the new Kali VM is highlighted blue and click the green arrow Start button.
- Next you'll be prompted for a start-up disk. Click the little folder icon with the green arrow.
- Add a new virtual optical disk image (ISO) file.
- Open the ISO you downloaded previously in your Downloads folder. Then click Choose.
- Finally, click Start.
- <img class="center-block border" src="https://i.imgur.com/ZuPRoF0.gif" />
:::danger
You may run into a critical error at this point for one of the following reasons:
1. You have Hyper-V installed, it will not share hardware resources with VirtualBox. Instructions to remove it are [here](https://www.google.com/search?q=how+to+uninstall+hyper-v&oq=how+to+uninstall+hyper-v).
1. You have Windows Subsystem for Linux installed which also uses Hyper-V. Instructions to remove it are [here](https://www.google.com/search?q=how+to+uninstall+windows+subsystem+for+linux).
1. You have _not_ enabled virtualization extensions in your motherboard's **BIOS/UEFI**. The process for enabling it is specific to your motherboard or computer vendor and is outside the purview of this guide.
1. You have very old hardware which doesn't support Virtualization. Not much you can do here. You're only option is to create a bootable USB and boot Kali directly on your hardware AKA bare-metal.
:::
#### Kali Installation
1. **Configuring the Locale and Hostname**
- Once the installer boots up, choose **Graphical Install** and press Return/Enter.
- Next choose your language, location and keyboard layout.
:::info
If you are unsure of an option, the default (highlighted) option is usually a safe bet.
:::
- After a few minutes of loading you will be asked for a hostname. For the purposes of this course you can set this to what you want as long as it is a single lowercase word or you can just leave the default as kali.
- Leave Domain name blank. If you were making the VM a publicly accessible server and linking it to a DNS record, you would use its fully qualified domain name e.g. kali.example.com. More info on hostnames [here](https://en.wikipedia.org/wiki/Hostname).
2. **Creating a User and Setting a Password**
- When setting up your user account, the Full name is your "display" name while the Username for your account is the actual login username. Set your username and password to something you'll remember.
- **WARNING: Usernames in Linux are case-senstive**. When logging in, you must type them exactly as you created them. It may be easier for you (and others) to remember if you follow the standard convention of keeping usernames all lowercase.
- <img class="center-block border" src="https://i.imgur.com/x1EWceL.gif" />
3. **Timezone, Partitioning, Filesystem layout**
- Set **your timezone**.
- Go with the default partition layout of **Guided - use entire disk**.
- Click continue to partition your only virtual disk: **sda**. Note how Linux names its drives. The first SCSI (or SATA) disk attached is named sda. If you attached a second one, it would be named sdb, third would be sdc and so forth.
- Choose **All files in one partition** in order to keep the partitioning layout simple. This will make it easier to enlarge the disk and filesystem later on should the need arise.
- Select **Finish partioning and write changes to disk** and continue.
- Lastly, confirm **Yes** and continue in order to make the changes take effect. Your final layout has 2 partitons, 1 partition for files and 1 for swap. Swap is used as a sort of RAM backup when the system runs out of memory and needs to write to the hard drive. When a system runs out of RAM it'll bring the system to a crawl. Small amounts of swap space is also used regularly for instance, whenever a low priotity process has been asleep for some time and no longer requires high-performance RAM.
- <img class="center-block border" src="https://i.imgur.com/F5BXefB.gif" />
4. **Software Installation**
- Once the base system is installed you'll be asked for proxy information. Leave the field blank (default).
- Next you'll choose which extra software to install. Go with the default Xfce Desktop environment or choose another. GNOME was the default in the last edition of Kali (pre-2020). You can also choose multiple environments to try out, but keep in mind that adding more will use more space on the hard drive. Each one consumes roughly 1G.
- Leave Collection of tools at the default setting and continue.
- :::danger
If you run into a critical error at this point it is likely due to the installer running out of disk space. Make sure you've set the drive size to at least 25G. It'll need to be >25G if you've modified the default software selection.
:::
5. **Bootloader Install and Reboot**
- Towards the end, you'll be asked to Install the GRUB (GRand Unified Bootloader) to the master boot record (MBR). Mark Yes, continue and choose **/dev/sda** to finish the final installation process.
<img class="center-block border" src="https://i.imgur.com/38KcyOt.gif" />
:::success
Congratulations, the installation is complete! The system will automatically reboot to a login prompt. Sign in.
:::
## Milestone 3: Installing More Software
Open a terminal. Look for the little black screen in the upper left (using Xfce environment).
<img class="border spaced" src="https://i.imgur.com/djyX7Hb.png" />
You can also search for installed applications by clicking the blue Kali logo in the upper left.
<img class="border spaced" src="https://i.imgur.com/WJTsyMk.png" />
The first step to take before installing new software is to sync your local package lists with the distribution's main repository's offerings.
```shell
sudo apt update
```
:::warning
The **sudo** (Super User DO) command must precede commands which require temporary elevated privileges e.g. commands that change system files, this includes installing and removing software. When a password prompt appears and you start typing you will not be able to see how many character's you've entered. This is a security feature to prevent shoulder surfers from seeing exactly how long your password is. Rest assured that what you are typing is being entered, the program is just waiting for you to hit the Return key. If you know you've already messed up, then go ahead and hit Return to try again.
:::
:::info
The **apt** (Advanced Packaging Tool) command is the primary package manager found on all Debian based systems such as Kali and Ubuntu.
:::
After updating the local repository's cache you can install the latest version of a package. Let's install the latest version of a program called [screenfetch](https://github.com/KittyKatt/screenFetch).
```shell
sudo apt install screenfetch
```
It may ask "Do you want to continue? \[Y/n]". Note that the letter which is capitalized signifies the default, pressing Return will make it continue.
Run it by simply entering screenfetch in the Terminal.
```shell
screenfetch
```
It should print out information about the system along with an ASCII art version of the Kali logo.
## Milestone 4: VirtualBox Guest Additions
The latest version of Kali comes pre-installed with VirtualBox's Guest Additions. The guest additions enable greater cohesion between host and guest, increasing ease of use and productivity. This section will briefly cover some of the most important features. For a full list of feature see [here](https://www.virtualbox.org/manual/ch04.html).
### Automatic Display Resizing
Try resizing your VM's Window. Does the screen resolution automatically adjust? If you want to disable this you can control it through the View menu.
<img class="border spaced" src="https://i.imgur.com/CTCLqFL.png" />
Perhaps you'd like to set a specific resolution or scaling ratio?
<img class="border spaced" src="https://i.imgur.com/Q92zvMf.png" />
### Shared Clipboard
Try turning **Bidirectional** mode on in the Devices menu and see if you can copy text back and forth from host to guest and vice versa.
Use the keyboard shortcut to copy: <kbd>Ctrl</kbd>+<kbd>C</kbd> and to paste use: <kbd>Ctrl</kbd>+<kbd>V</kbd>
When copying to or from a Mac you use <kbd>command ⌘</kbd>+<kbd>C</kbd> to copy and <kbd>command ⌘</kbd>+<kbd>V</kbd> to paste. When copying to or from the Kali Linux guest system you will need to use <kbd>Ctrl</kbd> instead of <kbd>command ⌘</kbd>.
<img class="border spaced" src="https://i.imgur.com/1IsQ47T.png" />
:::info
Note that you'll need to apply the <kbd>Shift</kbd> key when copying text to or from a Linux Terminal. Try echoing your name in a Terminal and then copying it to a text editor on your host system.
:::
In a Terminal on Kali run the following:
```shell
echo $USER'@'$HOSTNAME':~'" Hello, Hello, can anyone hear me?"
```
Can copy the output to your host? Remember to apply the <kbd>Shift</kbd> key when copying text to or from a Terminal.
<img class="center-block border" src="https://i.imgur.com/VaulkYf.png" />
:::success
There are many more features to check out! See if you can figure out how to share folders between host and guest.
:::
## Milestone 5: Documenting Your Work
Practice keeping notes of steps you've taken to solve problems. When we write down our problems, with solutons already tried, it clarifies in our minds what questions need to asked and answered. It also keeps us from going around in circles thereby giving back time we can use for making real progress.
Remember the old adage, "A picture speaks a thousand words". This is especially true when troubleshooting and asking for help (and trying to offer help!). Take plenty of quality pictures when possible as it will make the lives of those who are trying to help a million times easier.
# Method 2: Using Docker
## Milestone 0: Docker
### Step-by-Step Instructions
1. **Download Docker**
- Go to https://www.docker.com/products/docker-desktop
- Select the Docker Desktop appropriate for you such as mac with intel chip or mac with apple chip or windows or linux.
- Click on the platform package for your operating system.
- Save the file.
- OS Specific resources, the reference links have detailed steps on how to install docker:
- For Mac OSX
- Using the installer at this [link](https://docs.docker.com/docker-for-mac/install/) installs all the components necessary for this exercise.
- Please start docker first and start instructions from docker CLI
- Ensure python3 is installed if the usage of modifyCompose CLI app is desired.
- For Windows
- The installer at this [link](https://docs.docker.com/docker-for-windows/install/) includes all the necessary components.
- Ensure python3 is installed if the usage of modifyCompose CLI app is desired.
- For Linux Distros
- Follow the distro specific instructions for the [Docker Engine](https://docs.docker.com/engine/install/) and for [Docker Compose](https://docs.docker.com/compose/install/).
- There is no GUI included for Linux, and if needed install [Portainer](https://documentation.portainer.io/v2.0/deploy/ceinstalldocker/), an open source application which can help view and manage containers.
- Ensure python3 is installed if the usage of modifyCompose CLI app is desired.
Once installed, open the terminal and run below command to confirm the docker installation and version:
```shell
docker --version
```
Expected outcome is similar to:
```shell
Docker version 20.10.12, build e91ed57
```
:::warning
If you have pre-downloaded docker, verify the version of docker. We need to use docker version 19 or after to complete this assignment
:::
## Milestone 1: Install the package
Open terminal and go to the desired folder run git clone to get the package that we need to complete week 3 and week 7 assignment.
```shell
git clone https://github.com/0xrutvij/wpVSkali.git
```
Expected Outcome:
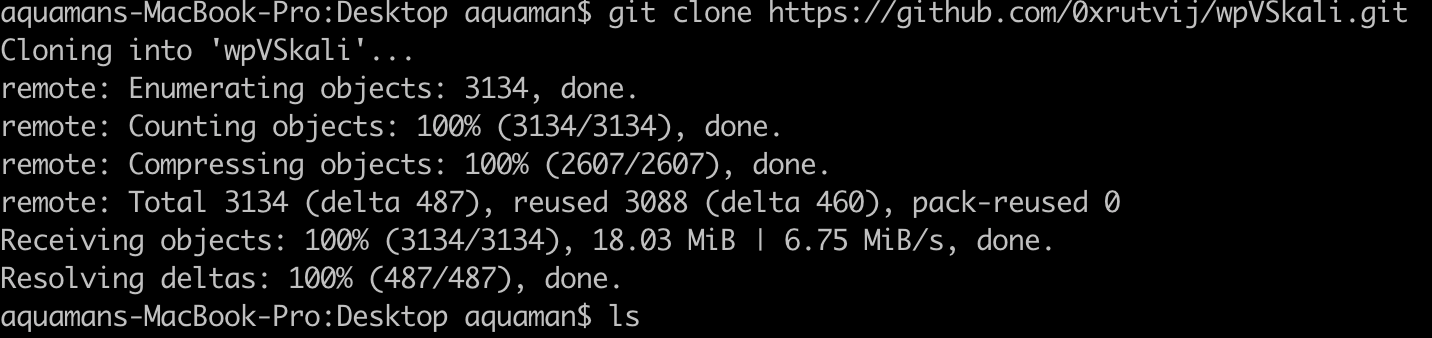
After the clone, there is a folder created with name **wpVSkali**
To navigate to wpVSkali run below:
```shell
cd wpVSkali
```
Run the build command to build an image/images from a Dockerfile
More reading - https://docs.docker.com/engine/reference/commandline/build/ and https://docs.docker.com/compose/reference/build/
```shell
DOCKER_BUILDKIT=1 docker-compose build
```
Expected outcome:
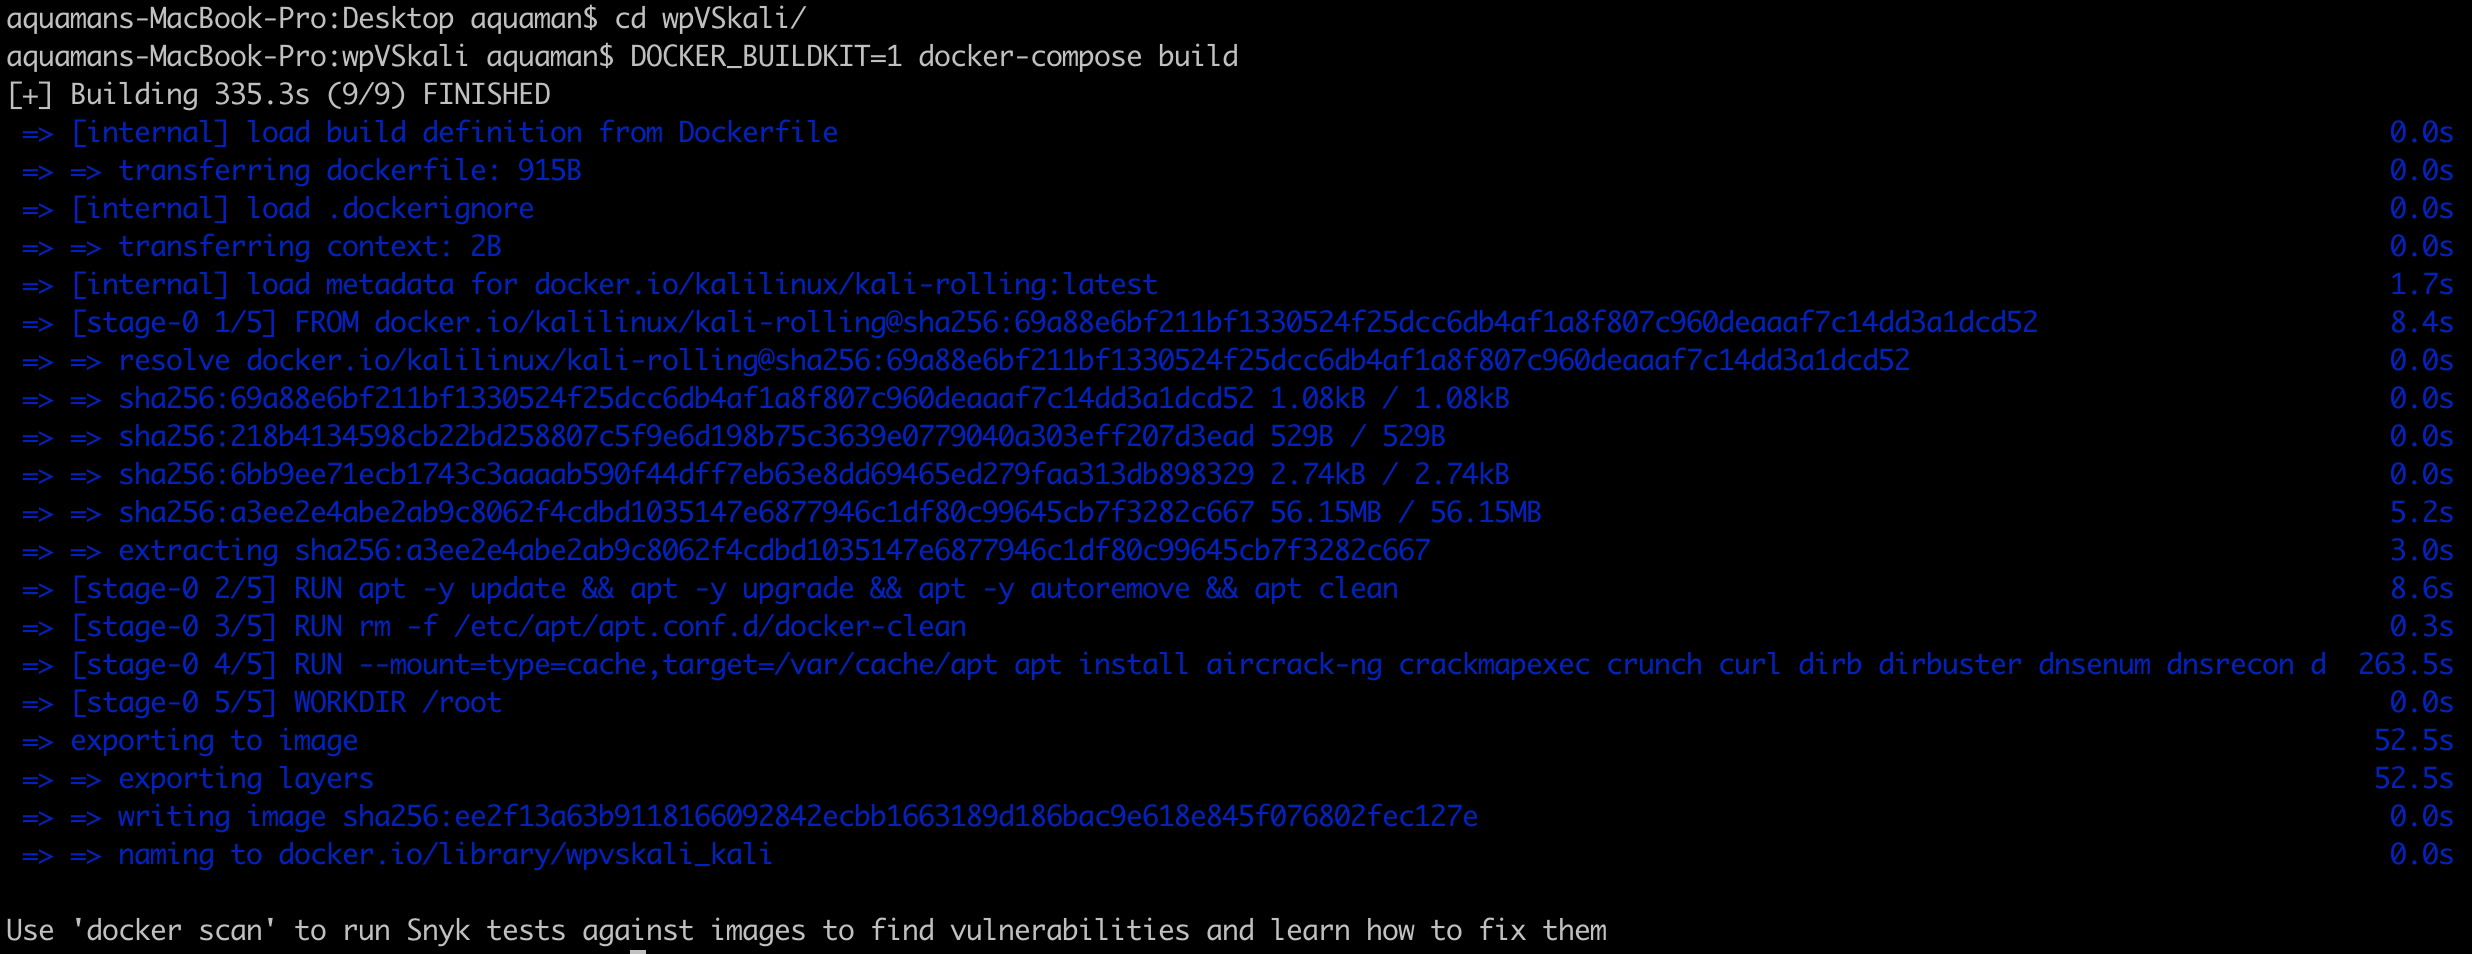
Ignore the docker scan response, we arenot going to use at this time.
- Use 'docker scan' to run Snyk tests against images to find vulnerabilities and learn how to fix them
Make WPFLODER for future use, you can skip the step for now, needed on Unit 7 :
```shell
mkdir wpFolder
```
## Milestone 2: Invoking Kali Linux
Run Docker ps -a to Show all containers (default shows just running)
More reading under - https://docs.docker.com/engine/reference/commandline/ps/
```shell
docker ps -a
```
Expected outcome:

You will see an image with name kaliCP, we need start kali interacitve mode
```shell
docker exec -it kaliCP bash
```
Expected outcome:
<img width="543" alt="Screen Shot 2022-03-04 at 1 09 14 PM" src="https://user-images.githubusercontent.com/19233781/156841860-2de8be94-281a-4c51-85bb-582b3c025303.png">
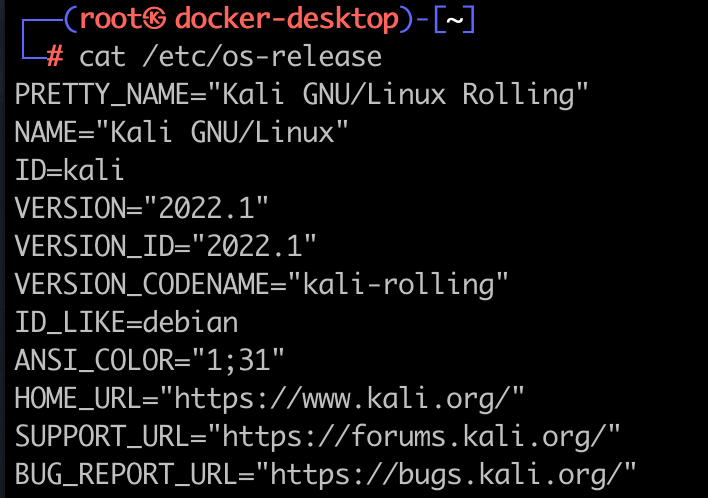
Verify kali os-release information:
```shell
cat /etc/os-release
```
## Milestone 3: Documenting Your Work
Practice keeping notes of steps you've taken to solve problems. When we write down our problems, with solutons already tried, it clarifies in our minds what questions need to asked and answered. It also keeps us from going around in circles thereby giving back time we can use for making real progress.
Remember the old adage, "A picture speaks a thousand words". This is especially true when troubleshooting and asking for help (and trying to offer help!). Take plenty of quality pictures when possible as it will make the lives of those who are trying to help a million times easier.
Submission for Week 3 Assignment:
- Expected GIF submission for week 3.
- Create a gif video showing important milestones such as git clone step and mainly showing kali version towards end. Go to Milestone 6 to know more about submission process.
- Expected a GIF with the below flow:
[Expected Submission](https://hackmd.io/@GQd-YFYmSca8cYesHoNRvw/rJoG1duJ5
## Milestone 4: Stopping the instances:
Stop all the instances once the work is completed.
Exit from the kali shell by typing *exit*.
<img width="353" alt="Screen Shot 2022-03-04 at 1 15 15 PM" src="https://user-images.githubusercontent.com/19233781/156842599-e1b46370-70da-4199-ae81-bfbb4222bf83.png">
Run below to shutdown all running containers:
```shell
docker-compose down
```
<img width="1128" alt="Screen Shot 2022-03-04 at 1 16 19 PM" src="https://user-images.githubusercontent.com/19233781/156842713-7fba0d74-47c9-4c35-b965-b516c1e46558.png">
### Keyboard Warrior
Make use of your operating system's built-in screen cropping tools and memorize the shortcuts! Keyboard shortcuts save time and most importantly keep you from straining your hands.
To crop a section of your screen and put it in memory (AKA clipboard), use <kbd>Ctrl</kbd>+<kbd>Shift</kbd>+<kbd>S</kbd> in Windows.
On [macOS](https://support.apple.com/en-us/HT201361) you can use <kbd>shift</kbd>+<kbd>control</kbd>+<kbd>command ⌘</kbd>+<kbd>4</kbd>.
Try pasting the screenshot in a Slack channel, DM or a [Discussion Board](https://discussions.codepath.com/courses/cybersecurity_university/questions) post using <kbd>Ctrl</kbd>+<kbd>V</kbd> or <kbd>command ⌘</kbd>+<kbd>V</kbd> if on a Mac.
### Movie Maker Extraordanaire
Use a GIF recorder to create videos out of multiple screenshots. We recommend [Kap](https://getkap.co/) for macOS, [ScreenToGif](https://www.screentogif.com/) for Windows, and [peek](https://github.com/phw/peek) for Linux.
:::warning
**Homework**:
1. Create a GIF recording of you starting your new Kali VM. Show VirtualBox Manger, click Start on your Kali box and end the recording when it reaches the login prompt. If it's larger than 5 MB, try to remove any large swathes of redudant frames. Save it as `vbox_kali.gif`.
2. Create a GIF recording of you running the following command block in your Kali Terminal. **Copy it to a text editor first and replace the examples with your real name and college name** then run it all together. Save it as `screenfetch.gif`.
```shell
name="FirstName LastName"
univ="University of Science"
screenfetch
echo $name'@'$univ
```
:::
## Milestone 6: Uploading Homework to GitHub
[](https://www.youtube.com/watch?v=ke5TnCGehyM "Unit 3 GitHub Guide")
For non-CTF/Security Shepherd assignments you'll be using a GitHub respository (repo) to save your homework.
### Initial Repo Setup
To create a repository for your CodePath homework, log in to https://github.com/
In the upper-right corner, click the **+** symbol and choose **New Repository**.
<img class="border spaced" src="https://i.imgur.com/b6pUmRJ.png" />
Make up a name, choose **Private** and check off **Initialize this repository with a README**.
<img class="center-block border" src="https://i.imgur.com/xwgHbtR.png" />
Edit the **main** branch's README.md by clicking the pencil in the upper-right.
<img class="border spaced" src="https://i.imgur.com/AVViqi7.png" />
Replace everything with the following text block:
```markdown
# codepath_homework
See branches for assignments.
```
Commit changes.
<img class="border spaced" src="https://i.imgur.com/8xUlS6z.png" />
Enter the **Settings** for your new repo.
<img class="border spaced" src="https://i.imgur.com/ZU8VdY4.png" />
Go to **Manage access** on the left navigator. Invite codepathreview as a collaborator.
<img class="center-block border" src="https://i.imgur.com/MpILNul.gif" />
:::warning
To ensure the operations team can grade your homework, double-check in **Settings** -> **Manage access**, the following:
- Repository is set to **private**
- **codepathreview** has been invited as collaborator.
:::
### Trees, roots and branches
In order to avoid having to create a new respository for every assignment, we'll use **branches**.
The **main** branch can be thought of as the root of a tree. During regular softare development lifecycles, invididual contributors will **clone** a main (the latest development version of software) branch (or another branch), make their changes (**commits**) and **push** them back to the central repository (possibly hosted on GitHub). They'll then likely create a **pull request** where they ask the maintainers (AKA custodians of the code) to **merge** their branch back into main. In other words, accept their changes/commits.
Don't worry if this is all too confusing. We are simply going to take advantage of the branch system by storing each invididual assignment in their own respective branches.
While looking at the code section of your repo, click the Branch: main button near the middle-left.
Create a new branch by typing a name and clicking Create branch underneath.
<img class="center-block border" src="https://i.imgur.com/jSySqk0.gif" />
Edit the README.md by clicking the pencil icon on the upper-right of the document. In edit mode you can use [markdown](https://guides.github.com/features/mastering-markdown/) and/or HTML to format the page. Each assignment will have a template you can copy in, filling in the blanks.
**This week's assignment template is [here](http://courses.codepath.org/snippets/cybersecurity_university/readme_templates/project_3_readme.md?raw=true)**. Copy and paste it into the new branch's README.md, replacing the original main's version.
:::info
A list of all README.md templates can be found under the [**Submitting Assignments**](https://courses.codepath.com/courses/tech_fellow_training/pages/submitting_assignments?renderer=cm#heading-readme-templates) section on the left menu.
:::
Next, upload the required GIFs to your repository. To upload files such as GIFs to your repo, exit edit mode and click **Upload files**.
<img class="border spaced" src="https://i.imgur.com/sv6fD6e.png" />
## Milestone 7: Submitting the Assignment
All non-CTF/Security Shepherd assignments will require one last step to submit the assignment.
Scroll up and look for the blue Submit button in the upper-right. The items circled in red are required. Add any relevant notes or feedback (optional).
<img class="center-block border" src="https://i.imgur.com/TQteRZq.png" />
:::success
Congratualtions, you just finished your first "written" assignment!
:::
 Sign in with Wallet
Connect another wallet
Sign in with Wallet
Connect another wallet