# 02.2-WebServic and APIs-Lesson2: Introduction
###### tags: `Udacity`
[ToC]
# 01 Introduction
{%youtube kzV3_EJM5TQ%}
# 02 Architechture Style
{%youtube 672a5lB093o%}
REST stands for **RE**presentational **S**tate **T**ransfer. It’s a set of guidelines application developers use to design APIs.
There are four principles that APIs follow:
1. Data and functionality in the API are considered “resources” and identified through something called the URI, or Uniform Resource Identifier. These are accessed by web links.
2. Resources are manipulated using a fixed set of operations. GET retrieves a resource. POST creates one. Use PUT to update the resource, and of course, DELETE will remove it.
3. Resources can be represented in multiple formats, such as HTML, XML, plain text, and other formats defined by a media type.
4. Communication between the client and server (i.e. endpoint) is stateless. This means the server will not remember or store any state about the client that made the call.
==ShannonNote==
>REST是Representational State Transfer是一組給application developers設計APIs的指標。
>* 她要遵守幾個原則
* Data 和 Funtionality 是資源的一種
* URI - Uniform Resource Identifier
* 資源被一組固定的操作來操作
* GET : 接收資源
* POST : 創造資源
* PUT : 更新資源
* DELETE : 移除資源
* 資源可以被表示在不同的形式,像是html, xml, plain texts...
* Stateless communication : Server不會去記得client的任何資訊
# 03 Case Study: Intro & Maven Dependencies
{%youtube Br5M86T4zek%}
The case study is a REST API that retrieves a list of locations from a database. The code can be cloned from [GitLab](https://gitlab.com/videolearning/udacity-java/tree/master/Lesson2-restapis).
* spring-boot-starter-web - This starter pack is used for web application development and automatically adds libraries like Spring MVC, REST, Tomcat, and Jackson.
* com.h2database - This starter pack is used for the H2 in-memory database.
* spring-boot-starter-data-jpa - This starter pack includes JDBC, Hibernate, Transactions API, JPA, and Aspects.
# 04 Lab I: Build a Dog REST API(Set Up)
**Lab I: Build a Dog REST API**
Throughout this lesson, you will work to create a REST API that returns a list of dogs from an embedded H2 in memory database. Note that you will build on this code throughout each of the lesson's labs, so while it starts with just a small piece, it will get bigger as we go.
**Set Up**
* Step 1: Use Spring Initializr to bootstrap a simple project.
* Add the H2 Database, Spring Web Starter, and the Spring Data JPA dependencies before generating the project.
* Step 2: Set-up the H2 in-memory database.
* Enable the console, add a path for the console, and create a url for the datasource using H2.
# 05 Lab I: Solution
**Solution: Build a Dog REST API - Set Up**
Below, we'll walk through each step of the lab and look at one potential way to implement the lab. Even if you get stuck, you should always first try to work through the lab without the solution before coming here, so that you can best learn the related skills and be ready for the project at the end of the course.
**Step 1: Use [Spring Initializr](https://start.spring.io/) to bootstrap a simple project.**
* Add the H2 Database, Spring Web Starter, and the Spring Data JPA dependencies before generating the project.
Select the correct dependencies for the project

**Step 2: Set-up the H2 in-memory database.**
* Enable the console, add a path for the console, and create a url for the datasource using H2.
Within `application.properties` (found within `/src/main/resources/`), you could add the following code:
```typescript
spring.h2.console.enabled=true
spring.h2.console.path=/h2
spring.datasource.url=jdbc:h2:mem:dogdata
```
Note that `dogdata` is just what I chose as the name - yours does not need to match this.
# 06 Case Study: Annotations
{%youtube kW6jWuxtCfE%}
The case study is a REST API that retrieves a list of locations from a database. The code can be cloned from [GitLab](https://gitlab.com/videolearning/udacity-java/tree/master/Lesson2-restapis).

# 07 Lab II: Build a Dog REST API(Annotation I)
**Lab II: Build a Dog REST API**
Let's build more onto our Dog REST API we set up earlier, by adding an entity and a controller.
**Annotations Part I**
* Step 1: Create an entity called Dog. The dog should have three attributes:
* Name
* Breed
* Origin
* Step 2: Create a web controller using `@RestController`.
* You just need to create the structure of the controller for now. You'll add more to it once we discuss services next.
# 08 Lab II: Solution
**Solution: Build a Dog REST API - Annotations Part I**
Below, we'll walk through each step of the lab and look at one potential way to implement the lab. Even if you get stuck, you should always first try to work through the lab without the solution before coming here, so that you can best learn the related skills and be ready for the project at the end of the course.
**Step 1: Create an entity called Dog.**
* The dog should have three attributes:
* Name
* Breed
* Origin
First, create a new package in the same directory that holds your main application, called `entity`. Then, create a new Java class called `Dog`.
The below code could be used to implement such an entity with the required attributes. Note that you should also include constructors for the class, as well as accessors and mutators for the three attributes. **Important**: The package name may differ depending on what you used during the set up of your project - make sure to adjust it to apply to your own project structure!
```typescript
package com.udacity.DogRestApi.entity;
import javax.persistence.*;
@Entity
public class Dog {
@Id
@GeneratedValue(strategy = GenerationType.AUTO)
private Long id;
private String name;
private String breed;
private String origin;
public Dog(Long id, String name, String breed, String origin) {
this.id = id;
this.name = name;
this.breed = breed;
this.origin = origin;
}
public Dog(String name, String breed) {
this.name = name;
this.breed = breed;
}
public Dog() {}
public Long getId() {
return id;
}
public void setId(Long id) {
this.id = id;
}
public String getName() {
return name;
}
public void setName(String name) {
this.name = name;
}
public String getBreed() {
return breed;
}
public void setBreed(String breed) {
this.breed = breed;
}
public String getOrigin() {
return origin;
}
public void setOrigin(String origin) {
this.origin = origin;
}
}
```
**Step 2: Create a web controller using @RestController.**
* You just need to create the structure of the controller for now. You'll add more to it once we discuss services next.
First, create a new package in the same directory that holds your main application, called `web`. Then, create a new Java class called `DogController`.
The below code contains the first steps for this controller, which we will complete in the final lab of this lesson after implementing the related `DogService`.
```typescript
package com.udacity.DogRestApi.web;
import org.springframework.web.bind.annotation.RestController;
// Note - we will eventually also import additional packages later on
@RestController
public class DogController {
}
```
# 09 Case Study Continued
{%youtube 7h28NrYZ1RU%}
* Controller - LocationController.java
* Service - LocationService.java and LocationServiceImpl.java
* CRUD Repository - LocationRepository.java
* Domain Entity/Model - Location.java
* H2 Database accessible via http://localhost:8080/h2/
* Tomcat Server accessible via http://localhost:8080
==ShannonNote==
> * Location的Entity: 住在Database
> * LocationRepository: 允許我們跟database互動
> * LocationService and LocationServiceImpl: Impl可以讓你設定business logic
> * ResponseEntity代表者整個HTTP response,像是包括statud code, headers, and the respones body,我們可以設定要return哪個
> 如果以上都設定好之後點擊執行,Spring Boot會包裝code and 佈屬到嵌入式的TomcatServer,然後就可以使用localhost
>
>* 順序
* 先設定Entity讓他可以跟資料庫的table mapping
* 寫一個interface which extends `CrudRepository`,繼承這個interface的話就可以存取database
* 寫一個ServiceImpl使用`@Service`然後建立一個物件,這個物件是那個extend crudrepository的interface,然後在Service裡面透過這個物件尋找你要的東西
* 設定Controller的GetMapping("/url"),這個方法裡面會設定要回傳的RESTful內容,到時候在網頁顯示service給的內容
# 10 Lab III: Build a Dog REST API(Annotations II)
**Lab III: Build a Dog REST API**
Here, we'll finish off this lesson's lab, creating a REST API that returns a list of dogs from an embedded H2 in memory database. This time, you'll add a repository & service, complete the `DogController` you started earlier, make sure errors are handled, and then create a `.sql` file for some example dog data.
**Annotations Part II**
* Step 1: Create a repository that extends CrudRepository for creating, reading, updating, and deleting Dog objects.
* Step 2: Create a dog service that performs the following operations:
* retrieveDogBreed
* retrieveDogBreedById
* retrieveDogNames
You may want to check out [this Stack Overflow post](https://stackoverflow.com/questions/22007341/spring-jpa-selecting-specific-columns) for one possible way you might help implement these operations by adjusting the repository created in Step 1.
* Step 3: Update the web controller using @RestController that handles requests for retrieving:
* a list of Dog breeds
* a list of Dog breeds by Id
* a list of Dog names
* Step 4: Make sure errors are handled appropriately.
* if an id is requested that doesn’t exist, appropriately handle the error
* Step 5: Create a `data.sql` file to create sample dog data in the database.
If you aren't familiar with SQL, take a look back at [Kesha's file](https://gitlab.com/videolearning/udacity-java/blob/master/Lesson2-restapis/bootstrap/src/main/resources/data.sql) from the Location API case study.
* Step 6: Check that you are able to access your API.
# 11 Lab III: Solution
**Solution: Build a Dog REST API - Annotations Part II**
Below, we'll walk through each step of the lab and look at one potential way to implement the lab. Even if you get stuck, you should always first try to work through the lab without the solution before coming here, so that you can best learn the related skills and be ready for the project at the end of the course.
**Step 1: Create a repository that extends CrudRepository.**
* This repository is for creating, reading, updating, and deleting Dog objects.
First, create a new package in the same directory that holds your main application, called `repository`. Then, create a new Java interface called `DogRepository` (note that you can create a new `interface` in IntelliJ first by adding a new Java class, and then selecting `interface` on the menu that comes up).
Here, you'll need to import both your `Dog` entity as well as `CrudRepository` from the Spring framework, which will extend your `DogRepository` interface. While Spring implements a lot of the repository for you, I have added a few helpful queries to be able to obtain some of the necessary information for our `DogService` later. When I use an `id` as input to `findBreedById`, I needed to add a `:` into the query line to feed in from my method.
Note that instead of taking this approach, you could alternatively use the built-in queries from `CrudRepository` within the `DogService` to get all dogs or get a dog by ID, then process the resulting object as well.
```typescript
package com.udacity.DogRestApi.repository;
import com.udacity.DogRestApi.entity.Dog;
import org.springframework.data.jpa.repository.Query;
import org.springframework.data.repository.CrudRepository;
import java.util.List;
public interface DogRepository extends CrudRepository<Dog, Long> {
@Query("select d.id, d.breed from Dog d where d.id=:id")
String findBreedById(Long id);
@Query("select d.id, d.breed from Dog d")
List<String> findAllBreed();
@Query("select d.id, d.name from Dog d")
List<String> findAllName();
}
```
**Step 2: Create a dog service.**
* The service should perform the following operations:
* retrieveDogBreed
* retrieveDogBreedById
* retrieveDogNames
First, create a new package in the same directory that holds your main application, called `service`. Then, we'll create two files - one for an interface called `DogService`, and the other a class called `DogServiceImpl` that will actually implement the `DogService`. Splitting them like this is not necessarily required, but is good practice.
First, let's look at `DogService`, which can pretty simply add the method names noted for this step. Note that I also added a `retrieveDogs` method that can get all of the dogs' information, but that's not required.
```typescript
package com.udacity.DogRestApi.service;
import com.udacity.DogRestApi.entity.Dog;
import java.util.List;
public interface DogService {
List<Dog> retrieveDogs();
List<String> retrieveDogBreed();
String retrieveDogBreedById(Long id);
List<String> retrieveDogNames();
}
```
Now, we can look at the implementation of the `DogService` within `DogServiceImpl`. Note that while the repository already has `findAll()` (and `findById(id)`, not used here) implemented, the other methods used here were implemented above within the `DogRepository`, or else they would not work. You'll want to use the `@Service` and `@AutoWired` annotations here as well.
```typescript
package com.udacity.DogRestApi.service;
import com.udacity.DogRestApi.entity.Dog;
import com.udacity.DogRestApi.repository.DogRepository;
import org.springframework.beans.factory.annotation.Autowired;
import org.springframework.stereotype.Service;
import java.util.List;
@Service
public class DogServiceImpl implements DogService {
@Autowired
DogRepository dogRepository;
public List<Dog> retrieveDogs() {
return (List<Dog>) dogRepository.findAll();
}
public List<String> retrieveDogBreed() {
return (List<String>) dogRepository.findAllBreed();
}
public String retrieveDogBreedById(Long id) {
return (String) dogRepository.findBreedById(id);
}
public List<String> retrieveDogNames() {
return (List<String>) dogRepository.findAllName();
}
}
```
**Step 3: Update the web controller.**
* The updated controller should handle requests for retrieving:
* a list of Dog breeds
* a list of Dog breeds by Id
* a list of Dog names
Below, I have updated the `DogController` to now use functions from the `DogService`, along with `@GetMapping`, to configure the different paths where a user could `GET` information from the Dog API. Note the use of `ResponseEntity` and `HttpStatus` to help formulate the API response. The paths **do not** need to match what I used - theoretically, if you wanted to return the information about your dogs from a path `/cats` you could, although that would clearly be confusing to the end user. I also added the extra mapping just for getting all dogs (`/dogs`), although it wasn't specified in the lab.
While I use `@PathVariable` along with the dog ID below, note that you could also use `@RequestParam` with a few minor changes to achieve the same result (see more [here](https://javarevisited.blogspot.com/2017/10/differences-between-requestparam-and-pathvariable-annotations-spring-mvc.html)).
```typescript
package com.udacity.DogRestApi.web;
// Don't forget the new imports!
import com.udacity.DogRestApi.entity.Dog;
import com.udacity.DogRestApi.service.DogService;
import org.springframework.beans.factory.annotation.Autowired;
import org.springframework.http.HttpStatus;
import org.springframework.http.ResponseEntity;
import org.springframework.web.bind.annotation.GetMapping;
import org.springframework.web.bind.annotation.PathVariable;
import org.springframework.web.bind.annotation.RestController;
import java.util.List;
@RestController
public class DogController {
private DogService dogService;
@Autowired
public void setDogService(DogService dogService) {
this.dogService = dogService;
}
@GetMapping("/dogs")
public ResponseEntity<List<Dog>> getAllDogs() {
List<Dog> list = dogService.retrieveDogs();
return new ResponseEntity<List<Dog>>(list, HttpStatus.OK);
}
@GetMapping("/dogs/breed")
public ResponseEntity<List<String>> getDogBreeds() {
List<String> list = dogService.retrieveDogBreed();
return new ResponseEntity<List<String>>(list, HttpStatus.OK);
}
@GetMapping("/{id}/breed")
public ResponseEntity<String> getBreedByID(@PathVariable Long id) {
String breed = dogService.retrieveDogBreedById(id);
return new ResponseEntity<String>(breed, HttpStatus.OK);
}
@GetMapping("/dogs/name")
public ResponseEntity<List<String>> getDogNames() {
List<String> list = dogService.retrieveDogNames();
return new ResponseEntity<List<String>>(list, HttpStatus.OK);
}
}
```
**Step 4: Make sure errors are handled appropriately.**
* If an id is requested that doesn’t exist, appropriately handle the error
Here, you'll want to first add a new Java class to the `service` package, called `DogNotFoundException`. We'll use `@ResponseStatus` along with an `HttpStatus` of `NOT_FOUND` to return a message (or `reason` in code) if an invalid ID was used.
```typescript
package com.udacity.DogRestApi.service;
import org.springframework.http.HttpStatus;
import org.springframework.web.bind.annotation.ResponseStatus;
@ResponseStatus(code = HttpStatus.NOT_FOUND, reason = "Dog not found")
public class DogNotFoundException extends RuntimeException {
public DogNotFoundException() {
}
public DogNotFoundException(String message) {
super(message);
}
}
```
That's part one - we haven't actually handled the error yet. To do so, you'll want to go back to `DogServiceImpl`, and specifically to the `retrieveDogBreedById` method (or your similarly named method) for retrieving a Dog breed by Id.
You'll want to make sure to import `Optional`, as we'll use that to try to get the resulting `Dog` object. If the Dog does not exist, you'll throw the `DogNotFoundException`.
```typescript
// Make sure to add this import
import java.util.Optional;
...
public String retrieveDogBreedById(Long id) {
Optional<String> optionalBreed = Optional.ofNullable(dogRepository.findBreedById(id));
String breed = optionalBreed.orElseThrow(DogNotFoundException::new);
return breed;
}
```
**Step 5: Create a data.sql file.**
* The file should create sample dog data in the database.
This last step is very open-ended, as you can add whatever dog details you want. Below, I've added five example dogs into my own `data.sql` file. This file should be within the `resources` directory (where your `application.properties` file was earlier).
```sql
INSERT INTO dog (id, name, breed, origin) VALUES (1, 'Fluffy', 'Pomeranian', 'Mountain View, CA');
INSERT INTO dog (id, name, breed, origin) VALUES (2, 'Spot', 'Pit Bull', 'Austin, TX');
INSERT INTO dog (id, name, breed, origin) VALUES (3, 'Ginger', 'Cocker Spaniel', 'Kansas City, KS');
INSERT INTO dog (id, name, breed, origin) VALUES (4, 'Lady', 'Direwolf', 'The North');
INSERT INTO dog (id, name, breed, origin) VALUES (5, 'Sasha', 'Husky', 'Buffalo, NY');
```
**Step 6: Check that you are able to access your API.**
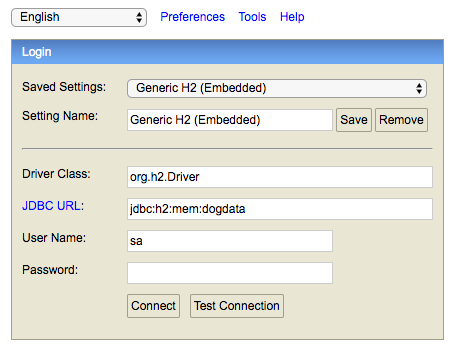
If everything is implemented correctly, once you run your code, you should be able to visit localhost:8080/h2 to first reach the H2 console. Here, I added my my `spring.datasource.url` from `application.properties`:
>The h2.console
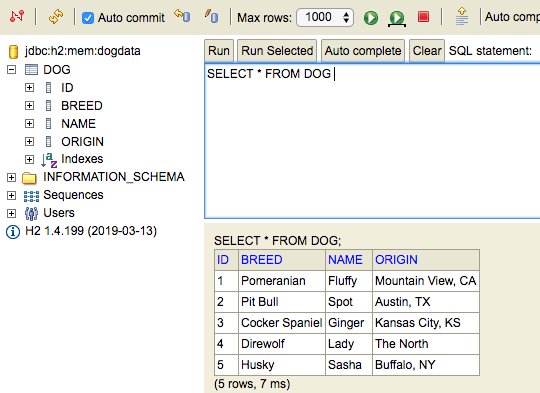
After clicking "Connect", you should go to the next H2 page, where you should be able to "Run" the query and see everything you added to `data.sql`.
> The H2 "Run" query showing the dogs added to `data.sql`
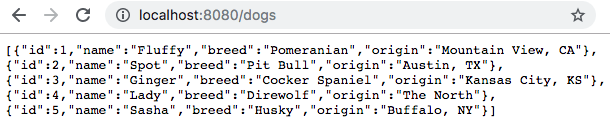
From there, I check that I can access the paths I added to my `DogController` at localhost:8080/{path}. Below is the example for my additional `/dogs` path I added.
> My result from localhost:8080/dogs
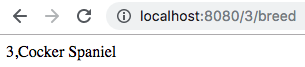
You should check the two methods returning just breed and name as well for all of the dogs, but most important is likely the response for the breed of a single dog, since it makes use of an ID and error handling.
> Use of a valid ID
> An invalid ID example-note it was `Not Found` with reason `Dog not Found`
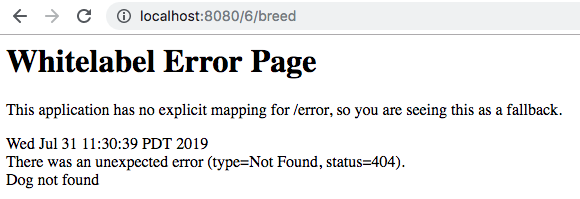
In the above, you can see the potential results of a valid ID being used in the `GET` request, as well as the error when an invalid ID was used. Note that you can further customize this error page (I didn't add an explicit mapping for `/error` as noted in the image), but you can see that the error reason was appropriately returned at the bottom.
**Full Solution**
If you'd like the full solution code all in one place, you can download it through the link below.
Supporting Materials
[DogRestApiSolution](https://video.udacity-data.com/topher/2019/July/5d41e2fa_dogrestapi/dogrestapi.zip)
==ShannonNote==
> `CrudRepository`實現基本的CRUD操作,包括count, delete, deleteById, save, saveAll, findById, findAll。
# 12 Recap
{%youtube D0HbGi4bgmg%}
 Sign in with Wallet
Connect another wallet
Sign in with Wallet
Connect another wallet