# Food truck temperature watch
>By: Alexander Bokvist(ab225ur)
This project is supposed to help monitor the temperature of a foodtruck so the workers can work in a safe environment.
### time
The project should take around 1-2h to do depending on your knowledge setting up connections and if you encounter any bugs and errors.
## Objective
### Why did i create it?
During this summer i worked(still works) at a food-truck. Me and me colleague have been complaining alot about the current temperature and often remind eachother do drink water because it's so warm inside the truck.
After some discussion we decided to google around how hot it's allowed to be inside the truck.
According to [AV]([Arbetsmiljöverket](https://www.av.se/inomhusmiljo/temperatur-och-klimat/))(Arbetsmiljöverket)
The temperature should not be over 26 degrees celsius.
### Purpose and insight
The IOT devices purpose is to alert me and my colleague when it's to hot to work so we can take small breaks,exit the truck and hydrate. We can also measure the temperatur after or before work to see what kind of clothing fits for the day and we can also control that we have turned off the griddle after our shift.
## Material
Components
| Component | ~Pris(kr) |
| ----------------- |:----------------------- |
| Pycom lopy4  | 400 |
| Pycom Expansion board 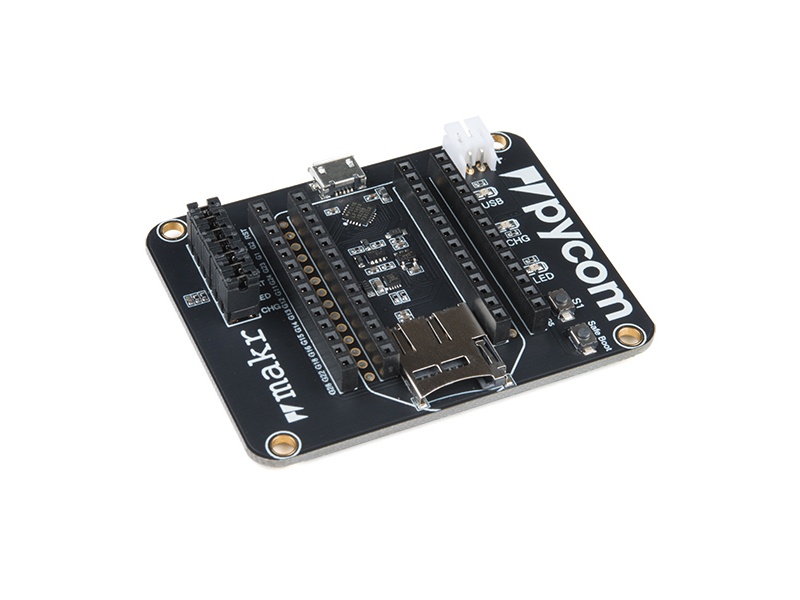 | 250 |
| Breadboard  | 35 |
| MCP9700 Temperature-sensor  | 15 |
| Jumper wire  | 29 |
| Micro-usb to usb-A  | 40 |
In this coruse i decided to use a Lopy4 device that works similiar to a Arduinio. The lopy4 device is the brain of this project and also the thing we code to send data to pybytes later using our sensor MCP9700 that is a temperature sensor. We can connect the sensor by using the breadboard and wires and then connecting them to the Lopy4 Expansionboard were Lopy4 is neatly seated. The Microusb cable was used to connect our Lopy4 to our used computer so we can upload the files created in Atom(IDE)
Everything was bought from Elektrokit. With a total cost of around 900kr but is cheaper buying just the needed parts instead of a bundle. The prices in the picture above is the price i see from googling the products(Price may vary)
### Computer setup
#### How i did it.
>Can also be found here: https://docs.pycom.io/index.html
Download the latest version of Python which can be found here: https://www.python.org/downloads/
In my project i used Atom that I can higly recommend I'm used to Vscode but might use Atom in the future.But shouldn't be a diffrence which IDE you use aslong as you have all the needed programs and plugins.An is IDE were we program our Lopy4 board by downloading the plugin called Pymakr we can now connect and communicate to the Lopy4 device.

The file structor looks like this were you type your main code aka your project code in the main.py file. The boot.py file is used to connect to wifi whenever the board starts and the lib folder is where we store the library of more advanced sensors in my case i did not have to use any library.
When you have downloaded your IDE downloaded the pymakr plugin and the board is connected to the computer correctly you should also make a good file directory that is easy to navigate. Then you are free to start coding away.When you are done with your code you can either just run the file or you could also save it on the board. Recommend just running the file until you are done and then upload it to the board. When you are ready to upload your code and make so pybytes can your the data I recommend that you read this awesome guide where you can also decide what type of connection to use: https://docs.pycom.io/pybytes/gettingstarted/
## Putting everything together
Excuse my paint picture 
The black dot represents the sensor that is grounded from the blue line that goes to the "negative" marked spot on the breadboard, We get an active ground by connecting that part to the ground on the lopy4 device. Same thing applies to 3volt which we also get from the lopy4 board that is powered by my computer in this case. Also important to check the polarity of the pins on the sensor. The middle pin is where we can collect data from by reading the analog pin which is set to pin16 in our project. In this project no resistor was needed, but if we were to use a higher energy source a pair of resistors might come in handy.
### Platform
I ended up using Pybytes as my platform for the data because it an easy alternative to set up and create a widget. You might not get super advanced widgets but in my case just to read the temperature it was enough. But if i were to make more advanced stuff like get alarms on the phone when the temperature reaches a special degree i would probaly use another platform or connect Pybytes to something else. You can find pybytes here which is free to use! :https://pybytes.pycom.io/
## The code
```python=
import machine
import time
import pycom
import sys
import os
pycom.heartbeat(False)
adc = machine.ADC(bits=10)
apin = adc.channel(pin='P16')
while True:
millivolts = apin.voltage()
celsius = (millivolts - 500.0) / 10.0
if (celsius >= 26 and celsius <30):
print("temp is currently:",celsius,"and therefore over the recommended working conditions")
pycom.rgbled(0xFF3300) # Orange condition is over recommened but not dangerous
elif celsius < 26:
print("temp is currently",celsius, "and therefore within the recommened working conditions")
pycom.rgbled(0x00FF00) # green condition is okay and safe to work in
else:
print("temp is currently:",celsius,"and therefore significantly over the recommended working conditions(Take a break!)")
pycom.rgbled(0xFF0000) # Red condition is dangerous high and you should take regular breaks as long as the statement is true
pybytes.send_signal(1, celsius)
time.sleep(5)
```
This code works by converting the milivolts from MCP9700 sensor to celsius so we can easily make statements using celsius so whenever we get that celsius is over 25 degrees it's no longer recommened to keep working in that environment so we warn the user by using the built in RGB on the lopy4 device to signal a yellow light. If we were to meassure celsius to over 30 degrees it is REALLY not recommened to work so use a red light as a warning for the user that it's dangerous and he/she should take a break and hydrate. If none of these statements would be true that means that it's less than 26 degrees and within the recommend working condition so we show that by using a green light meaning everything is okay.
But to later send this information somewhere we use
```python=
pybytes.send_signal(1, celsius)
time.sleep(5)
```
that every five second sends whatever output celsius have to the virtual signal 1 in pybytes.
### Transmitting the data/ Connectivity
The data is sent every five seconds to Pybytes but pybytes prints out every minute not to make the dashboard clustered. In my project i used WIFI because it was the most consistent when i was working on the proejct from home, Inside the foodtruck we can also use wifi by using a hotspot from the cash register. So the board should always have wifi if not that also means we can't take customers. The transport protocol used was MQTTT because i used pybytes
```python=
pybytes.send_signal(1, celsius)
time.sleep(5)
```
that uses the MQTT protocol
### Presenting the data

In the picture above you can see the data being sent to Pybytes.In my code i have so it sends a signal to Pybytes every fifth second. but is showed in Pybytes every minute to not send unnecessary data. I have made this choice because the temperature will not change much in five second if anything it might go down and back up again and repeat. So we wait and type or data every minute instead.
I have a linechart of all the temperatures that is "printed out" every minute.
If i were to choose one second it might be hard to read the data because it would jump all over the place
## Finalizing the design
The project have went "okay" had some problems with my USB port on the Lopy4 board so i needed to be very careful and not move it around at all. Except that i first had another project idea that i abandoned because i was unsure about time restraints. But i plan to continue it!

It is a very simple project but also very helpful for the foodtruck. So the plan for now is to continue working on it and see if we can make the foodtruck more IOT friendly by adding diffrent sensors so we can work not less but smarter!
 Sign in with Wallet
Connect another wallet
Sign in with Wallet
Connect another wallet