2021 嵌入式作業系統分析與實做 Lab3 report
===
[Lab3](https://docs.google.com/presentation/d/13U_vuLFg9q39B74HCuCsy-F6-CMNEgJVKuY7zuIe8ZM/edit#slide=id.gd33c47d9e9_0_72)
contribute by `Liao712148`
###### tags: `FreeRTOS`
### Lab要求
* In the STM32CubeIDE debug mode, it shows task control block(TCB) information, like priority, base priority, task's name. and we also through this moded to understand which task is in the ready list, which is blocked.
* So you need to use some macro to provide information which is provided by debug mode.
* Create four tasks
* Red LED blink. priority = 1;
* Green LED blink. priority = 1;
* TaskMonitor. priority = 2;
* Delay Task. priority = 14;
### 實做流程
##### Step.1
介紹:
* UART:是一種通用異步收發傳輸器,用於==異步通訊==,在嵌入式設計中,UART用來與PC進行通訊,因為少了clock,所以雙方接收資料的速度(baud rate)要相近,否則可能接收不到資料。
* USART:全雙工通用==同步/異步==串行收發模塊,在UART基礎上增加了同步的功能,所以在USART硬體的連接方式會多了**時鐘線**。USART的接口不但可以用於同步串行通訊,也可以用於異步串行通訊。在USART選擇同步傳輸的模式時,USART會有3個pin腳被定義功能,分別是:RX和slaver的data out相連,TX和slaver的data in相連,以及SCLK和slaver的Clock相連。在USART選擇異步傳輸的模式時與UART沒什麼差別。
* 同步與異步通訊:
* 同步通訊:額外提供時脈訊號,使兩端機器在溝通時能夠藉此同步收發資料。比起非同步傳輸,同步傳輸不需要start/stop bit,因此能夠一次傳較多的資料。
* 異步通訊:異步通訊中的接收方,並不知道資料什麼時候會到達,收發雙方可以又各自自己的時鐘。接收端必須隨時做好接收訊息的準備。發送端可以在任意時刻發送字符(所發送的字符之間的時間間隔可以是任意的),但是必須在資料的兩邊分別加上start/stop bit。透過start/stop bit這樣接收端才能夠正確地將每一個字符接受下來。以達到同步的效果。
* [同步與異步通訊區別](https://blog.csdn.net/wind19/article/details/7433249)
##### Step.2
在.ioc檔,點選connectivity。選擇USART2,並將mode設為Asynchronous(非同步傳輸)。再將USB to TTL 的RXD接上PA2(USART2_TX)以及GND接到F407G-DISC GND,這樣就能將STM32 USART傳送的訊號傳給PC。
##### Step.3
因為是透過**FreeRTOS**來實做所以要先
```cpp=
#include "FreeRTOS.h"
```
接著**FreeRTOS**是以task的方式來實行funcion所以要
```cpp=
#include "task.h"
```
兩者得include的順序不能對調,否則會報錯。
並且include以下header檔,沒有include的話雖然會有**warnning**但不影響。
```cpp=
#include "stdio.h"
#include "stdlib.h"
#include "string.h"
```
##### Step.4
定義相關的task
```cpp=
void TaskMonitor_App(void *pvParameters){
uint8_t i = 1000;
for(;;)
{
Taskmonitor();
i += 100;
vTaskDelay(i);
if( i == 5000)
i = 0 ;
}
}
void Red_LED_App(void *pvParameters){
uint32_t Redtimer = 500;
while(1){
HAL_GPIO_TogglePin(Red_LED_GPIO_Port, GPIO_PIN_14);
vTaskDelay(Redtimer);
Redtimer += 1;
}
}
void Delay_App(void *pvParameters){
while(1){
vTaskDelay(15000);
}
}
void Green_LED_App(void *pvParameters){
uint32_t Greentimer = 1000;
while(1){
HAL_GPIO_TogglePin(Green_LED_GPIO_Port, GPIO_PIN_12);
vTaskDelay(Greentimer);
Greentimer += 2;
}
}
```
其中`TaskMonitor_App`為本次Lab的核心,它會呼叫`taskmonitor`。
##### Step.5
* 需要去access **pxReadyTasksLists**、**pxDelayedTaskList**、**pxOverflowDelayedTaskList**來得到處於 ready state, delayed state 中的task。
但是上述的`list`都被定義在**task.c**而且是用==static==來修飾該變數。
```cpp=
PRIVILEGED_DATA static List_t pxReadyTasksLists[ configMAX_PRIORITIES ];/*< Prioritised ready tasks. */
PRIVILEGED_DATA static List_t xDelayedTaskList1; /*< Delayed tasks. */
PRIVILEGED_DATA static List_t xDelayedTaskList2; /*< Delayed tasks (two lists are used - one for delays that have overflowed the current tick count. */
PRIVILEGED_DATA static List_t * volatile pxDelayedTaskList; /*< Points to the delayed task list currently being used. */
PRIVILEGED_DATA static List_t * volatile pxOverflowDelayedTaskList; /*< Points to the delayed task list currently being used to hold tasks that have overflowed the current tick count. */
```
因此我們如果在**main.c**定義`taskmonitor`則無法使用上述的list。所以我們會在**task.c**中定義`taskmonitor`。
* `pxReadyTasksLixts`是以`List_t`組成的`array`目的是利用index可以把相同priority的task串接起來。所以在scheduler時,只需要從大的index向下尋找,就可以快速的找到高priority的task。
* 示意圖:
* `pxDelayedTaskList`和`pxOverflowDelayedTaskList`相較於`pxReadyTasksLixts`少了priority的概念,所以它的type是pointer to List_t。
* 示意圖: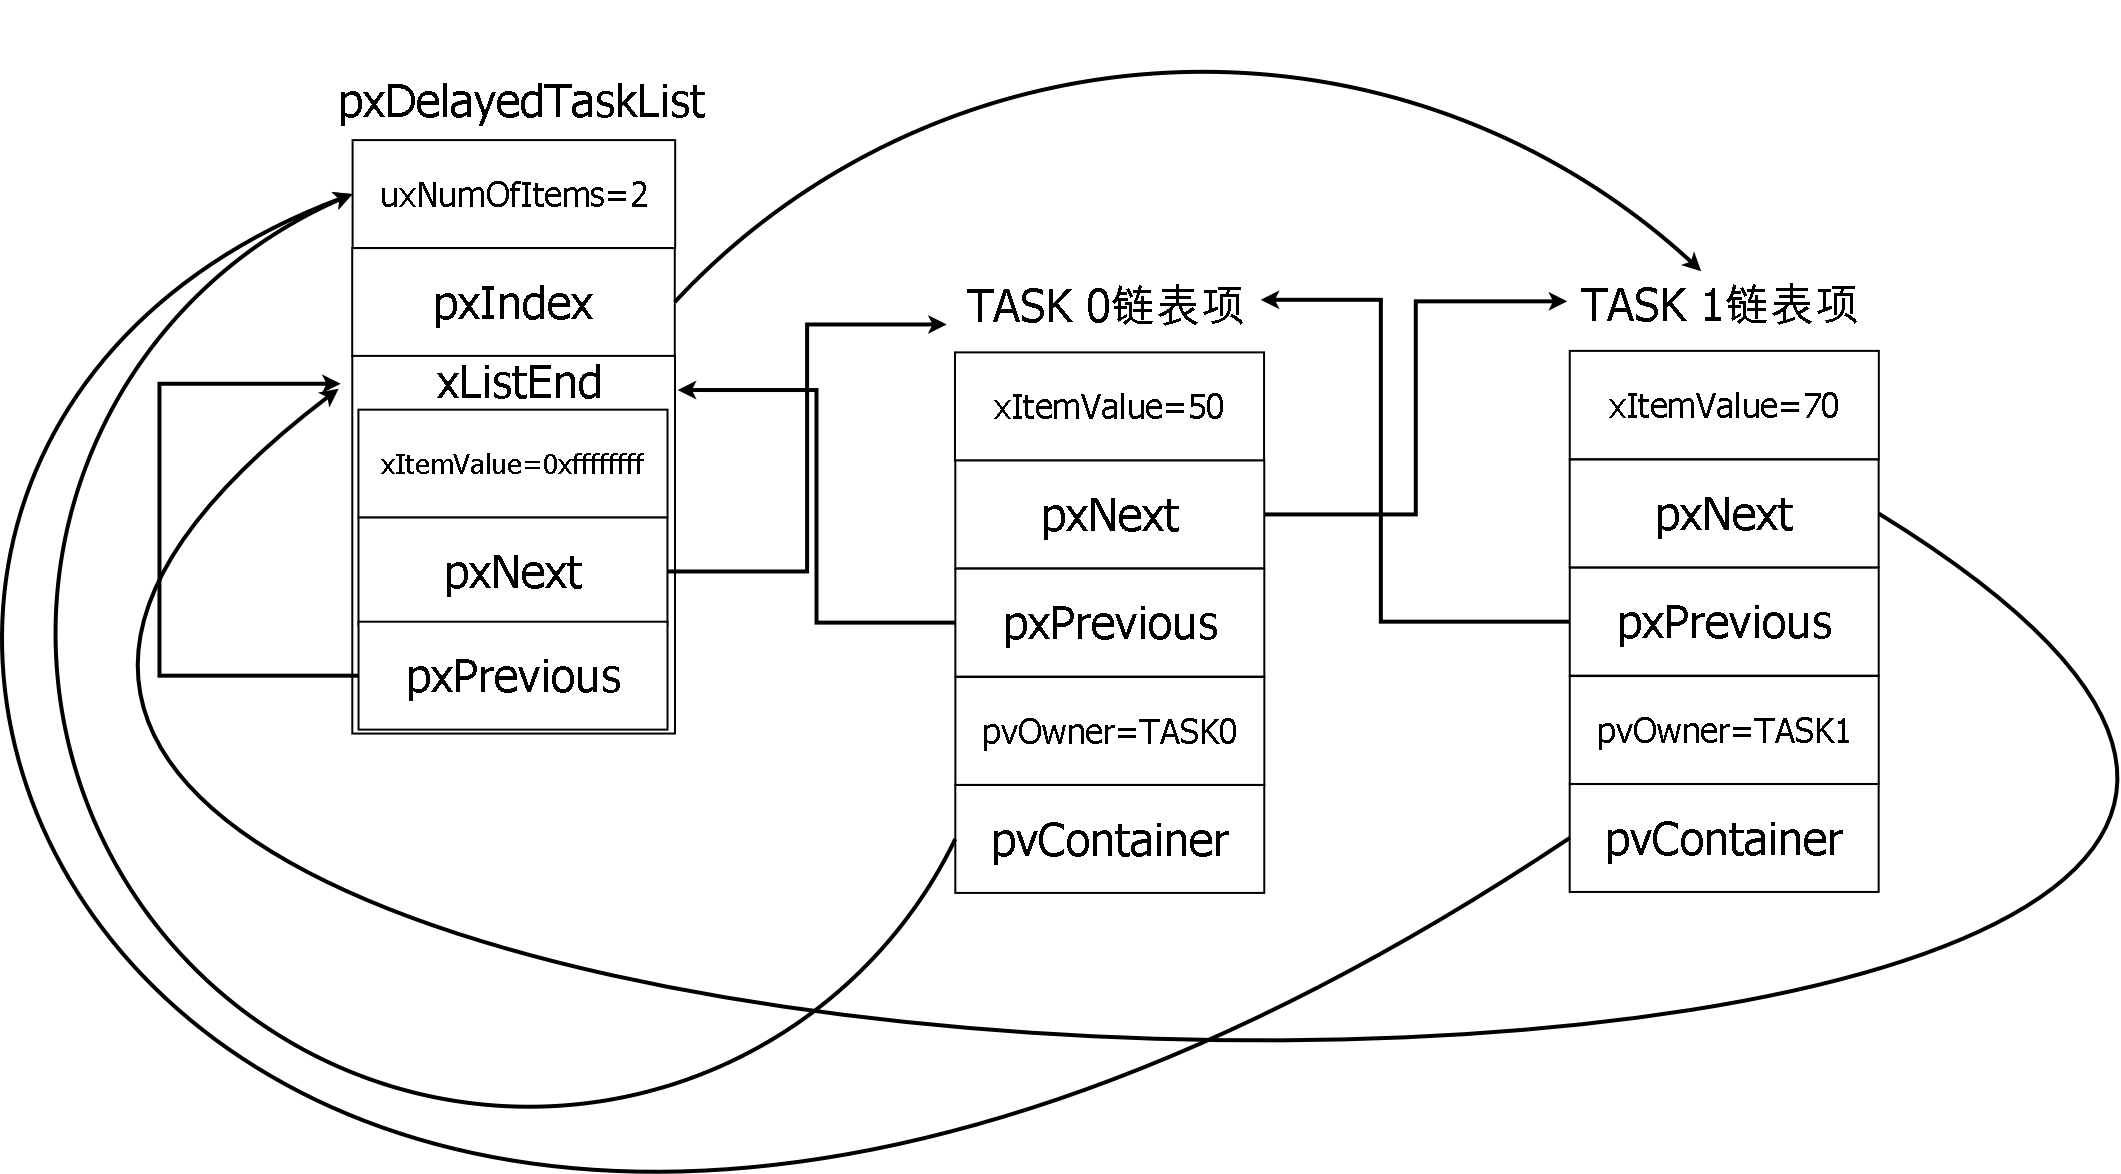
##### Step.6
使用定義在`list.h`中的macro,來幫助我們會得TCB中的資料。
```cpp=
#define listLIST_IS_EMPTY( pxList ) ( ( ( pxList )->uxNumberOfItems == ( UBaseType_t ) 0 ) ? pdTRUE : pdFALSE )
#define listGET_OWNER_OF_HEAD_ENTRY( pxList ) ( (&( ( pxList )->xListEnd ))->pxNext->pvOwner )
#define listCURRENT_LIST_LENGTH( pxList ) ( ( pxList )->uxNumberOfItems )
#define listGET_ITEM_OF_HEAD_ENTRY( pxList ) ( (&( ( pxList )->xListEnd ))->pxNext )
```
* listLIST_IS_EMPTY: 可以知道目前是否有串接tskTCB type的物件,如果有回傳pdFALSE,沒有則回傳pdTRUE
* listGET_OWNER_OF_HEAD_ENTRY: 可得到串接中的TCB
* listCURRENT_LIST_LENGTH: 可以知道現在串接了幾個tskTCB type的物件
* listGET_ITEM_OF_HEAD_ENTRY: 因為有可能串接多個ListItem_t type 的物件,所以利用listGET_ITEM_OF_HEAD_ENTRY搭配pxNext,即可走訪整個串接的物件。
##### Step.7
==在task.c中定義Taskmonitor==
```cpp=
void Taskmonitor(void)
{
/*....*/
TCB_t *pvowner;
TCB_t *pxCurrent;
ListItem_t *listitem;
unsigned portBASE_TYPE readylength;
unsigned portBASE_TYPE blocklength;
unsigned portBASE_TYPE overflowlength;
/*running state*/
pxCurrent = pxCurrentTCB;
memset(MonitorTset,'\0',sizeof(MonitorTset));
memset(pxStack,'\0',sizeof(pxStack));
memset(pxTopOfStack,'\0',sizeof(pxTopOfStack));
Uint32ConvertHex(pxCurrent->pxStack, pxStack);
Uint32ConvertHex(pxCurrent->pxTopOfStack, pxTopOfStack);
sprintf(MonitorTset,"%s %d/%d %s %s running\n\r",pxCurrent->pcTaskName,pxCurrent->uxPriority,pxCurrent->uxBasePriority,pxStack,pxTopOfStack);
HAL_UART_Transmit(&huart2,(uint8_t *)MonitorTset,strlen(MonitorTset),0xffff);
/*Ready state*/
for (int i = 0; i <= 15; i++)
{
readylength = listCURRENT_LIST_LENGTH( &( pxReadyTasksLists[ i ] ) );
listitem = listGET_ITEM_OF_HEAD_ENTRY( &( pxReadyTasksLists[ i ] ) );
for (int j = 0; j < readylength; j++)
{
pvowner = listitem->pvOwner;
if (pvowner == pxCurrent)
break;
/*...*/
listitem = listitem->pxNext;
}
}
/*delay state*/
delaylength = listCURRENT_LIST_LENGTH( pxDelayedTaskList );
listitem = listGET_ITEM_OF_HEAD_ENTRY( pxDelayedTaskList );
for (int i = 0; i < delaylength; i++)
{
pvowner = listitem->pvOwner;
/*...*/
listitem = listitem->pxNext;
}
/*overflow delay state*/
overflowlength = listCURRENT_LIST_LENGTH( pxOverflowDelayedTaskList );
listitem = listGET_ITEM_OF_HEAD_ENTRY( pxOverflowDelayedTaskList );
for (int i = 0; i < overflowlength; i++)
{
pvowner = listitem->pvOwner;
/*...*/
listitem = listitem->pxNext;
}
}
```
* 第`4`行:宣告變數pvowner,它的type是poniter to TCB_t。目的在於我們會將ListItem_t中的pvOwner member assign 給pvowner,然後透過pvowner來使用TCB中的資訊,像是
* `pxTopOfStack`:Points to the location of the last item placed on the tasks stack.
* `pxStack`: Points to the start of the stack.
* `pcTaskName`:Descriptive name given to the task when created.
* `uxPriority`:The priority of the task. 0 is the lowest priority
* `uxBasePriority`:The priority last assigned to the task - used by the ==priority inheritance== mechanism.
* 第`5`行:宣告變數pxCurrent,它的type是poniter to TCB_t。
* Q:為什麼要在宣告一個與pvowner type的變數?
* A:因為要用來把在running 的 TCB 從ready list 中排除。否則ready list中又有跟runnning 中的一樣的TCB。
* 第`6`行:宣告變數listitem,它的type是pointer to ListItem_t。可以利用listitem來走訪串接中的物件。
* 第`7,8,9`行:拿來紀錄有多少ListItem_t串接在一起。記得不要用int來宣告變數否則有可能會發生==cast==,而使得length變成一個很大的數。
* 第`11`行:pxCurrentTCB指向了正在running中的TCB,所以將pxCurrentTCB assign 給變數pxCurrent。
* 第`20`行:在ready list不像delay list任意prtority的delay task接串在一起。而是根據priority串在對應到的ready list的index下。所以利用for迴圈可以走訪整個ready list。
* 當中的15是max priority,可以利用`FreeRTOSConfig.h`中的**configMAX_PRIORITIES**來更改。
* 第`22`行:利用`listCURRENT_LIST_LENGTH(&( pxReadyTasksLists[ i ] ) )`來得知priority i 下串接了幾個ListItem_t的物件。
* 第`23`行:將第一個ListItem_t assign 給 listitem,即可利用list即可利用來走訪。
* 第`26`行:可以得到TCB。
* 第`27,28`行:用來排除running 中的 TCB與ready list中的TCB可能會有重複的狀況。
* 第`30`行:前往串接的下一個 ListItem_t物件。
##### Step.8
```cpp=
void Taskmonitor(void)
{
/*...*/
/*Ready state*/
for (int i=0;i< 15;i++)
{
/*...*/
for (int j=0;j<readylength;j++)
{
/*...*/
HAL_UART_Transmit(&huart2,(uint8_t *)MonitorTset,strlen(MonitorTset),0xffff);
/*...*/
}
}
/*block state*/
/*...*/
for (int i=0;i<blocklength;i++)
{
/*...*/
HAL_UART_Transmit(&huart2,(uint8_t *)MonitorTset,strlen(MonitorTset),0xffff);
/*...*/
}
/*overflow delay state*/
/*...*/
for (int i=0;i<overflowlength;i++)
{
/*...*/
HAL_UART_Transmit(&huart2,(uint8_t *)MonitorTset,strlen(MonitorTset),0xffff);
/*...*/
}
}
```
* 第`11,20,28`行:CPU不斷查尋(polling)IO設備,如IO設備有請求則加以處理。
*HAL_StatusTypeDef HAL_UART_Transmit(UART_HandleTypeDef *huart,uint8_t *pData,uint16_t Size, uint32_t Timeout):
polling的缺點是效率太低,占用cpu時間。
*HAL_StatusTypeDef HAL_UART_Transmit_IT (UART_HandleTypeDef *huart, uint8_t *pData, uint16_t Size):
沒有收到數據時,執行其他的程序,收到數據後,進入中斷處理通訊。相對對於polling來說,不用循環查詢狀態暫存器,可以有更多的時間運行其他程序。
*HAL_StatusTypeDef HAL_UART_Transmit_DMA (UART_HandleTypeDef *huart, uint8_t *pData, uint16_t Size):
資料的發送與接收都不用CPU干預,通過DMA進行。 CPU有更多的時間運行其他程序。
##### Step.9
初始化task
```cpp=
int main(void)
{
/* ...*/
xTaskCreate(Red_LED_App, "Red", 1000, NULL, 1, NULL);
xTaskCreate(Delay_App, "Delay", 1000, NULL, 14, NULL);
xTaskCreate(Green_LED_App, "Green", 1000, NULL, 1, NULL);
xTaskCreate(TaskMonitor_App, "Monitor", 1000, NULL, 2, NULL);
vTaskStartScheduler();
/* ...*/
while (1)
{
/* ...*/
}
}
```
### 心得
謝謝助教的幫忙。
### 參考資料
[同步異步通訊的差別](https://blog.csdn.net/wind19/article/details/7433249)
[同步異步通訊](https://blog.csdn.net/RhythmWANG/article/details/68066584)
[UART和USART](https://blog.csdn.net/wangguchao/article/details/101705366)
[UART](https://zh.wikipedia.org/wiki/UART)
[同步異步](http://wiki.csie.ncku.edu.tw/embedded/USART)
[UART 串列傳送](https://ithelp.ithome.com.tw/articles/10252096)
 Sign in with Wallet
Connect another wallet
Sign in with Wallet
Connect another wallet