# Why designers should use Webflow
This post helps designers approach developers' fundamental knowledge needed working with Webflow: HTML/ CSS & CMS. With the help of Webflow, designer now no longer just "design", we can even "devevop" ourselve and turn our design into live.
The opportunity came to our team when we received a brief that the client wants to build a simple - low costed website. It includes content showcases based on client's old website. In addition, they intend to manage, update and also edit content in real-time on live-site without the help of the dev team.
Based on client requirement, our solution divided into 2 parts:
* Redesign client website into a stunning, modern, and hi-tech one.
* Apply new design.
Our big question appears: Which tool is the best option? With the growth of technology, tools now on market are uncountable. Webflow, WordPress, Bubble is mentioned when we start working on this project. There are similar advantages to those tools which are easy to use, simple platform, free template that could use immediately and there's huge knowledge; instruction on the Internet. After considering carefully, our team decides to apply Webflow, no-code tools to process this project.
It is open-source, and customizable, allowing anyone to build a website quickly, for a few dollars a month to pay for hosting. Besides, the client can modify client content in real-time on the live site.
We designed the site-map, the mockup website in Figma. Next is transition design in Webflow, all we need is set up layout, drag and drop elements but with HTML/CSS knowledge. [View the live version from our project here](https://atvpro.webflow.io/).
Beside, following requirement, our team will deliver a blog website which client can edit themselves, on live-site. And it's easy to use, designer can check out [the intro to the editor](https://university.webflow.com/lesson/intro-to-the-editor)
What did we get? We spend time in the [Webflow University](https://university.webflow.com/) to find lessons that fit client requirements. We have learned how to optimize building the website by following Webflow's guidelines. We want to share some fundamental things that designers need to know before considering diving into the development environment by this article.
## Webflow is HTML, CSS and CMS in a visual way
> *"The time old question of whether or not “designers should code” comes up, I actually think the answer is “yes, designers should code — but visually.” -- Barrett Johnson, Senior Product Marketing Manager - _Webflow_*
Webflow is a no-code tool that empowers designers to build a website. Webflow sits somewhere in between the role of designer and front-end dev. To kickstart Webflow, we cover 4 important things to help designer understand the basics one.
### HTML Structure
HTML Structure is established the overall appearance, relationship between elements to achieve a smooth flow.
Before we create a basic flow page, 3 fundamental HTML elements that we need to keep in mind:
1. **Layout:**
* **Section element**: It represents a generic standalone section of a page.
* **Container element**: It can hold one or more “child’’ elements, including other Containers
2. **Basic:**
* **Div Block element**: It is the basic element, “division of block”. Similiar with [Frame in Figma](https://help.figma.com/hc/en-us/articles/360041539473-Frames-in-Figma)

_Layout elements and Basic elements_
In the design tools, we don't know this concept clearly. We just add the assets element to the framed canvas.

_Create frame in Figma_
In the Webflow, we need to define which one is the Container, which one is the Div block.

_Figma Frame doesn’t define Layout and Basic elements._
**We want the structure of the layout to ensure consistency and visual alignment.**
We learned how to use the right layout element through Webflow tutorial: [Container – Webflow's most misunderstood element](https://youtu.be/KGg5cIjHQiw) The best practice is:
Section --> Container --> Div Block --> Assets elements

_The best practice structure in Webflow_
The result we got: Consistency and Alignment.

_Structure works in Webflow - emulated on Figma_
**Thing need to avoid:** Container or Div block are kind of confusing as to which assets element is needed for Container or Div Block. If designer just use div block element, It alway keeps full width of the screen.

_This is what happend if we don't have container element to contains the asset element. Don't do this way._
Knowing fundamental HTML elements, we can control the assets element, change the positions of the elements without breaking the layout, keep alignment. Beside, using the right role of layout elements can boost designer workflow when doing responsive web effectively.
Designer can learn more how webflow apply the structure to site's homepgae: [Design a hero section](https://youtu.be/S8CMTdl8oV4)
### CSS Style manager
> "The Style Manager displays a complete list of classes, combo classes, and tags designer've created or edited in designer project. Here, designer can rename styles and delete any styles that aren’t being used anymore." -- [Webflow](https://university.webflow.com/lesson/style-manager)
In the design tools, we need a style guide such as color styles, text style, effect style... In Webflow, it's called "Class element". Style manager allow to style and name a class element such as Section, Container, Button...
**What is the difference between Figma style and Webflow style management:**
Let's say, Figma allows designer define a set of properties or attributes of an object. Designer can create styles for colors, text, effects, and layout grids so designer can reuse them across designs.
Webflow allows designer create a new class or style a tag, it appears in the Style Manager in the order it was created. Include:
- **Tags:** All the tags (pink) designer've styled will appear at the very top.
- **Nested tags**: All nested tags appear in pink and are nested under each class with an arrow icon to client left.
- **Classes**: All the classes appear in blue below the tags in the order they were created.
- **Combo classes:** All combo classes appear in blue and are nested under each class with an icon to client left.

_Style manager panel Webflow and Style manager Figma_
Class element is an important role that helps designer manage styled elements. Without naming the class, designer will have to handle the consistency of styles for pages by hand. It could be a nightmare which we want to avoid.
The styled element is named well can be quick to find, use, edit, update. We recommend that designer should style an element first before creating a new one.
**Hence, we followed the Webflow’s tutorial:**
Same with design tools, we create a page “Style guide” to define a style for colors, text style in Webflow. Or we can download the [template here](https://webflow.com/discover/likes?t=styleguide) to save time make it from scratch. It helps designer start design process and make sites more consistent and speed up development time.

_Style guide community. Get one before start the project_
Next step, we add class for styled Layout element such as Section, Container... Because we use it so often, in order to make sure the website layout is consistent.

_Add section, naming. Add Container, style, naming. Setup is done!_
After that, we style the "component element" such as Button, rename it to "Button" class.

_Edit styles on a class Button and update every element using that class. Boom, CSS! -- Image by Webflow_
With CSS style manager, It saves a lot of time for designer to built up website by few click for updating, or editing the style. Keep style and component elements consistent.
Full lession for using class, check it video tutorial: [Web design using classes, combo classes, and Rob Lowe global classes](https://youtu.be/Rrz0I0Gc5IM)
### CMS & Dynamic content
> ”A CMS (content management system) is where all the dynamic content is stored and maintained. The website references that dynamic content on different pages. Anytime designer create or changes any content in the CMS, it updates all the pages where it’s referenced, instantly.”
The CMS is a tool that helps designer create, manage, and modify content on a website without the need for specialized technical knowledge.
The Webflow’s CMS includes 2 types:

* [Collection list](https://university.webflow.com/lesson/collection-list): which lets us drop in collection content anywhere on a static page.
* [Collection page](https://university.webflow.com/lesson/structure-and-style-collection-pages): design one template page and all designer collection content will fill in the page.
When design website in design tools, we always put the Lorem Ipsum. Designer would design a lot of static pages that include real-contents, it takes a lot of effort to prototyping like the site live.
Webflow pushes the site live with real-contents by CMS. The CMS allows to create custom fields, it connects directly to the design template. Designer can test the design with real-content instant of Lorem Ipsum.
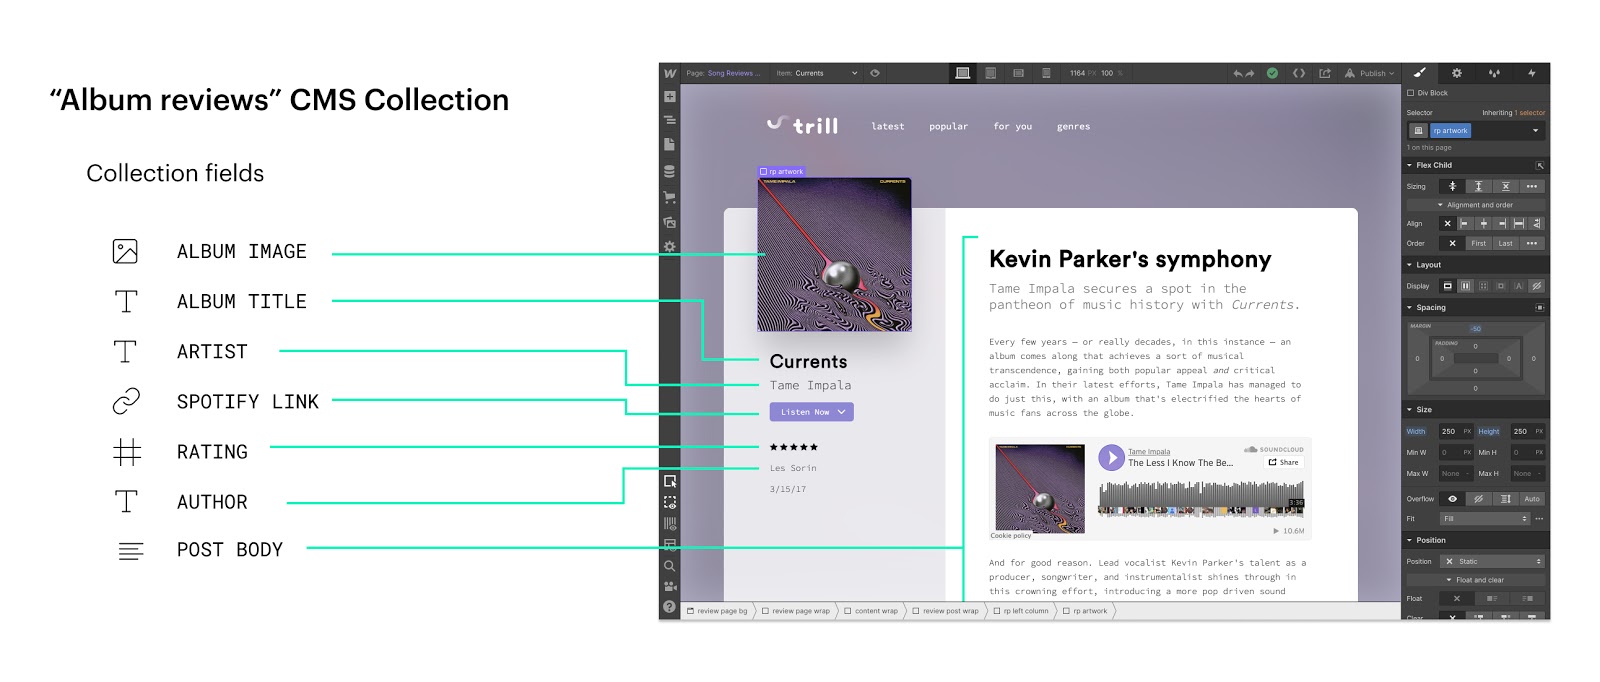_Webflow’s CMS lets designer define custom fields and connect those fields directly to designer design template. Image by Webflow_
The CMS also provides to help clients easily use to control client site’s content, functionality, and updates. The client no need a full-time technical support. Clients put the content into the fields that designer created and published the live site by themselves.
[Learn CMS more detail here.](https://university.webflow.com/lesson/intro-to-webflow-cms)
### Responsive design in webflow.
With the growth of devices, the screen resolution now is diverse. Responsive website suggest that it’s wise to appeal to both desktop and mobile viewers. The [number of mobile viewers now outnumbers desktop](http://www.smartinsights.com/mobile-marketing/mobile-marketing-analytics/mobile-marketing-statistics/), and this number will only continue to rise as global smartphone accessibility increases. Designers need to adapt client designs that fit each screen.
Designer might know Mobile first design. [The mobile-first approach](https://www.uxpin.com/studio/blog/a-hands-on-guide-to-mobile-first-design/) organically leads to a design that’s more content-focused, and therefore viewer-focused. The heart of the site is content — that’s what the viewers are there for. The stategy called "[Progressive enhancement](https://www.smashingmagazine.com/2009/04/progressive-enhancement-what-it-is-and-how-to-use-it/)"
Webflow start the repsonsive website based on [Desktop viewport](https://youtu.be/bW2FZOtEOqQ), it's call "[Graceful degradation](https://searchnetworking.techtarget.com/definition/graceful-degradation)"
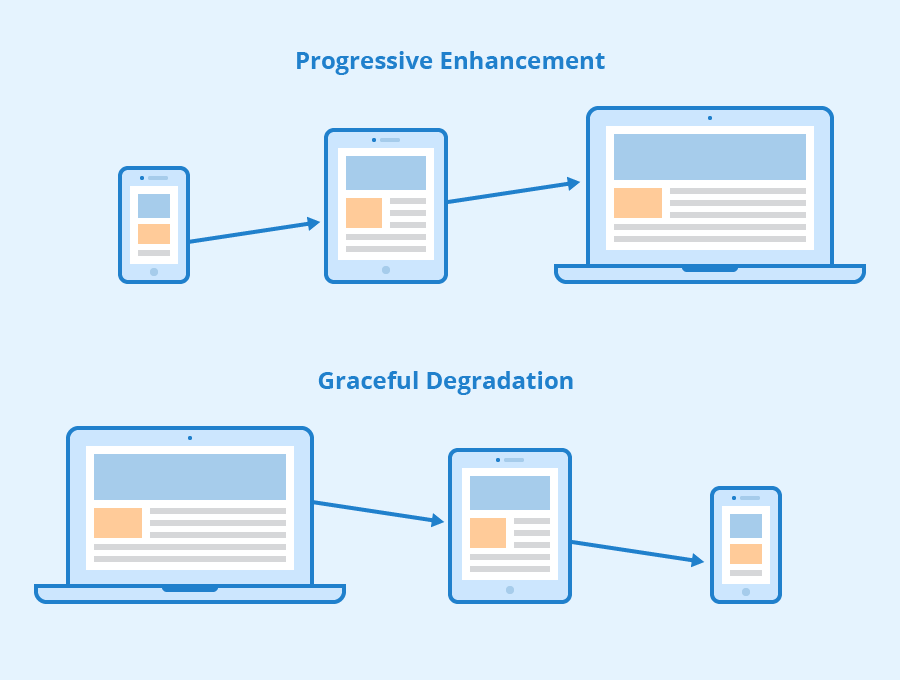
_Enhancement vs Degradation_
What should we do? Which one is the best practice? Our solution: we did both based on requirement.
* Progressive ehancement for mockup website to check to main content in smallest viewport.
* Graceful degradation for implement website based on design file.
That is why we design site-map, design mockup website to define the main content should show up in the mobile viewport.
Then we use Webflow to build a base on the desktop viewport as default, the design mockup helps us to know which element is shown or hidden in the table, mobile viewport, in case those elements are unnecessary, it saves bandwidth in order to faster load the website on the small viewport devices.
To do the responsive design, we style the layout elements Section and Container, make it become Class CSS. We drop the div- block inside the container element, we can change this element to grid Layout or flexbox Layout (similar with [Auto Layout - Figma](https://www.figma.com/blog/announcing-auto-layout/)) support to make it responsive in few click from desktop to tablet, mobile viewport.

_Desktop viewport change Layout to mobile viewport by 1 click, Block display to Flexbox display - emulated on Figma_
When having a website with responsive design, designer can make changes quickly and easily and will not worry about making changes on two websites. This flexibility is a huge advantage when designer want to make a quick design tweak or fix a typo on site— designer only have to do it once.
Let take a quick look at ["Make your homepage fully responsive" by Webflow 21dayportfolio](https://youtu.be/wbcIj7jUz_s)
## Where to start?
* Webflow supports user with [Webflow University](https://university.webflow.com/) that we can learn a huge knowledge from the beginning, step by step. It helps designer build website looks stunning.
* In the [Webflow community](https://webflow.com/community), the community provides cases that designer might need, Q&A, shares knowledge. Any questions asked will be responded to as soon as possible.
* There are [showcase, template for commercial](https://webflow.com/discover/popular) with an average price that could apply immediately
# Conclusion
Webflow is no-code tool that help designer build a website for a small, medium business with the low-cost budget. Webflow hosting is the fastest and most reliable website hosting technology for the web. Customizable CMS website which clients can edit themselves, on live-site.
Designers now can understand how front-end dev environments work visually throughout Webflow. Besides, Webflow supports designers with free and costed templates, the community which can help designers in visual direction... all that advantages can lead designer to a higher position, higher skill-set and gain more opportunity with freelance work.
---
What do you think about the Webflow? Do you have any concern Webflow, let's Join our [Discord](https://discord.gg/Ffarda5FD9) and let us know!
If there are any topics you would like to us to cover next, send us a message at team@dwarves.foundation
Thank you for taking the time.
---
Minh Trương Product Designer at Dwarves Foundation
"I make and write about digital products."
- [Medium](https://medium.com/dwarves-foundation/)
- [Discord](https://discord.gg/Ffarda5FD9)
- [Facebook](https://www.facebook.com/dwarvesf)
- [Twitter](https://twitter.com/dwarvesf)
- [Behance](https://www.behance.net/dwarvesf)