# 第六章 物件及資料結構
###### tags: `clean code`
### - 資料結構與物件的差別
* 資料結構:將資料直接暴露在外,可以直接對資料讀取與寫入。例如:list、dict、set 等。
* 物件:將資料隱藏起來,提供可以操作這些資料的函式在外面。
第一段程式碼中,暴露了程式的實踐過程,很清楚的知道是一個直角座標系。
```
public class Point {
public double x;
public double y;
}
```
第二段程式碼中,我們將實現的過程隱藏,不只是加上一層函式的介面而已,確切來說這是一種抽象化的過程,讓使用者在不需要知道實現的過程狀態下,還能夠操作資料的本質。(也就是說再不清楚資料本質的情境下,我們限制了只能透過一種存取手段(setter、getter),可以獨立存取座標資訊,但同時也必須設定單點的所有座標資訊)
```
public class Point {
double getX();
double getY();
void setCartestion(double x, double y);
double getR();
double getTheta();
void setPolar(double r, double theta);
}
```
再來個舉例 - 具體化&抽象化
```
\\具體化的交通工具類別
FuleTankCapacityInGallons() {
double getGallonsOfGasoline();
}
\\抽象化的交通類別
public interface Vehicle {
double getPercentFuelRemaining();
}
```
很明顯的,後者是比較好的選擇,理由在於,我們不想將資料的細節暴露在外,因此利用抽象化的詞彙來表現資料,讓其他物件可以繼承並使用。
### - 結構化程式碼(程序式圖形)
```
public class Square {
public Point topLeft;
public double side;
}
public class Rectangle {
public Point topLeft;
public double height;
public double width;
}
public class Circle {
public Point center;
public double radius;
}
```
```
public class Geometry {
public final double PI = 3.141592653589793 ;
public double area (Object shape) throws NoSuchShapeException
{
if (shape instanceof Square) {
Square s = (Square) shape;
return s.side * s.side;
} else if (shape instanceof Rectangle) {
Rectangle r = (Rectangle) shape;
return r. height * r. width;
} else if (shape instanceof Circle) {
Circle c = (Circle) shape;
return PI * c. radius * c. radius;
}
}
throw new NoSuchShapeException();
}
```
當你要新增一個新的perimeter(周長)函式到Geometry類別時,這些圖形類別完全不會受到影響(因為圖形類別是單純的資料結構)!任何其他相依於圖形類別的類別也不會受到影響,另一方面,如果我新增了一個新的圖形類別,則我必須改變在Geometry裡所有的函式來處理它。
### - 物件導向化程式碼(多型的圖形)
```
public class Square implements Shape {
private Point topLeft;
private double side;
public double area() {
return side*side;
}
}
public class Rectangle implements Shape {
private Point topLeft;
private double height;
private double width;
public double area() {
return height * width;
}
}
public class Circle implements Shape {
private Point center;
private double radius;
public final double PI = 3.141592653589793;
public double area() {
return PI * radius * radius;
}
}
```
上面是物件導向的程式風格,如果新增一個圖形類別,不用修改所有的類別,但如果我要新增一個新的函式,例如添加一個周長函數,則所有的圖形類別都必須要修改(因為每個圖形都需要周長)。
這就是物件和資料結構的二分性,結構化的程式碼(使用資料結構的程式碼)容易添加新的函式,而不需要變更既有的資料結構,而物件導向的程式碼,容易添加新的類別,而不用變動既有的函式。
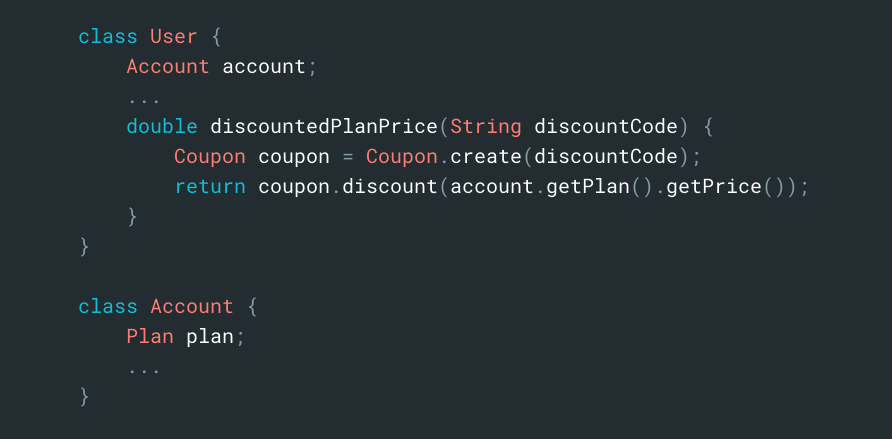
### - 德摩特爾法則 (The Law of Demeter) 最少知識原則
符合 LoD 的函式要求在物件 O 中的函式 m 只能調用以下幾種類型的函式:
1. O 本身
2. m 的參數
3. 在 m 中建立的物件
4. 宣告在 O 中的物件
5. 被 O 存取的全域變數,並且在 m 的 scope 中
```
private A a;
private void f() {...}
public void m(B b) { // 方法中只能呼叫
f(); // 類別定義的方法
b.action(); // 引數的方法
new D().run(); // 自建物件之方法
a.execute(); // 實例擁有物件之方法
}
```
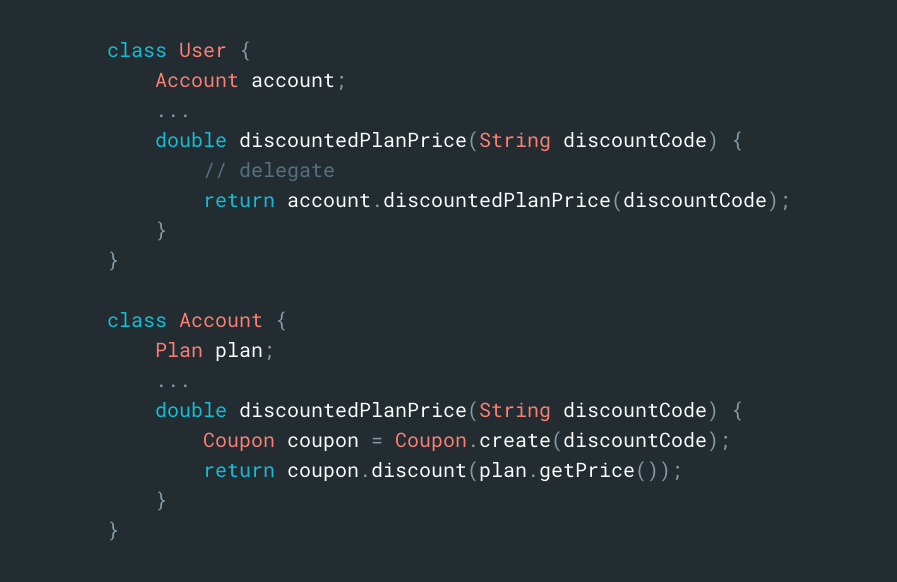
如果是物件,則破壞了物件封裝;而如果是資料結構,資料結構本來就暴露了資料在外面,所以透過巢狀存取資料是沒有問題的。
```
// 破壞封裝,違反 LoD
// 通常又被稱作火車事故般的糟糕程式碼,因為一連串呼叫容易混淆目前正在做的事,也不太容易看懂個別的呼叫的意義。
class A {
fun(b) {
b.getOption().getSelection()
}
}
// 存取資料結構,沒有違反 LoD
data = {
a: {
b: 2
}
}
console.log(data.a.b)
```
> 你不應該讓一個函式知道太多事情,否則會破壞物件封裝原本的意義。
***補充 : 合理的設計***
### - DTO
1. 最爲精簡的數據結構,只有公共變量、沒有函數的類。多用在與資料庫通信,解析套接字信息之類的場景中。
2. Active Record,特殊 DTO 形式。擁有公共變量的數據結構,通常也會擁有類似 save 和 find 這樣可瀏覽方法。一般是對資料庫表或者其他數據源的直接翻譯。不要在這類數據結構裡面塞進業務規則,應該創建包含業務規則隱藏內部數據的獨立對象。
### 總結:
1. 物件的私有變數不應該隨意將它們暴露在外,物件即是要隱藏其內容,只讓外部的人看見它們想公開的行為。
2. 德摩特爾法則是一種撰寫程式的規範,我們不應該知道太多物件內的事情,否則就會破壞物件的封裝,讓被使用的物件難以被維護。
# 第七章 錯誤處理
### - 使用例外事件而非回傳錯誤碼
```
public class DeviceController{
...
public void sendShuntDown(){
DeviceHandel handle = getHandel(DEV1);
//Check the ststus of the device
if(handle != DeviceHandel.INVAILD){
//Save the device status to the record field
retrieveDeviceRecord(handle);
//if not suspended ,shut down
if(record.getStatus()!= DEVICE_SUSPENDED){
pauseDevice(handle);
clearDeviceWorkQueue(handle);
closeDevice(handle);
} else{
logger.log("Device suspended .Unable to shut down");
}
}else{
logger.log("Invalid handel for :"+DEV.toString());
}
}
...
}
```
上面的程式碼問題在於,在呼叫這段程式碼之後還必須立刻檢查錯誤,如果返回了錯誤的log,呼叫者還要做出不同的邏輯處理,但因為程式本身順利執行,所以這個步驟也是常常被忽略。
再來看另一段改寫過後的程式碼,我們將自行定義了一個例外實體,並在函式發生例外時拋出,這樣事情便會變得簡單許多,原本糾纏在一起的兩個事件邏輯(裝置關閉演算法和錯誤處理),現在被巧妙分開了。
```
public class DeviceController{
...
public void sendShutDown(){
try{
tryToShutDown();
}catch(DeviceShutDownError e){
logger.log(e);
}
}
private void tryToShutDown() throws DeviceShutDownError{
DeviceHandle handle = getHandle(DEV1);
DeviceRecord record = retrieveDeviceRecord(handle);
pauseDevice(handle);
clearDeviceWorkQueue(handle);
closeDevice(handle);
}
private DeviceHandle getHandle(DeviceID id){
...
throw new DeviceShutDownError("Invalid handle for:" + id.toString());
...
}
}
```
> 使用例外事件的方式,讓程式偵測到錯誤時,可以主動拋出例外。
### - 從呼叫者的角度定義例外類別
當我們在應用程式裡定義例外類別時,應該關心的是,他們如何被捕獲的。
下面的程式碼中,依照每個可能會拋出的例外都進行了捕獲,雖然沒有錯,但卻包含著許多重複的程式碼,也無法進行複用。
```
CMEPort port = new ACMEPort(12);
try{
paro.open();
} catch(DeviceResponseException e){
reportPortError(e);
logger.log("Device response exception" ,e);
}catch(ATM1212UnlockedException e){
reportPortError(e);
logger.log("Unlock exception" ,e);
}catch(GMXError e){
reportPortError(e);
logger.log("Device response exception");
}finally{
...
}
```
但如果改成以下的寫法,我們將可能會拋出例外的程式碼邏輯獨立包裹成一個LocalPort類別,當進行呼叫時,同時就已經做好了錯誤處理。
```
LocalPort port = new LocalPort(12);
try{
port.open();
}catch(PortDeviceFailure e){
reportError(e);
logger.log(e.getMessage(),e);
}finally{
...
}
public void LocalPort{
private ACMEPort innerPort;
public LocalPort(int portNumber){
innerPort = new ACMEport(portNumber);
}
public void open(){
try{
innerPort.open();
}catch(DeviceResponseException e){
reportPortError(e);
logger.log("Device response exception" ,e);
}catch(ATM1212UnlockedException e){
reportPortError(e);
logger.log("Unlock exception" ,e);
}catch(GMXError e){
reportPortError(e);
logger.log("Device response exception");
}finally{
...
}
}
}
```
### - Special Case Pattern (特殊情況模式)
我們可以看到程式碼中如果 HanResponse.search() 經過搜尋後,無法找到問題的解答,get_response() 拋出了一個例外事件 AnswerNotFoundError,轉而使用另一個函式 get_response_from_experts() 讓其他專家回答問題。
```
try:
han_response = HanResponse.search(question)
response = han_response.get_response()
except AnswerNotFoundError:
response = get_response_from_experts()
```
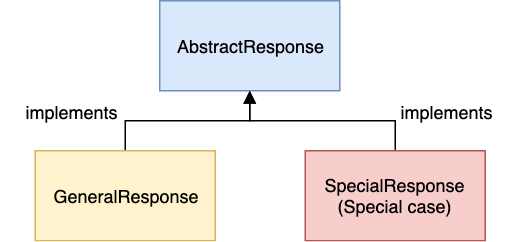
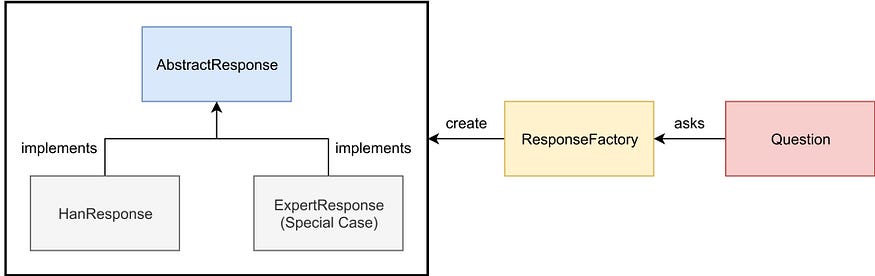
當我們用到 Special Case Pattern 時,經常會使用工廠模式 (Factory Pattern) ,讓工廠中的物件繼承同一個抽象類別,並且可以額外傳遞 Special Case 的物件。
```
response_factory = ResponseFactory.search(question)
response = response_factory.get_response()
```
```
from abc import ABC, abstractmethod
class AbstractResponse(ABC):
@abstractmethod
def get_response(self):
pass
class HanResponse(AbstractResponse):
def __init__(self, question):
self.response = question
def get_response(self):
return "Han Response."
class ExpertResponse(AbstractResponse):
def __init__(self, question):
self.response = self.search(question)
def get_response(self):
return self.response
def search(self):
...
```
### - Null Object Pattern

👉 STEP 1:建立抽象類別 AbstractCustomer,並且讓物件共同繼承這個類別,限定所有類別都必須實作在抽象類別中的抽象方法。因此,如同前一章節,所有類別都有同樣的方法。
```
from abc import ABC, abstractmethod
class AbstractCustomer(ABC):
@abstractmethod
def get_name(self):
pass
@abstractmethod
def is_none(self):
pass
class RealCustomer(AbstractCustomer):
def __init__(self, name):
self.name = name
def get_name(self):
return self.name
def is_none(self):
return False
class NullCustomer(AbstractCustomer):
def get_name(self):
return "Not Available in Customer Database"
def is_none(self):
return True
```
👉 STEP 2:我們建立一座工廠,讓工廠找不到名字時回傳 Null Object。
```
from Customer import RealCustomer, NullCustomer
class CustomerFactory:
def __init__(self):
self.names = ["Rob", "Joe", "Julie"]
def get_customer(self, customer_name):
for name in self.names:
if name == customer_name:
return RealCustomer(name)
return NullCustomer()
```
👉 STEP 3:使用 Special Case Pattern 的好處就是,儘管我們查詢的名字不存在,但是回傳的物件同樣繼承 AbstractCustomer,所以最後能夠呼叫同樣名稱的函式。
```
from CustomerFactory import CustomerFactory
customer_factory = CustomerFactory()
customer_1 = customer_factory.get_customer("Rob")
customer_2 = customer_factory.get_customer("Henry")
customer_3 = customer_factory.get_customer("Julie")
customer_4 = customer_factory.get_customer("Peter")
print("Customer 1: ", customer_1.get_name())
print("Customer 2: ", customer_2.get_name())
print("Customer 3: ", customer_3.get_name())
print("Customer 4: ", customer_4.get_name())
```
### - 不要回傳Null值
如果打算在方法中返回null值,不如拋出異常,或是返回特例對象。因為當今天程式可能出現null值,我們就必須加上一層一層的null判斷if else,防止空值出現。
Worst code
```
public void registerItem(Item item) {
if (item != null) {
ItemRegistry registry = peristentStore.getItemRegistry();
if (registry != null) {
Item existing = registry.getItem(item.getID());
if (existing.getBillingPeriod().hasRetailOwner()) {
existing.register(item);
}
}
}
}
```
Better code
相對回傳null,我們可以回傳一個空陣列。
```
public List getList(){
...
if(lis != null){
return lis;
}else {
return Collections.emptyList();
}
}
```
# 第八章 邊界
第一種是與第三方軟體的邊界,第二種是已知與未知的邊界。更白話一點,邊界就是「程式與程式的邊界」。
但使用第三方套件的缺點就是,如果沒有透過適當的方式呼叫,將會使軟體邊界模糊不清,讓我們來看一下以下這個寫法。
```
Map sensors = new HashMap();
Sensor s = (Sensor)sensors.get(sensorId);
```
上面這段程式碼其實沒有甚麼錯誤,也可以正確執行,但如果整個專案都充斥這種寫法,可讀性將會變得很差。
如果換成多型的寫法,將會使可讀性變得更好:
```
Map<Sensor> sensors = new HashMap<Sensor>();
Sensor s = sensors.get(sensorId);
```
現在這種寫法雖然比較好,但還是會有一個缺點,就是當Sensor介面發生改變時,譬如回傳物件內容、型態改變,就必須連帶修正系統內相關的地方(因為我們在系統內傳遞Map<Sensor>實體)。
如果要更簡潔一點的話,我們可以再修正為以下寫法:
```
public class Sensors {
private Map sensors = new HashMap();
public Sensor getById(String id){
return (Sensor) sensors.get(id);
}
}
```
我們把Map隱藏並封裝進Sensors類別中,轉型及多型都在Sensor類別中處理,若真的需要修改,就只要修改Sensor就好。
### - 學習式測試(第三方軟體的邊界)
未來為了滿足更多的需求進行升級了第三方軟體的版本,或是資料庫被修改了一些欄位,舊有的程式碼不一定會相容於現階段的系統。因此,假設未來升級時,無法通過我們先前撰寫的單元測試,我們就能夠立即發現問題。
> 而這些測試,作者稱為邊界測試,可以減輕升級整合所造成的負擔。
### - 使用尚未存在的程式(已知與未知的邊界)
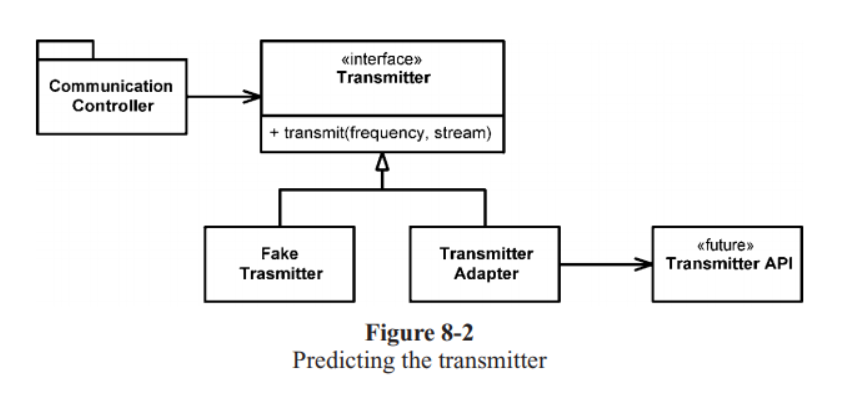
> 採用這種設計,Adapter 封裝了與 API 的互動,當 API 升級時,Adapter 是唯一需要被修改的地方。
Transmitter是一個未知的API,而作者們將 CommunicationsController 類別從 Transmitter API (未被定義,且不在作者們掌控之下)分離出來。一旦 Transmitter API 被定義出來,作者們就撰寫 TransmitterAdapter 來轉接。
因此,往後若TransmitterAPI升級或更改時,Adapter是唯一需要修改的地方。同時,我們也可以透過撰寫邊界測試來測試Adapter是否正確使用了Transmitter API。
透過以上的兩種方法(封裝特定介面或引用、使用Adapter轉接API),我們將可以有效且簡潔使用第三方軟體,當第三方軟體發生變動時,只需要更改最少的地方,也就是說,維護會更加方便。
 Sign in with Wallet
Connect another wallet
Sign in with Wallet
Connect another wallet