# **Job notebook**
[toc]
# 環境建置
網址:
[Install Sublime Text on Ubuntu 20.04](https://linuxize.com/post/how-to-install-sublime-text-3-on-ubuntu-20-04/)
[Trace code](http://kunhsien.blogspot.com/2015/02/linuxsublime-text3ctagssource-insight.html)
[git 教學](https://zlargon.gitbooks.io/git-tutorial/content/)
# share memory
## shmget()
**用來得到一個shared memory id或建立一個shared memory object。
格式如下**
```c
#include <sys/shm.h>
int shmget(key_t key, size_t size, int shmflg);
```
:::info
**ex:
shm_id=shmget(SHMKEY, MAXBUF+1, IPC_CREAT | 0666)**
key:
> IPC_PRIVATE:產生一個新的共享記憶體分段。
0表示建立新的shared memory object,>0表示根據shmflag的值操作。
size:
> 需要共享記憶體的大小 , 因為分配大小皆以page為單位 , 所以如果size = 1~4096 , 則實際上會分配到4k。
0表示只取得share memory,>0則表示要指定的shared memory大小。
shmflag:
> IPC_CREAT :確保開啟的記憶體是新的,而不是現存的記憶體。
| 0666 : 作為校驗 , ubuntu要加。
使用IPC_CREAT時,若沒有shared memory object則建立一個,若有則回傳shared memory id。
:::
**Hint:**
:::spoiler
rwx rwx rwx = 111 111 111
rw- rw- rw- = 110 110 110
rwx --- --- = 111 000 000
and so on...
rwx = 111 in binary = 7
rw- = 110 in binary = 6
r-x = 101 in binary = 5
r-- = 100 in binary = 4
Where of course, ==r== stands for *read* and ==w== for *write* then ==x== means *execute*.
| model | code |description |
|--------|--------|--------|
|S_IRWXU | 00700 | user (file owner) has read, write and execute permission |
|S_IRUSR | 00400 |user has read permission|
|S_IWUSR | 00200 |user has write permission|
|S_IXUSR | 00100 |user has execute permission|
|S_IRWXG | 00070 |group has read, write and execute permission|
|S_IRGRP | 00040 |group has read permission|
|S_IWGRP | 00020 |group has write permission|
|S_IXGRP | 00010 |group has execute permission|
|S_IRWXO | 00007 |others have read, write and execute permission|
|S_IROTH | 00004 |others have read permission|
|S_IWOTH | 00002 |others have write permission|
|S_IXOTH | 00001 |others have execute permission|
:::
## shmat()
**透過shmget()產生的shared memory id將shared memory object映射到memory,之後會回傳可直接存取的shared memory address。**
```c
#include <sys/shm.h>
void *shmat(int shmid, const void *shmaddr, int shmflg);
```
:::info
**ex:
shm = shmat(shm_id, NULL, 0)**
shmid:
>共享記憶體的id
shmaddr:
> 指定shared memory要出現的位置,直接指定null可讓作業系統自己決定。
shmflg:
> SHM_RDONLY:唯讀模式
0:可讀可寫
:::
## shmdt()
**將shared memory的address關閉,成功會傳回0**
```c
#include <sys/shm.h>
int shmdt(const void *shmaddr);
```
:::info
**ex:
shmdt(shm);**
shmaddr:
>shared memory的address
:::
## shmctl()
**管理shared memory**
```c
#include <sys/ipc.h>
#include <sys/shm.h>
int shmctl(int shmid, int cmd, struct shmid_ds *buf);
```
:::info
**ex:
shmctl(shmid, IPC_RMID, NULL);**
shmid:
> share memory id
cmd:
>IPC_STAT: 從共享記憶體裡,拿 shmid_ds 結構資料給 buf.
IPC_SET: 從buf 複製到共享記憶體
IPC_RMID: 砍了共享記憶體
buf:
> 暫存區.
:::
## For example
### <shm_server.c>
```c=
#include <sys/types.h>
#include <sys/ipc.h>
#include <sys/shm.h>
#include <stdio.h>
#include <sys/stat.h>
#define shm_size 32
#define PARM IPC_CREAT | 0666
int main(void)
{
char c;
int shm_id;
char *shm_addr, *s;
key_t key;
key = 5679;
if ((shm_id = shmget(key, shm_size, PARM)) < 0) {
perror("shmget");
return 0;
}
if ((shm_addr = shmat(shm_id, NULL, 0)) == (char *) -1) {
perror("shmat");
return 1;
}
s = shm_addr;
for (c = 'a'; c <= 'z'; c++)
*s++ = c;
*s = NULL;
while (*shm_addr != '*'){
sleep(1);
}
shmdt(shm_addr);
shmctl(shm_id , IPC_RMID , NULL);
return 0;
}
```
### <shm_client.c>
```c=
#include <sys/types.h>
#include <sys/ipc.h>
#include <sys/shm.h>
#include <stdio.h>
#include <sys/stat.h>
#define shm_size 32
int main(void)
{
int shmid;
key_t key;
char *shm, *s;
key = 5679;
if ((shmid = shmget(key, shm_size , S_IRUSR | 0666)) < 0) {
perror("shmget");
return 1;
}
if ((shm = shmat(shmid, NULL, 0)) == (char *) -1) {
perror("shmat");
return 1;
}
for (s = shm; *s != NULL; s++)
putchar(*s);
putchar('\n');
*shm = '*';
return 0;
}
```
```cpp=
#include <iostream>
#include <string>
#include <sys/types.h>
#include <sys/ipc.h>
#include <sys/shm.h>
#include <unistd.h>
using namespace std;
int main()
{
struct Data
{
int a;
int arr[3];
};
int shm_id;
key_t key = 1234;
struct Data *p;
shm_id = shmget(key, sizeof(struct Data), IPC_CREAT | 0666);
p = (struct Data *) shmat(shm_id, NULL, 0);
p->a = 27;
p->arr[0] = 1;
p->arr[1] = 2;
p->arr[2] = 3;
cout << p->a << endl;
cout << p->arr[0] << endl;
cout << p->arr[1] << endl;
cout << p->arr[2] << endl;
int pid = fork();
if(pid > 0)
{
sleep(1);
}
if(pid == 0)
{//Notice that we didn't explicitly attach the shared memory to the child
p->a = 32;
p->arr[0] = 4;
p->arr[1] = 5;
p->arr[2] = 6;
exit(0);
}
cout << p->a << endl;
cout << p->arr[0] << endl;
cout << p->arr[1] << endl;
cout << p->arr[2] << endl;
return 0;
}
```
## openlog()
:::info
|logopt Parameter| Description|
|----------|----------|
|LOG_PID|加上程序識別符號(系統分配給每個程序的一個獨一無二的數字標識)|
|LOG_CONS|如果訊息無法記錄到日誌檔案裡則傳送訊息到控制檯|
|LOG_NDELAY | 在第一次呼叫 syslog 函式時開啟日誌功能|
:::
## syslog()
:::info
LOG_EMERG——緊急情況
LOG_ALERT——應該被立即改正的問題,如系統數據庫破壞
LOG_CRIT——重要情況,如硬盤錯誤
LOG_ERR——錯誤
LOG_WARNING——警告信息
LOG_NOTICE——不是錯誤情況,但是可能需要處理
LOG_INFO——情報信息
LOG_DEBUG——包含情報的信息,通常旨在調試一個程序時使用
:::
### For example
```c
#include<stdio.h>
#include<stdlib.h>
#include <syslog.h>
void main(void)
{
for(int i=0;i<3;i++){
syslog(LOG_USER|LOG_EMERG,"syslog programming test %d times/n", i);
}
}
```
## write log example
```c
#include
#include
int main(int argc,char* argv[])
{
openlog(argv[0],LOG_CONS | LOG_PID, LOG_USER);
int count=0;
while(count<5){
syslog(LOG_INFO,"%d, log info test...",count);
count++;
}
closelog();
return 0;
}
```
## memset()
**作用是在一段記憶體塊中填充某個給定的值,它是對較大的結構體或數組進行清零操作的一種最快方法 。**
:::info
**void *memset(void *s, int ch, size_t n) 將s中當前位置後面的n個位元組 (typedef unsigned int size_t )用 ch 替換並返回 s 。**
s:
>這是來填充的內存塊的指針。
ch:
> 這是要設置的值。作為一個int值傳遞,但使用這個值的無符號字符型轉換函數填充的內存塊。
n:
>這是要設置的值的字節數。
:::
### for example
```c
#include <stdio.h>
#include <string.h>
int main ()
{
char str[50];
strcpy(str,"This is string.h library function");
puts(str);
memset(str,'$',7);
puts(str);
return(0);
}
/**
result:
This is string.h library function
$$$$$$$ string.h library function
**/
```
### 參考資料:
[結構與指標](https://kopu.chat/2017/05/30/c-%E8%AA%9E%E8%A8%80%EF%BC%9A%E7%B5%90%E6%A7%8B%E8%AE%8A%E6%95%B8%E8%88%87%E6%8C%87%E6%A8%99/)
[字串長度、複製、串接](https://openhome.cc/Gossip/CGossip/StringLengthCopyCat.html)
# 指標
::: info
Function Pointer:指向函數的指標。 int (*pfunc)(int);
Function return a pointer: 回傳指標的函數。 int* func(int);
Function pointer return a pointer。 int (pfunc)(int);
括弧(*functionName)是很重要的部份,如果沒有括弧,編譯器會自動視為此函式回傳的只是一個指標而不是指標函式
:::
```c
// 函式宣告如下
void func1(int int1, char char1);
/* 指向func1的指標如下:
* 這樣的寫法應理解成:funcPtr1是一個函數指標,它指向的函數接受int與char兩個參數並回傳void。(signature)
*/
void (*funcPtr1)(int, char);
/* 如果今天有另一個函式有相同的參考簽名
* 則funcPtr1也能指向func2。
*/
void func2(int int2, char char2);
// 函式指標指向函式1
funcPtr1 = &func1;
// 函式指標指向函式2
funcPtr1 = &func2;
// 在宣告時就直接給予初值,則如下:
void (*funcPtr1)(int, char) = &func1; //&亦可省略
// example
#include <stdio.h>
int foo(int, int);
int main (){
int (*add)(int, int) = foo;
printf("add: %d",add(1, 2)); // 顯示 1 + 2 = 3
}
int foo(int a, int b) {
return a + b;
}
```
```c
/****************** 結構中呼叫函式執行strcpy ***************************/
#include <stdio.h>
#include <stdint.h>
#include <string.h>
typedef struct sConfig2ShdMem_s
{
void (* Set_Val)(uint8_t *value, uint32_t *u8InputShm);
uint8_t *u8InputShm;
} tConfig2ShdMem_t;
void vfn_Config2Shm_String(uint8_t *value, uint32_t *u8InputShm)
{
strcpy(u8InputShm, value);
}
int main()
{
unsigned char src[] = "fewfefwefwefwef";
unsigned char abc[32];
tConfig2ShdMem_t tConfig2ShdMem[]=
{
{vfn_Config2Shm_String,abc},
};
tConfig2ShdMem[0].Set_Val(src, tConfig2ShdMem[0].u8InputShm);
printf("abc:%s",abc);
return 0;
}
```
```c
#include<stdio.h>
#define n 3
struct body
{
double p[3];//position
double v[3];//velocity
double a[3];//acceleration
double radius;
double mass;
};
struct body bodies[n];
int main()
{
int a, b;
for(a = 0; a < n; a++)
{
for(b = 0; b < 3; b++)
{
bodies[a].p[b] = 0;
bodies[a].v[b] = 0;
bodies[a].a[b] = 0;
}
bodies[a].mass = 0;
bodies[a].radius = 1.0;
printf("bodies[%d]:%f\n",a,bodies[a].radius);
}
return 0;
}
```
> 函式的返回值是指標型別 int* fun(int a,int b);
```c
#include <stdio.h>
int* str(){
//申請堆空間
int *p=malloc(20*sizeof(int));
//列印地址
printf("addr p:%d\r\n",p);
//資料儲存
for(int i=0;i<20;i++){
p[i]=i;
}
return p;
}
void main(){
//呼叫
int *p=str();
//地址
printf("addr p:%d\r\n",p);
//資料輸出
for(int i=0;i<20;i++) {
printf("%d",p[i]);
}
//釋放堆空間
free(p);
}
```
>函式名表示的就是這個地址,既然是地址我們就可以定義一個指標變數來存放
int (*funp)(int,int)
```c
#include <stdio.h>
//找最大值
int max(int a,int b){
if(a>b) return a;
return b;
}
//找最小值
int min(int a,int b){
if(a<b) return a;
return b;
}
void main(){
//定義函式指標變數 pfun
int (*pfun)(int,int);
//賦值函式指標,找最大值
pfun=max;//或者為&max
int c=pfun(10,20);
printf("%d\r\n",c);
//賦值函式指標,找最小值
pfun=min; //或者為&min
c=pfun(10,20);
printf("%d\r\n",c);
}
```
```c
#include <stdio.h>
//找最大值
int max(int a,int b){
if(a>b) return a;
return b;
}
//找最小值
int min(int a,int b){
if(a<b) return a;
return b;
}
//函式入口
int all(int a,int b,int (*pfun)(int,int)){
return pfun(a,b);
}
void main(){
int c=0;
//找最大值呼叫
c=all(10,20,max);
printf("%d\r\n",c);
//找最小值呼叫
c=all(10,20,min);
printf("%d\r\n",c);
}
```
# OpenWrt
OpenWrt項目是基於Linux作業系統的嵌入式設備作業系統。並不是試圖建立一個單一的,靜態的固件,而是提供了一個完全可寫的檔案系統與OpenWrt套裝軟體管理。這可以讓您從供應商提供的應用程式選擇和配寘中解脫出來,並允許您通過使用開發包來定制設備,以適應任何應用程式。對於開發人員來說,OpenWrt是一個用於構建應用程式的框架,並不需要在它周圍建立了一個完整的固件;這意味著用戶擁有完整的定制權限,用意想不到的方式來使用設備。
## The UCI System
* “uci”是Unified Configuration Interface“的縮寫, 此模組的目的是集中管理OpenWrt中, 各個模組的設定值(configuration).記錄系統的設定值, 應該是非常直覺且容易達到的工作.
* 對於OpenWrt而言, 我們可以將UCI視為系統中主要使用者操作介面, 用來操作系統中最重要的設定項目.
* 最常見的例子有: 主要網路設定(main network interface configuration), 無線網路設定(wireless settings), 系統日誌功能(logging) 和 遠端存取功能的設定(remote access configuration).
**OpenWRT UCI API的使用**
* OpenWrt中主要的設定值, 被切割成好幾個獨立的檔案(UCI設定檔), 存放在系統的 /etc/config/ 目錄之中. 大致上, 每一個設定檔會和它所屬的系統功能有關. 使用者可以透過文字編輯器(vim, notepad之類的)直接修改UCI設定檔的內容, 來達到修改設定值的目的, 或者透過 uci 這個指令來修改設定值. UCI設定檔也可以透過各種的API(例如shell, Lua 和 C)來修改, 例如Web GUI就可以透過 LuCI 來修改UCI設定檔.
* 當UCI設定檔被修改, 不論使用者用什麼方式(透過文字編輯器修改或是透過uci指令)修改的, 其相關的service或是執行檔必須(重新)啟動, �方可讓修改過的設定值可以產生作用, (重新)啟動的方式是透過init.d call.
==root@OpenWrt:/# /etc/init.d/example restart==
[https://openwrt.org/zh-tw/docs/guide-user/base-system/uci]
**基本概念**
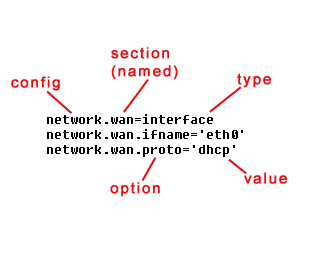
* UCI上下文: struct uci_context *
* 包(Package): 一個包對應一個UCI格式的文件.類型是 struct uci_package *
* 節(Section): 一個配置文件的節點. 類型是 struct uci_list *
* 值(Value):一個節下面可能包含多個值 一個值具有一個名字.
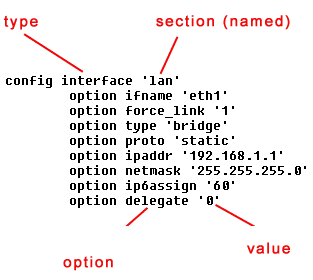
:::info
```
package 'example'
config 'example' 'test' # type:example section:test
option 'string' 'some value' # name:string value:'some value'
option 'boolean' '1' # name:boolean value:'1'
list 'collection' 'first item' # name:collection collection[0]='first item'
list 'collection' 'second item' # name:collection collection[1]='second item'
```
:::
```c
#include <unistd.h>
#include <stdio.h>
#include <string.h>
#include <uci.h>
static struct uci_context * ctx = NULL; //定義一個UCI上下文的靜態變量.
/*********************************************
* 載入配置文件,並遍曆Section.
*/
bool load_config()
{
struct uci_package * pkg = NULL;
struct uci_element *e;
ctx = uci_alloc_context(); // 申請一個UCI上下文.
if (UCI_OK != uci_load(ctx, UCI_CONFIG_FILE, &pkg))
goto cleanup; //如果打開UCI文件失敗,則跳到末尾 清理 UCI 上下文.
/*遍曆UCI的每一個節*/
uci_foreach_element(&pkg->sections, e)
{
struct uci_section *s = uci_to_section(e);
// 將一個 element 轉換爲 section類型, 如果節點有名字,則 s->anonymous 爲 false.
// 此時通過 s->e->name 來獲取.
// 此時 您可以通過 uci_lookup_option()來獲取 當前節下的一個值.
if (NULL != (value = uci_lookup_option_string(ctx, s, "ipaddr")))
{
ip = strdup(value) //如果您想持有該變量值,一定要拷貝一份。當 pkg銷毀後value的內存會被釋放。
}
// 如果您不確定是 string類型 可以先使用 uci_lookup_option() 函數得到Option 然後再判斷.
// Option 的類型有 UCI_TYPE_STRING 和 UCI_TYPE_LIST 兩種.
}
uci_unload(ctx, pkg); // 釋放 pkg
cleanup:
uci_free_context(ctx);
ctx = NULL;
}
```
## for example
```c
/*
現在有一個如下的配置文件:
config "server" "webserver"
list "index" "index.html"
list "index" "index.php"
list "index" "default.html"
*/
/********************代碼片段***********************/
// s 爲 section.
struct uci_option * o = uci_lookup_option(ctx, s, "index");
if ((NULL != o) && (UCI_TYPE_LIST == o->type)) //o存在 且 類型是 UCI_TYPE_LIST則可以繼續.
{
struct uci_element *e;
uci_foreach_element(&o->v.list, e)
{
//這裏會循環遍曆 list
// e->name 的值依次是 index.html, index.php, default.html
}
}
/**********************寫配置**********************/
/*
* UCI提供了一個簡潔的辦法來操作配置信息,例如有一個配置文件
* 文件名: testconfig
* config 'servver'
* option 'value' '123' # 我們想修改 'value' 的值爲 '456'
*/
struct uci_context * ctx = uci_alloc_context(); //申請上下文
struct uci_ptr ptr ={
.package = "config",
.section = "servver",
.option = "value",
.value = "256",
};
uci_set(_ctx,&ptr); //寫入配置
uci_commit(_ctx, &ptr.p, false); //提交保存更改
uci_unload(_ctx,ptr.p); //卸載包
uci_free_context(ctx); //釋放上下文
/*
* uci_ptr 用來指定資訊.而是用uci_set則是寫入資訊.同類的函式有如下幾個: 針對list的操作:
* uci_add_list() // 新增一個list 值
* uci_del_list() // 刪除一個list 值
* uci_delete() // 刪除一個option值
*/
```
### 參考資料:
[OpenWRT 筆記](https://yume190.github.io/2016/11/15/OpenWRT-2016-11-15-OpenWRT-Begin/)
[OpenWRT uci](https://yume190.github.io/2016/11/24/OpenWRT-2016-11-24-OpenWRT-uci/)
[OpenWRT 介紹以及應用情境](https://note-on-clouds.blogspot.com/search?q=OpenWRT)
[OpenWRT: WiFi 網路的開放平台](https://openwrt-nctu.gitbook.io/project/)
[Openwrt development am335x beginner](https://www.programmersought.com/article/77343556635/)
[OpenWrt系統及新增自開發軟體](https://www.itread01.com/content/1545217025.html)
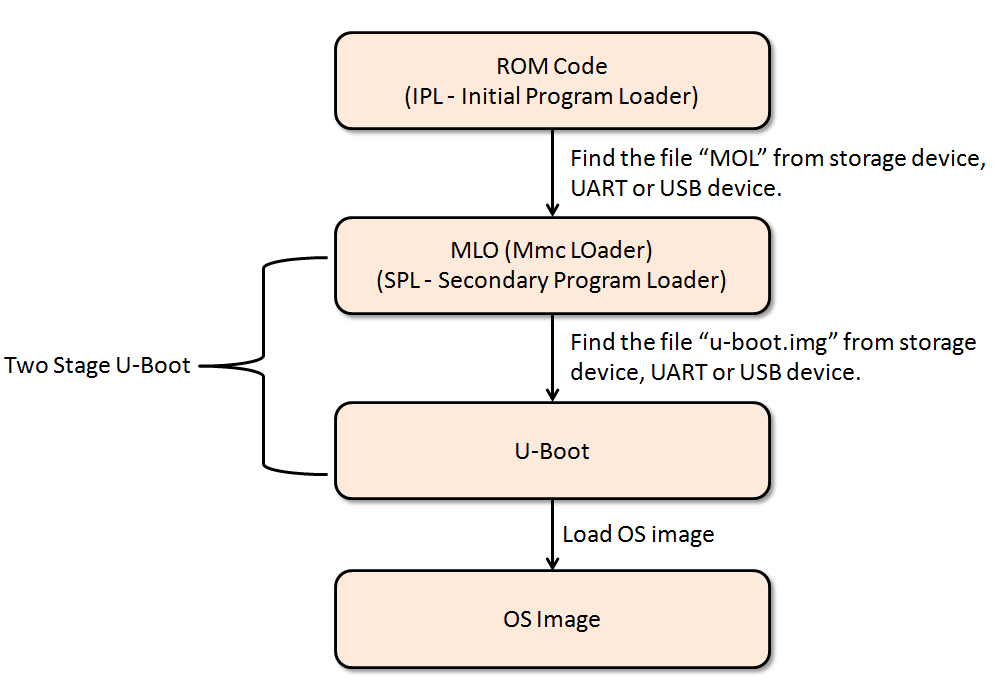
# Overview to AM335x Boot Sequence
:::info
ROM Code主要有幾項任務: - Stack Setup - Watchdog timer 1 configuration (set to three minutes) - System clock configuration - Search bootable devices (must be the FAT 12/16/32 partition) for a valid booting image (the image name must be MLO) - Load the content of the file “MLO” from a bootable device to internal RAM (the 128KB on-chip memory) - Execute the file “MLO” stored in internal RAM
:::
### 參考資料:
[Embedded Linux Boot Sequence](https://kernelmasters.org/blog/2020/06/30/embedded-linux-boot-sequence/)
[AM335x ARM Cortex-A8 Boot Sequence](http://wiki.csie.ncku.edu.tw/embedded/rt-thread)
[AM335x booting ](http://lirobo.blogspot.com/2014/06/am335x-booting.html)
[AM335x U-Boot User's Guide](https://blog.csdn.net/yaked/article/details/41515793)
[uboot 命令列操作簡介](http://pominglee.blogspot.com/2013/12/uboot.html)
## Setting the board
```htmlembedded
Hardware setup: PC <-> USB_to_RS485(D+/D-) <-> board(D+/D-)
board connect power supply(DC 12v)
Software setup:
environmant: ubuntu
terminal: putty or minicom (baudrate:115200)
first. open the terminal and listen comport before power-on
second. terminal will show U-boot info like...
---------------------------------------------------
U-boot SPL 2019.01 (Jan 30 2019 - 12:21:02 +0000)
>>>am33xx_spl_board_init
Enabling Spread Spectrum for DISP
Trying to boot from NAND
...
...
...
Hit any key to stop autoboot: 3
---------------------------------------------------
third. press 'Enter' when info show 'Hit any key to stop autoboot:'
forth. step by step enter cmd
=> fatload mmc 0 0x80000000 MLO && nand erase 0x00000000 0x00080000 && nand write 0x80000000 0x00000000 0x00080000
'
response:
109596 bytes read in 9 ms (11.6 MiB/s)
NAND erase: device 0 offset 0x0, size 0x80000
Erasing at 0x40000 -- 100% complete.
OK
NAND write: device 0 offset 0x0, size 0x80000
524288 bytes written: OK
'
=> fatload mmc 0 0x80000000 u-boot.img && nand erase 0x00280000 0x00100000 && nand write 0x80000000 0x00280000 0x00100000
'
response:
996940 bytes read in 66 ms (14.4 MiB/s)
NAND erase: device 0 offset 0x280000, size 0x100000
Erasing at 0x340000 -- 100% complete.
OK
NAND write: device 0 offset 0x280000, size 0x100000
1048576 bytes written: OK
'
=> fatload mmc 0 0x80000000 image-am335x-evm.dtb && nand erase 0x00200000 0x00080000 && nand write 0x80000000 0x00200000 0x00080000
'
response:
39893 bytes read in 4 ms (9.5 MiB/s)
NAND erase: device 0 offset 0x200000, size 0x80000
Erasing at 0x240000 -- 100% complete.
OK
NAND write: device 0 offset 0x200000, size 0x80000
524288 bytes written: OK
'
=> fatload mmc 0 0x80000000 openwrt-omap-am335x-evm-initramfs-kernel.bin && nand erase 0x00500000 0x01000000 && nand write 0x80000000 0x00500000 0x01000000
'
response:
14463136 bytes read in 936 ms (14.7 MiB/s)
NAND erase: device 0 offset 0x500000, size 0x1000000
Erasing at 0x14c0000 -- 100% complete.
OK
NAND write: device 0 offset 0x500000, size 0x1000000
16777216 bytes written: OK
'
fifth. turn the power 'off' and 'on' again
Hint:
Clear flash cmd : 'nand erase.chip'
minicom: cannot open /dev/modem: No such file or directory :
'sudo ln -s /dev/ttyS0 /dev/modem'
Error opening /dev/sdb: No medium found: 'sudo eject -t /dev/sdb'
The board does not boot up(maybe error reason->Disk identifier: 0x00000000):
first. Format sd card:
*look for all available devices cmd : 'lsblk'
*format device (Securely Wipe Up the Data):
'sudo dd if=/dev/zero of=/dev/sdb bs=4096 status=progress'
*Format with FAT32:
'sudo parted /dev/sdb --script -- mklabel msdos'
*Create a FAT32 partition that takes the whole space:
'sudo parted /dev/sdb --script -- mkpart primary fat32 1MiB 100%'
*Format the boot partition to FAT32:
'sudo mkfs.vfat -F32 /dev/sdb1'
second. Check the SD bootable partition:
*Into SD : 'sudo fdisk /dev/sdb'
*print disk partition: 'p'
*partition type: 't' change to 'W95 FAT32 (LBA)'
*set bootable flag: 'a'
*write table to disk and exit: 'w'
third. copy files to SD card
```
### 參考資料:
[如何在 Linux 上格式化 USB 驅動器和 SD 卡](https://linuxize.com/post/how-to-format-usb-sd-card-linux/)
[C/C++ 中的 static, extern 的變數](https://medium.com/@alan81920/c-c-%E4%B8%AD%E7%9A%84-static-extern-%E7%9A%84%E8%AE%8A%E6%95%B8-9b42d000688f)
# 更改ubuntu terminal be colorful
`vim ~/.bashrc`
若找不到~/.bashrc
`cp /etc/bash.bashrc ~/.bashrc`
於最後貼上
```
if [ "$color_prompt" = yes ]; then
PS1='${debian_chroot:+($debian_chroot)}\[\033[01;32m\]\u@\h\[\033[00m\]:\[\033[01;34m\]\w\[\033[00m\]\$ '
else
PS1='${debian_chroot:+($debian_chroot)}\u@\h:\w\$ '
fi
unset color_prompt force_color_prompt
# Set color_prompt
PS1='${debian_chroot:+($debian_chroot)}\[\033[01;32m\]\u\[\033[00m\]@\[\033[01;36m\]\h\[\033[00m\]:[\[\033[01;34m\]\w\[\033[00m\]]\$ '
# If this is an xterm set the title to user@host:dir
case "$TERM" in
xterm*|rxvt*)
PS1="\[\e]0;${debian_chroot:+($debian_chroot)}\u@\h: \w\a\]$PS1"
;;
*)
;;
esac
export LS_OPTIONS='--color=auto'
eval "$(dircolors -b)"
alias ls='ls $LS_OPTIONS'
```
存檔後, `source ~/.bashrc`
## 只要打指令的前幾的字,或是 branch 名稱的前幾個字,就可以用 TAB 自動完成剩下的部分
只要打指令的前幾的字,或是 branch 名稱的前幾個字,就可以用 TAB 自動完成剩下的部分
> 若你所安裝的 git 預設已經有這個功能,則不需要安裝
如何安裝設定:
下載 git-completion.bash,存到 ~/.git-completion.sh
在 ~/.bash_profile 加上 [ -f ~/.git-completion.sh ] && . ~/.git-completion.sh
重開終端機
```shell
curl https://raw.githubusercontent.com/git/git/master/contrib/completion/git-completion.bash > ~/.git-completion.sh
$ echo "" >> ~/.bash_profile
$ echo "# git completion" >> ~/.bash_profile
$ echo "[ -f ~/.git-completion.sh ] && . ~/.git-completion.sh" >> ~/.bash_profile
$ source ~/.bash_profile
```
# Server build codimd
安裝環境:
Docker for windows
git
下載指令
```shell
$ git clone https://github.com/codimd/container.git codimd-container
$ cd codimd-container
$ docker-compose up
```
進入docker container
```dockerfile
docker-compose exec codimd bash
```
進入docker SQL(postgres)
```dockerfile
範例:docker exec -it my-postgres psql -U postgres
docker exec -it 6c48b480500d psql -U codimd
```
SQL cmd:(for example)
```sql
SELECT "email","password" FROM "Users" ;
SELECT * FROM "Notes" ;
SELECT "alias","id","shortid","title","ownerId" FROM "Notes";
SELECT "email","id" FROM "Users";
```
:::info
hint
\l: List of databases
\c: Connect to databases ex: \c codimd
\dt: list tables
docker內安裝vim:
docker exec -u root -it e444ac9c514f bash -c "apt-get update&&apt-get install -y vim"
:::
# TCP Server
概念補充:https://beej-zhtw-gitbook.netdpi.net/whatissocket/liang_zhong_internet_sockets
struct addrinfo由getaddrinfo()返回,並在成功時包含針對指定主機名和/或服務的此類struct的鏈接列表(linklist)。
ai_addr成員實際上不是struct sockaddr,因為該struct只是一個通用類,其中包含所有其他成員的通用成員,並用於確定您實際擁有的結構類型。根據傳遞給getaddrinfo()的內容以及發現的功能的不同,ai_addr實際上可能是struct sockaddr_in或struct sockaddr_in6或其他的指針,具體取決於該特定地址條目的內容。
```c
struct addrinfo {
int ai_flags; // AI_PASSIVE, AI_CANONNAME, etc.
int ai_family; // AF_INET, AF_INET6, AF_UNSPEC
int ai_socktype; // SOCK_STREAM, SOCK_DGRAM
int ai_protocol; // use 0 for "any"
size_t ai_addrlen; // size of ai_addr in bytes
struct sockaddr *ai_addr; // struct sockaddr_in or _in6
char *ai_canonname; // full canonical hostname
struct addrinfo *ai_next; // linked list, next node
};
struct sockaddr {
unsigned short sa_family; // address family, AF_xxx
char sa_data[14]; // 14 bytes of protocol address
};
```
## Linked list of addrinfo’s
struct addrinfo 一個有趣的方面是它也是linklist中的一個節點。 ai_next 字段存儲指向下一個 addrinfo 的指針,該地址存儲其他解析為域的 IP 地址。 最終,ai_next 引用了 NULL,它表示列表的結尾。 我們現在可以像這樣遍歷 addrinfo 的linklist:
```c
struct addrinfo * cur_result, *results, hints;
//...
//Convert the hostname to an address
if ((s = getaddrinfo(argv[1], NULL, &hints, &result)) != 0) {
fprintf(stderr, "getaddrinfo: %s\n",gai_strerror(s));
exit(1);
}
for (cur_result = result; cur_result != NULL; cur_result = cur_result->ai_next) {
// do something with the current result
}
```
## IPv4 vs IPv6
要考慮的 addrinfo 結構的最後一個方面是 ai_family,它描述了已解析的地址類型。 這可以是 IPv4 (AF_INET) 或 IPv6 (AF_INET6)。 我們主要關注 IPv4,因此您可以將 ai_family 與 AF_INET 進行比較,以確保您只訪問正確 IP 地址的解析:
```c
if (cur_result->ai_family == AF_INET) { /* ... */ }
```
### 參考資料
[openssl](https://breezetemple.github.io/2019/04/09/ssl-programming/)
[TCP Server](https://www.geeksforgeeks.org/tcp-server-client-implementation-in-c/)
[C語言-struct、union、enum](http://gundambox.github.io/2015/10/30/C%E8%AA%9E%E8%A8%80-struct%E3%80%81union%E3%80%81enum/)
https://www.cnblogs.com/yjf512/category/385367.html?page=2
https://www.cnblogs.com/skyfsm/p/7079458.html
[Socket筆記](https://www.kshuang.xyz/doku.php/programming:c:socket)
### json_object_array_put_idx.c
```C
#include <json/json.h>
#include <stdio.h>
/*
http://linuxprograms.wordpress.com/2010/08/19/json_object_array_put_idx/
Input:
NONE
Output:
{
"Categories":[
null,
null,
"c",
"c++",
"php"
]
}
*/
int main() {
/*Creating a json object*/
json_object * jobj = json_object_new_object();
/*Creating a json array*/
json_object *jarray = json_object_new_array();
/*Creating json strings*/
json_object *jstring[3];
jstring[0] = json_object_new_string("c");
jstring[1] = json_object_new_string("c++");
jstring[2] = json_object_new_string("php");
/*Adding the above created json strings to the array*/
int i;
for (i=0;i<3; i++) {
json_object_array_put_idx(jarray,i+2, jstring[i]);
}
/*Form the json object*/
json_object_object_add(jobj,"Categories", jarray);
/*Now printing the json object*/
printf ("%s\n", json_object_to_json_string(jobj));
}
```
## enum to string (lookup table)
```c
#include <stdio.h>
typedef enum
{
north,
south,
east,
west
} E_directions;
struct direction_datum
{
E_directions direction;
char direction_name[6];
};
struct direction_datum direction_data[] =
{
{north, "north"},
{south, "south"},
{east, "east"},
{west, "west"},
};
#define ARRAY_LENGTH(A) sizeof(A) / sizeof(*A)
char *Get_text_from_enum(int enum_value,
void *array,
unsigned int array_length,
unsigned int size_of_array_entry)
{
unsigned int i;
unsigned int offset;
for (i = 0; i < array_length; i++)
{
offset = i * size_of_array_entry;
if ((int) * ((int *) (array+ offset)) == enum_value)
return (char *) (array + offset + sizeof(int));
}
return NULL;
}
int main()
{
printf("Expect south, got %s\n",
Get_text_from_enum(south,
direction_data,
ARRAY_LENGTH(direction_data),
sizeof(direction_data[0])));
return 0;
}
```
```c
#include <stdio.h>
typedef enum
{
north,
south,
east,
west
} E_directions;
typedef struct EnumName {
int value;
const char *name;
} EnumName;
const EnumName direction_data[] =
{
{north, "north"},
{south, "south"},
{east, "east" },
{west, "west" },
{0, NULL },
};
const char *Get_text_from_enum(int enum_value, const EnumName *names)
//const char *Get_text_from_enum(E_directions enum_value, const EnumName *names)
{
while (names->value != enum_value && names->name != NULL)
names++;
return names->name;
}
int main(void)
{
printf("Expect south, got %s\n",
Get_text_from_enum(south, direction_data));
}
```
{"metaMigratedAt":"2023-06-16T03:28:25.692Z","metaMigratedFrom":"Content","title":"**Job notebook**","breaks":true,"contributors":"[{\"id\":null,\"add\":69,\"del\":1}]"}