---
slideOptions:
transition: slide
---
# 第四次(2)
###### tags: `課程`
---
## 1. DOM
----
### 什麼是DOM?
Document Object Model
----
描述每個網頁頁面的資料結構,長的像是一棵樹的樣子。
裡面包含了網頁中每個文字、圖片、連結、標籤的資訊。
----
其實從html檔案的結構就可以看出DOM樹狀結構的端倪
```= html
<!DOCTYPE html>
<html>
<head>
<title>example</title>
</head>
<body>
<h1 class="txt">Hello World</h1>
</body>
</html>
```
----
----
從DOM的根節點遍歷就可以得到所有節點(也就是所有元素)
```= js
function dom_bfs() {
let root = document;
let q = [];
q = [root, ...q];
while (q.length != 0) {
let front = q.pop();
console.log(front.nodeName);
for (let child of front.childNodes) {
q = [child, ...q];
}
}
}
```
----
### 如何操作DOM?
----
上古時代用原生JS操作DOM十分不方便,所以出現了JQuery。
但現在原生JS已經進化了,所以我們這邊先介紹用原生JS操作DOM的方法。
----
### 選取元素-1
```
# 回傳單一元素
document.querySelector()
# 回傳所有符合的元素
document.querySelectorAll()
```
> 這邊的`document`就是DOM的根節點
----
### 選取元素-2
querySelector裡面可以放**標籤**、**ID**、**ClassName**等等
還可以進一步選取元素裡面的屬性
`document.querySelector("button[type=submit]")`
----
### 新增元素
```
# 建立一個新的元素
hello = document.createElement("h1")
# 選取父元素
div = document.querySelector("#append_div")
# 將h1加到父元素底下
div.appendChild(hello)
# 在h1下新增text子節點
hello.appendChild(document.createTextNode("hello!"))
```
----
### 刪除元素
```
# 選取hello, world元素
hello = document.querySelector("#hello")
# 刪除該元素
hello.remove()
```
----
### 修改元素Class
```
# 選取一元素
hello = document.querySelector("hello")
# 新增一個class
hello.classList.add()
# 移除一個class
hello.classList.remove()
# toggle一個class
hello.classList.toggle()
# 元素是否包含該class
hello.classList.contains()
```
----
### 修改元素屬性
```
# 選取一元素
hello = document.querySelector("hello")
# 更改元素屬性
hello.屬性名稱 = 屬性值
# 更改元素type
hello.type = "submit"
---------------
# 更改元素css
hello.style.css名稱 = css值
# 更改元素css顏色
hello.style.color = "red"
```
----
### 監聽事件
```
# 選取元素
btn = document.querySelector("button")
# 設定click eventListener
btn.addEventListener('click', (event) => {
// 在btn被按下之後要做的事情...
// e.g, 關閉開啟的modal
})
# 設定keyboard eventListener
document.addEventListener('keydown', (event) => {
console.log(event.code, event.key, event.keyCode)
})
```
----
### stopPropagation()-1
> 阻止事件冒泡
每個事件產生都會有個`event`紀錄該次事件的內容及狀態
```
propBtn = document.querySelector("#propBtn")
propBtn.addEventListener('click', (event) => {
console.log("prop btn clicked!")
// event.stopPropagation()
})
```
----
### stopPropagation()-2
```
innerDiv = document.querySelector("#inner")
innerDiv.addEventListener('click', (event) => {
console.log("inner div clicked!")
// event.stopPropagation()
})
outerDiv = document.querySelector("#outer")
outerDiv.addEventListener('click', (event) => {
console.log("outer div clicked!")
// event.stopPropagation()
})
```
----
### preventDefault()
> 阻止預設動作發生
e.g, F5, `<a>`
```
document.addEventListener('keydown', (event) => {
event.preventDefault()
console.log(event.code, event.key, event.keyCode)
})
```
----
### Example: 選取元素+修改元素css+監聽事件
```
hello = document.querySelector("#hello")
btn = document.querySelector("button")
btn.addEventListener('click', (event) => {
if (hello.style.display === "none")
hello.style.display = "block"
else
hello.style.display = "none"
})
```
---
## 2. AJAX
----
### 什麼是AJAX?
----
Ajax全名為**Asynchronous javascript and XML**
上古時期沒有ajax的時候,更新網頁需要按F5,重新向伺服器請求新的網頁、資料內容
但有了ajax後,不需要按F5(省去重新繪製頁面、減少等待伺服器回應、提昇使用者體驗)便可以更新網站頁面、資料內容。
----
### 哪裡有AJAX?
----
1. Spotify
2. Google搜尋提示字
3. Gmail
----
### JS is single-threaded
> 一次只能執行一件事
缺點: 只要有一個指令卡住,整個都會卡住(blocking)
----
### Asynchronous(非同步)?
<!-- 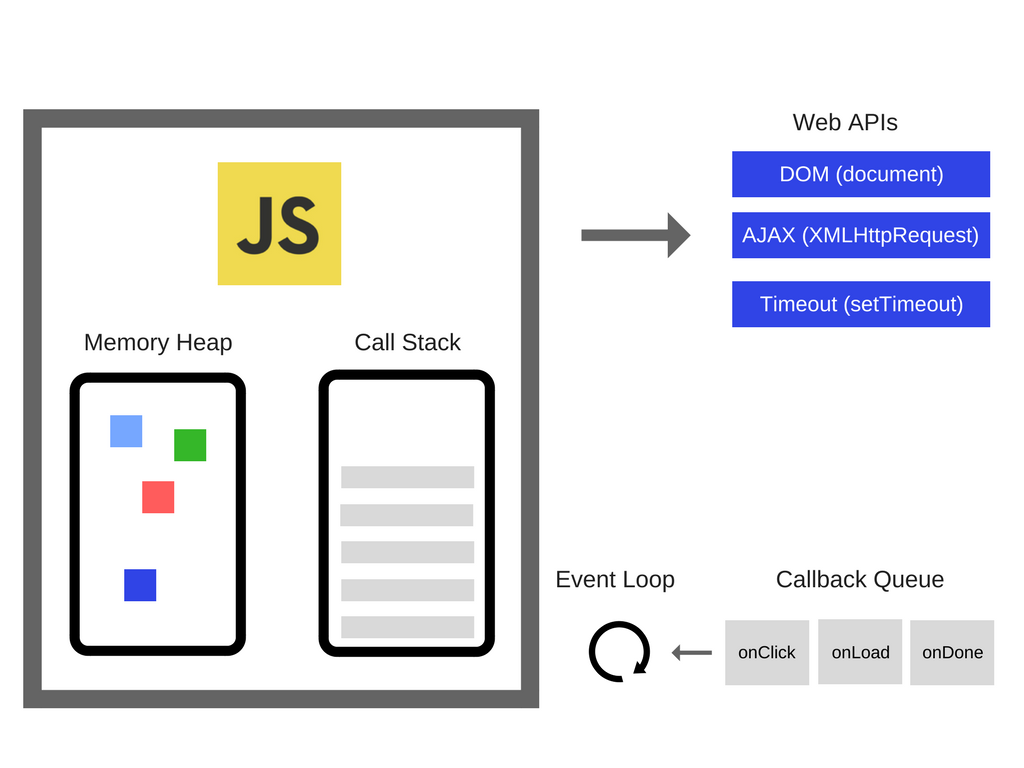 -->

DOM, HTTP request, AJAX都是browser Web APIs所提供
----
### Callback function
時機、事件觸發才執行的function(從callback queue中回到js runtime stack才執行)
```
console.log("before")
window.setTimeout(() => {
console.log("async call")
}, 0)
console.log("after")
```
----
### Callback Hell

----
### AJAX in Javascript
----
### 原生JS使用AJAX-1
* [ajax get url](https://ptx.transportdata.tw/MOTC/v2/Tourism/ScenicSpot?$top=30&$format=JSON)
```
# 發送GET請求
let res = await fetch('get url')
let resJson = await res.json()
```
----
### 原生JS使用AJAX-2
* [ajax post url](https://ncufresh-cloudrun-p2qvm7cmaq-uc.a.run.app/users/Hello)
```
# 發送POST請求
let data = {"title": "新知網", "content": "POST req"}
let res = await fetch('post url', {
body: JSON.stringify(data),
method: "POST",
headers: new Headers(
{"Content-Type": "application/json"}
)
})
await res # 取得server response info
```
----
### 不使用async, await(Promise寫法)
```
# 發送GET請求
fetch('get url')
.then((res) => {
return res.json()
})
.then((myJson) => {
console.log(myJson)
})
# 發送POST請求
let data = {"title": "新知網", "content": "POST req"}
fetch('post url', {
body: JSON.stringify(data),
method: "POST"
}).then((res) => {
return res.json()
}).then((myJson) => {
console.log(myJson)
})
```
---
## 3. Practice: 簡單備忘錄
----
### 功能
使用express(不用用到mongodb),運用AJAX、JS操作,在不用F5更新頁面的情況下,**新增/刪除/修改** 備忘錄內容
----
### api簡介
* [API網址](https://ncufresh-cloudrun-p2qvm7cmaq-uc.a.run.app/)
* 我很懶,沒防SQL injection, XSS,大家不要打QQ
* 正常使用應該流量不會爆
----
#### GET /
取得所有使用者的所有memo
----
#### GET /users/:使用者名稱
取得指定使用者名稱的memo,沒有該使用者得到status 404
----
#### POST /users/:使用者名稱
以指定使用者的身份新增新的memo
```
{
"title": "你的memo的title",
"content": "你的memo的content"
}
```
----
#### PUT /memoID/:memo的ID
以指定使用者的身份修改指定memo ID的memo
```
{
"user": "你想要改的user名稱"
"title": "你想要改的memo title",
"content": "你想要改的memo content"
}
```
----
#### DELETE /memoID/:memo的ID
以指定使用者的身份刪除指定memo ID的memo
----
#### Simple Memo Reference
https://github.com/flyotlin/SimpleMemoExample
---
## 4. Reference
* https://jmln.tw/blog/2017-07-07-vanilla-javascript-dom-manipulation.html
* https://dev.to/hanakivan/checking-which-keyboard-key-was-pressed-in-javascript-update-for-2020-1i86
* https://ithelp.ithome.com.tw/articles/10198999
* https://developer.mozilla.org/zh-TW/docs/Web/API/Fetch_API/Using_Fetch
* https://www.youtube.com/watch?v=8aGhZQkoFbQ&t=344s
* https://developer.mozilla.org/zh-TW/docs/Web/JavaScript/EventLoop
* https://eyesofkids.gitbooks.io/javascript-start-from-es6/content/part4/callback.html
 Sign in with Wallet
Connect another wallet
Sign in with Wallet
Connect another wallet