h1 - Course Title
h2 - Lesson Title
h3 - sub-titles in lesson
# Introduction to Digital Forensics
## Course Objectives
After completing this course, you will be able to:
+ What is Digital Forensics and why do we need it?
+ Define basic definitions/concepts in Digital Forensics.
+ What all steps in Digital Forensics Process.
+ What is a Digital Evidence?
+ Understand different categories in Digital Forensics.
+ Challenges in Digital Forensics.
## What is Digital Forensics?
Digital Forensics is a science which deals with techniques used to track the **footprints** left behind a cyber attack.
Digital Forensics can also be defined as the process of collecting, preserving, analysing, interpreting, and documenting digital evidence and presenting the outcome.
Digital forensics is directly linked to any cybercrime which has data loss and recovery. Some examples include investigation on possible **forged digital signatures, the authenticity of images, analysis of malicious software** etc.
## Why is Digital Forensics needed?
TBA
## Why does Security industry need Digital Forensics?
When we talk about employment, research or anything, Cyber Forensics is one of the prime areas which comes into a security analyst's mind. Forensics is strongly employed in **Incident Response, Malware Analysis, Data leak protection**. Actually, to sum it up, every cybercrime is always related to cyber forensics.
To really understand this, let us look into a very dangerous virus attack which almost started world war III. **Stuxnet** was a virus which was found lurking in the systems which controlled nuclear centrifuges in Iran. Stuxnet had a stolen yet officially authorised digital signature which acted as a very good camouflage. Stuxnet made the windows systems constantly reboot or lead them to **Blue Screen of Death**. Stuxnet could easily affect any computer which was linked to the network. It was really difficult for security experts to trace it. It severely affected the **SCADA systems** which were employed in maintaining the rotation speed of the centrifuges. After heavy investigation, when several forensic analysts looked into the SCADA network transfer, they found a malicious program being run which altered the system processes. The main aspect which made Stuxnet almost invisible was that it became active only when its target was present or being run. Until then the virus remained dormant. So as you can see, Cyber forensics played a huge role in the detection of the virus.
### Handy definitions:
**Cyber Espionage**: Use of computer networks to get access to confidential information held by important organizations.
**Hacktivism**: Act of hacking which is mainly done for a political purpose.
**Cyber Warfare**: Cyber attacks are done on state organizations to gain military secrets etc.
## What is a Digital Evidence?
Digital evidence or electronic evidence is the information or data stored or transmitted in a format that can be presented in the court. It is generally found on a computer hard-drive, a mobile phone, etc. It is commonly assosiated with electronic crime or e-crime such as child pornography or credit card fraud. However Digital evidence is now being used in all types of crimes, not just e-crime.
< image with all types of digital evidences >
## Digital Forensics Process
Digital Forensics has 6 crituial steps. They are:
1. Identification
2. Preservation
3. Collection
4. Analysis
5. Documentation
6. Presentation

### Identification
This is the 1st step in the process. Where investigator identifies what evidence is present, where it is stored, and finally how is it stored.
### Preservation
This is the next step, where the investigator preserves the evidence such that it is not tampered. Tamparing includes, altration, addition, or deletion of files/data etc.
### Collection
This step involves acquiring the evidence without causing any damage to the evidence. In this step, Investigator creates a copy of the evidence to conduct analysis.
### Analysis
This is one of the important step, where the investigator conducts automatic tools and manual analysis on the copied evidence.
### Documentation
In this step, investigator writes down/documents all pieces of analysis he did on the evidence that was acquired(In short, a detailed report). It includes how the evidence was acquired, and analysed, what all tools were used during the analysis phase and who all analysed the evidence.
### Presentation
In this step, The Digital Forensics investigator, should be able to present the results of the investigation to the person/organisation that requested it.
## Different Branches in Digital Forensics
There are different branches in Digital Forensics, some of them are:
1. File Forensics
2. Network Forensics
3. Memory Forensics
4. Computer Forensics
5. Mobile Forensics
6. Multimedia Forensics
7. Email Forensics
8. Web Forensics
9. Cloud Forensics
10. Database Forensics
11. Live Forensics
and so on...
< mind map can be included here >
## Challenges in Digital Forensics
---
# File Forensics
+ Basic definitions
+ File signature
+ https://en.wikipedia.org/wiki/File_format#Magic_number
+ Various file signatures
+ https://en.wikipedia.org/wiki/List_of_file_signatures
+ Chunks
+ https://en.wikipedia.org/wiki/Chunk_(information)
+ Various file formats
+ Portable Network Graphics
+ http://libpng.org/pub/png/spec/1.0/png-1.0.pdf
+ From the above PDF, read the following sections:
+ 2.4 Image Layout
+ 3.1 PNG File Signature
+ 3.2 & 3.3
+ Also the entire 4.1 Critical Chunks (Other topics can be read but not very much recommended for CTFs)
+ JPEG
+ https://en.wikipedia.org/wiki/JPEG
+ Only need to learn about the File signature and the offset of certain important bytes like the height and width
+ ZIP (PkZIP)
+ https://en.wikipedia.org/wiki/Zip_(file_format)#Design
After learning about the above file-formats, solve the below challenges:
+ https://app.traboda.com/challenge/41
+ https://app.traboda.com/challenge/730
# Steganography
*Prerequisite: File Forensics*
## What is Steganography?
Steganography is an art of hiding data/important/secret message within an ordinary file(like Image, Audio files) in order to avoid detection.
The advantage that steganography has over cryptography is that the hidden data does not attract serious attention. However, when someone sees a cryptographic data, they'll immediately recognize that this data is encrypted. Though the extraction of the hidden message is difficult in cryptography, steganographic data looks less malicious!!
## Why is steganography used?
Let us consider that a person "A" is sending something secret to person "B". Let us consider that the agent who is going to transfer this secret is "C". If "A" uses some kind of cryptographic techniques, "C" will definitely notice that some sort of a secret message is getting transferred and he'll try all possible way to decrypt it. So "A" has to use some technique so that "C" won't bother into examining the hidden message. This is why steganography is used. The message which is to be transferred will definitely look less malicious.
## Screening tools
Tools to run in the beginning, to give us a broad idea of what type of file you are dealing with.
| Tool | Description | How to use |
|:----:|:--------------------------------:|:-----------------------------------------------:|
| file | Check what kind of file you have | `file image.png` |
| exiftool | Check out metadata[^1] of files | `exiftool image.png` |
| strings | Check interesting readable characters in a file | `strings image.png` |
| foremost | Extract embedded/appended[^2] files | `foremost image.png` |
| pngcheck | Get details about a PNG file | `pngcheck image.png` |
| binwalk | Get details about the embedded/appended in files | `binwalk image.png` |
| dd | Extract embedded/appended from files | `dd if=<input_file> of=<output_file> skip=1 bs=<bytes_to_skip>` |
[^1]: Data that describes and gives information about other data.
[^2]: Data added after an End of File(EOF).
There are a lot of tools available for steganography, you can use this shell script to install most important tools for analysis.
:::warning
Run this only in any **Linux/Ubuntu** distributions. It might give error while installing using WSL.
:::
```shell=
wget https://gist.githubusercontent.com/bolisettynihith/1389a475a955125eca02e08c13ffc0a9/raw/7a051ee2936caf078c5b089d39cbdf032f326c89/tools_stego.sh
chmod +x tools_stego.sh
sudo ./tools_stego.sh
```
# Steganography Tools
## Screening tools
These are the basic tools which can be used for ideal screening of the files.
### Exiftool
It is a tool that is used mainly to read metadata in files.
#### Installation
```sh
$ sudo apt install exiftool
```
#### Usage
```bash
$ exiftool <file-name>
```
Exiftool gives the metadata of a file as its output. This data can be used for further analysis regarding the file type and its data. On a CTF point-of-view, we might get clues and hints or information that might turn out to be crucial for finding the flag.
> Tip
> _strings_ is a bash command that shows all the ASCII strings in the file that is passed into the command. In CTFs it is often seen that sometimes some clues or even the flag can be found as an ASCII string inside the given challenge file. Way to use:
```sh
$ strings <file-name>
```
#### References
For more information about the tool,
```bash
$ man exiftool
```
---
### GHex
Ghex is a tool which helps us to view and edit the hex data or hex dump of an image.
#### Installation
```sh
$ sudo apt install ghex
```
#### Usage
```sh
$ ghex image.jpg
```
Using ghex we can see the headers, footers, and the data chunks of an image. It is to be noted that ghex can be used for all types of files not only images.
#### References
For more information about the tool,
```bash
$ man ghex
```
---
### Binwalk
It is a tool used mainly for searching embedded files and executable code within another data file.
#### Installation
```sh
$ sudo apt install binwalk
```
#### Usage
```bash
$ binwalk -e <file-name>
```

Here in the above image, we see that there is a 'jpg image' that has a compressed 'images' in it and we see that it is, it is embedded within the jpg image file. To extract it we can make use of a carving tool **dd**. It can carve out data from specific offsets that are passed as arguments to the tool along the with the file that needs to be read. Give the following command:
```sh
$ dd if=deeper.jpg of=image1.jpg bs=1 skip=202
```
Where at _if=_ the file from which data has to be extracted is passed as an argument and _of=_ has the name of the file that we give after extraction. _skip=_ is the offset of the file that has to be read and _bs=_ i the byte skip argument that specifies the frequency of reading data from the given file.
#### References
For more information about the tool,
```bash
$ man binwalk
```
---
### Steghide
It is used to embed and extract secret messages in images. It supports all the general formats of images like .png, .jpg etc.
#### Installation
```sh
$ sudo apt install steghide
```
#### Usage
To embed a secret message into an image
```sh
$ steghide embed -cf image.jpg -ef secret_message.txt
Enter passphrase : ********
Re-Enter passphrase : ********
embedding "secret_message.txt" in "image.jpg"... done
```
To extract the secret message from the image
```sh
$ steghide extract -sf image.jpg
Enter passphrase : ********
wrote extracted data to "secret_message.txt".
```
For any help with the commands type
```sh
$ steghide --help
```
It is important to note that the password may not always be a plain text sentence.
Sometimes it may be hashed. Some examples of hashes include MD5, sha1 etc. We all know that there is no specific way to reverse the hashes. But, there are websites which store hashes of certain commonly used strings.
Some of such websites are:
1. [HashKiller](https://hashkiller.co.uk/md5-decrypter.aspx)
2. [MD5Decrypt](http://md5decrypt.net/)
#### References
For more information about the tool,
```bash
$ man steghide
```
---
### Stegdetect
It is a tool which detects whether the given file has steganographic content or not.
#### Installation
Please clone [this](https://github.com/abeluck/stegdetect) repository before executing the following commands.
If using a 64-bit system,
```bash
$ linux32 ./configure
$ linux32 make
```
You can now run stegdetect from the local directory:
```bash
$ ./stegdetect
```
**Note**: Stegdetect tool works only for JPEG image formats.
#### Usage
To run stegdetect on a directory of JPEGs use:
```bash
for img in `find /path/to/images/ -iname "*jpg"`; do
./stegdetect -tF $img;
done
```
---
### Zmarimg
It is a tool used to scan and decode QR codes from image files
#### Installation
```bash
$ sudo apt-get install zbar-tools
```
#### Usage
```bash
$ zbarimg <file-name>
```
**Note**: Zbar can also decode QR code by webcam, for this install the following tool,
```bash
$ sudo apt-get install zbarcam
```
#### References
For more information about the tool,
```bash
$ man zbarimg
```
---
### GPG
GNU Privacy Guard (GnuPG or GPG),replacement of PGP(Pretty Good Privacy) a free-software tool used to bring out encryption, it features a versatile key management system.
#### Installation
```bash
$ sudo apt install gnupg
```
#### Usage
###### To create Public and Private Keys
```bash
$ gpg --gen-key
```
###### List Keys
```bash
$ gpg --fingerprint ibaydan
```
###### Register To Key server
```bash
$ gpg --keyserver gpg.mit.edu --send-keys 003D114F
```
###### Export Public Key in ASCII formats
```bash
$ gpg --armor --output pubkey.txt --export 'ibaydan'
```
###### Encrypt A file
```bash
$ gpg --encrypt --recipient 'ibayadan' --output ServerPass.txt.enc ServerPass.txt
```
###### Decrypt A file
```bash
$ gpg --output foo.txt --decrypt ServerPass.txt.enc
```
###### List Installed Keys
```bash
$ gpg --list-keys
```
###### Delete Key
```bash
$ gpg --delete-key ibayadan
```
###### Delete Key with Secret Keys
```bash
$ gpg --delete-secret-keys 'ibaydan@poftut.com'
```
#### References
For more information about the tool,
```bash
$ man gpg
```
---
## Protected Files Cracking
### John The Ripper
John the Ripper is a fast password cracker, currently available for many flavors of Unix, Windows, DOS,
and OpenVMS. Its primary purpose is to detect weak Unix passwords. Besides several crypt(3) password hash
types most commonly found on various Unix systems, supported out of the box are Windows LM hashes, plus
lots of other hashes and ciphers in the community-enhanced version. John can almost crack all password encrypted archives.
#### Installation
```bash
$ sudo snap install john-the-ripper
```
#### Usage
```bash
$ zip2john file.zip
```
#### Example
???question "Example file"
- [File Transfer](https://github.com/sai1274/images/blob/main/flag.zip)
```bash
$ zip2john flag.zip
flag.zip:$zip2$*0*1*0*47690c81c096c3c8*4d21*1f*7b9718219de608c6c2d860c4cf5566471d3d4bb5c73b5449ab75ac357c185c*6114d207125db9159c6a*$/zip2$:::::flag.zip
```
```bash
$ zip2john flag.zip >> hash.txt
```
```bash
$ john hash.txt
Warning: detected hash type "ZIP", but the string is also recognized as "zip-opencl"
Use the "--format=zip-opencl" option to force loading these as that type instead
Loaded 1 password hash (ZIP, WinZip [PBKDF2-SHA1 8x SSE2])
Will run 8 OpenMP threads
Press 'q' or Ctrl-C to abort, almost any other key for status
123321 (flag.zip)
1g 0:00:00:02 DONE 2/3 (2019-04-26 17:31) 0.4651g/s 16946p/s 16946c/s 16946C/s 123456..MATT
Use the "--show" option to display all of the cracked passwords reliably
Session completed
```
So the password found is **123321**, similarly we can crack the archive compressions like 7z, Rar.
#### References
For more information about the tool,
```bash
$ man john
```
---
### Steg Cracker
It is a tool used to crack passwords in files which contains hidden data.
#### Installation
For installing stegcracker we would require steghide, for installing steghide try
```bash
$ sudo apt-get install steghide -y
$ pip3 install stegcracker
```
#### Usage
```bash
$ stegcracker <file> [<wordlist>]
```
For the wordlist, an example is to use rockyou.txt
---
### Fcrackzip
Fcrackzip is a password cracking tool for ZIP files. Fcrackzip cracks the password by **Brute-Force Attack** or by a **Dictionary Attack**.
In a **Brute-force Attack** the attacker checks all the known combinations of passwords until the correct password founds.
**Dictionary Attack** involves providing a wordlist which contains a set of commonly used passwords.
#### Installation
```bash
$ sudo apt install fcrackzip
```
#### Usage
The general usage of fcrackzip for brute forcing the password is as follows.
```bash
$ fcrackzip -v -b -u <file_name.zip>
```
* -v for knowing what's going on in background. Commonly Know as **verbose**.
* -b for **brute-forcing**.
* -u for **unzip**.
* -p for setting the **initial password** for brute forcing or the file to supply password for dictionary attack.
* -D sets **dictionary mode** and reads passwords from a wordlist alphabetically.
The general usage for the dictionary attack is as follows.
```bash
$ fcrackzip -v -u -D -p <path_to_wordlist_file> <file_name.zip>
```
The common wordlist which is publicly available is [rockyou](https://github.com/brannondorsey/naive-hashcat/releases/download/data/rockyou.txt).
##### Example
Here is an example, using a dictionary attack.
On opening the zip file, we found that the file was protected.
We used dictionary attack to find the password.

In this way cracking the zip is possible when you don't know the password.
#### References
For more information about the tool,
```bash
$ man fcrackzip
```
---
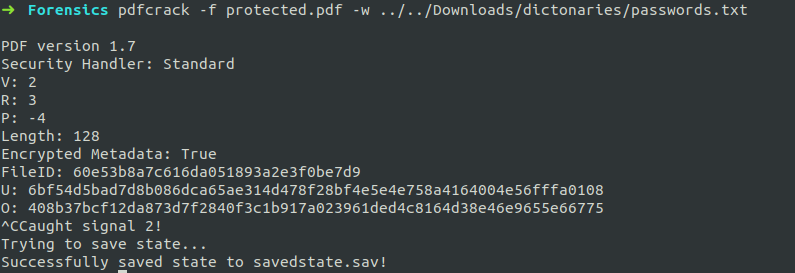
### PDFCrack
PDF Crack is a tool for recovering the pass for **Encrypted PDF files**.
**Encrypted files** means the metadata of the file was encrypted with some characters.
It has some special features like:
* Checks with the system password and also the user provided password.
* It can crack password by **brute-forcing** method only for character sets and only when we provide the maximum and minimum length of the password.
* Searches the password from the **wordlist**.
* Optimized search for owner-password when user-password is known.
#### Installation
To install PDF Crack,
```bash
$ sudo apt-get install pdfcrack
```
#### Usage
The general usage of pdfcrack for brute-forcing is,
```bash
$ pdfcrack -f <file_name>
```
The general usage of pdfcrack when we provided a wordlist is,
```bash
$ pdfcrack -f <file_name> -w <location_of_wordlist_file>
```
#### Example
Here is an example, using a wordlist. On opening the PDF, we found that the file was protected.
We used dictionary attack(using a wordlist) to find the password.
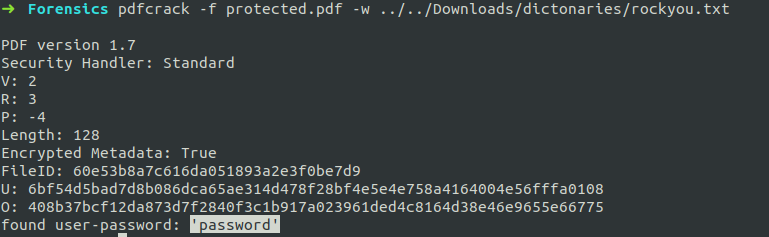
In this way cracking the password of PDF files is done when you don't know/forget the password.
If you unfortunately, click **ctrl+c** then it will save the process until you clicked into an another file called **savedstate.sav** in the directory where the PDF is present or the current directory.
For further reference visit,
```bash
$ man pdfcrack
```
## Image Analysis in different planes
### Stegsolve
It is used to analyze images in different planes by taking off bits of the image.
#### Installation
```sh
$ wget http://www.caesum.com/handbook/Stegsolve.jar -O stegsolve.jar
$ chmod +x stegsolve.jar
$ mkdir bin
$ mv stegsolve.jar bin/
```
#### Usage
Stegsolve can be invoked by placing the image in the /bin folder and running stegsolve.
```sh
$ java -jar stegsolve.jar
```
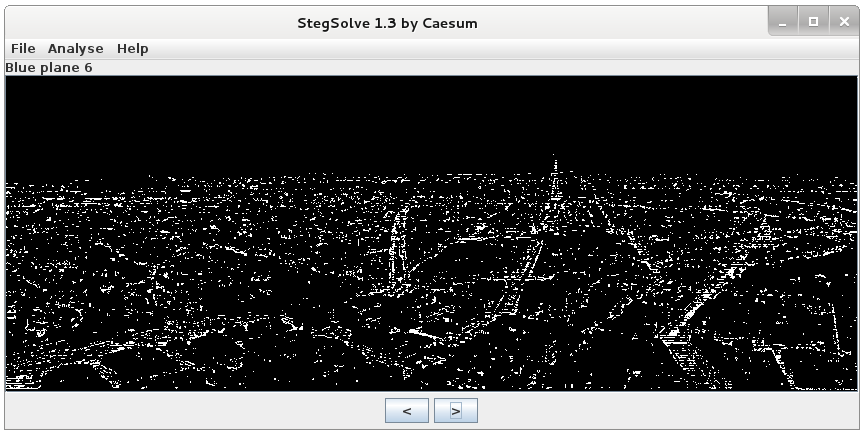
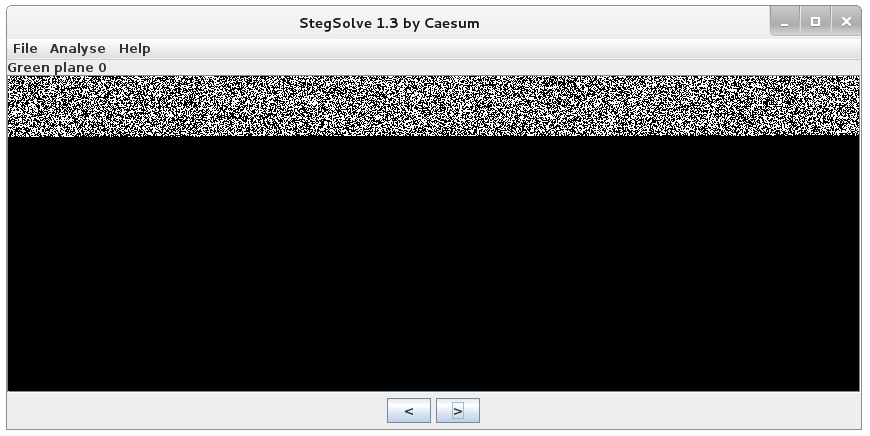
There are over 10 different planes supported by stegsolve like Alpha, Blue, Green, Red, XOR etc.
---
### Stegoveritas
It is a python based steganography tool used to give various information about any particular stego file and prints out any data embedded inside it.
#### Installation
using pip
```bash
$ pip3 install stegoVeritas
$ stegoVeritas_install_deps
```
#### Usage
```bash
$ stegoveritas <file>
```
#### References
For more information about the tool,
```bash
$ stegoveritas -h
```
## Whitespace Steganography
### Stegsnow
_Stegsnow_ is a tool for concealing messages in text files by appending tabs and whitespaces at the end of lines.The encoding used by snow relies on the fact that whitespaces and new lines won't be displayed in text editors.
#### Installation
``` bash
$ sudo apt install stegsnow
```
#### Usage
##### Encryption
Original Text File
```
Not like the brazen giant of Greek fame,
With conquering limbs astride from land to land;
Here at our sea-washed, sunset gates shall stand
A mighty woman with a torch, whose flame
Is the imprisoned lightning, and her name
Mother of Exiles. From her beacon-hand
Glows world-wide welcome; her mild eyes command
The air-bridged harbor that twin cities frame.
“Keep, ancient lands, your storied pomp!” cries she
With silent lips. “Give me your tired, your poor,
Your huddled masses yearning to breathe free,
The wretched refuse of your teeming shore.
Send these, the homeless, tempest-tossed to me,
I lift my lamp beside the golden door!”
```
###### Command
```bash
$ stegsnow -C -m "Attack At Dawn" -p "hail-hydra" NewColossus.txt NewColossusMod.txt
```
Modified Text File
```
Not like the brazen giant of Greek fame,
With conquering limbs astride from land to land;
Here at our sea-washed, sunset gates shall stand
A mighty woman with a torch, whose flame
Is the imprisoned lightning, and her name
Mother of Exiles. From her beacon-hand
Glows world-wide welcome; her mild eyes command
The air-bridged harbor that twin cities frame.
“Keep, ancient lands, your storied pomp!” cries she
With silent lips. “Give me your tired, your poor,
Your huddled masses yearning to breathe free,
The wretched refuse of your teeming shore.
Send these, the homeless, tempest-tossed to me,
I lift my lamp beside the golden door!”
```
##### Decryption
###### Command
``` bash
$ stegsnow -C -p "hail-hydra" NewColossusMod.txt
Encoded Message: Attack At Dawn
```
#### References
For more information about the tool,
```bash
$ man stegsnow
```
## PDF Files Analysis
### Peepdf
Peepdf is a Python based tool to explore PDF files in order to find out if the file can be harmful or not. The
aim of this tool is to provide all the necessary components that a security researcher could need in a
PDF analysis without using 3 or 4 tools to make all the tasks. With peepdf it's possible to see all the
objects in the document showing the suspicious elements, supports all the most used filters and
encodings, it can parse different versions of a file, object streams and encrypted files.
#### Installation
Download the tool from the official [Github Repo](https://github.com/jesparza/peepdf)
#### Usage
```bash
$ ./peepdf.py -i pdffile.pdf
```
#### Example
We will now see how to extract an embedded object file in PDFs
As we can see there is no suspiction in the pdf file when viewed normally in a pdf viewer.
So now lets load the pdf file in **peepdf**
```bash
$ ./peepdf.py -i nothing.pdf
File: nothing.pdf
MD5: 56572d46b09ef2b3de1faa4c9d5e1cb0
SHA1: 99b73b7d87815f669d54bb1c430b703d4ae827a4
SHA256: 98d1aa64f417da1a331b18c3b57d8d25e642c8f23a661e5298730c01d0a04ad2
Size: 925647 bytes
Version: 1.1
Binary: True
Linearized: False
Encrypted: False
Updates: 0
Objects: 8
Streams: 2
URIs: 0
Comments: 0
Errors: 0
Version 0:
Catalog: 1
Info: No
Objects (8): [1, 2, 3, 4, 5, 6, 7, 8]
Streams (2): [5, 8]
Encoded (1): [8]
Suspicious elements:
/Names (1): [1]
/EmbeddedFiles: [1]
/EmbeddedFile: [8]
```
As we can see there is an embedded file in the pdf.
So now we need to extract the embedded file using the stream command as follows,
```bash
PPDF> stream 8 > embedfile
```
```bash
$ file embedfile
embedfile: PNG image data, 960 x 640, 8-bit/color RGB, non-interlaced
$ xdg-open embedfile
```
We can see that there is an Image embedded in the pdf.
---
## PNG Files Analysis
### Pngcheck
A tool to test PNG image files for corruption, display size, type, compression info.
pngcheck is the official PNG tester and debugger. Originally designed simply to test the CRCs within a PNG image file (e.g., to check for ASCII rather than binary transfer), it has been extended to check and optionally print almost all the information about a PNG image and to verify that it conforms to the PNG specification. It also includes partial support for MNG animations.
It can dump the chunk-level information in the image in human-readable form. For example, it can be used to print the basic stats about an image (dimensions, bit depth, etc.); to list the color and transparency info in its palette; or to extract the embedded text annotations. All PNG and JNG chunks are supported, plus almost all MNG chunks (everything but PAST, DISC, tERm, DROP, DBYK, and ORDR). This is a command-line program with batch capabilities.
#### Installation
```bash
$ sudo apt install pngcheck
```
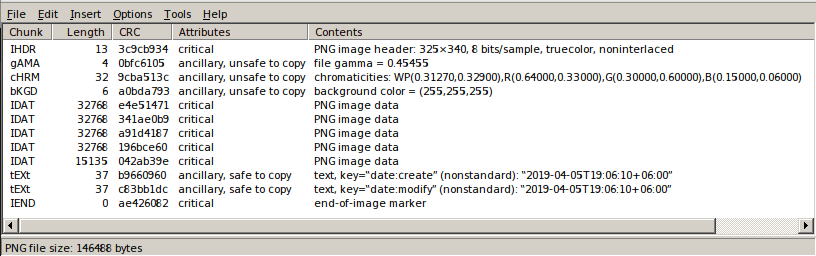
We will now use pngcheck with the following Image
#### Usage
```bash
$ pngcheck -v image.png
File: image.png (40711 bytes)
chunk IHDR at offset 0x0000c, length 13
2560 x 1440 image, 32-bit RGB+alpha, non-interlaced
chunk bKGD at offset 0x00025, length 6
red = 0x00ee, green = 0x00ee, blue = 0x00ee
chunk pHYs at offset 0x00037, length 9: 2835x2835 pixels/meter (72 dpi)
chunk IDAT at offset 0x0004c, length 8192
zlib: deflated, 32K window, maximum compression
chunk IDAT at offset 0x02058, length 8192
chunk IDAT at offset 0x04064, length 8192
chunk IDAT at offset 0x06070, length 8192
chunk IDAT at offset 0x0807c, length 7799
chunk IEND at offset 0x09eff, length 0
No errors detected in image.png (9 chunks, 99.7% compression).
```
#### References
For more information about the tool,
```bash
$ man pngcheck
```
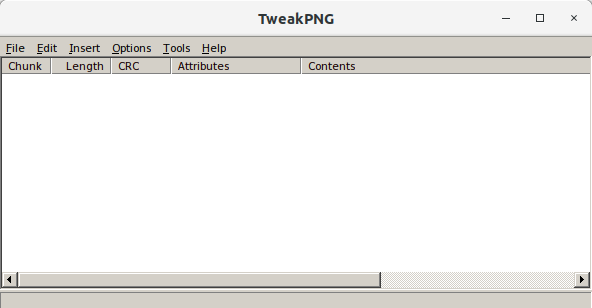
### TweakPNG
TweakPNG is a low-level utility for examining and modifying PNG image files. It supports Windows XP and higher. In order to make much use of it, you have to be at least familiar with the internal format of PNG files. This is a windows based tool so we need to install a tool called **wine** to run TweakPNG on Linux.
#### Installation
Installation for wine can be done by executing the following command.
```bash
$ sudo apt install wine-stable
```
TweakPNG executable can be downloaded from [here](http://entropymine.com/jason/tweakpng/).
#### Usage

Let's open this **PNG** image in TweakPNG and examine it.
Open 64-bit version of TweakPNG using wine. The syntax is as follows.
```bash
$ wine tweakpng.exe
```
Then the following window will be displayed.
Now, if the above cat image is opened in TweakPNG, the following window will be displayed.
#### References
For an in-depth understanding on PNG file structure , click [here](http://www.libpng.org/pub/png/pngdocs.html).
## Audio Files Analysis
### Sonic Visualiser
Sonic-Visualiser is also a GUI based tool. It is similar to Audacity but a bit more powerful than it. It is an application software for viewing and analysing the contents of audio files.
#### Installation
Sonic Visualiser is available for Linux, OS/X, and Windows. You can download [Sonic-Visualiser](https://www.sonicvisualiser.org/download.html) from its official site, or in Ubuntu, you can download it from the Ubuntu store.
#### Usage
Sonic-Visualiser can be used from the command line or by directly clicking the icon in applications.
```bash
$ sonic-visualiser <file_name>
```
On opening a file with the sonic visualiser you would see something similar to it.
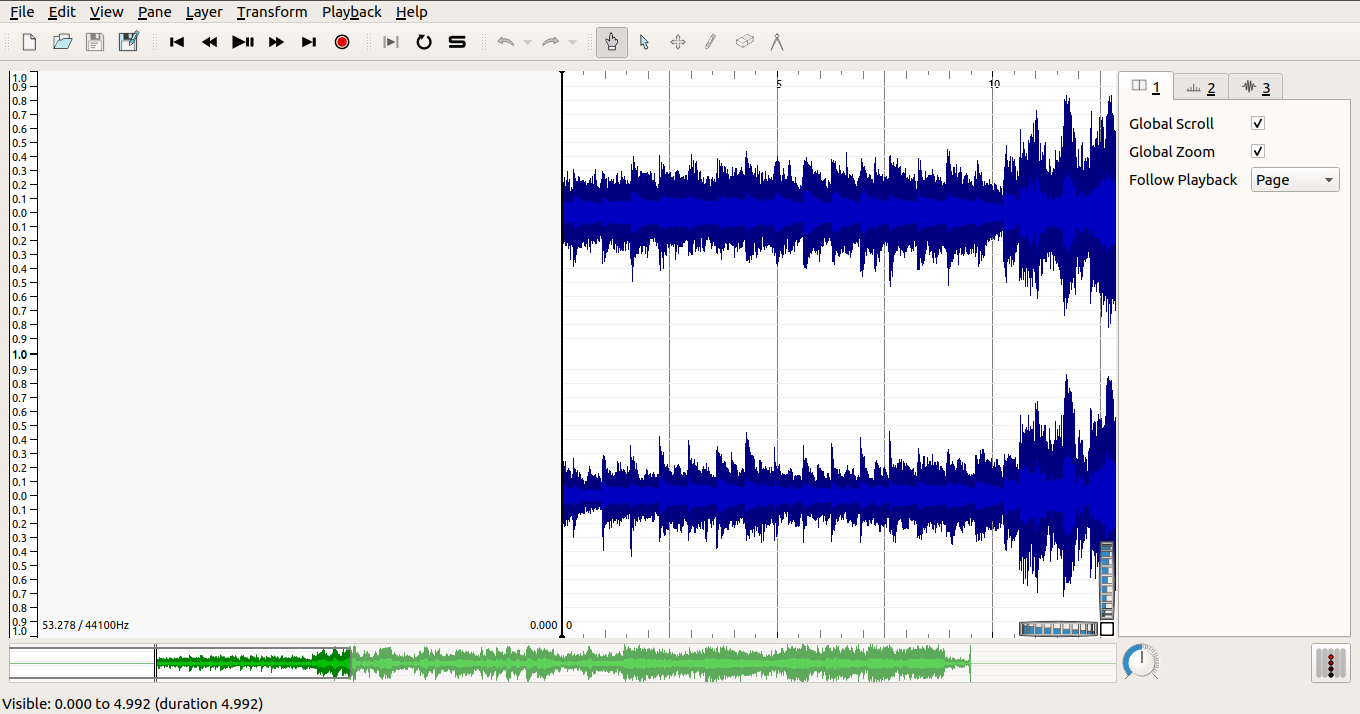
Similar to Audacity, Sonic-visualiser also has a feature of changing layers like spectrogram. To do that, go to layer option in the option menu. You can find so many features like spectrogram and some more features like changing the speed of the audio etc, by clicking the "playback" option in the option menu. We can view the morse code etc.
Finally, after analysing both Audacity and Sonic-Visualiser, Sonic-Visualiser has more flexibility of revealing the data in audio files.
#### Example
Sonic visualiser reveals more information which can't be shown in the audacity also. Look at this example,
When a file was opened in Audacity under spectrogram,

When the same file was opened using sonic visualiser under spectrogram,

In this way, sonic visualiser reveals the information present in the audio files.
#### References
Visit its [Documentation](https://www.sonicvisualiser.org/documentation.html).
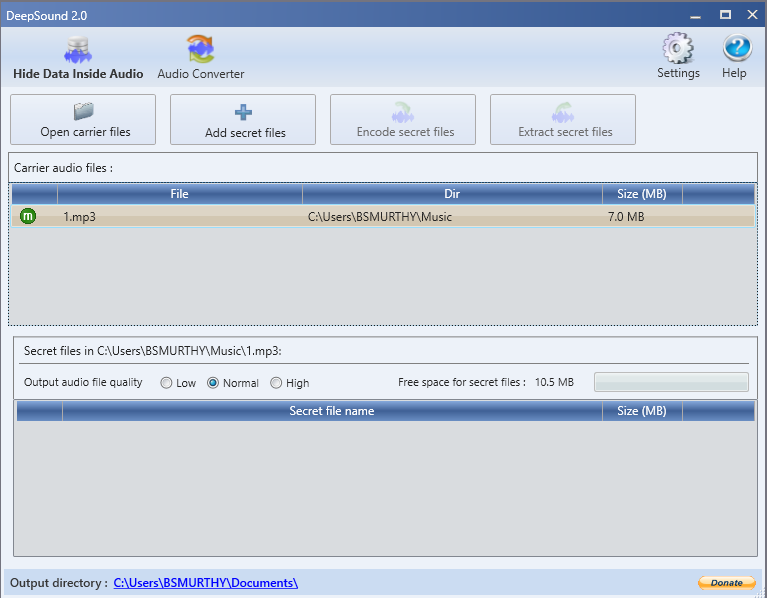
### Deep Sound
Deep Sound is a steganography tool and audio converter that hides the information in audio files or audio/CD tracks. It is a windows tool. It allows us to extract the secret hiding data from the audio files or CD tracks. DeepSound also support encrypting secret files using **AES-256**(Advanced Encryption Standard) to improve data protection.
#### Installation
This tool can be installed from it's official [site](http://jpinsoft.net/deepsound/download.aspx).
#### Usage
On opening the Deep Sound after downloading it in Windows it looks something similar to this,
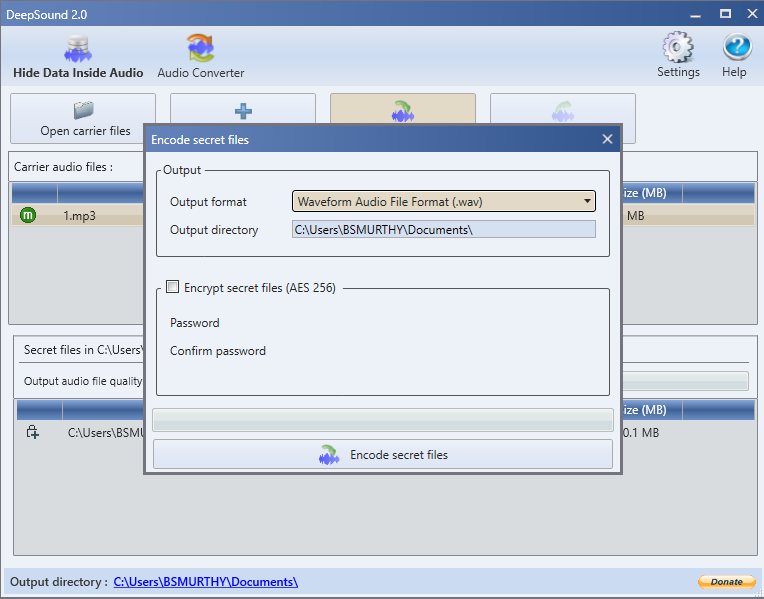
There you can see **Open Carrier Files** option, click on it and choose a music file(of any type like wav, mp3, etc) which you are choosing to embed secret files in it. Then click on **Add Secret Files** option next to it. And choose the embedding file. Then click **Encode Secret Files** option. then you will see a window something similar to this,
You can encode the secret file using a password also, by clicking the tick mark, you will be able to see the password choosing option. 
and choose the password with which you are going to encrypt the file. After click **Encode Secret Files** option in the bottom, then it will save the encoded file in the output directory mentioned which you have mentioned.
#### Example
Here's an example of encoding a secret file into an audio file,
Choose an audio file which you needed to embed a file.
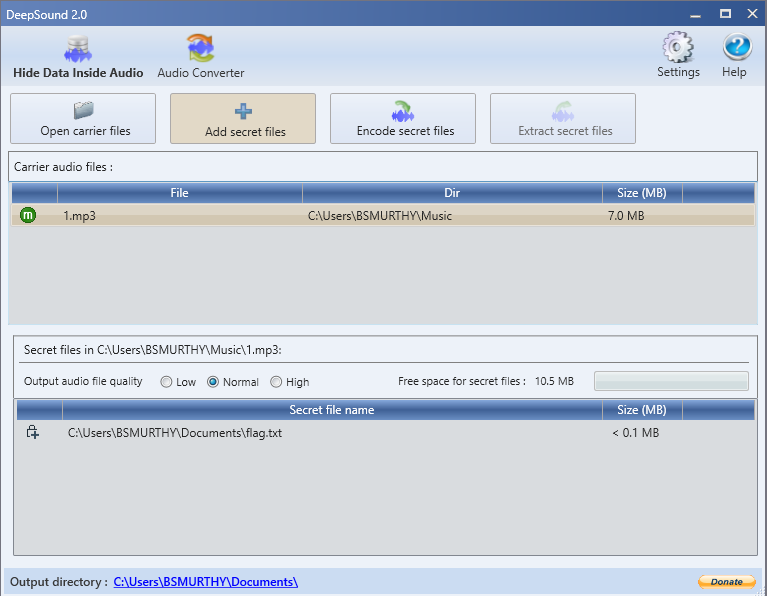
Choose the embedding file which you needed to embed it in the audio file.
Click on the Encode secret files option and choose the output format.
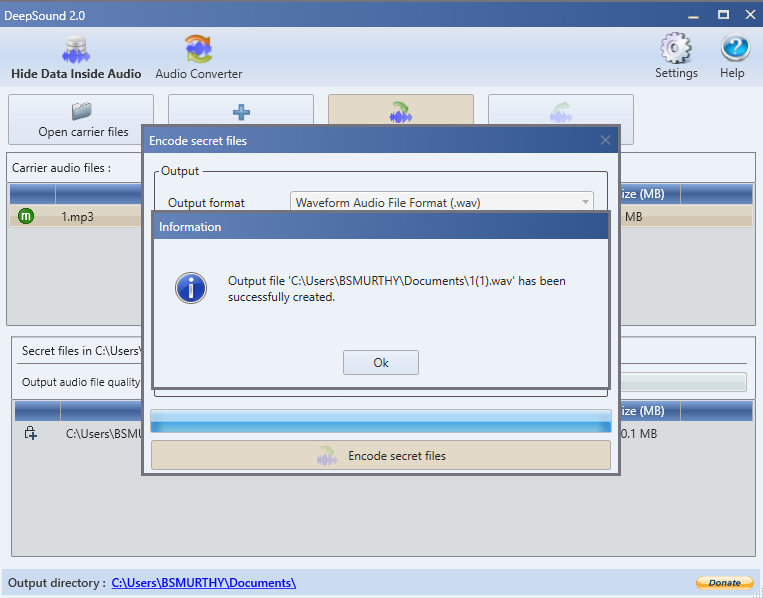
Then it will give an another file in the format you specified.
Here's am example of decoding the secret file from the audio file,
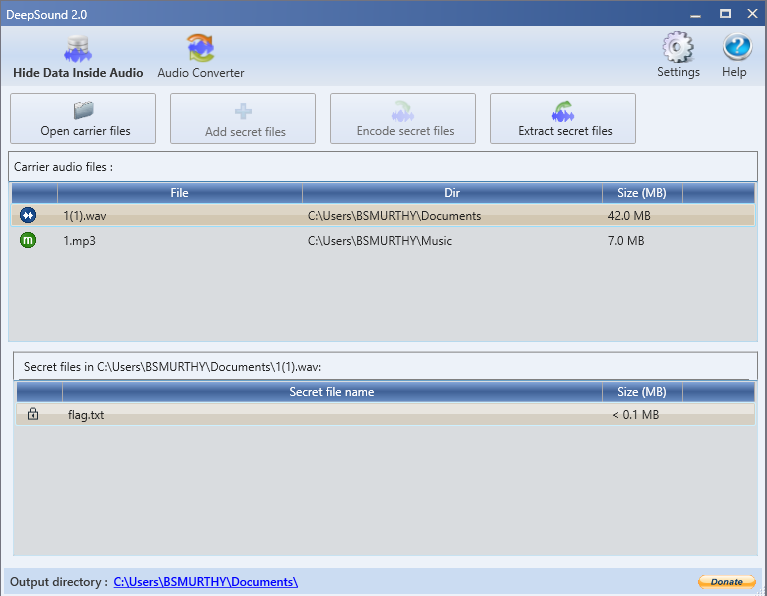
In the above picture you can see a file(**1(1).wav**) in Carrier audio files and in secret file name you can the embedded file and click the **Extract secret files** option, then it will decode the file present in that audio into an another file.
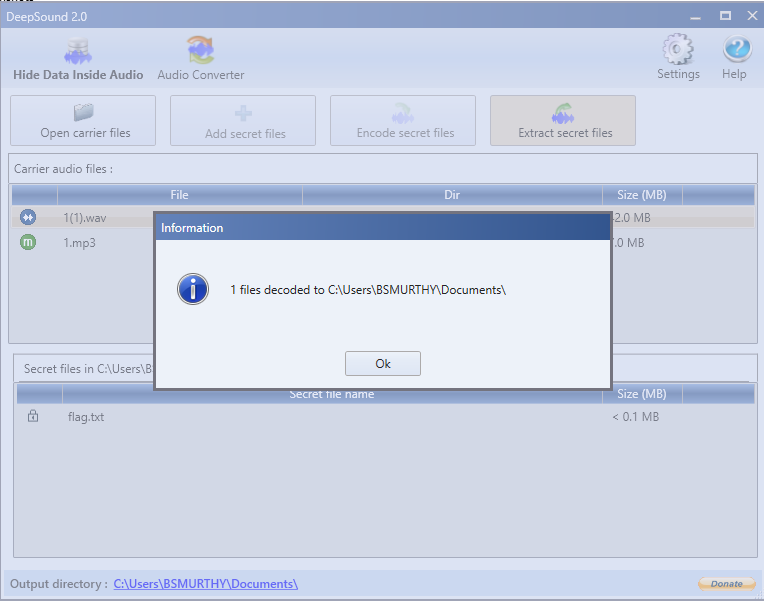
By going to the directory mentioned in the **Information** window you will get the embedded file in the audio.
#### Reference
For further information, visit the [documentation](http://jpinsoft.net/DeepSound/Documentation.aspx).
## LSB Detection in Images
### Zsteg
Zsteg is also a tool like Jsteg but it is used to detect *LSB* steganography only in the case of **PNG** and **BMP** images.
#### Installation
```bash
$ sudo apt install ruby
$ sudo gem install zsteg
```
#### Usage
Zsteg tool can be initialised by typing the following command.
```bash
$ zsteg
```
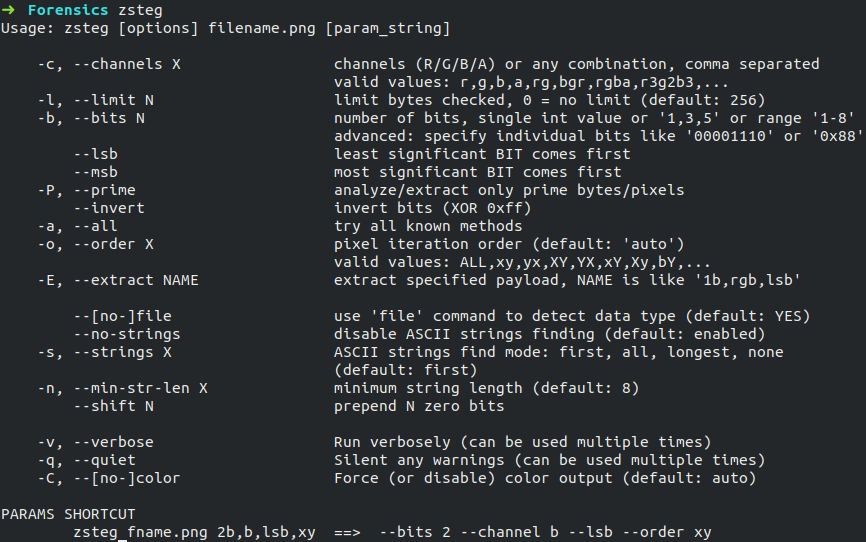
Now, let's see a challenge from Securinets CTF Quals 2019 in which the following **PNG** image is given .
Let's use zsteg on this image and see what happens. The syntax is as follows.
```bash
$ zsteg <filename>
```
Then the result can be seen below.
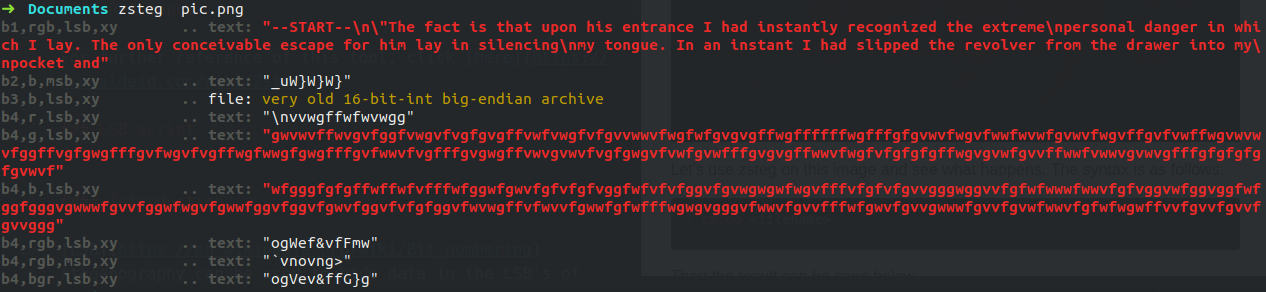
In the above result, we can find some meaningful data embedded in the LSBs of the PNG image. This meaningful data helped in solving the challenge.
#### References
For further reference of this tool, click [here](https://www.aldeid.com/wiki/Zsteg).
---
### Jsteg
Jsteg is a package for hiding data inside JPEG files with a technique known as [steganography](https://en.wikipedia.org/wiki/Steganography). This is accomplished by copying each bit of the data into the least-significant bits ([LSB](https://en.wikipedia.org/wiki/Bit_numbering)) of the image. The amount of data that can be hidden depends on the file size of the jpeg; it takes about 10-14 bytes of jpeg to store each byte of the hidden data.
#### Installation
```bash
$ sudo wget -O /usr/bin/jsteg https://github.com/lukechampine/jsteg/releases/download/v0.1.0/jsteg-linux-amd64
$ sudo chmod +x /usr/bin/jsteg
$ sudo wget -O /usr/bin/slink https://github.com/lukechampine/jsteg/releases/download/v0.2.0/slink-linux-amd64
$ chmod +x /usr/bin/slink
```
#### Usage
Jsteg tool can be initialised by typing the following command.
```bash
$ jsteg
```

#### Hiding data
Now, let's hide some data using jsteg.
Consider this image of Itachi.

Let the name of the file to be embedded be 'jsteg.txt'.
The file to be embedded contains the following data.

Commands to embed a file in the JPEG image is as follows.
```bash
$ jsteg hide <in.jpg> <secret file name> <out.jpg>
```

Now, the image looks like this.

#### Revealing data
The syntax for revealing data is as follows.
```bash
$ jsteg reveal <in.jpg> <output file name>
```

#### References
For further reference , click [here](https://godoc.org/github.com/lukechampine/jsteg).