# Setting up Apache Spark with Hadoop
Welcome to my guide, it walks through the process of creating a multi DataNode cluster with Virtual box VMs.
This offers more extensibility then the single-node setup that is the default way for a new comer to take to Hadoop. The problem with the single node is there is not much of a performance gain in just
using a single node.
## Topics
- [ ] Apache Spark Setup
- [ ] Master Node configuration
- [ ] Work node configuration
- [ ] Hadoop Setup
- [ ] Master Nodes
- [ ] Worker Nodes
## References
The guide was constructed from the following:
- https://medium.com/@jootorres_11979/how-to-install-and-set-up-an-apache-spark-cluster-on-hadoop-18-04-b4d70650ed42
- [https://medium.com/@jootorres_11979/how-to-set-up-a-hadoop-3-2-1-multi-node-cluster-on-ubuntu-18-04-2-nodes-567ca44a3b12](https://medium.com/@jootorres_11979/how-to-set-up-a-hadoop-3-2-1-multi-node-cluster-on-ubuntu-18-04-2-nodes-567ca44a3b12)
- https://medium.com/@madtopcoder/install-a-spark-cluster-on-virtualbox-fad075449521
- https://spark.apache.org/docs/latest/spark-standalone.html
# Setup and requirements
### Download Ubuntu 22.04.3
- https://ubuntu.com/download/server
# VirtualBox
Create a VM with the same setting for each of the three VM, with hostnames hdp-master, node-1, node-2 or whatever names you prefer.
- Create a new VM
- Insert screenshot CreateAnode
- 10GB of RAM is preferred
- settings png
## Create Virtual Network
### **Set up a Virtual Network in VirtualBox.**
_Cite: https://medium.com/@madtopcoder/install-a-spark-cluster-on-virtualbox-fad075449521_
Here I am skipping the steps of installing Oracle VirtualBox application on my ubuntu desktop since I believe most of you guys already know how.
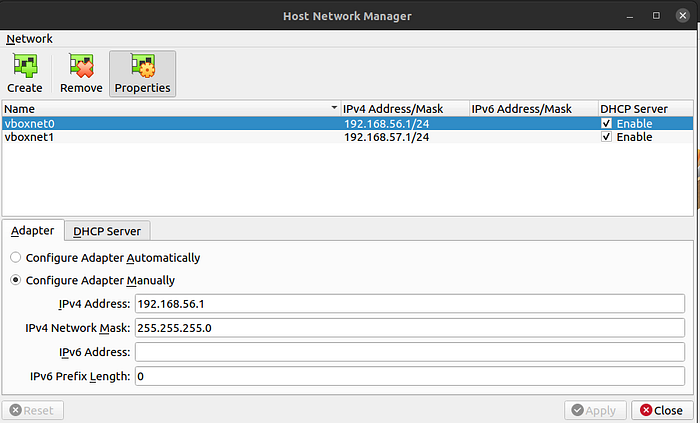
Before we can build a cluster in which machines can communicate with each other, we need a virtual network. Launch VirtualBox application and select “Host Network Manager …” from the File menu. It will present you a screen where you can set up a virtual network. Click on the “Create” button on the top to create a new network adapter with DHCP server option enabled. Here is a screenshot of my network adapter settings.
# Master Node Configuration
## Tools
- vim; everyone's favorite IDE :)
- python3; Spark required.
- java; Spark required.
- openssh; connecting to Guest OS (VM).
- rsync; copying files from host to Guest.
```sh
sudo apt install vim openjdk-8-jdk python3 openssh-server openssh-client rsync -y
```
### Config
After getting the to be master node created next step is to get the IP address, then add that IP and the next sequential two; one will confirm that they are sequential after cloning the master node.
1. Add to /etc/hosts:
```sh
# Please Check IPs before copying.
# <YOUR NODE IP> hostname
192.168.10.56.10 hpd-master
192.168.10.56.11 hpd-node-1
192.168.10.56.12 hpd-node-2
```
## Install Apache Spark
1. Get Spark:
```sh
wget https://dlcdn.apache.org/spark/spark-3.5.0/spark-3.5.0-bin-hadoop3.tgz
```
2. On the same terminal, issue this command to extract the directory:
```sh
tar xvf spark-3.5.0-bin-hadoop3.tgz
```
3. Issue the move directory command:
```sh
sudo mv spark-3.5.0-bin-hadoop3 /opt/spark
```
This command will move all the content under “spark-3.2.1-bin-hadoop3.2 folder to “/opt/spark” directory.
# Worker Node Configuration
## Clone the Master
after clone ensure that the ips are different. If they aren't then issue:
```sh
sudo hostnamectl set-hostname hpd-node-1
sudo rm -r /etc/machine-id
sudo dbus-uuidgen --ensure=/etc/machine-id
sudo rm /var/lib/dbus/machine-id
sudo dbus-uuidgen --ensure
reboot
```
change the hostname
```sh
hostnamectl set-hostname new-hostname #I named my hdp-node-1 and my second hdp-node-2
```
## On each Node
1. Ensure, and change master node ip if it is not set:
`vim /opt/spark/conf/spark-env.sh`
`SPARK_MASTER_HOST = <ip address of the master node>`
2. Add the Node:
`start-worker.sh spark://<MASTER_IP>:7077`
## View the active workers.
1. Visit: `http://MASTER_HOST:8080`
For example mine is `http://192.168.56.10:8080` but your VM network may be different.
## Optional configuration
1. Generate authorization keys to control workers from the master:
1. ssh-keygen -t rsa -P ""
2. cat ~/.ssh/id_rsa.pub >> ~/.ssh/authorized_keys
3. Copy this authorized key to all the workers:
```sh
# your username on each node/master might be different
ssh-copy-id master@hpd-master
ssh-copy-id master@hpd-node-1
ssh-copy-id master@hpd-node-2
```
2. Set up `/opt/spark/conf/workers`:
Add your hosts to your `/opt/spark/conf/workers`
```sh
hdp-master
hpd-node-1
hpd-node-2
```
This allows you to start all workers from the master node.

### Commands for nodes:
Now a new level has been unlocked. All the nodes can be managed by the master.
#### Favorites:
`stop-all.sh`
`start-all.sh`
`start-master.sh`
`start-workers.sh`
# Additional Configuration
(configuration_for_spark.docx conversion)
1. Add the log4j configuration:
```sh
cp /opt/spark/conf/log4j2.properties.template /opt/spark/conf/log4j2.properties
```
1. Change to warn:
```
# Set everything to be logged to the console
rootLogger.level = WARN
rootLogger.appenderRef.stdout.ref = console
```
2. Installing required libraries for python:
```sh
sudo apt install pip
pip install numpy scipy matplotlib ipython pandas sympy nose
```
3. Add to ~/.bashrc
```
export PATH=$PATH:/home/master/.local/bin
```
4. Follow the course module prerequisite check:
- SPARK_HOME is defined
- python can import scipy numpy
- Log4j2 properties are set.
5. Add Event logging:
- Be default there is not any logging for apache. Let's change this easily.
```sh
mkdir /tmp/spark-events # default location for spark logs```
```
``` sh
# Edit /opt/spark/conf/spark-defaults.conf
# If it doesn't exist use the template to create one.
if [ ! /opt/spark/conf/spark-defaults.conf ]; then
mv /opt/spark/conf/spark-defaults.template /opt/spark/conf/spark-defaults.conf
fi
vim /opt/spark/conf/spark-defaults.conf
# Uncomment spark.master and set to you master url
# Uncomment eventLog.enabled
spark.master spark://hpd-master:7077
spark.eventLog.enabled true
```

- Now all your jobs will show on http://hpd-master:8080

- Notice that we have three workers, we have included the master in our `/opt/spark/conf/works` this is optional and you can remove the master from this if you so wish.
# [Running Alongside Hadoop](https://spark.apache.org/docs/latest/spark-standalone.html#running-alongside-hadoop)
You can run Spark alongside your existing Hadoop cluster by just launching it as a separate service on the same machines. To access Hadoop data from Spark, just use an hdfs:// URL (typically `hdfs://<namenode>:9000/path`, but you can find the right URL on your Hadoop Namenode’s web UI). Alternatively, you can set up a separate cluster for Spark, and still have it access HDFS over the network; this will be slower than disk-local access, but may not be a concern if you are still running in the same local area network (e.g. you place a few Spark machines on each rack that you have Hadoop on).
1. Download
```sh
wget https://dlcdn.apache.org/hadoop/common/hadoop-3.3.6/hadoop-3.3.6.tar.gz
```
2. For ease of configuration place this here before moving it to
```sh
tar xvf hadoop-3.3.6.tar.gz
mv hadoop-3.3.6 hadoop
# Open and set Java home for Hadoop
vim hadoop/etc/hadoop/hadoop-env.sh
# Find JAVA_HOME
JAVA_HOME="/usr/lib/jvm/java-8-openjdk-amd64/jre"
```
```sh
sudo mv hadoop /usr/local/hadoop
```
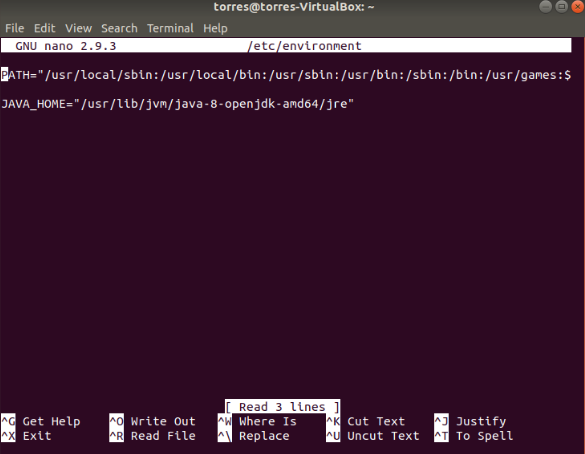
3. Add: /usr/local/hadoop/sbin to env path.
```sh
vim /etc/environment`
PATH="/usr/local/sbin:/usr/local/bin:/usr/sbin:/usr/bin:/sbin:/bin:/usr/games:/usr/local/games:/usr/local/hadoop/bin:/usr/local/hadoop/sbin"
```
- Do the same on each of the worker nodes
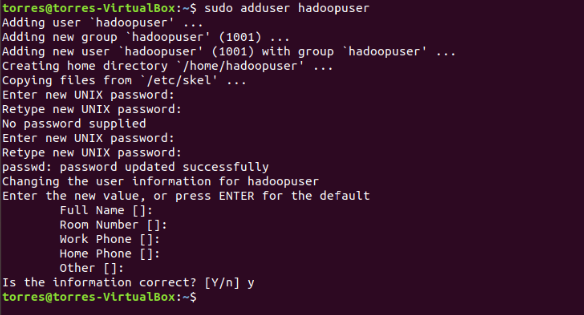
4. Now we will add a user called **hadoopuser**, and we will set up it’s configurations:
```sh
sudo adduser hadoopuser
```
5. Provide the password and you can leave the rest blank, just press **Enter.**
6. Now type these commands:
```sh
sudo usermod -aG hadoopuser hadoopuser
sudo chown hadoopuser:root -R /usr/local/hadoop/
sudo chmod g+rwx -R /usr/local/hadoop/
sudo adduser hadoopuser sudo
```
7. Configuring Hadoop ports (master/main only)
- This step should be done on **ONLY** the master/main node. We’ll need to configure Hadoop ports and write more configuration files. Here’s the command:
```sh
sudo nano /usr/local/hadoop/etc/hadoop/core-site.xml
```

- And then, in the file, inside the configuration segment, write:
```
<property>
<name>fs.defaultFS</name>
<value>hdfs://hpd-master:9000</value>
</property>
```
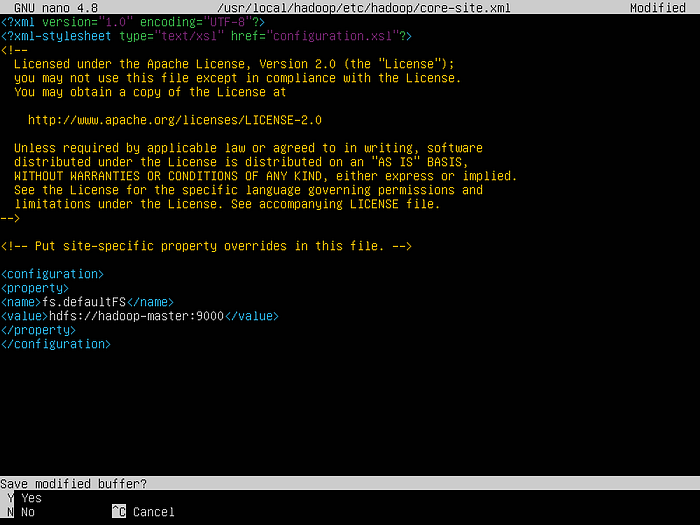
Visual Representation of how the core-site file needs to look like.
8. Configuring HDFS (Master/main only)
- We’ll be configuring HDFS this time around, **on the Master/main node only!**Command is:
```
sudo vim /usr/local/hadoop/etc/hadoop/hdfs-site.xml
```

Visual Representation of the command to the hdfs site file
- Once again, in the file in the configuration segment, write:
```
<property>
<name>dfs.namenode.name.dir</name>
<value>/usr/local/hadoop/data/nameNode</value>
</property>
<property>
<name>dfs.datanode.data.dir</name>
<value>/usr/local/hadoop/data/dataNode</value>
</property>
<property>
<name>dfs.replication</name>
<value>2</value>
</property>
```
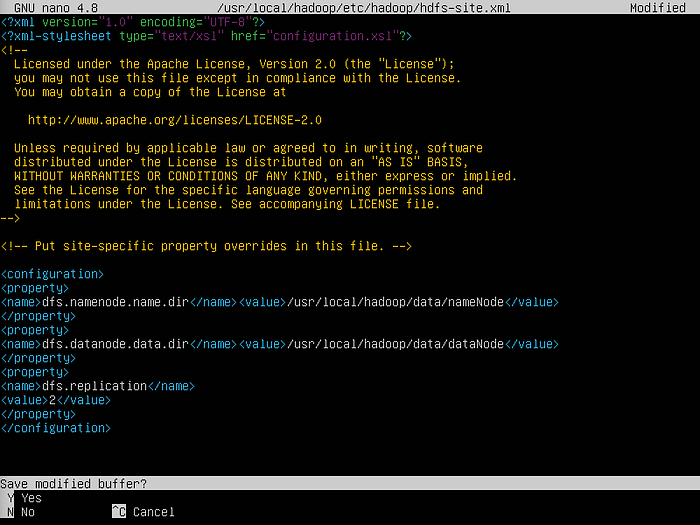
- Visual Representation of the HDFS file
9. Source env:
`source /etc/environment`
10. format the HDFS system:
```sh
hdfs namenode -format
```

- Visual Representation of how to format HDFS.
- It’ll look like this:

- Visual Representation of HDFS formatting.
11. Now, start hdfs:
```sh
start-dfs.sh
```
12. Add the Hadoop_CONF_DIR
```
vim /opt/spark/conf
# Find HADOOP_CONF_DIR and set the following
HADOOP_CONF_DIR=/usr/local/hadoop/etc/hadoop/
```
# RDBMS Optional
### References:
- https://www.machinelearningplus.com/pyspark/pyspark-connect-to-postgresql/
A couple of guides mention getting a MySQL or PostgreSQL Database connected to the Apache Spark cluster.
Options:
1. Configure another VM.
2. Use Docker Postgres container on Master Node
There are enough guides out that I will leave the first option to the reader to solve, and pursue the second option as the configuration is simple and puts the focus on Spark.
 Sign in with Wallet
Connect another wallet
Sign in with Wallet
Connect another wallet