
# React | Building the Rest API
## Learning Goals
In this lesson, we will:
- Recap our knowledge building RESTful APIs (main focus on `models` and `routes`)
## REST overview
**RE**presentational **S**tate **T**ransfer is an architecture which describes how network resources are accessed.
The main features are:
- State and functionality are divided into distributed resources
- Every resource is uniquely addressable using a uniform and minimal set of commands (typically using HTTP verbs GET, POST, PUT, or DELETE over the internet)
- The protocol is client/server and stateless
This architecture makes the interaction between a client and a server easier with a well-defined API. Resources are manipulated using HTTP methods like POST, GET, PUT, and DELETE.

Resources are organized like a filesystem and we can navigate into it by adding parameters to the URL, while using different verbs for our HTTP requests.
All REST APIs have a routes structure along these lines, following the same pattern:
|URL | HTTP verb | Request body | Action |
|-----|----------|-----------|--------|
| `/api/projects` | GET | (empty) | Returns all projects |
| `/api/projects` | POST | JSON | Creates a new project |
| `/api/projects/:id` | GET | (empty) | Returns a single project |
| `/api/projects/:id` | PUT | JSON | Edits a project |
| `/api/projects/:id` | DELETE | (empty) | Deletes a project |
## Build the API: The Project Management App
We will be building the backend for our **Project Management** app, and we will have all these previously listed routes plus some more, but let's start from the beginning. **We've prepared a starter code for you on this GitHub repository** - [project-management-server](https://github.com/ironhack-labs/react-day4-server-starter).
Clone it and let's see what is already pre-built in there for us: a `user` model is there as well as a `configs/passport.js` file. **Both files are commented out**, and let's keep them that way until we start dealing with users.
<!-- :::info
The packages that you will have to install when you incorporate users into the app are: `passport-local`, `passport`, `bcryptjs` and `express-session`. Also note that config file is required in `app.js`.
::: -->
Side note: We've decided to use the word `server` in the name of the app to be descriptive, and our frontend will eventually be named *client*.
:::warning
:bulb: The `.env` file is not there since the app was cloned. Originally, *.env* is listed in `.gitignore`, so now we have to create a new **.env** file in the root folder and add `PORT` to it:
```bash
PORT=5555
```
:::
Great, now we have the app so let's start from the beginning. In the following section we'll see how to structure our database and define the routes to access the resources.
### Setup
#### Dependencies
Since we cloned the repository, we got all the dependencies needed for now. Don't forget, after cloning, you have to run **`npm install`** or **`npm i`** inside the folder. To start the app, use **`npm run dev`** from within the project folder.
Don't install authentication (user) related npm packages yet! Patience is a virtue. 🏆
### Define the model
Our app is already connected to the database and we can see that when we run the app in our terminal:
*`Connected to Mongo! Database name: "project-management-server"`*.
So let's start! We are creating a `project` management app so let's define a schema for our `projects`.
Let's add a `project-model.js` file into the `models` folder:
```js
// models/project-model.js
const mongoose = require('mongoose');
const Schema = mongoose.Schema;
const projectSchema = new Schema({
title: String,
description: String,
tasks: [{type: Schema.Types.ObjectId, ref: 'Task'}],
// owner will be added later on
});
const Project = mongoose.model('Project', projectSchema);
module.exports = Project;
```
Our projects will have a `title` and `description` both as type *String* and `tasks` of type `ObjectId` referencing the `Task` model. Later we will add the `owner` property. Mongo will automatically add an auto-generated unique `id` field, so we don't need to specify it.
Our projects will have some tasks, so let's see what we can do with its data structure. Inside the `models` folder, create new file `task-model.js`. Tasks will have following properties:
```js
// models/task-model.js
const mongoose = require('mongoose');
const Schema = mongoose.Schema;
const taskSchema = new Schema({
title: String,
description: String,
project: {type: Schema.Types.ObjectId, ref: 'Project'}
});
const Task = mongoose.model('Task', taskSchema);
module.exports = Task;
```
Great! The data structures are defined, so let's proceed to defining the routes.
### Define the routes
Adopting the REST architecture, we will provide the following routes in our API:
#### Project routes
|URL | HTTP verb | Request body | Action |
|-----|----------|-----------|--------|
| `/api/projects` | GET | (empty) | Returns all the projects |
| `/api/projects` | POST | JSON | Adds a new project |
| `/api/projects/:id` | GET | (empty) | Returns the specified project |
| `/api/projects/:id` | PUT | JSON | Edits the specified project |
| `/api/projects/:id` | DELETE | (empty) | Deletes the specified project |
#### Task routes
|URL | HTTP verb | Request body | Action |
|-----|----------|-----------|--------|
| `/api/tasks` | POST | JSON | Adds a new task |
| `/api/tasks/:id` | GET | (empty) | Returns the specified task |
| `/api/tasks/:id` | PUT | JSON | Edits the specified task |
| `/api/tasks/:id` | DELETE | (empty) | Deletes the specified task |
Let's go and create two files inside the `routes` folder: `project-routes.js` and `task-routes.js`.
#### GET and POST
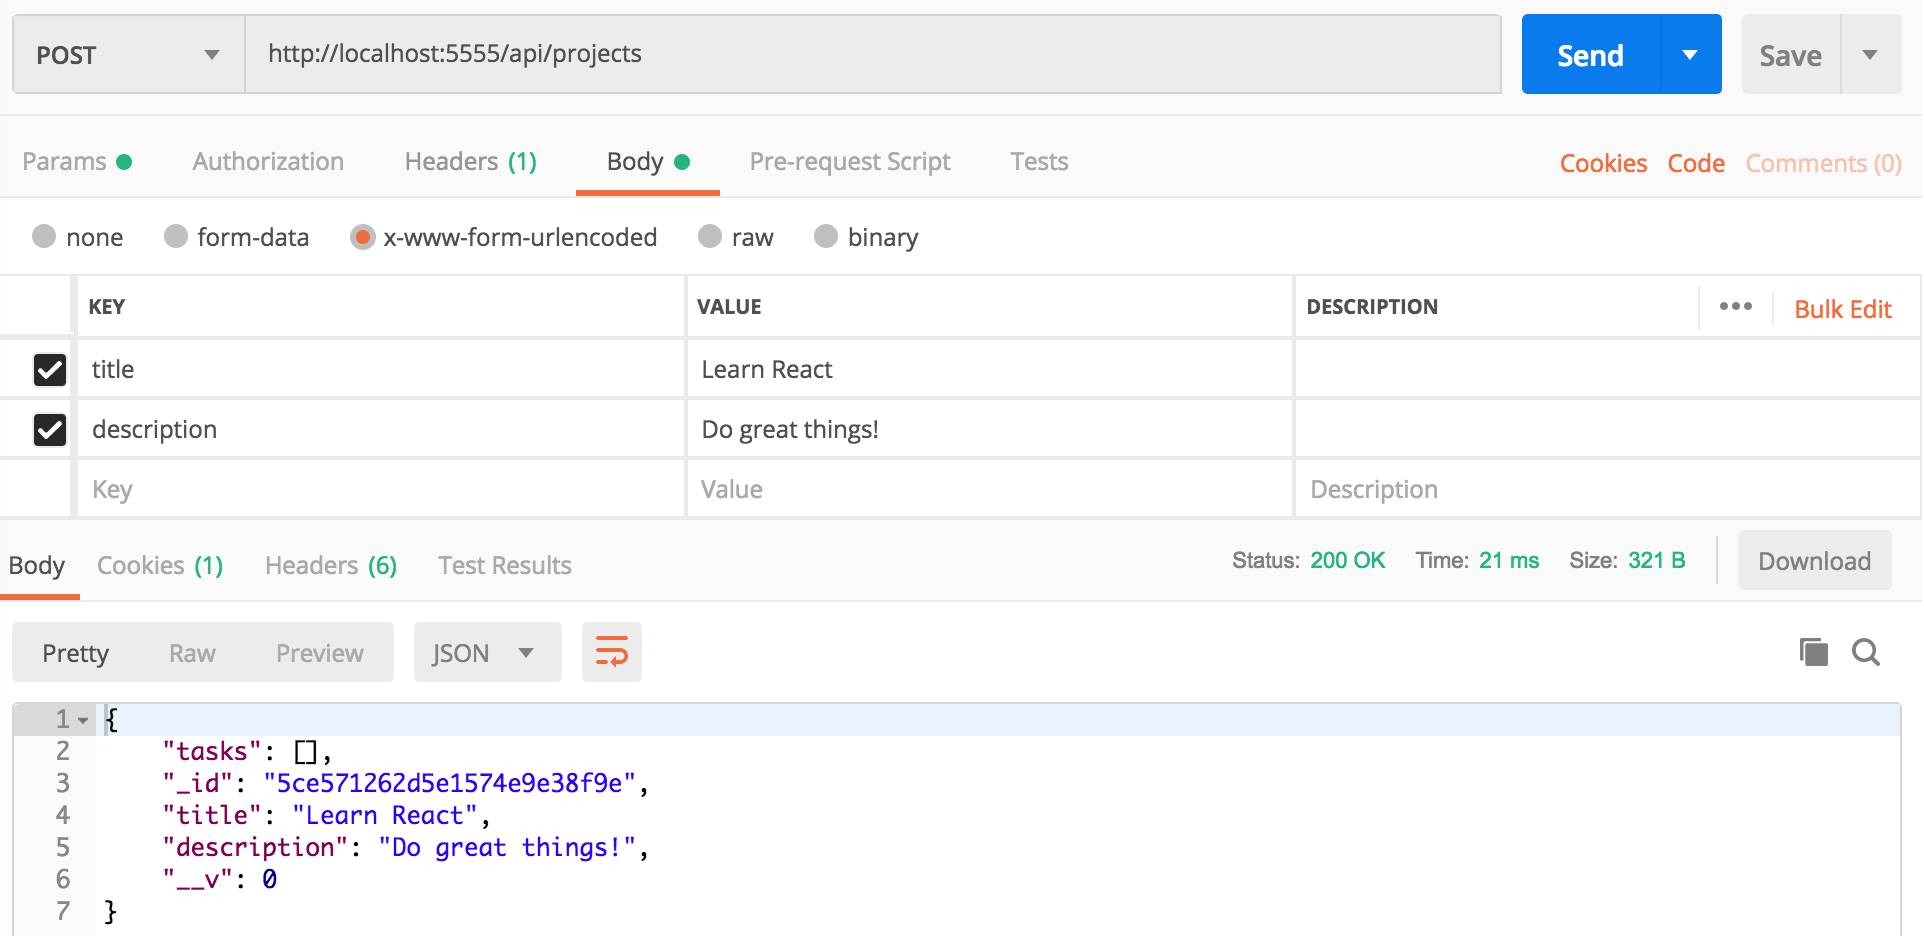
The first thing we will do is to enable our users to add some projects to the database so we will start with a POST route for creating a project. In the `project-routes.js` file add the following code for the mentioned route:
```js
// routes/project-routes.js
const express = require('express');
const mongoose = require('mongoose');
const router = express.Router();
const Project = require('../models/project-model');
const Task = require('../models/task-model'); // <== !!!
// POST route => to create a new project
router.post('/projects', (req, res, next)=>{
Project.create({
title: req.body.title,
description: req.body.description,
tasks: []
})
.then(response => {
res.json(response);
})
.catch(err => {
res.json(err);
})
});
module.exports = router;
```
Here we used the model's `create()` method and we passed the body parameters of the request to create a new project and save it to the database.
Now, let's go into `app.js` and toward the end of the file, require the newly created `project-routes.js` file. Don't forget to add the `api` prefix to them (this step is not mandatory but it will help us in the long run).
```js
// app.js
...
// ROUTES MIDDLEWARE STARTS HERE:
app.use('/api', require('./routes/project-routes'));
```
You can go ahead and use [Postman](https://www.getpostman.com/) to test this route out.
We'll now move to defining the first GET route for the collection of projects:
```js
// routes/project-routes.js
...
// GET route => to get all the projects
router.get('/projects', (req, res, next) => {
Project.find().populate('tasks')
.then(allTheProjects => {
res.json(allTheProjects);
})
.catch(err => {
res.json(err);
})
});
```
Let's break it down:
1. We get a `Project` mongoose reference to operate on the `projects` collection
2. In the `GET` we use the `find()` method without parameters to retrieve all the projects
3. We use a JavaScript promise to get the response from our database, and we return it as a JSON object
4. `catch()` deals with errors
Also you should test out the functionality of this route using [Postman](https://www.getpostman.com/).
#### Complete the API
Now that we validated our first two routes, let's complete the REST API:
```js
// routes/project-routes.js
...
// GET route => to get a specific project/detailed view
router.get('/projects/:id', (req, res, next)=>{
if(!mongoose.Types.ObjectId.isValid(req.params.id)) {
res.status(400).json({ message: 'Specified id is not valid' });
return;
}
// our projects have an array of tasks' ids and
// we can use the .populate() method to include whole task objects
// ^
// |
// |
Project.findById(req.params.id).populate('tasks')
.then(response => {
res.status(200).json(response);
})
.catch(err => {
res.json(err);
})
})
// PUT route => to update a specific project
router.put('/projects/:id', (req, res, next)=>{
if(!mongoose.Types.ObjectId.isValid(req.params.id)) {
res.status(400).json({ message: 'Specified id is not valid' });
return;
}
Project.findByIdAndUpdate(req.params.id, req.body)
.then(() => {
res.json({ message: `Project with ${req.params.id} is updated successfully.` });
})
.catch(err => {
res.json(err);
})
})
// DELETE route => to delete a specific project
router.delete('/projects/:id', (req, res, next)=>{
if(!mongoose.Types.ObjectId.isValid(req.params.id)) {
res.status(400).json({ message: 'Specified id is not valid' });
return;
}
Project.findByIdAndRemove(req.params.id)
.then(() => {
res.json({ message: `Project with ${req.params.id} is removed successfully.` });
})
.catch( err => {
res.json(err);
})
})
module.exports = router;
```
Nothing fancy here, we have just used 3 built-in Mongoose methods to achieve what we needed:
- `findById()` to get the specified project,
- `findByIdAndUpdate()` to update the specified project and
- `findByIdAndRemove()` to delete the specified project.
Let's test the added project routes in `Postman`.
At the very beginning, we created two files inside the `routes` folder. One was *project-routes.js*, which we filled with routes, and now we will do the same for `task-routes.js`:
```js
// routes/task-routes.js
const express = require('express');
const mongoose = require('mongoose');
const Task = require('../models/task-model');
const Project = require('../models/project-model');
const router = express.Router();
// GET route => to retrieve a specific task
router.get('/tasks/:taskId', (req, res, next) => {
Task.findById(req.params.taskId)
.then(theTask =>{
res.json(theTask);
})
.catch( err =>{
res.json(err);
})
});
// POST route => to create a new task
router.post('/tasks', (req, res, next)=>{
Task.create({
title: req.body.title,
description: req.body.description,
project: req.body.projectID
})
.then(response => {
Project.findByIdAndUpdate(req.body.projectID, { $push:{ tasks: response._id } })
.then(theResponse => {
res.json(theResponse);
})
.catch(err => {
res.json(err);
})
})
.catch(err => {
res.json(err);
})
})
// PUT route => to update a specific task
router.put('/tasks/:id', (req, res, next)=>{
if(!mongoose.Types.ObjectId.isValid(req.params.id)) {
res.status(400).json({ message: 'Specified id is not valid' });
return;
}
Task.findByIdAndUpdate(req.params.id, req.body)
.then(() => {
res.json({ message: `Task with ${req.params.id} is updated successfully.` });
})
.catch(err => {
res.json(err);
})
})
// DELETE route => to delete a specific task
router.delete('/tasks/:id', (req, res, next)=>{
if(!mongoose.Types.ObjectId.isValid(req.params.id)) {
res.status(400).json({ message: 'Specified id is not valid' });
return;
}
Task.findByIdAndRemove(req.params.id)
.then(() => {
res.json({ message: `Task with ${req.params.id} is removed successfully.` });
})
.catch(err => {
res.json(err);
})
})
module.exports = router;
```
Also make sure you require these routes in `app.js`:
```js
// app.js
...
// Here are routes:
...
app.use('/api', require('./routes/task-routes'));
```
Test all the routes through `Postman`. Let's add one more configuration to our `nodemon` so we don't run into trouble when we add the client side to our application – after that we will have completed our backend (at least for now :sunny: ).
## Nodemon: Ignore client folder
In the next lesson we will add a frontend (`client`) folder to our setup. We want to configure our backend `nodemon` in such a way that it does not restart when we change files in the client (which leads to hard-to-debug issues because then the React code and the server code would reload at the exact same time).
```js
{
"name": "project-management-server",
// .....
// .....
"devDependencies": {
"nodemon": "^1.12.1"
},
// add this !! :
"nodemonConfig": {
"ignore": ["client/*"]
}
}
```
## Summary
In this lesson, we have reviewed our knowledge of how to define models for our application using Mongoose, how to build a REST API to provide access to the resources, and how to test our APIs using Postman.
## Extra Resources
- [REpresentational State Transfer](https://en.wikipedia.org/wiki/Representational_state_transfer) - Wikipedia
- [Express generator](http://expressjs.com/en/starter/generator.html) - Express
 Sign in with Wallet
Connect another wallet
Sign in with Wallet
Connect another wallet