# Github documentation procedure
:::info
:bulb:This tutorial explains you how to setup github from scratch.
There is two ways to do that :
- The Github Desktop Way (more visual and easier for begginers)
- The Git Command Line Way (more advanced)
Go check [What shoud I install page](https://hackmd.io/@mmd/install) if you miss some installations.
:::
## Getting Started
#### What are Git and Gitub?
Git was developed in 2005 by Linus Torvalds as open source software for tracking changes in a distributed version control system.
Git track changes via a distributed version control system. This means that Git can track the state of different versions of your projects while you're developing them. It is distributed because you can access your code files from another computer – and so can other developers.
When you're building an open source project, you'll need a way to document or track your code. This helps make your work organized, and lets you keep track of the changes you've made. This is what Git lets you do.
But you also need a place to host your code – which makes controlling each version of your project easier and faster. This is where GitHub comes in.
GitHub is a "hub" (a place or platform) where Git users build software together. GitHub is also an hosting provider and version control platform you can use to collaborate on open source projects and share files. When you're using GitHub, you're working with Git beneath the hood.
## :sunglasses: Github Desktop way
### Setup
1. Create a github account on [Github](https://github.com) (use your hesge email to access free features)
2. Install [Github Desktop](https://desktop.github.com/)
3. Open Github Desktop and connect to your Github account 

4. Create a new local repository on your hard Drive

5. Write your repo infos

### Manage your repository
Now your local folder is a Git repository that is linked to a distant repository on Github.
Each time that you make changes into your repository you will have to "commit" those changes.
:::info
The ```git commit``` command captures a snapshot of the project's currently staged changes. Committed snapshots can be thought of as “safe” versions of a project—Git will never change them unless you explicitly ask it to. Prior to the execution of git commit, The git add command is used to promote or 'stage' changes to the project that will be stored in a commit. These two commands ```git commit``` and ```git add``` are two of the most frequently used.
:::
#### Add file
Let's add a readme file into our repo and see how we can manage this file addition.
1. Open Virtual Studio Code.
2. Open your folder with VS code.
3. Create a ```readme.md```file

4. Add ```# My Github Project``` into your readme.md file.
This is a Markdown file which acts as a document that presents ths content of your repo.
#### Manage added file on your repo
If you go back to Github Desktop, you will see that the app tells you that there "1 changed file" in the repo.

In order to commit those changes, the files that you want to add to your commit should be selected. Then you can write a name of your commit (here "Create readme.md") as well as a description (not compulsory), and then click ```commit to main``` which means that you commit those added files to the ```main``` branch of your repository.
Here you see all the commits in the History tab.

Once you commited all your files and want to update your distant Github repository with your local repository, you can push your changes clicking on ```publish repository```.


Now you have more or less all the infos to manage your Github repositories with Github Desktop.
Dont hesitate to look at the [Github Desktop Documentation](https://docs.github.com/en/desktop)
#### Large File Support (LFS)
https://docs.github.com/en/repositories/working-with-files/managing-large-files/configuring-git-large-file-storage
https://medium.com/geekculture/mastering-github-how-to-manage-large-repositories-like-a-pro-8450b256254
## :nerd_face: Git command line way
### Git Setup
1. Check if you have Git installed
```bash=
git version
```
2. Create a github account on [Github](https://github.com)
3. Connect your github account to your git
To set your Git username, type this in your terminal:
```bash=
git config --global user.name "Your Name"
```
To confirm that you have set your Git username correctly, type this:
```bash=
git config --global user.name
```
You should have "Your Name" as the output.
To set your Git email, type this in your terminal:
```bash=
git config --global user.email "youremail@gmail.com"
```
To confirm that you have set your Git email correctly, type this:
```bash=
git config --global user.email
```
You should have "youremail@gmail.com" as the output.
You will be asked to authenticate your GitHub account, so just sign in with the same email to confirm.
### Create a repository on GitHub
Click the + sign at the top right corner to create a new repository. Repositories are like your code folders online.
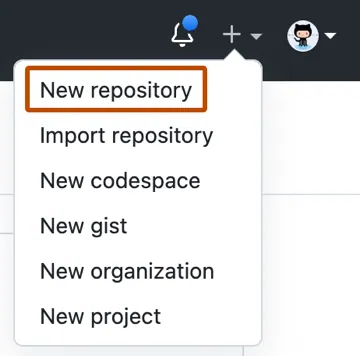
1. In the "Repository name" field, type your repository name.
2. In the "Description" field, type a brief description.
3. Indicate whether your repository will be public or private.
4. Select Add a README file.
5. Click on Create a repository.
### Push your local code to GitHub
Input the commands below one after the other in your terminal. Press the Enter key to proceed after every input.
```bash=
echo "# sample-code" >> README.md
```
```bash=
git init
```
```bash=
git add .
```
```bash=
git commit -m "first commit"
```
```bash=
git branch -M main
```
```bash=
git remote add origin https://github.com/yourname/sample-code.git
```
```bash=
git push -u origin main
```
Note that we have git add README.md in the repository on GitHub. But here we have git add ., which is to let Git add all our code files instead of the README.md file which will be created by ``` echo "# sample-code" >> README.md ```. So if you have created other files in your local folder, you need to use git add . to add all files.
Take note that git remote add origin https://github.com/yourname/sample-code.git will contain the link to your own repository and it will have the name of your GitHub account.
### Common Git Commands to Know
They are many Git commands you can use in the terminal, and that can get overwhelming. So I'd suggest focusing on some of the most popular ones first.
Here they are:
```git init``` lets you initialize Git in your folder.
```git add Readme.md``` lets you add the Readme file, while git add . lets you add all files in the present folder.
```git commit``` stores the added files. Use -m for message followed by the actual message.
```git branch``` creates a new branch which is a new version of the repository as it appears when added, and -M to move the name to main.
```git remote add origin``` finally connects the local folder to the repository on GitHub. It is followed by the repository's link.
```git push -u origin main``` pushes the code to GitHub. The -u flag creates a tracking reference for the branch, and origin main puts the code in the main branch.
# Media Design documentation
## Organise your local repository properly
Before pushing anything to the distant Github repository, let's look at how is the github repository organised.
- course
- course 1
- cours 2
- ...
- documentation
- project 1
- your scripts
- readme.md -> with title, description and an image
- project 2
- ...
- work in progress -> same organisation as documentation
- Readme.md -> here you can find the brief
<!---
--->
 Sign in with Wallet
Connect another wallet
Sign in with Wallet
Connect another wallet