# Mastering Form Validation in TypeScript Projects: A Comprehensive Guide with Zod and TypeScript
## Introduction
Form validation is an important aspect of software development. This is because it ensures type safety and helps preserve data integrity by preventing your application users from submitting inaccurate or incomplete information.
Imagine a form asking for an exact number of guests, yet a user enters a range. In this scenario, your application is not expecting a range. But imagine again that the inaccurate data gets to your database. This is not a behavior you want from your application.
Validation helps prevent such mismatches. Form validation can be implemented on either the client side (using JavaScript) or the server side.
In this article, you will learn how to build type-safe forms using the powerful combination of [React-Hook-Form](https://react-hook-form.com/) library for form management and [Zod](https://zod.dev/) for robust validation on the client side.


## Prerequisites
To follow along this article and understand the code, you will need to satisfy the following conditions:
* Have a basic understanding of [HTML forms and their structure](https://developer.mozilla.org/en-US/docs/Learn/Forms/How_to_structure_a_web_form).
* Know [TypeScript's core principles](https://www.typescriptlang.org/docs/handbook/typescript-in-5-minutes.html), such as types, interfaces, and type checking.
* Have an [understanding of React](https://react.dev/) as this article uses [React-Hook-Form](https://react-hook-form.com/).
* Have an understanding of [form validation principles](#Principles-of-Form-Validation).
* Be familiar with the [terminal and basic command-line usage](https://www.linode.com/docs/guides/using-the-terminal/).
* Have [Node.js](https://nodejs.org/en/download/) installed on your machine.
## Understanding Form Validation in TypeScript
In TypeScript, form validation uses the language's type system to create robust and reliable forms.
### Principles of Form Validation
Form validation entails defining rules and checking for the data users enter into your application form. These rules (principles) can include various aspects, such as:
* **Required fields**: Identifying fields that users must fill out before submitting the form.
* **Data types**: Ensuring that data entered into specific fields adheres to the expected format (e.g., email address, phone number).
* **Value ranges**: Limiting the range of acceptable values for certain fields (e.g., age within a specific range).
* **Data validity**: Checking for specific criteria within the data (e.g., a valid password must meet minimum length requirements).
By implementing these validation checks, you prevent users from submitting incomplete or erroneous data, ultimately improving data quality and the functionality of your web application.
### Introduction to Typescript's Type System and its Role in Form Validation
TypeScript's core strength lies in its type system. This system allows you to define the expected data types for variables, functions, and other aspects of your code. In the context of form validation, you can leverage types to define the structure of your form data.
For instance, you can create an interface or type alias that specifies the properties (fields) of your form and their corresponding data types.
### Common Challenges in Form Validation and How Typescript Addresses Them
Here are some common challenges developers often encounter in form validation and how TypeScript helps you fix them:
* **Data type mismatches**: TypeScript's static type checking identifies situations where the data entered does not match the expected type. This helps prevent runtime errors and ensures data consistency.
* **Incomplete data**: Defining required fields as types forces users to fill them out before submission, reducing the likelihood of missing information.
* **Error-prone manual validation**: By leveraging types and validation libraries that integrate with TypeScript, you automate the validation process, minimizing the chance of human error.
## Introducing Zod Validation Library
[Zod](https://zod.dev/) is a powerful [TypeScript-first](https://strapi.io/blog/what-is-typescript) schema declaration and validation library with [static type inference](https://herbsutter.com/2008/06/20/type-inference-vs-staticdynamic-typing/) for TypeScript applications, which allows you to define the expected structure (schema), data types, and validation rules for your application's inputs.
Zod is a lightweight, yet powerful validation library that enables you to define the structure of your data through schemas. Although TypeScript-first, it also supports JavaScript validation.

Zod supports many schema types, from primitive values like `strings`, `numbers`, and `booleans` to complex types like `objects`, `arrays`, and `tuples`. When TypeScript, React Hook Form, and Zod are combined, you can build robust and powerful forms. In the following sections, you will learn how to set up your form validation project.
## Setting Up Your TypeScript Project
If you wish to quickly get started, proceed with cloning the [GitHub repository](https://github.com/Eunit99/zod-ts-rhf).
First, install `create-next-app` globally by running:
```bash
npm i -g create-next-app
```
After that, you can use [create-next-app CLI](https://nextjs.org/docs/pages/api-reference/create-next-app) to create a Next app.
### Install and Create a React-Typescript Application
For this project, you will use [Create Next App](https://nextjs.org/docs/api-reference/create-next-app) with the [Typescript](https://www.typescriptlang.org/) template to quickly bootstrap your React application. You will need to run this command to get started:
```bash
npx create-next-app@latest zod-ts-rhf --typescript --eslint
cd zod-ts-rhf
```
The command above:
- Uses the [Create Next App](https://nextjs.org/docs/api-reference/create-next-app) command to create an application named `zod-ts-rhf`
- Uses the `--typescript` flag to specify the template to use; in this case TypeScript.
- Creates a Next.js application with support for TypeScript and all necessary configurations installed by default.
- `cd zod-ts-rhf` changes directory into the `zod-ts-rhf` folder.
Ensure to make the following selection:

### Configure Tailwind CSS
Inside the folder `zod-ts-rhf`, update your `tailwind.config.ts` with this code:
```javascript=
import type { Config } from "tailwindcss";
const config: Config = {
content: [
"./src/**/*.{js,ts,jsx,tsx,mdx}",
"./src/**/*.{js,ts,jsx,tsx,mdx}",
"./src/**/*.{js,ts,jsx,tsx,mdx}",
],
mode: "jit",
theme: {
extend: {},
screens: {
xs: "480px",
ss: "620px",
sm: "768px",
md: "1060px",
lg: "1200px",
xl: "1700px",
},
},
plugins: [],
};
export default config;
```
The above code adds responsive breakpoints to Tailwind CSS.
## Install Zod
Next, you need to install the `zod` library and the React Hook Form resolver ([@hookform/resolvers](https://www.npmjs.com/package/@hookform/resolvers)) by running this command inside the `zod-ts-rhf` directory:
```bash
npm i @hookform/resolvers zod
```
In the next section, you will set up your form and learn how to get started using Zod.
### Define Form Schemas with Zod
First, start with creating a `Form` component. To do this, create a `components` folder in the `src` directory, then create a `Form.tsx` file in the `components` directory, and then, paste this code:
We will be building a sign-up form with Zod validation. Paste the following code in the `Form.tsx` file
```javascript=
// ./src/components/Form.tsx
import React from "react";
export default function Form() {
return (
<div>
<div>
<div className="signup-1 flex items-center relative h-screen">
<div className="overlay absolute inset-0 z-0 bg-black opacity-75"></div>
<div className="container px-4 mx-auto relative z-10">
<div className="sm:w-10/12 md:w-8/12 lg:w-6/12 xl:w-5/12 mx-auto">
<div className="box bg-white p-6 md:px-12 md:pt-12 border-t-10 border-solid border-indigo-600">
<h2 className="text-3xl text-gray-800 text-center">
Create Your Account
</h2>
<form>
<div className="signup-form mt-6 md:mt-12">
<div className="border-2 border-solid rounded flex items-center mb-4">
<div className="w-10 h-10 flex justify-center items-center flex-shrink-0">
<span className="far fa-user text-gray-500"></span>
</div>
<div className="flex-1">
<input
type="text"
placeholder="Username"
className="text-gray-700 h-10 py-1 pr-3 w-full"
/>
</div>
</div>
<div className="border-2 border-solid rounded flex items-center mb-4">
<div className="w-10 h-10 flex justify-center items-center flex-shrink-0">
<span className="far fa-envelope text-gray-500"></span>
</div>
<div className="flex-1">
<input
type="text"
placeholder="E-mail"
className="text-gray-700 h-10 py-1 pr-3 w-full"
/>
</div>
</div>
<div className="border-2 border-solid rounded flex items-center mb-4">
<div className="w-10 h-10 flex justify-center items-center flex-shrink-0">
<span className="fas fa-asterisk text-gray-500"></span>
</div>
<div className="flex-1">
<input
type="password"
placeholder="Password"
className="text-gray-700 h-10 py-1 pr-3 w-full"
/>
</div>
</div>
<div className="border-2 border-solid rounded flex items-center mb-4">
<div className="w-10 h-10 flex justify-center items-center flex-shrink-0">
<span className="far fa-user text-gray-500"></span>
</div>
<div className="flex-1">
<input
type="text"
placeholder="Full name"
className="text-gray-700 h-10 py-1 pr-3 w-full"
/>
</div>
</div>
<div className="border-2 border-solid rounded flex items-center mb-4">
<div className="w-10 h-10 flex justify-center items-center flex-shrink-0">
<span className="fa fa-hashtag text-gray-500"></span>
</div>
<div className="flex-1">
<input
type="number"
placeholder="Age"
className="text-gray-700 h-10 py-1 pr-3 w-full"
/>
</div>
</div>
<p className="text-sm text-center mt-6">
By signing up, you agree to our{" "}
<a href="#" className="text-indigo-600 hover:underline">
Terms
</a>{" "}
and{" "}
<a href="#" className="text-indigo-600 hover:underline">
Privacy Policy
</a>
</p>
<div className="text-center mt-6 md:mt-12">
<button className="bg-indigo-600 hover:bg-indigo-700 text-white text-xl py-2 px-4 md:px-6 rounded transition-colors duration-300">
Sign Up{" "}
<span className="far fa-paper-plane ml-2"></span>
</button>
</div>
</div>
</form>
<div className="border-t border-solid mt-6 md:mt-12 pt-4">
<p className="text-gray-500 text-center">
Already have an account,{" "}
<a href="#" className="text-indigo-600 hover:underline">
Sign In
</a>
</p>
</div>
</div>
</div>
</div>
</div>
</div>
</div>
);
}
```
Then, update the `index.tsx` file in the `./src/pages/index.tsx` file with this code:
```javascript=
import Form from "@/components/Form";
export default function Home() {
return (
<>
<Form />
</>
);
}
```
The code snippets above renders the `Form` component in the `index.tsx` file corresponding to the `index` page since you are making use of the [Next.js Pages Router](https://nextjs.org/docs/pages). Subsequently, in this article, you will only focus on working on the `Form.tsx` file.
### Start Application
Start your app by running the command below:
```bash
npm run dev
```
You should see your Sign-up form by navigating to [http://localhost:3000](http://localhost:3000):

In the next sections, you will walk through creating schema definitions for form fields and also, handling complex validation scenarios with Zod.
### Create Schema Definitions for Form Fields
To get started with Zod validation in your form, you will need to import a couple of things at the beginning of your `Form.tsx` file:
* `zodResolver` (from `@hookform/resolvers/zod`): This allows you to connect Zod's validation with React Hook Form. It expects your defined schema as input.
* `z (from zod)`: This import gives you access to all the functionalities and functions offered by Zod for building your validation schema.
```javascript
// ./src/components/Form.tsx
import { zodResolver } from '@hookform/resolvers/zod';
import * as z from 'zod';
...
```
Next, define your form schema. This form will have the following form fields:
* `username`,
* `email`,
* `password`,
* `fullName`,
* `age`
```typescript
import { zodResolver } from "@hookform/resolvers/zod";
import * as z from "zod";
const FormSchema = z.object({
username: z.string(),
email: z.string(),
password: z.string(),
fullName: z.string(),
age: z.number(),
});
type IFormInput = z.infer<typeof FormSchema>;
...
```
The code snippet above uses Zod to define `FormSchema` to define a schema object that has five form fields with the following data types:
* `username`: string,
* `email`: string,
* `password`: string,
* `fullName`: string,
* `age`: number
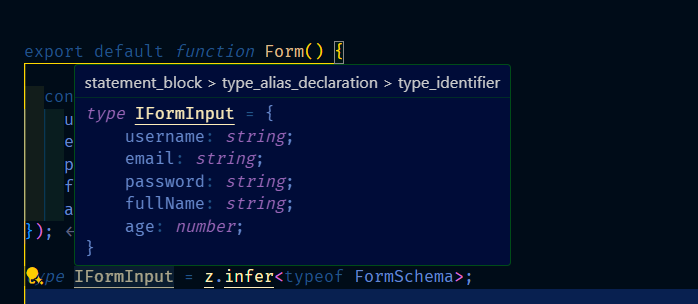
The `IFormInput` type uses [Zod type inference](https://zod.dev/README?id=type-inference) to statically infer the TypeScript type from the `FormSchema` schema. This is an added advantage provided by Zod, which allows you to infer types rather than explicitly defining them.
Right now, the validation check by Zod is a simple one, it defines the data type for each form field.
In the next section, you will walk you through how to use Zod to add complex validation checks like defining the minimum and maximum length for the `password` field, checking that the `username` does not contain special characters, and checking that the `age` falls within a range.
By hovering over `IFormInput` in your code editor, you should see that `IFormInput` matches your Zod `FormSchema` schema.
## Handling Complex Validation Scenarios with Zod
In this section, you will update the `FormSchema` schema to check for complex validations. To do that, update the `FormSchema` schema with this code below:
```javascript
const FormSchema = z.object({
username: z
.string()
.min(3, "Username must not be lesser than 3 characters")
.max(25, "Username must not be greater than 25 characters")
.regex(
/^[a-zA-Z0-9_]+$/,
"The username must contain only letters, numbers and underscore (_)",
),
email: z.string().email("Invalid email. Email must be a valid email address"),
password: z
.string()
.min(3, "Password must not be lesser than 3 characters")
.max(16, "Password must not be greater than 16 characters"),
fullName: z.string().min(3, "Name must not be lesser than 3 characters"),
age: z.string().refine(
(age) => {
return Number(age) >= 18;
},
{ message: "You must be 18 years or older" },
),
});
```
In the above code, you are using the different Zod validation functions such as [`min()`](https://zod.dev/?id=minmaxlength), [`max()`](https://zod.dev/?id=minmaxlength), `string()`, `email()`, [`.refine()`](https://zod.dev/?id=refine), and `regex()` to validate the different form fields. These functions also accept custom error messages in case the validation does not pass.
Specifically, you are doing the following for these form fields:
* For `username`: You are using the `min()` function to make sure the characters are not below three and, then the `max()` function checks that the characters are not beyond twenty-five. You also make use of [Regex](https://regexr.com/) to make sure the username must contain only letters, numbers, and underscore
* For `email`: You use the `email()` function from Zod functions to check that the `email` is valid.
* For `password`: Just like in the case of `username`, you are checking for the length using the `min()` and `max()` functions.
* For `fullName`: You are using the `min()` function to set a minimum number of characters expected.
* For `age`: you will use of the `string()` function, because, even though `age` should be a number. This is because Zod sees the values from the age input as strings. However, you will limit the values to `number` in the age input by using the `<input type="number" />`. You then use the Zod [`.refine()`](https://zod.dev/?id=refine) function to customize the validation logic to check that the `age` is greater than 18.
## How to Create a Form with React Hook Form
Up until this section of the article, you have not started using both the `IFormInput` type and the `FormSchema` schema. In this section, you will learn how to pass the Zod schema to React Hook Form using the `useForm` hook:
Update the `Form.tsx` file with the following code, like so:
```javascript
import { useForm } from "react-hook-form";
...
export default function Form() {
...
const {
register,
handleSubmit,
formState: { errors },
} = useForm<IFormInput>({
resolver: zodResolver(FormSchema),
});
const onSubmit = (data: IFormInput) => {
console.log(data);
};
return (
<div className="signup-1 flex items-center relative h-screen">
<div className="overlay absolute inset-0 z-0 bg-black opacity-75"></div>
<div className="container px-4 mx-auto relative z-10">
<div className="sm:w-10/12 md:w-8/12 lg:w-6/12 xl:w-5/12 mx-auto">
<div className="box bg-white p-6 md:px-12 md:pt-12 border-t-10 border-solid border-indigo-600">
<h2 className="text-3xl text-gray-800 text-center">
Create Your Account
</h2>
<form onSubmit={handleSubmit(onSubmit)}>
<div className="signup-form mt-6 md:mt-12">
<div className="border-2 border-solid rounded flex items-center mb-4">
<div className="w-10 h-10 flex justify-center items-center flex-shrink-0">
<span className="far fa-user text-gray-500"></span>
</div>
<div className="flex-1">
<input
{...register("username")}
type="text"
placeholder="Username"
className="text-gray-700 h-10 py-1 pr-3 w-full"
/>
</div>
</div>
{errors?.username?.message && (
<p className="text-red-700 mb-4">{errors.username.message}</p>
)}
<div className="border-2 border-solid rounded flex items-center mb-4">
<div className="w-10 h-10 flex justify-center items-center flex-shrink-0">
<span className="far fa-envelope text-gray-500"></span>
</div>
<div className="flex-1">
<input
{...register("email")}
type="text"
placeholder="E-mail"
className="text-gray-700 h-10 py-1 pr-3 w-full"
/>
</div>
</div>
{errors?.email?.message && (
<p className="text-red-700 mb-4">{errors.email.message}</p>
)}
<div className="border-2 border-solid rounded flex items-center mb-4">
<div className="w-10 h-10 flex justify-center items-center flex-shrink-0">
<span className="fas fa-asterisk text-gray-500"></span>
</div>
<div className="flex-1">
<input
{...register("password")}
type="password"
placeholder="Password"
className="text-gray-700 h-10 py-1 pr-3 w-full"
/>
</div>
</div>
{errors?.password?.message && (
<p className="text-red-700 mb-4">{errors.password.message}</p>
)}
<div className="border-2 border-solid rounded flex items-center mb-4">
<div className="w-10 h-10 flex justify-center items-center flex-shrink-0">
<span className="far fa-user text-gray-500"></span>
</div>
<div className="flex-1">
<input
{...register("fullName")}
type="text"
placeholder="Full name"
className="text-gray-700 h-10 py-1 pr-3 w-full"
/>
</div>
</div>
{errors?.fullName?.message && (
<p className="text-red-700 mb-4">{errors.fullName.message}</p>
)}
<div className="border-2 border-solid rounded flex items-center mb-4">
<div className="w-10 h-10 flex justify-center items-center flex-shrink-0">
<span className="fa fa-hashtag text-gray-500"></span>
</div>
<div className="flex-1">
<input
{...register("age")}
type="number"
placeholder="Age"
className="text-gray-700 h-10 py-1 pr-3 w-full"
/>
</div>
</div>
{errors?.age?.message && (
<p className="text-red-700 mb-4">{errors.age.message}</p>
)}
<div className="text-center mt-6 md:mt-12">
<button
className="bg-indigo-600 hover:bg-indigo-700 text-white text-xl py-2 px-4 md:px-6 rounded transition-colors duration-300"
onClick={handleSubmit(onSubmit)}
>
Sign Up <span className="far fa-paper-plane ml-2"></span>
</button>
</div>
</div>
</form>
</div>
</div>
</div>
</div>
);
}
```
In the above code, you:
* Start by importing `useForm` from the [react-hook-form](https://www.npmjs.com/package/react-hook-form) library. Other imports remain unchanged such as `z` and `zodResolver`.
* set up a React Hook Form instance using the `useForm` hook
pass a configuration object to the useForm hook as an argument
set the resolver property to the result of calling the `zodResolver` function with the `FormSchema` as an argument
* You then passed the `onSubmit()` function as an argument to the React Hook Form `handleSubmit()` function and assigned it to the form's `onSubmit` event.
The `useForm` hook returns a [couple of properties](https://react-hook-form.com/api/useform/) to manage your form. While it offers a wider range of functionalities, you will focus on three key ones for our Zod validation setup:
* `register`: This registers your form's input. By using `register`, you tell React Hook Form to track the values entered by the input elements and integrate Zod's validation for them.
* `formState`: This information about your entire form's state. It includes details like whether any validation errors.
* `handleSubmit`: This function is fired when the user submits the form. But here's the catch: `handleSubmit` only receives the form data if it successfully passes Zod's validation checks. This way, you can be sure the data is clean before processing it further.
Running the application, you should see similar to the GIF below:
## Conclusion
In this article, you learned form validation using TypeScript, React Hook Form, and Zod. Here's a quick recap of the valuable takeaways:
You now understand the power of Zod for defining a schema – a blueprint for your form data. This schema controls the structure and data types for each form field, ensuring consistency and catching potential errors early. You also learned how Zod allows you to add validation logic, keeping your user-submitted data clean and reliable. By combining React Hook Form and Zod, you now know how to create robust and user-friendly forms.
Check out the complete code for this article on this [GitHub repository](https://github.com/Eunit99/zod-ts-rhf). Check out the [deployed site live](https://zod-ts-rhf.vercel.app/).
If you still want to explore more on this topic, links to relevant articles and documentation are included below.
## Additional Resources
* [Complete Github Repo](https://github.com/Eunit99/zod-ts-rhf).
* [Zod Documentation](https://zod.dev/)
* [React Hookform Resolvers: NPM Package](https://www.npmjs.com/package/@hookform/resolvers)
* [Error Handling in Zod](https://zod.dev/ERROR_HANDLING?id=error-handling-in-zod)
* [React-Hook-Form Documentation](https://react-hook-form.com/get-started)
 Sign in with Wallet
Connect another wallet
Sign in with Wallet
Connect another wallet